The Shield & Strike: Own 22 Exit Strategy
Master the art of exiting your own 22 with this secure, multi-option set play designed to relieve pressure and gain maximum territory.

Equipment Needed
1. Overview
Exiting your own 22-metre area safely and effectively is a fundamental requirement of modern rugby. When pinned deep in your own territory, the primary objective is to secure possession, alleviate defensive pressure, and clear the ball as far downfield as possible without conceding a turnover.
The Shield & Strike exit play provides a structured, low-risk approach to achieving this. It uses a compact forward pod to secure the initial ruck, drawing in the opposition's defensive line, before releasing the ball to the backline for a high-percentage clearing kick or a wide attack if the overlap presents itself. This play is ideal for use following a defensive lineout or a scrum near your own try line, giving your playmakers the time and space needed to execute under pressure.
2. Setup
To run this set play effectively during training, ensure you have the correct setup and personnel in place.
- Pitch Area: Own 22-metre zone (100m x 70m pitch dimensions).
- Starting Scenario: Defensive lineout on the 5-metre or 15-metre line, or a defensive scrum.
- Player Positioning:
- Forwards (1-8): Grouped in a tight pod or standard scrum formation.
- Half-backs (9, 10): Positioned for rapid ball clearance.
- Centres (12, 13): Flat alignment to offer crash options or decoy runs.
- Back Three (11, 14, 15): Positioned in depth to cover counter-attacks and offer wide support.

3. Step-by-Step Instructions
Execute the Shield & Strike with precision by following these sequential steps:
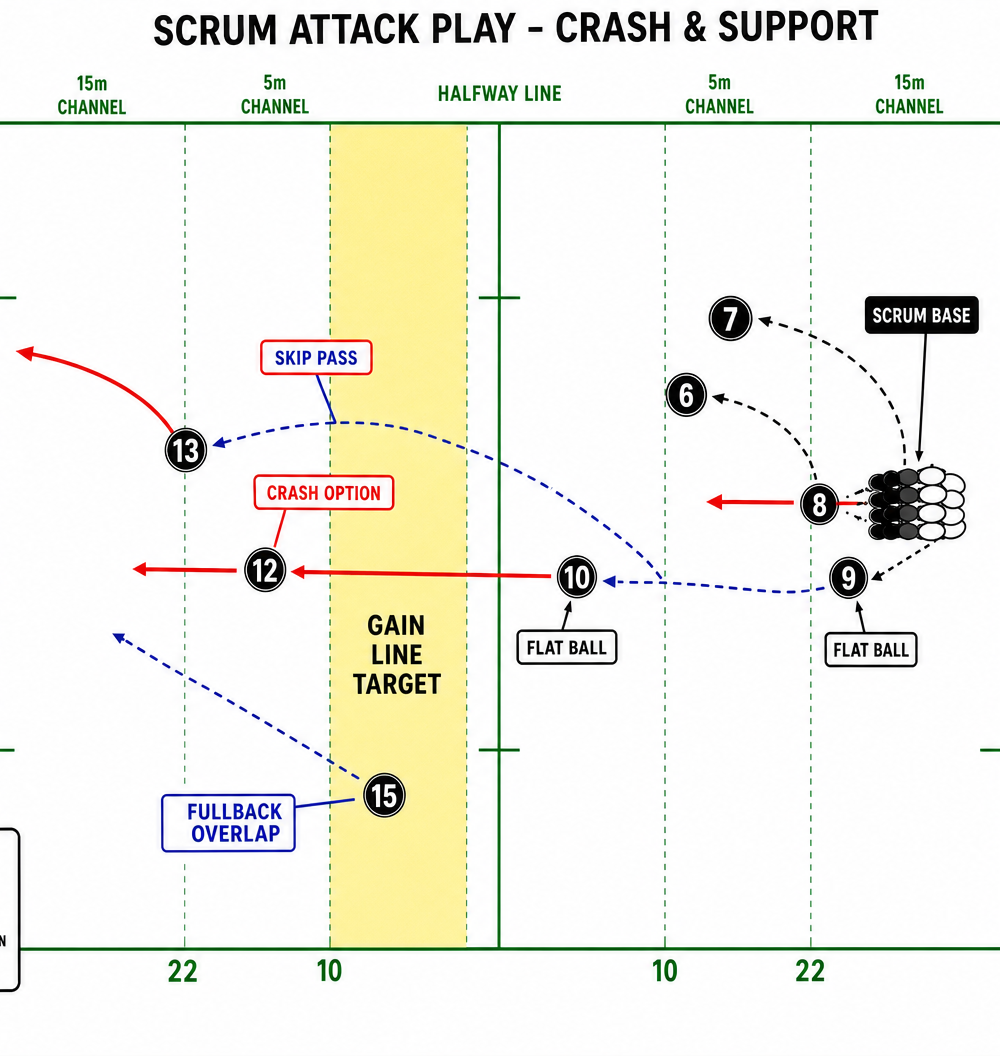
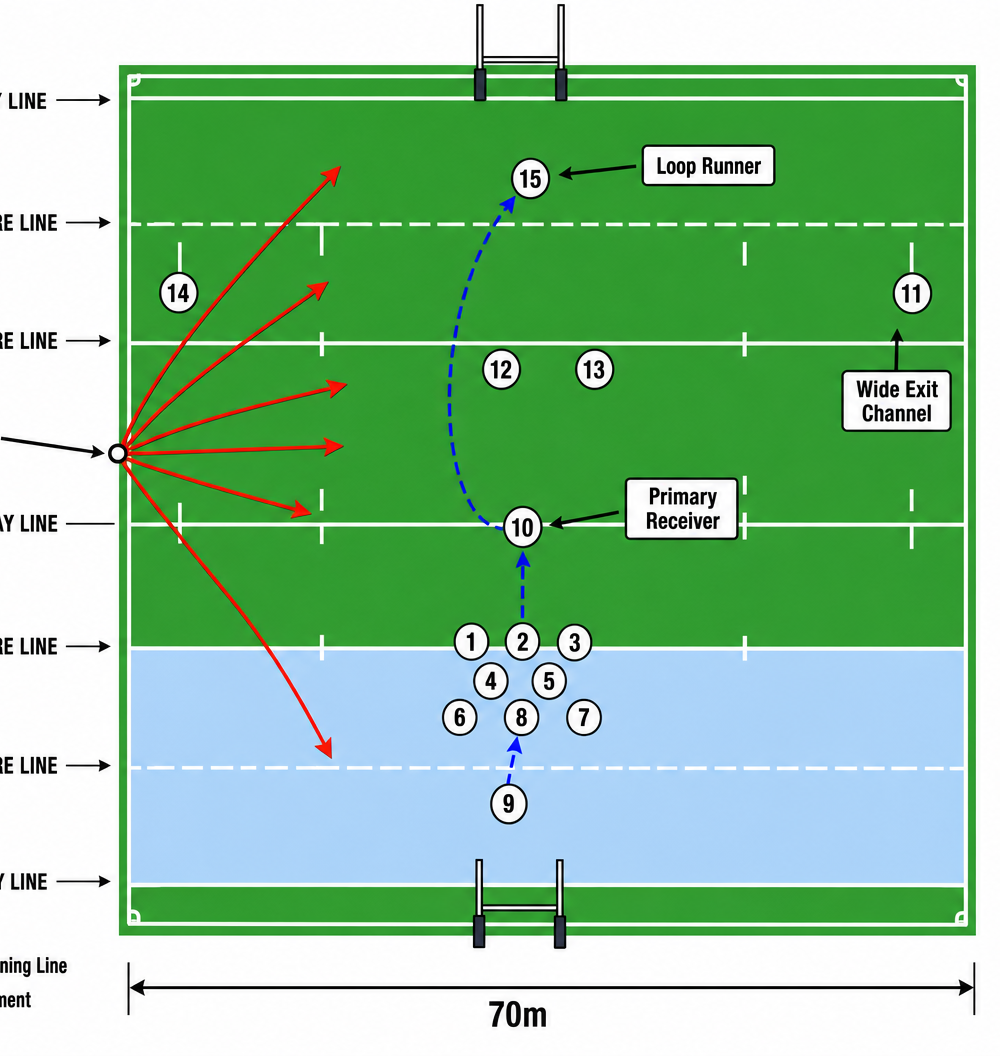
- Secure Primary Possession: From the lineout or scrum, the forwards must guarantee clean, quick ball. The jumper must deliver off the top, or the number 8 must control the base of the scrum securely.
- The Shield Carry (Phase 1): The scrum-half (9) passes to a pre-designated forward pod (usually the tight five) running a hard, direct line straight into the defensive teeth. The goal is to cross the gain line, suck in defenders, and present the ball cleanly and quickly (under 3 seconds).
- Repositioning: While the ruck is being formed, the fly-half (10) drops into the pocket, approximately 10-15 metres behind the ruck, ensuring they are protected by the 'shield' of forwards.
- The Strike (Phase 2): The scrum-half (9) delivers a swift, accurate pass to the fly-half (10).
- Execution Options:
- Option A (The Kick): The fly-half (10) executes a long, spiral touch-finder or a high contestable box kick, aiming to land the ball outside the 22 and preferably beyond the 10-metre line.
- Option B (The Run): If the opposition wingers have dropped back to cover the kick, leaving space out wide, the fly-half (10) can initiate a passing movement through the centres (12, 13) to release the wingers (11, 14) or fullback (15) down the touchline.
4. Key Coaching Points
To ensure this play functions correctly under match conditions, focus on these critical elements during practice:
- Ruck Speed is Paramount: The initial forward carry must result in lightning-fast ball. Slow ball gives the defense time to rush the kicker.
- Depth of the Kicker: The fly-half must drop deep enough to avoid being charged down. 10-15 metres is the standard, but adjust based on the speed of the opposition's defensive line speed.
- The Escort Runners: Players not involved in the ruck or the kick (often the blindside winger or loose forwards) must actively 'escort' the kicker, legally blocking the running lines of potential charge-down threats.
- Communication: The fly-half must clearly communicate their intention (Kick or Run) to the outside backs as soon as they receive the ball.
- Chase Line Integrity: If a contestable kick is chosen, the chase line must be organized and aggressive, preventing any easy counter-attack.
5. Common Mistakes
Watch out for these frequent errors that can turn an exit play into a disaster:
- Isolation on the First Carry: The forward pod carrier gets isolated, leading to a holding-on penalty or a turnover right in front of the posts.
- Shallow Kicking Position: The fly-half stands too flat, resulting in a charged-down kick and a likely opposition try.
- Telegraphing the Kick: The fly-half shapes to kick too early, allowing the opposition back three to easily read the play and position themselves for the catch.
- Poor Pass from the Base: A slow or inaccurate pass from the scrum-half puts the kicker under immediate pressure, compromising the distance and accuracy of the clearance.
6. Variations & Progressions
Keep the opposition guessing by introducing these variations:
- The Scrum-Half Box Kick: Instead of passing to the fly-half, the scrum-half executes a box kick directly from the base of the ruck. This is particularly effective if the ruck is formed near the touchline.
- The Inside Ball: The fly-half shapes to kick but throws a short inside pass to a hard-running centre or blindside winger cutting against the grain.
- Two-Sided Attack: Position a kicking option on both sides of the ruck (e.g., the fly-half on one side, the fullback on the other) to split the defense and provide options depending on the defensive alignment.
7. Age Adaptations
Tailor the Shield & Strike to suit the developmental stage of your players:
- Under 10s/12s: Focus entirely on securing the ball and running to space. Kicking should be minimized. Emphasize the 'Shield' carry and quick hands to the edges.
- Under 14s: Introduce the basic clearing kick from the fly-half. Focus on the mechanics of the kick and the importance of depth. Keep the options simple (Kick or Run).
- Under 16s: Begin incorporating the escort runners and the organized chase line. Introduce the box kick variation from the scrum-half.
- Open/Senior: Implement all options, including the inside ball and two-sided attack. Focus heavily on reading the defense and making split-second decisions under extreme pressure.