T20 Innings Acceleration Plan: From Powerplay to Death Overs
A comprehensive guide for coaches to structure batting innings, maximizing scoring opportunities during the Powerplay and executing high-risk, high-reward shots in the Death Overs.

Equipment Needed
1. Overview
This set play resource is designed to equip coaches with a structured approach to T20 batting innings acceleration. It provides a clear blueprint for maximizing runs during the crucial phases of a T20 match: the Powerplay (Overs 1–6) and the Death Overs (Overs 17–20). The goal is to establish a solid foundation early on, capitalize on fielding restrictions, and then seamlessly transition into an aggressive, calculated assault in the final overs to post or chase down imposing totals.
2. Setup

Equipment: Full batting kit (pads, gloves, helmet, bat), standard cricket balls (minimum 12), bowling machine (optional but recommended for consistent delivery practice), cones or markers for defining scoring zones.
Pitch/Field Setup: A standard 22-yard cricket pitch located centrally within an oval ground (approximately 137 metres in diameter). The 30-yard fielding circle must be clearly marked with cones or painted lines before the session begins.
Player Positions: Standard cricket fielding positions are utilised, with specific emphasis on field placements during the Powerplay and Death Overs as detailed in the diagrams below.
3. Step-by-Step Instructions

Phase 1: Powerplay Exploitation (Overs 1–6)
During the Powerplay, a maximum of two fielders are permitted outside the 30-yard circle. This phase is about calculated aggression and exploiting the gaps in the inner ring.
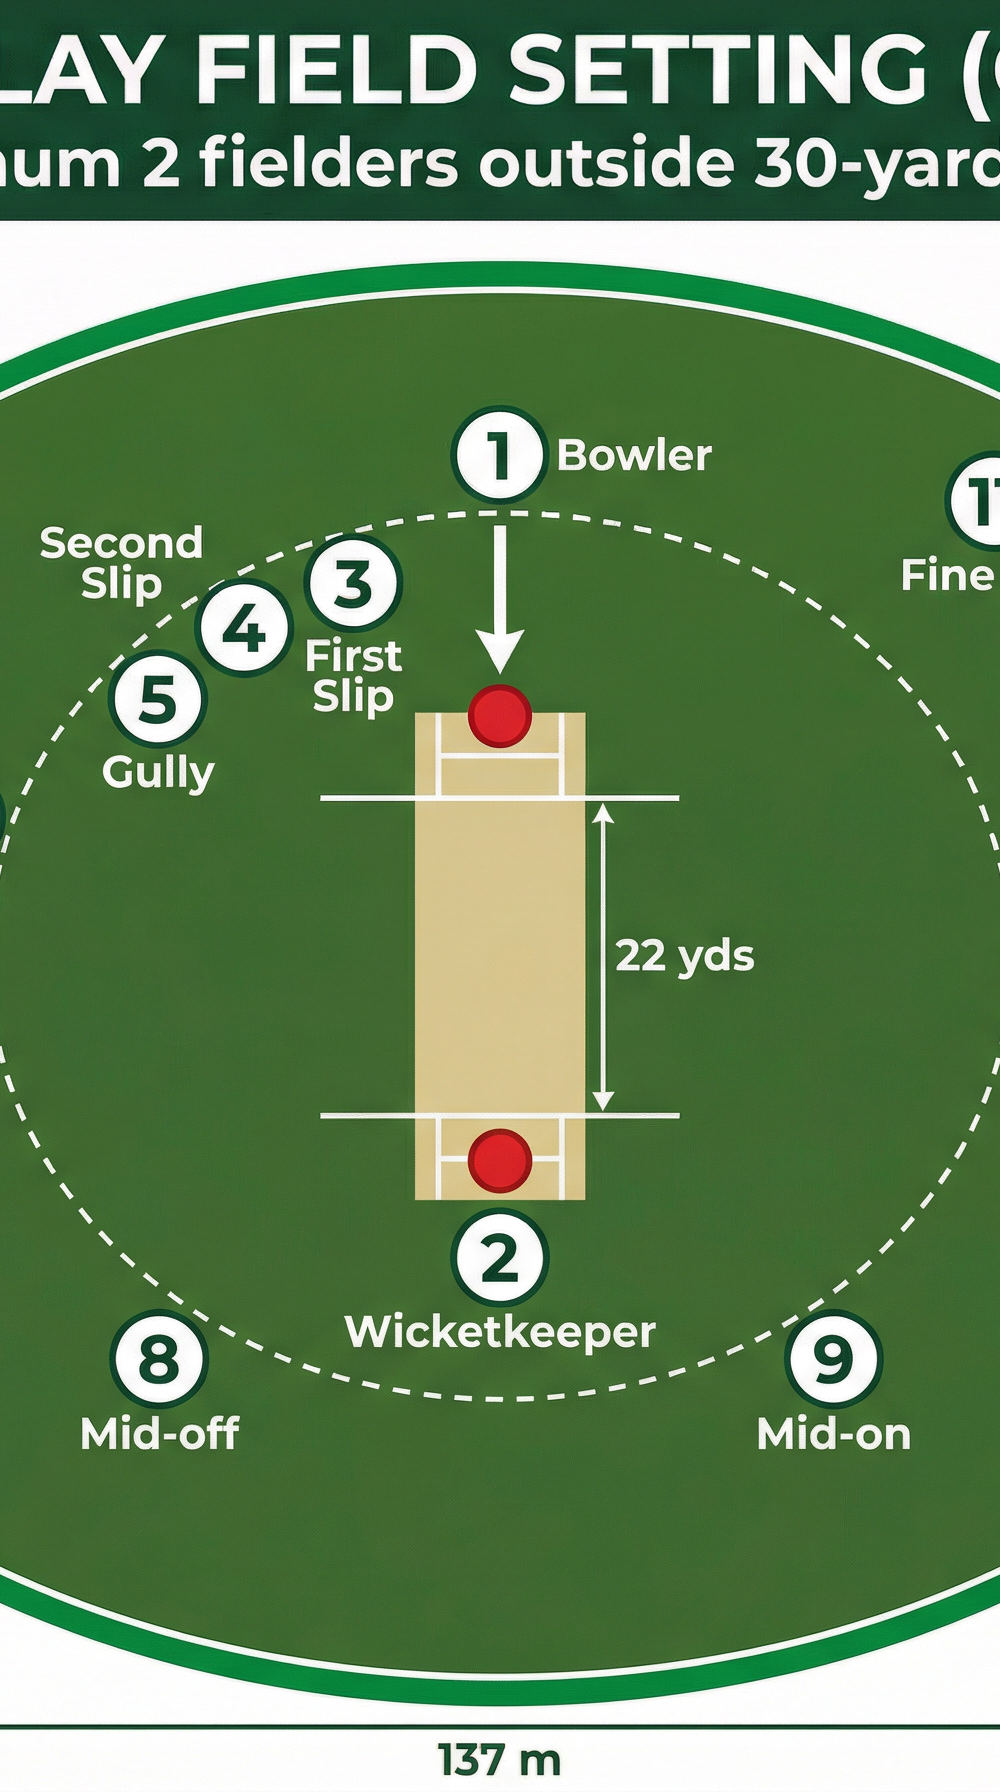
Step 1 — Assess the Field Immediately. The opening batsmen must assess the field placement from the first ball. Identify the two boundary fielders (typically Fine Leg and Third Man, or Deep Square Leg and Long-on depending on the bowling attack).
Step 2 — Target the Inner Ring. The primary objective is to pierce the infield. Batsmen should play strong, conventional cricket shots — drives, cuts, and pulls — along the ground, aiming for the gaps between Point (6), Cover (7), Mid-off (8), and Mid-on (9).
Step 3 — Punish Width and Length Errors. Bowlers often err in line or length early in the innings. Batsmen must be primed to punish any width outside off stump with forceful square cuts or cover drives, and any over-pitched delivery with a full-blooded straight or off drive.
Step 4 — Rotate the Strike Consistently. Even when boundaries are not forthcoming, consistent strike rotation is vital. Quick singles by dropping the ball softly into the leg side or towards mid-off/mid-on keep the scoreboard ticking and disrupt the bowler's rhythm. Target a minimum run rate of 8 runs per over during this phase.
Phase 2: Middle Overs Consolidation (Overs 7–16)
With up to five fielders now permitted outside the 30-yard circle, boundaries become harder to hit. The focus shifts to finding gaps for twos and threes while preserving wickets.
Step 5 — Find the Gaps. With a spread field, batsmen must be more precise. Placement over power becomes the priority. Look for the two-man gaps on the off side and the leg side.
Step 6 — Employ Sweeps Against Spin. Employing sweeps and reverse sweeps against spinners can effectively disrupt their line and length, manipulate the field, and access the fine leg and square leg boundary with minimal risk.
Step 7 — Target the Weakest Bowler. Identify the opposition's weakest bowler and look to score aggressively against them, ensuring a run rate of at least 7–8 per over through this phase. Protect wickets against the best bowlers.
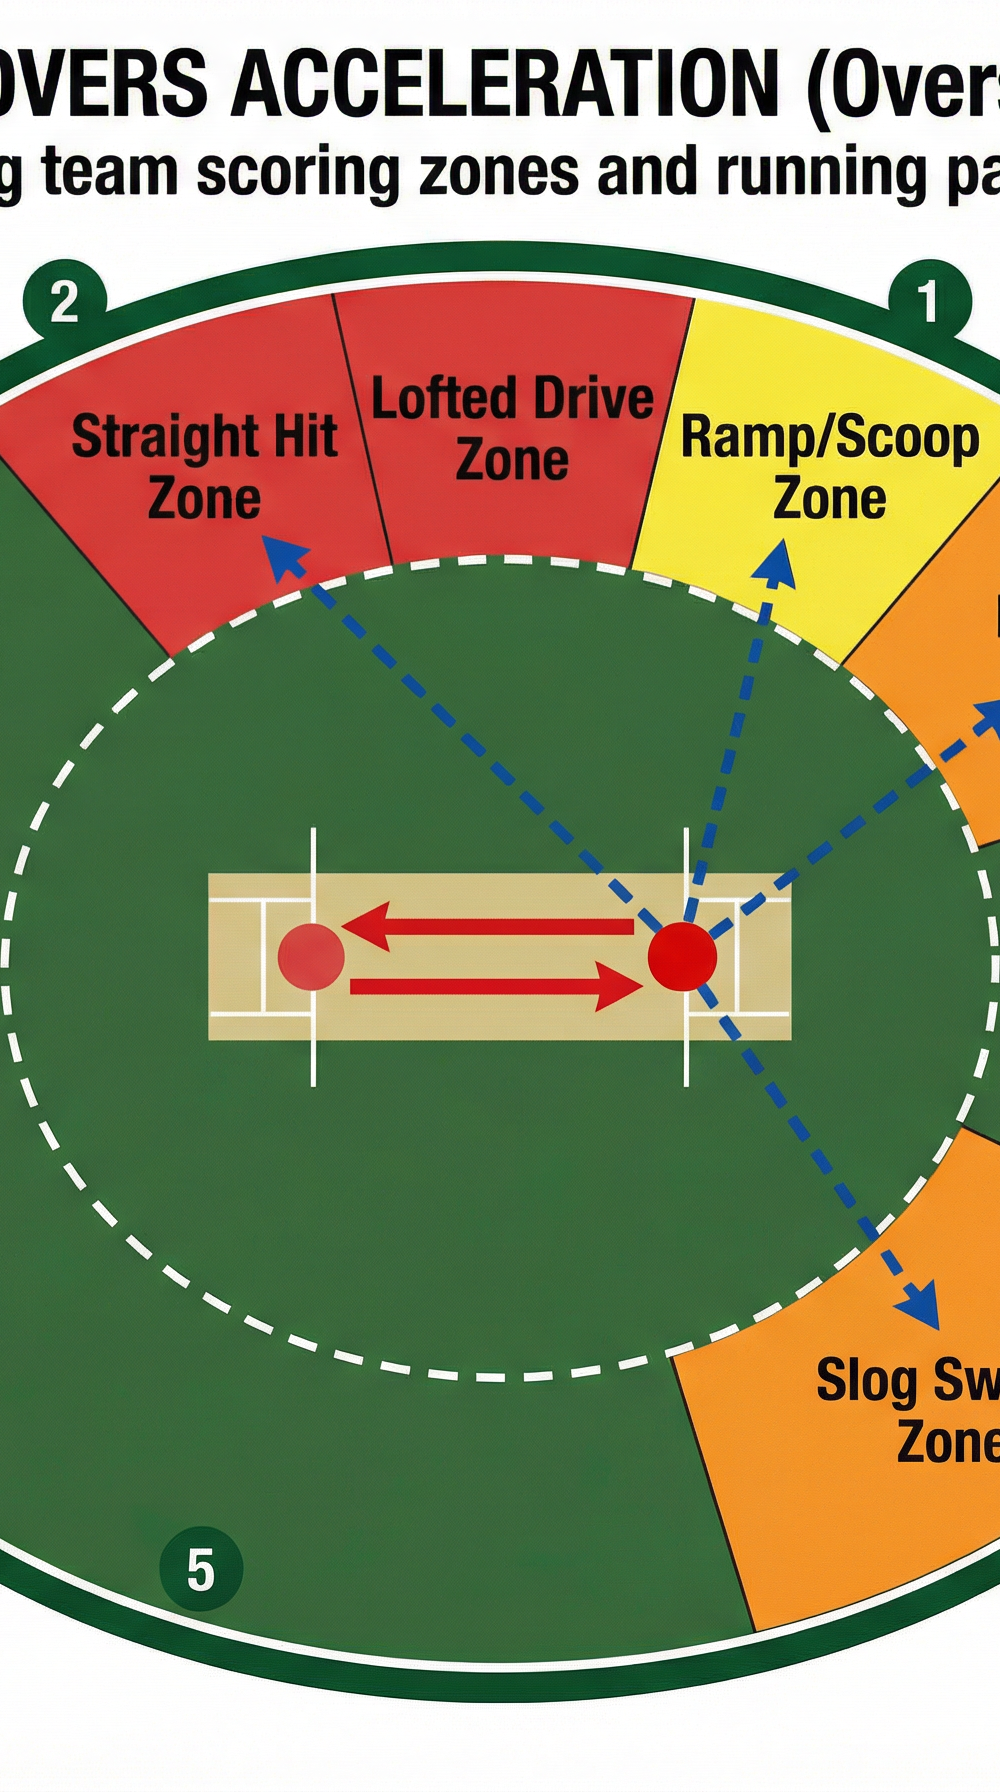
Phase 3: Death Overs Acceleration (Overs 17–20)
This is the final assault. Batsmen must be prepared to play high-risk, high-reward shots to maximise the team's total. The target run rate in this phase should be 12–15 runs per over.

Step 8 — Pre-meditated Movement. Batsmen should use the crease effectively, moving across the stumps or backing away to create angles and access different parts of the field. Decide on the movement before the bowler enters their delivery stride.
Step 9 — Execute Innovative Shots. This is the time for ramps, scoops, and switch hits. These shots exploit the areas behind the wicket — fine leg and third man — which are often left vacant or protected by only one boundary fielder.
Step 10 — Target Specific Scoring Zones. As shown in Diagram 2, batsmen should target specific scoring zones based on the delivery type: a full delivery outside off stump is lofted over Long-off (Lofted Drive Zone); a shorter delivery is pulled over Deep Midwicket (Pull Shot Zone); a full delivery on the pads is slog swept to the Slog Sweep Zone; and a bouncer or back-of-a-length delivery is ramped over the keeper's head (Ramp/Scoop Zone).
Step 11 — Clear the Boundary. The ultimate goal in this phase is to hit sixes. Batsmen must trust their power and timing to clear the ropes, particularly straight down the ground or over the leg side. Commit fully to the shot — half-hearted attempts lead to catches.
4. Key Coaching Points

- Situational Awareness: Batsmen must constantly assess the match situation, the required run rate, wickets in hand, and the field placement. The plan must adapt in real time.
- Shot Selection: Choosing the right shot for the right delivery is crucial. Avoid premeditating shots too early, especially against quality pace bowlers who can vary their length.
- Crease Utilization: Encourage batsmen to use the depth and width of the crease to disrupt the bowler's length and line, creating scoring opportunities that would not otherwise exist.
- Communication: Clear and concise communication between the batsmen is essential for quick singles and turning ones into twos. A loud 'yes', 'no', or 'wait' prevents run-out disasters.
- Execution Under Pressure: Practice scenarios that simulate match pressure — last over, 20 runs needed — requiring batsmen to execute their skills when it matters most.
- Trust the Plan: Coaches must reinforce that sticking to the phased plan, even when a wicket falls, is more effective than panic-driven improvisation.
5. Common Mistakes
| Mistake | What It Looks Like | Correction |
|---|---|---|
| Over-hitting | Loss of shape, mistimed shots, caught in the deep | Emphasise timing over power; drill with lighter balls |
| Ignoring Singles | Dot ball accumulation, rising pressure | Set a 'no dot ball' rule in practice drills |
| Predictability | Same shot, same zone every ball | Introduce 'zone targeting' drills with varied deliveries |
| Poor Shot Selection | Scooping a 90mph yorker; driving a wide short ball | Video analysis of dismissals; decision-making drills |
| Running Between Wickets | Hesitation, poor calling, run-outs | Dedicated running drills with live calling scenarios |
6. Variations & Progressions
Progression 1 — Target Scores: Set specific target scores for each phase of the innings during practice matches (e.g., 55 runs from the Powerplay, 80 runs from Overs 7–16, 45 runs from the Death Overs). This builds phase-specific accountability.
Progression 2 — Fielding Restrictions Simulation: Use cones to simulate different field placements and challenge batsmen to find the gaps against a specific field. Gradually increase the difficulty by adding fielders to previously open zones.
Progression 3 — Specific Bowler Types: Develop specialised game plans against specific types of bowlers — left-arm pace, right-arm off-spin, leg-spin — to ensure batsmen have pre-planned responses for each scenario they will face in a match.
7. Age Adaptations
Under 12s: Focus exclusively on basic shot execution, strike rotation, and understanding the concept of pacing an innings. Minimise the emphasis on high-risk shots like ramps and scoops. Use a softer ball and a shorter boundary (approximately 50 metres) to build confidence.
Under 14s / Under 16s: Introduce more advanced concepts such as crease utilisation, targeting specific areas of the field, and executing innovative shots under controlled conditions. Begin introducing the concept of a phased innings plan with simple run-rate targets.
Open Age: Full implementation of the acceleration plan, including high-pressure match scenarios, advanced tactical analysis using video, and the complete repertoire of innovative shots. Players should be able to articulate their own game plan for each phase of the innings.