The Ultimate Goalkeeper Shot-Stopping & Recovery Drill
Develop elite shot-stopping reflexes, rapid recovery mechanics, and second-ball awareness in this high-intensity goalkeeping drill.
Equipment Needed
1. Overview
This high-intensity shot-stopping drill is designed to test and develop a goalkeeper's reflexes, footwork, and recovery speed under pressure. In modern football, a goalkeeper's job rarely ends with the first save; the ability to quickly recover posture, track the rebound, and react to a secondary threat is paramount. This session forces the goalkeeper to make explosive saves from various angles and distances, immediately reset their feet, and prepare for the next action. It is ideal for mid-week training sessions where the focus is on match-realistic intensity and explosive power.
2. Setup
To run this drill effectively, you will need a standard penalty area and the following equipment:
- Pitch Area: Penalty box (40.32m x 16.5m) and the surrounding 'D' (penalty arc).
- Equipment: 1 full-size goal (7.32m x 2.44m), 10-15 footballs, 6 marker cones, and bibs for the outfield players.
- Players Required: 1 Goalkeeper (GK), 3-4 Shooters/Servers (S1, S2, S3, S4), and 1 Coach (C).
Positioning:
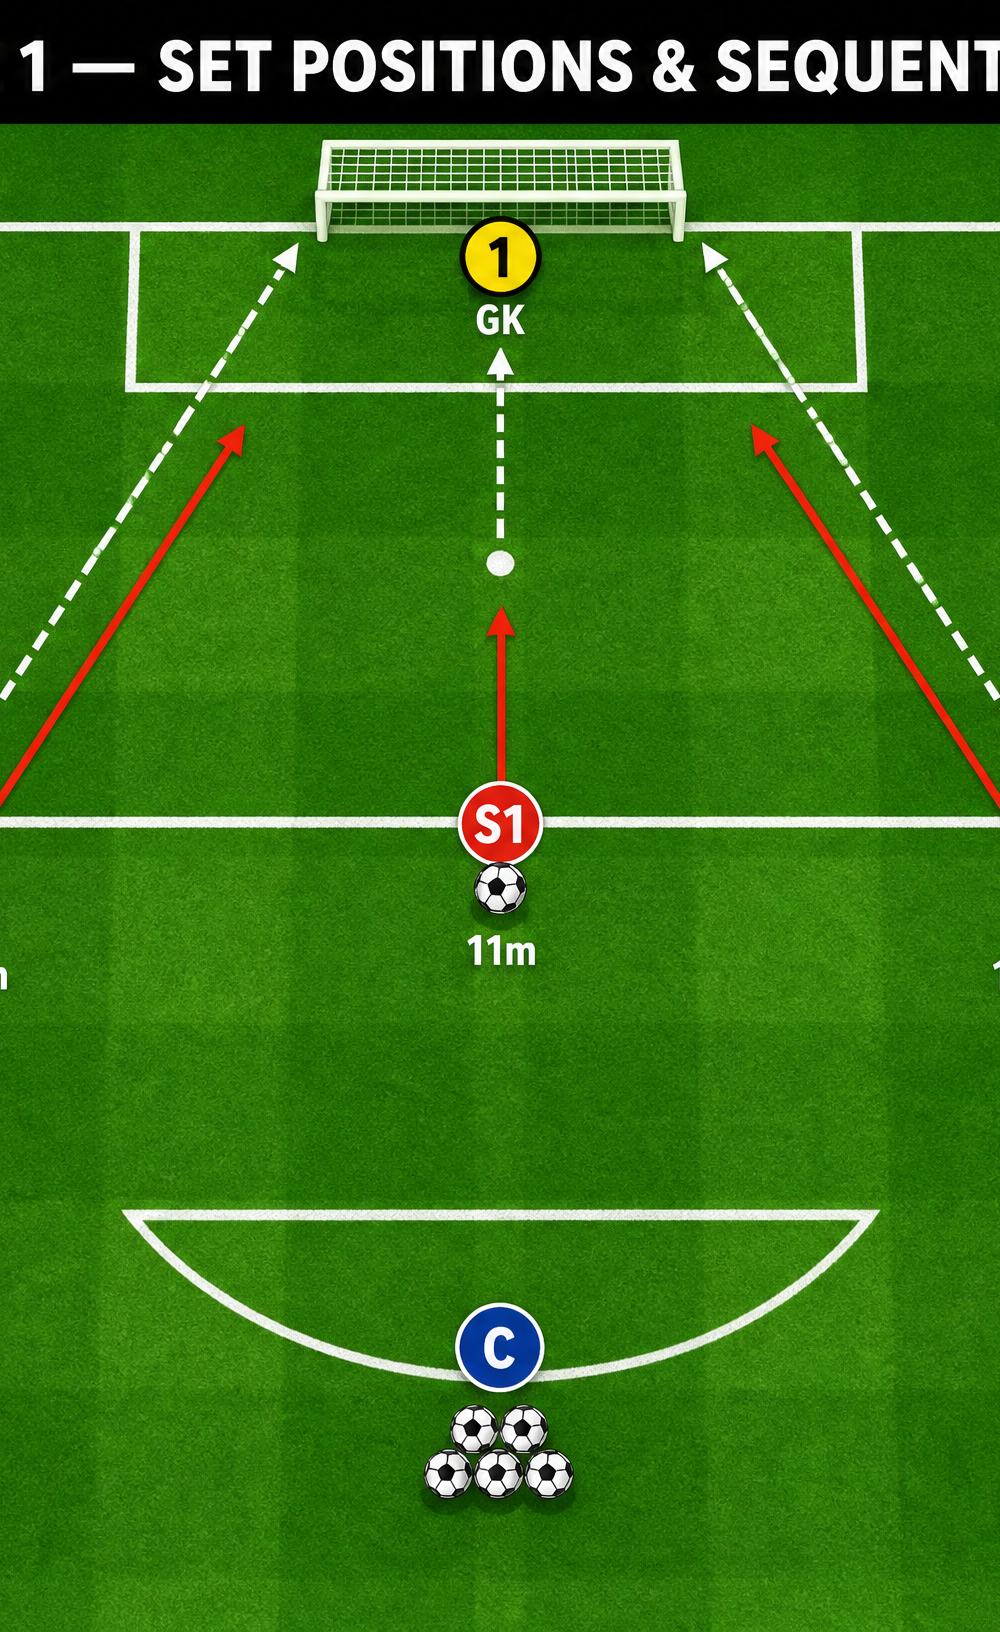
- The Goalkeeper (GK) starts centrally on the goal line.
- Shooter 1 (S1) is positioned at the penalty spot (11m).
- Shooter 2 (S2) is positioned 16m from the goal line, in the left channel.
- Shooter 3 (S3) is positioned 16m from the goal line, in the right channel.
- The Coach (C) stands near the penalty arc with a large supply of footballs to keep the drill flowing seamlessly.
3. Step-by-Step Instructions
Phase 1: Set Positions & Sequential Shooting
This initial phase focuses on fundamental shot-stopping mechanics and angle play from static positions.
- Start Position: The Goalkeeper assumes a balanced, ready stance in the center of the goal.
- Shot 1 (Center): On the Coach's whistle, S1 strikes a firm, driven shot from the penalty spot. The GK must react, make the save, and secure the ball or parry it safely wide.
- Reset: The GK immediately resets their position, checking their angles relative to the next shooter.
- Shot 2 (Left Channel): S2 takes a touch and shoots from the left channel. The GK must adjust their footwork to cover the near post while remaining aware of the far post.
- Shot 3 (Right Channel): After recovering from S2's shot, the GK quickly shifts across the goal face to face S3, who shoots from the right channel.
- Rotation: Rotate the shooters after 3-4 full sets to ensure the GK faces different striking techniques.
Phase 2: Rapid Fire & Recovery Movement
This phase increases the intensity, demanding explosive recovery movements and split-second decision-making.
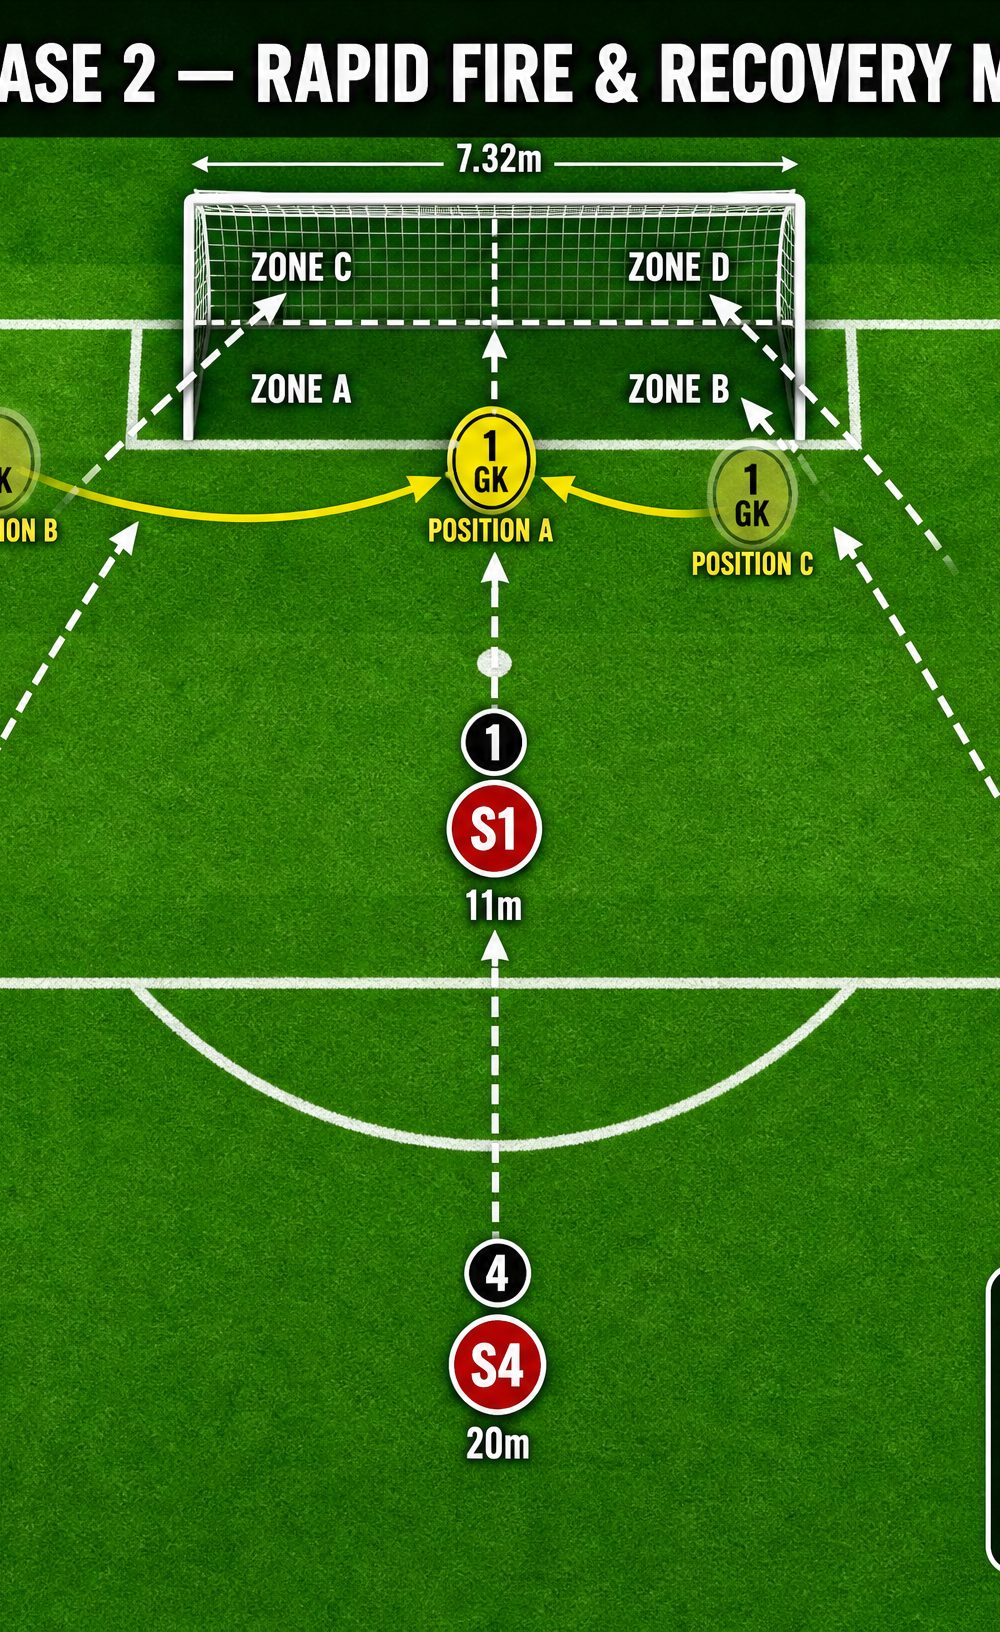
- Continuous Action: The Coach dictates the tempo, calling out the shooter number (1, 2, 3, or 4) in a randomized order.
- The Save: The GK makes the initial save from the called shooter.
- Explosive Recovery: Crucially, as soon as the save is made (or the ball goes out), the GK must use explosive footwork (e.g., cross-step or side-shuffle) to recover to the center of the goal (Position A) before the next shot is struck.
- Second Ball: If a shot results in a rebound inside the penalty area, the drill goes 'live'. Any available shooter can immediately attack the rebound, forcing the GK into a second-ball reaction save.
- Duration: Keep sets short (4-6 shots maximum) to maintain maximum explosive power and prevent fatigue-induced poor technique.
Phase 3: Cross & Second-Ball Reaction (Advanced)
This final phase integrates wide deliveries, forcing the GK to make complex decisions regarding interception versus shot-stopping.
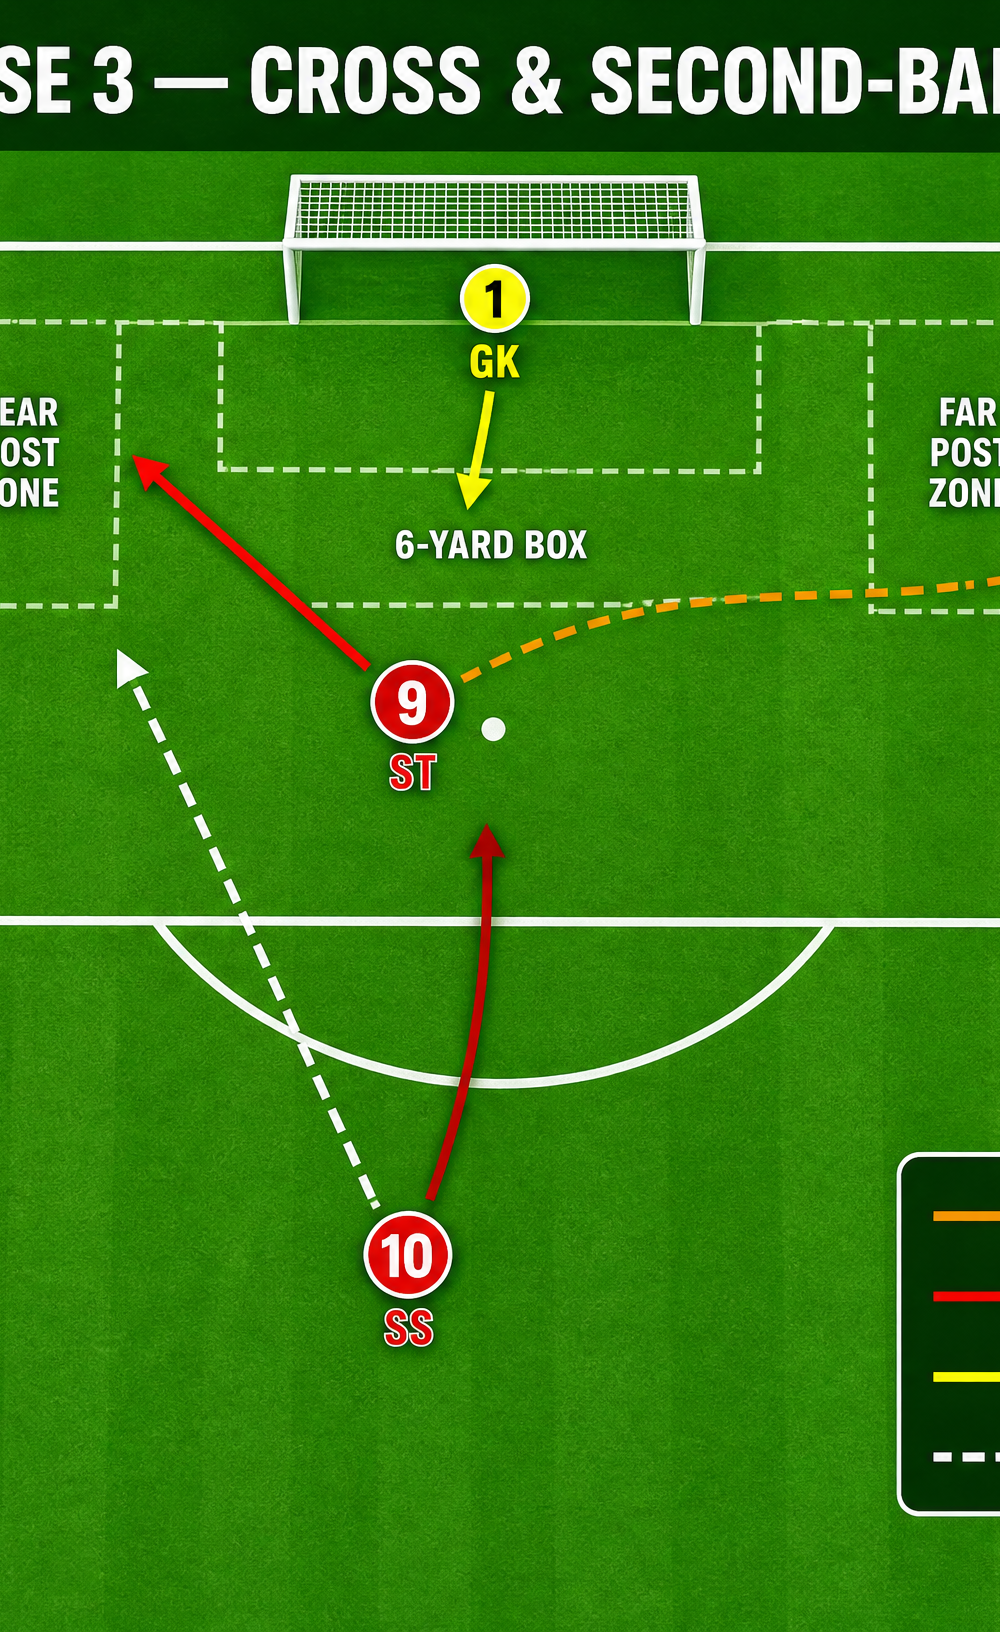
- Wide Delivery: The Wide Player (W) drives down the flank and delivers a varied cross (driven, lofted, or cut-back) into the penalty area.
- Decision Making: The GK must read the flight of the ball and decide whether to come off their line to catch/punch the cross, or stay deep to prepare for a shot from the Striker (ST).
- The Knock-Down: If the cross is won by the ST but not directed on goal, the Second Striker (SS) arrives late at the edge of the box to strike the loose ball.
- Reaction: The GK must rapidly adjust their position from defending the cross to facing a direct shot from the SS, requiring excellent spatial awareness and agility.
4. Key Coaching Points
- Set Position: Ensure the GK is 'set' (feet shoulder-width apart, weight slightly forward on the balls of the feet, hands in a neutral ready position) before the ball is struck. A moving GK cannot react effectively to a shot.
- Footwork Efficiency: Emphasize small, quick steps for minor adjustments and explosive cross-steps for covering larger distances across the goal mouth. Avoid crossing the feet unnecessarily.
- Parrying Zones: Teach the GK to parry the ball into 'safe zones' (wide and away from the goal) rather than back into the central danger area where strikers are lurking.
- Recovery Mechanics: Focus on the speed of getting off the ground after a dive. Use the momentum of the dive and the lower body to spring back to a standing, ready position.
- Angle Play: Constantly remind the GK to draw an imaginary line from the ball to the center of the goal, ensuring they are bisecting the angle and minimizing the target area for the shooter.
5. Common Mistakes
- Cheating the Angle: Anticipating the shot and moving before the strike, leaving the opposite side of the goal exposed.
- Flat-Footedness: Standing with weight on the heels, drastically reducing reaction time and explosive power.
- Poor Rebound Control: Pushing the ball back into the central 'danger zone' instead of directing it wide or securing it cleanly.
- Slow Recovery: Staying on the ground too long after the initial save, leaving the goal vulnerable to a quick follow-up shot.
6. Variations & Progressions
- Visual Obstruction: Place a mannequin or a passive attacking player in the GK's line of sight to simulate match traffic and force them to track the ball late.
- Uneven Surface: Use a slightly uneven surface or introduce a 'deflection board' in front of the GK to create unpredictable ball bounces.
- Fitness Integration: Add a physical task (e.g., a quick sprint to the 6-yard box line and back) immediately before the first shot to simulate late-game fatigue.
7. Age Adaptations
- Under 8 - Under 10: Focus purely on the fundamental mechanics of catching and diving safely. Reduce the distance of the shots (e.g., 8-10m) and use a softer, lighter ball. Remove the rapid-fire element to allow time for resetting.
- Under 12 - Under 14: Introduce the concept of angle play and basic recovery. Begin incorporating the rapid-fire phase but with slightly longer intervals between shots.
- Under 16 - Open: Run the drill at full match intensity. Demand perfection in recovery speed, parrying decisions, and dealing with complex second-ball scenarios.

