Breaking the 1-3-1 Zone: A Complete Offensive System for Basketball Coaches
Master the 1-3-1 zone offense with this complete coaching resource — featuring tactical diagrams, step-by-step player instructions, and proven strategies to exploit every gap in a zone defense.

Equipment Needed
Overview
The 1-3-1 zone offense is one of the most versatile and tactically rewarding offensive systems a basketball coach can deploy. Designed specifically to attack zone defenses — most commonly the 2-3 zone, 1-2-2 zone, and 3-2 zone — this formation exploits the structural weaknesses inherent in any zone: the gaps between defenders, the vulnerable short corners, and the high-post area that most zones leave chronically under-defended.
At its core, the 1-3-1 offense mirrors the shape of a 1-3-1 zone defense, positioning your players to occupy the exact gaps that zone defenders must choose to cover or concede. When executed with patience and precision, it generates high-percentage looks from the mid-range, the short corner, and the low block, while also creating open three-point opportunities on ball reversal.
When to use this play: Deploy the 1-3-1 offense whenever the opposition drops into a zone defense — whether as their primary defensive scheme or as a change-of-pace tactic. It is equally effective in half-court set situations, late-clock scenarios, and as a structured response to a zone trap. Coaches at all levels from under-12 through to open/elite competition will find this system adaptable and immediately impactful.
Setup

Equipment Required
- 1 regulation basketball (size 7 for open/senior; size 6 for women's and under-16; size 5 for under-12 and below)
- Full FIBA half-court (28m x 15m); the offense operates entirely within the offensive half
- Cones or markers (optional, for marking initial positions during early learning phases)
- Coaching whiteboard or clipboard for pre-session walkthrough
Court Setup
The play is run on a standard FIBA half-court. All five offensive players must be positioned before the ball is advanced past half-court. The key spatial reference points are the top of the key (approximately 6.75m from the basket), the wing positions (at the three-point line extended, roughly 6.75m from the basket on each side), the free throw line (5.8m from the backboard), and the short corner / baseline (approximately 1–2m inside the baseline, aligned with the lane line extended).

Player Positions
| Position | Number | Label | Starting Location |
|---|---|---|---|
| Point Guard | 1 | PG | Top of the key, ~1m above the three-point arc |
| Right Wing | 2 | RW | Right wing, on the three-point line extended |
| Left Wing | 3 | LW | Left wing, on the three-point line extended |
| High Post | 4 | HP | Free throw line, centre of the lane |
| Baseline | 5 | BL | Baseline, centre — directly below the basket |
The Point Guard (1) is the quarterback of this offense and must be your most composed ball-handler. The Wings (2 and 3) should be your best perimeter shooters, as they will receive the majority of catch-and-shoot opportunities. The High Post (4) is ideally a forward or skilled big who can catch, face up, and make decisions — this is the most demanding role in the system. The Baseline (5) is your post player, responsible for sealing defenders and finishing in the paint.
Step-by-Step Instructions
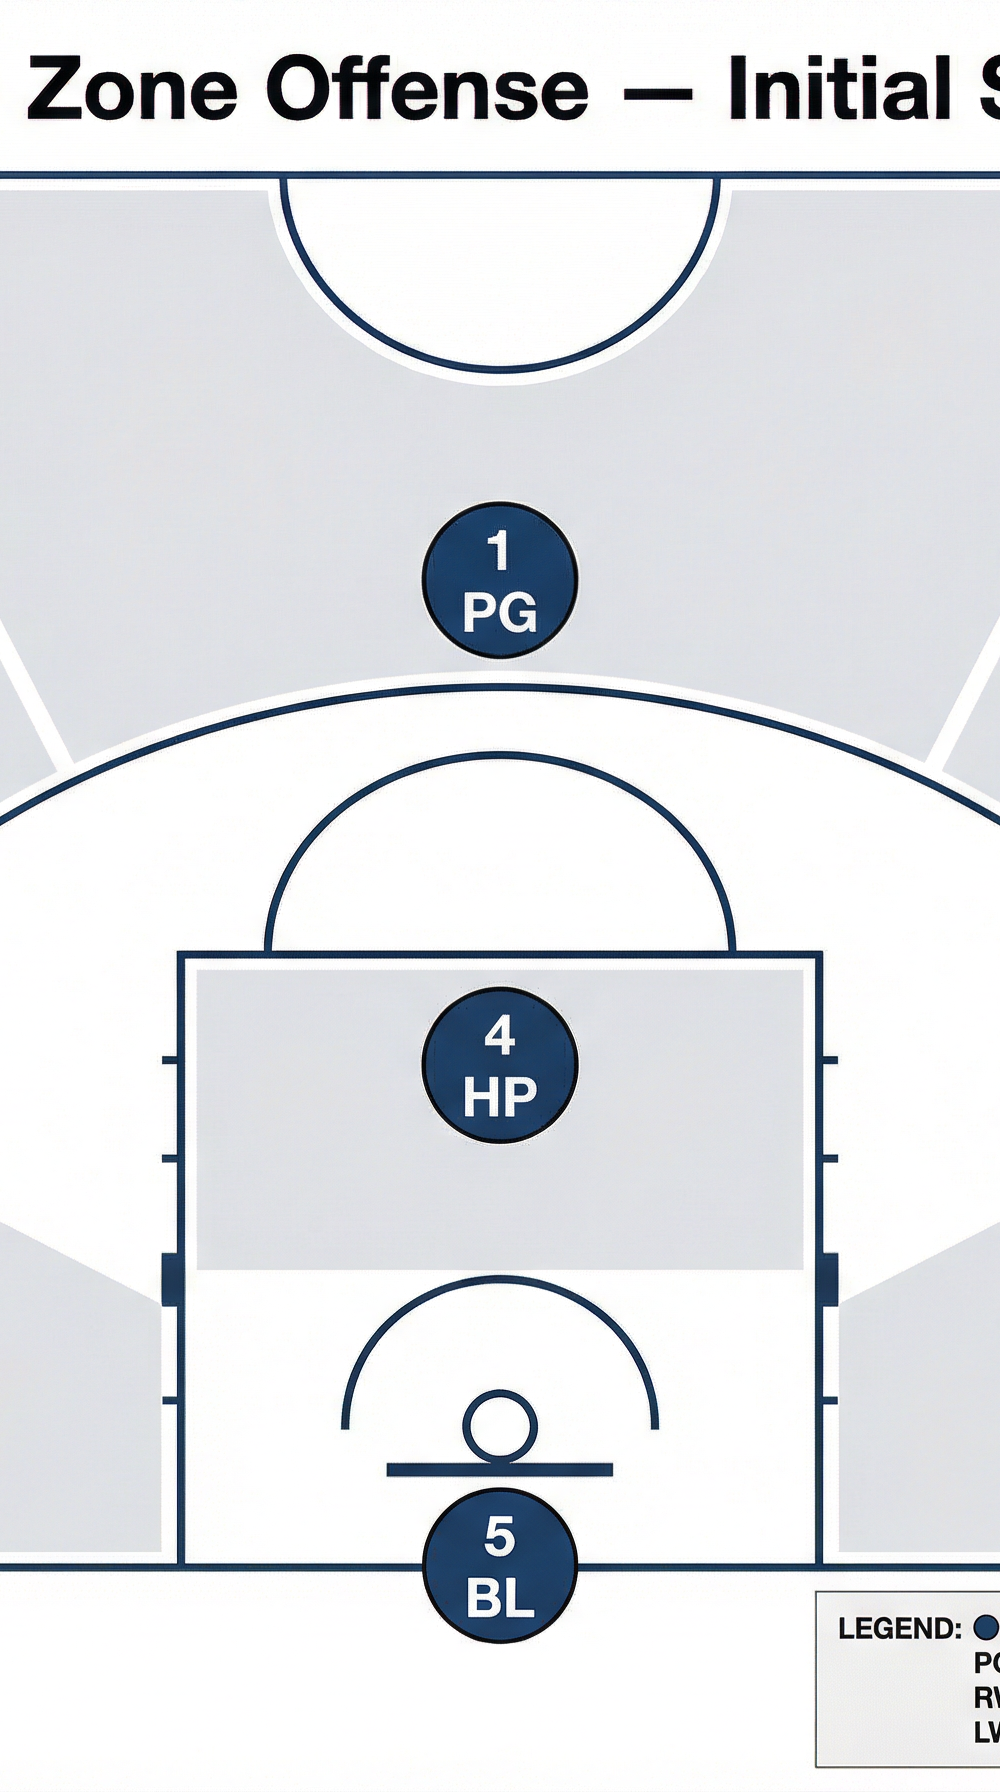
Phase 1 — Initial Entry and Zone Recognition
Step 1. Player 1 (PG) dribbles the ball to the top of the key and calls the play. Before entering the ball, 1 reads the zone — identifying the top defender and the positioning of the two wing defenders. This recognition determines which side the first action will be initiated.
Step 2. Player 4 (HP) sets their position at the free throw line and faces the ball. Player 5 (BL) positions at the baseline centre. Both interior players must be stationary and visible as passing targets before 1 initiates movement.
Step 3. Player 1 passes to the wing on the strong side — either Player 2 (right wing) or Player 3 (left wing). This initial pass is the trigger for all subsequent movement.
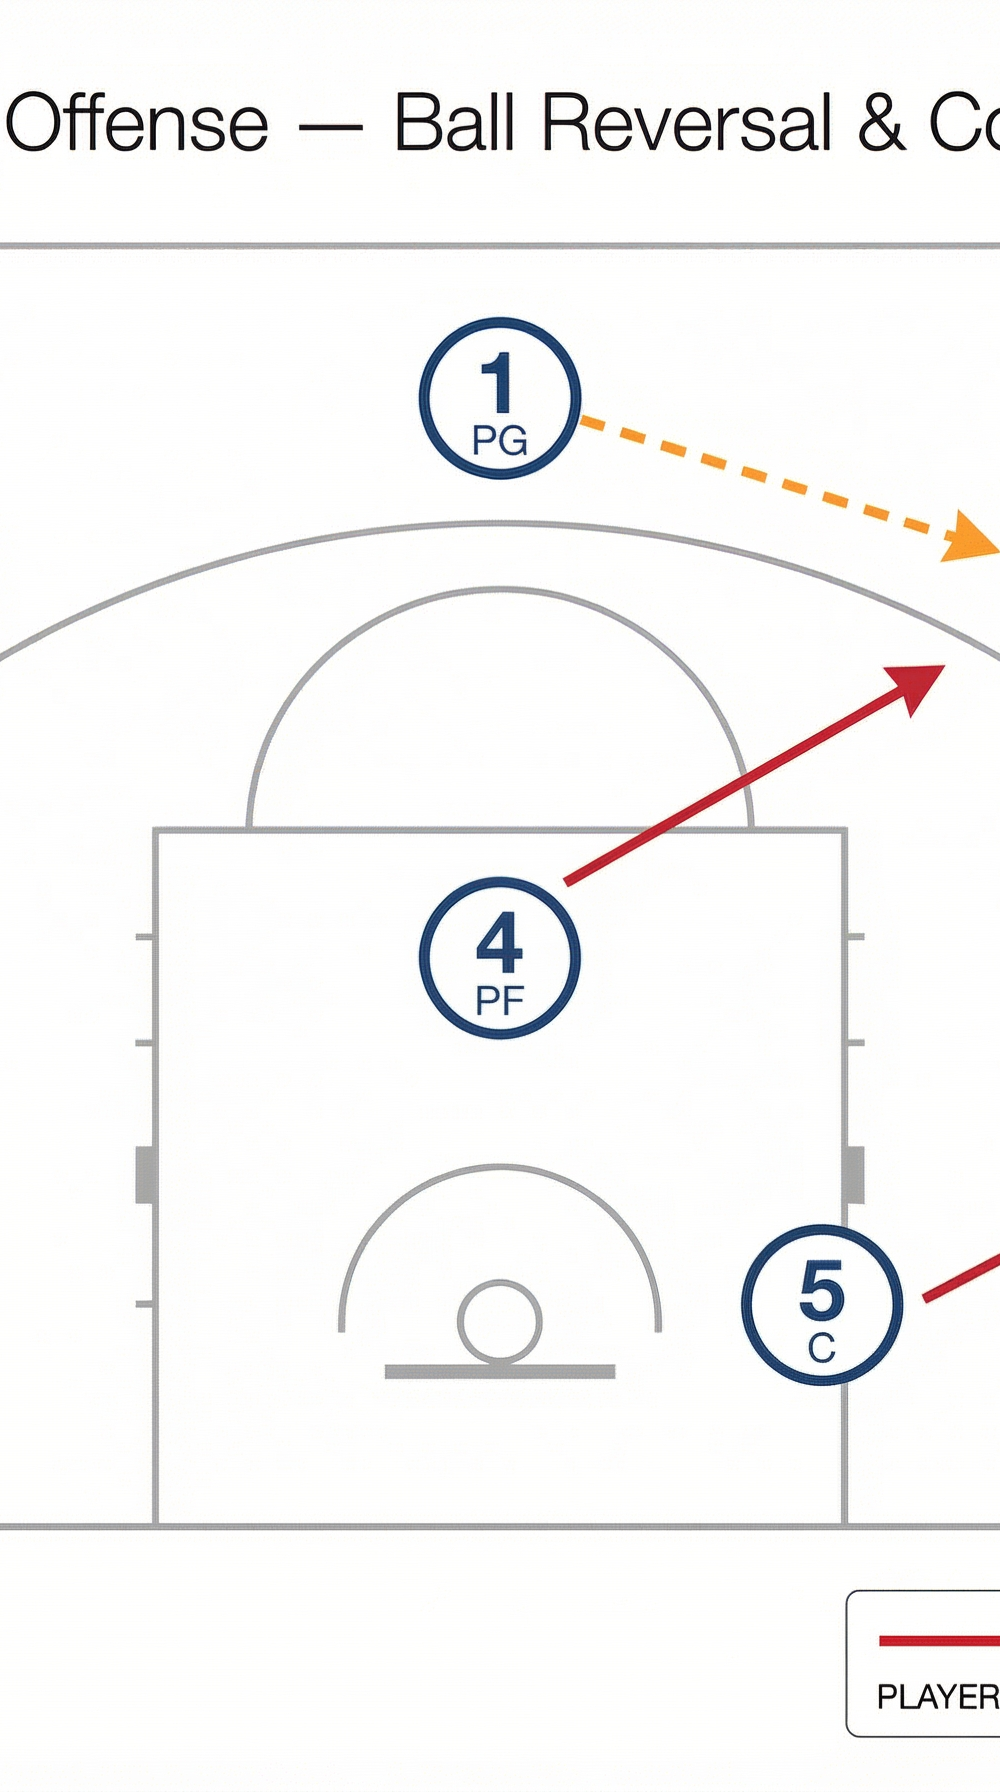
Phase 2 — Ball Reversal and Corner Attack

Step 4. As the ball reaches the wing (e.g., Player 2), Player 4 (HP) slides to the ball-side elbow — the junction of the free throw line and the lane line. This movement pins the middle defender of the zone and opens a passing lane into the paint.
Step 5. Player 5 (BL) reads the movement of 4 and immediately shifts to the ball-side short corner — approximately 1.5m inside the baseline, aligned with the lane line extended. This is the most dangerous position in the 1-3-1 offense; the short corner sits in the gap between the baseline zone defender and the wing defender, and most zones cannot cover it without collapsing.
Step 6. Player 2 (wing) now has three primary reads:
- Pass to 4 at the elbow if the middle defender has not recovered.
- Pass to 5 in the short corner if the baseline defender has followed 4's movement.
- Reverse the ball back to 1 at the top if both interior options are covered.
Step 7. If the ball is reversed to Player 1, Player 3 (opposite wing) must be ready to receive a skip pass or a swing pass. On ball reversal, all players shift — 4 slides to the opposite elbow, 5 slides to the opposite short corner, and the entire formation mirrors to the new strong side.
Phase 3 — High-Low Action and Scoring
Step 8. When Player 2 successfully enters the ball to Player 4 at the elbow, the high-low action is triggered. Player 5 (BL) makes a decisive cut to the ball-side low block, sealing the nearest zone defender with their body.
Step 9. Player 4 (HP) reads the defense: if the low-block defender has followed 5, 4 delivers a direct pass to 5 for a close-range finish. If the zone collapses on 5, 4 can face up for a mid-range jumper from the elbow.
Step 10. As the high-low action develops, Player 1 cuts from the top toward the ball-side wing to maintain spacing and provide a safety outlet. Player 3 spaces to the opposite corner to prevent zone recovery and threaten a skip-pass three-pointer.
Step 11. If no scoring opportunity materialises within 5–6 seconds of entering the ball to the wing, reset to Phase 1. Patient ball movement is the cornerstone of this offense — never force a pass into a covered position.
Key Coaching Points

1. Occupy the gaps, not the defenders. Every player must understand that their job is to stand in the space between zone defenders, not in front of them. Reinforce this constantly during early learning sessions by having players identify the gaps before they move.
2. The short corner is your best friend. The short corner (Player 5's primary destination) is the single most effective position against any zone. Emphasise to Player 5 that they must get there quickly and seal their defender with a wide, low stance before the ball arrives.
3. Ball movement beats zone defense — not dribbling. Zone defenses are broken by rapid, decisive passing that forces defenders to rotate. Limit dribbling to one or two bounces maximum at each position. Encourage players to catch and immediately look to pass.
4. Player 4 must be a decision-maker. The High Post role is the engine of this offense. Player 4 must be comfortable catching with pressure, reading two or three options simultaneously, and delivering accurate passes under duress. Spend extra individual time developing this player's skill set.
5. Patience wins. Coaches must instil the discipline to reset when the defense recovers. A forced shot against a set zone is far worse than a clean reset. Teach players to recognise when to attack and when to recycle.
6. Weak-side spacing is non-negotiable. Player 3 on the weak-side wing must maintain their position at the three-point line at all times. If they drift inside, they collapse the spacing and allow the zone to shrink. Use the phrase "stay wide, stay alive" as a constant reminder.
Common Mistakes

Mistake 1 — Player 5 camping under the basket. Many post players default to standing directly under the basket, which is the most heavily defended zone position. Correct this immediately: Player 5's value in this system comes entirely from their movement to the short corner and low block, not from standing still.
Mistake 2 — Player 4 receiving the ball and immediately dribbling. When the High Post catches at the elbow, the instinctive response for less experienced players is to dribble toward the basket. This destroys the high-low angle and alerts zone defenders. Drill Player 4 to catch, pivot, and pass first — drive only as a last resort.
Mistake 3 — Wings drifting off the three-point line. Under defensive pressure, wings tend to drift inside to receive passes more easily. This collapses the offense and removes the threat that keeps zone defenders honest. Use cones during practice to mark exact wing positions and enforce them strictly.
Mistake 4 — Rushing the offense. Coaches often see their team forcing shots within the first two or three passes because players feel pressure from the shot clock or game situation. Reinforce that the 1-3-1 offense requires three to five passes to generate the best looks. Run timed possession drills (minimum 8-second possessions) to build patience.
Mistake 5 — Ignoring the weak-side skip pass. On ball reversal, the skip pass from Player 1 to Player 3 (or from 3 to 2) is one of the highest-percentage shots in this system because it catches the zone mid-rotation. Many teams practice only the strong-side action and neglect this option. Dedicate specific drill time to skip-pass recognition and catch-and-shoot execution.
Variations & Progressions

Variation 1 — Point Guard Dribble Entry (Simplified)
For teams still learning the system, replace the initial pass to the wing with a dribble entry by Player 1. Player 1 dribbles to the right wing, Player 2 cuts baseline to the short corner, and Player 4 fills the top. This reduces the number of simultaneous movements and makes the entry phase more manageable for developing players.
Variation 2 — Baseline Runner Option (Advanced)
Once the base offense is established, introduce a baseline runner action where Player 5 does not stop at the short corner but instead continues across the baseline to the opposite short corner if the ball is reversed. This creates a moving target that zone defenses struggle to track, and it opens the ball-side low block for Player 4 to seal and receive.
Progression — 1-3-1 vs. Live Zone Defense
Begin all practice sessions with a walk-through (no defense, coach calls each step), then progress to a shell drill (passive zone defense, defenders do not contest passes), and finally to a live 5v5 scenario. Add a shot clock (24 seconds for senior teams; 30 seconds for youth) to simulate game conditions. Track the number of passes before each shot attempt — the goal is a minimum of four passes per possession.
Age Adaptations

Under-12 and Under-14
At younger age groups, simplify the system to a three-player version: use only Player 1 (top), Player 4 (high post), and Player 5 (short corner). Remove the wing players initially and focus exclusively on the high-low action. Use a size 5 ball and reduce court dimensions if necessary. Emphasise the concept of gap-filling through fun activities — for example, a "find the space" game where players must stand in a coloured hoop placed in the gaps of a 2-3 zone.
Under-16
Introduce the full 1-3-1 formation but limit the number of reads at each position to two options (strong-side pass or reset). Introduce the skip pass only once the base system is consistent. Focus heavily on Player 4's development, as this is the age at which the High Post role becomes critical. Use video review of one possession per session to build tactical awareness.
Open / Senior
At the senior level, the full system should be run with all variations and the baseline runner option. Introduce counter actions — for example, if the zone overplays the short corner, Player 5 back-cuts to the basket for a lob. Encourage players to make reads autonomously rather than relying on called plays. The 1-3-1 offense at this level should feel fluid and reactive, not mechanical.