Passing Accuracy Under Pressure: The Triangle Gauntlet Drill
Build composure and precision in your players by training them to execute clean, accurate passes against active defensive pressure — the skill that separates good teams from great ones.
Equipment Needed
Overview
The Triangle Gauntlet is a high-intensity passing drill designed to replicate the decision-making demands of live game situations. Its core purpose is to develop passing accuracy, spatial awareness, and mental composure when defenders are actively contesting passing lanes. Too many teams train passing in isolation — stationary lines, no defence, no consequence for a poor decision. This drill eliminates that comfort zone entirely.
Use this drill during the skill-development phase of your practice session, ideally after a thorough warm-up and before your primary tactical work. It is equally effective as a pre-game activation tool at the intermediate and advanced levels. The drill runs on a FIBA-standard half-court (28m x 15m) and requires a minimum of 6 players, making it practical for squads of all sizes.
Setup
Equipment Required: 2 basketballs, 6 cones (to mark passing zones), 1 stopwatch, pinnie vests for defenders.
Court Configuration: Use the half-court only. Place cones at three positions forming a triangle: (1) the top of the key, approximately 6.75m from the basket at the centre of the three-point arc; (2) the right wing, at the three-point line level; and (3) the left wing, at the three-point line level. The three cone positions are separated by approximately 5–6 metres from each other, creating a clear passing triangle within the arc.
Player Positions:
- Player 1 (Point Guard — PG): Top of the key, ball handler, initiates all passes.
- Player 2 (Shooting Guard — SG): Right wing, primary receiver.
- Player 3 (Small Forward — SF): Left wing, secondary receiver.
- Defender X1: Positioned between Player 1 and Player 2, applying on-ball pressure.
- Defender X2: Positioned between Player 2 and Player 3, contesting the skip pass lane.
- Rebounder/Feeder: Stands under the basket to retrieve any errant passes and return the ball.
Divide your squad into two groups. One group occupies the offensive triangle positions, the other rotates through the defensive roles. Groups swap every 90 seconds.
Diagram 1 — Phase 1 Initial Setup: Player 1 (Ball Handler) at the top of the key initiates the drill. The defender (X) applies immediate on-ball pressure. The dashed blue arrow shows the intended pass to Player 2 (Receiver) on the right wing. The solid red arrow shows Player 1's movement after releasing the ball.
Step-by-Step Instructions

Step 1 — Establish Starting Positions. Player 1 takes the ball at the top of the key (6.75m from the basket). Players 2 and 3 take their wing positions on either side of the three-point arc. Defenders X1 and X2 take up their pressure positions as described above. The coach or assistant stands at the sideline with a stopwatch.
Step 2 — Initiate the Drill. On the coach's whistle, Player 1 receives a pass from the feeder under the basket. The moment Player 1 catches the ball, Defender X1 closes out hard to apply chest-to-chest pressure. The clock starts.
Step 3 — Execute the First Pass. Player 1 must make a decisive, accurate pass to either Player 2 or Player 3 within 3 seconds of receiving the ball. The pass must be a game-realistic pass — chest pass, bounce pass, or overhead pass. No lob passes are permitted. Player 2 or 3 must make a sharp V-cut (one step toward the defender, then a hard cut back to their cone) before receiving.
Step 4 — Continue the Triangle Rotation. Once the ball reaches the wing, the receiving player immediately faces the next defender (X2) who closes out. The ball is then passed across the key to the opposite wing, or back to Player 1 who has relocated. The drill continues for 90 seconds of continuous passing.
Step 5 — Score the Round. Count every clean, on-target pass that reaches the receiver in stride as one point. A turnover (intercepted pass, out-of-bounds pass, or a pass that forces the receiver to stop their cut) costs the group one point. Post the score on a whiteboard. The competitive element is critical — groups should be trying to beat the previous group's score.
Step 6 — Rotate and Repeat. After 90 seconds, defenders become offensive players and vice versa. Run 3–4 rotations per session. Allow 30 seconds of rest between rotations.
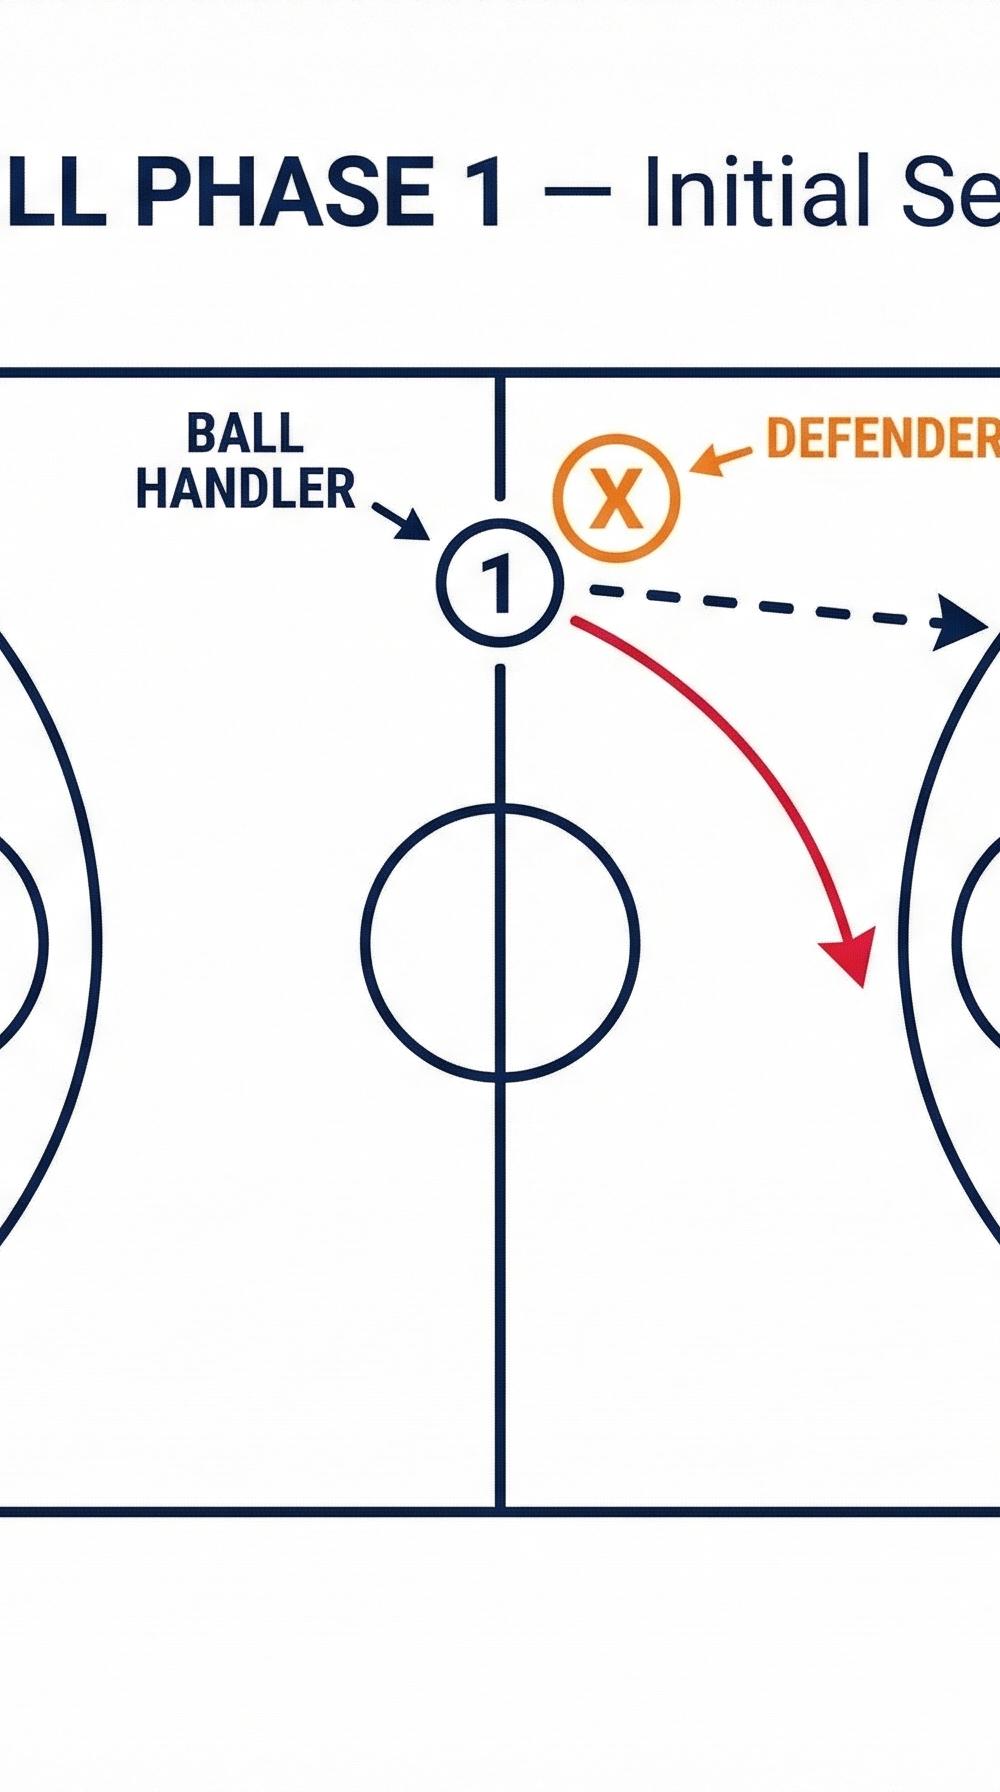
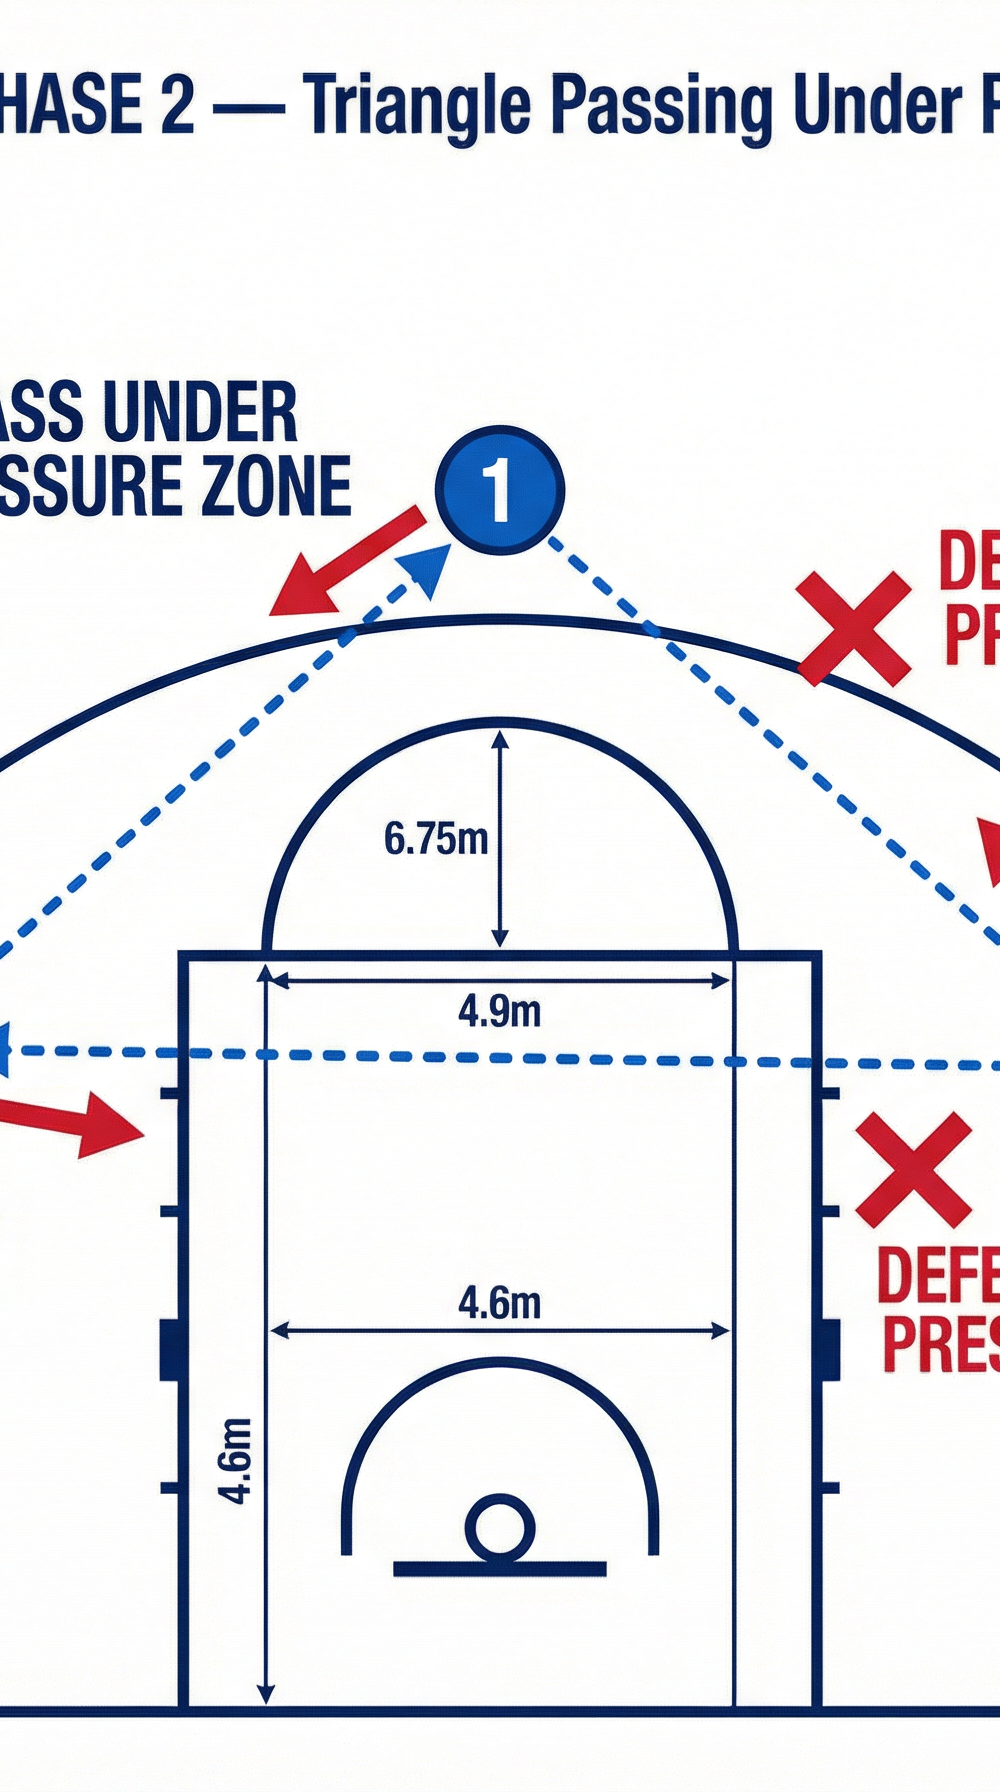
Diagram 2 — Phase 2 Triangle Passing Under Pressure: The full triangle circuit in motion. Dashed blue arrows show the ball movement pattern (1→2→3→1). Solid red arrows show the V-cut movement each player must make before receiving. Defenders X1 and X2 contest the passing lanes actively. The "Pass Under Pressure Zone" label highlights the critical decision-making area at the top of the key.
Key Coaching Points

1. Eyes Up Before the Pass. The single most important habit to build is pre-pass vision. Demand that Player 1 scans the floor before the defender arrives. Coaches should call out "Eyes!" as a cue whenever they see a player staring at the ball or looking down. A player who sees the floor early will always make a better decision under pressure.
2. Pass to the Target Hand, Not to the Body. Receivers must present a clear target hand — the hand furthest from the defender — and passers must hit it. A pass to the chest of a closely guarded receiver is a turnover waiting to happen. Reinforce this constantly: "Give me a target, hit the target."
3. The V-Cut Must Be Sharp and Decisive. A lazy cut is as bad as no cut. Players must sell the cut toward the defender before breaking back to receive. If the cut is half-hearted, the defender recovers easily and the passing lane closes. Demand two hard steps toward the defender before the cut-back.
4. Pass Fake Before You Pass. Encourage Player 1 to use a single, sharp pass fake to move the defender's hands before delivering the ball. A good pass fake creates 15–20 centimetres of space in the passing lane — often the difference between a clean delivery and a deflection.
5. Footwork on the Catch. Receivers must catch the ball in a balanced, athletic stance — feet shoulder-width apart, knees bent, ready to pass or drive. A receiver who catches off-balance immediately puts the next passer under greater pressure. Emphasise "catch ready, not catch and then get ready."
6. Communicate Verbally. Players should call for the ball with a short, sharp verbal cue ("Ball!", "Here!") as they complete their cut. This trains the habit of active communication that translates directly into game situations.
Common Mistakes

Mistake 1 — Telegraphing the Pass. Players look directly at their intended receiver for 1–2 seconds before passing, giving the defender time to read and intercept. Correction: Introduce a "look-away" rule — the passer must look in one direction for at least one count before passing in another. Drill this with a simple freeze-and-check: blow the whistle mid-drill and ask the passer where they were looking.
Mistake 2 — Holding the Ball Too Long. Under pressure, less experienced players freeze and hold the ball for 4–5 seconds, allowing the defence to fully set. Correction: Enforce the 3-second pass rule strictly and award a turnover point for any hold exceeding this. The time pressure forces faster decision-making and builds the habit over time.
Mistake 3 — Flat-Footed Receivers. Players standing still at their cone position rather than moving to receive. Correction: Remove the cones entirely for one round and instruct players that they must always be in motion. A stationary offensive player is the easiest player to defend. Reward active movement with verbal praise during the drill.
Mistake 4 — Forcing the Skip Pass. When the direct passing lane is closed, players attempt a high-risk skip pass across the key rather than resetting. Correction: Designate a "reset" option — Player 1 can always pass back to the feeder under the basket to reset the drill without penalty. This teaches players that resetting possession is a smart play, not a failure.
Mistake 5 — Poor Pass Selection. Players default to the chest pass regardless of the defensive positioning, making passes easy to read and deflect. Correction: Call out specific pass types during the drill ("Bounce pass only!", "Overhead only!") to force players to develop a full passing vocabulary and choose the right tool for each situation.
Variations & Progressions

Progression 1 — Add a Shot Opportunity. After 5 consecutive clean passes, Player 2 or 3 is permitted to drive baseline or take a catch-and-shoot three-pointer. This rewards accurate passing with a scoring opportunity and teaches players to recognise when the defence has been broken down. It also adds a natural consequence to the drill — a missed shot resets the count to zero.
Progression 2 — Live 3-on-2 Conversion. After the triangle passing phase, the coach calls "Live!" and the drill converts into a live 3-on-2 situation. The three offensive players attack the two defenders toward the basket. This bridges the gap between the structured drill and full game play, testing whether the passing habits built in the drill hold up under competitive pressure.
Variation 1 — Reduced Space (Pressure Box). Shrink the triangle by moving all three cone positions 1.5 metres closer together, operating entirely within the paint and elbow area. This dramatically reduces passing lanes and forces quicker, more precise decisions. Use this variation for advanced groups or as a late-session conditioning challenge.
Variation 2 — Two-Ball Drill. Introduce a second ball simultaneously — Player 3 starts with a ball while Player 1 starts with a ball. Both players must pass at the same time, with Player 2 receiving from Player 1 while Player 1 simultaneously receives from Player 3. This extreme variation is for advanced players only and develops split-focus awareness and rapid hand-eye coordination.
Age Adaptations

| Age Group | Key Modifications |
|---|---|
| Under 10 | Remove defenders entirely. Focus on the V-cut movement and hitting the target hand. Use a smaller ball (Size 5). Reduce the triangle distance to 3–4 metres. No time pressure — emphasise technique over speed. |
| Under 12 | Use passive defenders (arms up, no active contesting). Allow 5 seconds to pass. Introduce verbal communication requirements. Use Size 5 or Size 6 ball. |
| Under 14 | Use semi-active defenders (can deflect but not intercept). Introduce the 3-second rule. Begin scoring rounds competitively. Full court markings apply. |
| Under 16 | Full drill as described. Introduce Progression 1 (shot opportunity) after players are comfortable with the base drill. |
| Open / Senior | Full drill with both progressions. Use the two-ball variation. Increase defender intensity to full live defence. Reduce rest intervals between rotations to 15 seconds. |
For all age groups under 14, prioritise positive reinforcement over error correction. The goal at younger ages is to build confidence in passing under any pressure, not to achieve perfection. As players mature, the standard of correction should rise accordingly.