Pick and Roll Execution Drill: Reading the Screen and Making the Right Play
Master the most versatile two-man action in basketball — teaching your point guard and big man to read the defense and execute the pick and roll with precision, timing, and decision-making under pressure.

Equipment Needed
Overview
The pick and roll — also known as the ball screen action — is the single most frequently used play in modern basketball at every level of the game, from youth leagues to the NBA. When executed correctly, it creates a numerical advantage by forcing the defense to make a split-second decision: help on the roller, hedge on the ball-handler, or switch. This drill teaches your Point Guard (1) and Center (5) to operate as a cohesive two-man unit, reading the defensive coverage and selecting the correct option every time.
Use this drill during the skill development phase of practice, typically in the first 20–25 minutes before transitioning to team sets. It is equally effective as a film-session companion, where coaches can pause and identify the defensive coverage being shown before players execute the correct counter.
| Drill Attribute | Detail |
|---|---|
| Primary Skill | Pick and roll execution, decision-making |
| Secondary Skill | Spacing, rim-rolling, pull-up shooting |
| Court Area | Half-court (FIBA: 28m x 15m) |
| Duration | 25–30 minutes |
| Players Required | 5 (minimum 2 for base version) |
| Difficulty | Intermediate |
Setup

Equipment needed: 1 basketball per group, cones (optional, to mark screen positions), a full FIBA half-court (key dimensions: paint area 5.8m wide x 5.79m deep, three-point arc at 6.75m from the basket).
Player Positions:

Begin with all five players in their base spacing positions as shown in Diagram 1. The Point Guard (1 — PG) starts at the top of the key, approximately 1.5m above the three-point arc, with the ball. The Shooting Guard (2 — SG) positions at the right wing, just outside the three-point line at the wing slot. The Small Forward (3 — SF) occupies the left corner, 0.9m from the baseline and outside the three-point line. The Power Forward (4 — PF) holds the left wing position, mirroring Player 2 on the opposite side. The Center (5 — C) starts at the right elbow — the junction of the free-throw line and the lane line — approximately 4.6m from the basket.
This spacing is critical. Players 2, 3, and 4 must remain wide to occupy their defenders and prevent defensive help from collapsing into the paint. Emphasise to your players: spacing is not passive — it is an active offensive weapon.
Step-by-Step Instructions

Phase 1 — Calling the Action (0–3 seconds)
- Player 1 (PG) dribbles to the top of the key and calls the screen verbally or with a hand signal. Use a consistent team call — for example, "Ball!" — so Player 5 knows to initiate the screen.
- Player 5 (C) reads the call and begins walking their defender toward the screen position. The key teaching point here is that Player 5 must set up their defender first — take one or two steps away from the screen spot before reversing direction to set the screen. This is called "selling the cut" and prevents the defender from anticipating the screen.
Phase 2 — Setting the Screen (3–5 seconds)
- Player 5 moves from the elbow to a position approximately 1m to the side of Player 1's defender, planting their feet shoulder-width apart before contact. The screener must be stationary before Player 1 uses the screen — a moving screen is an illegal screen under FIBA rules.
- Player 5 sets the screen with arms crossed over the chest, elbows in, to protect themselves and avoid an offensive foul. The screen should be set at an angle that forces Player 1's defender to go under or over — typically at a 45-degree angle toward the direction of the dribble.
- Player 1 reads the screen being set and uses a hesitation dribble — a stutter-step — to allow Player 5 to become fully stationary. Timing is everything: coming off the screen too early means the screen is not yet set; coming too late allows the defense to recover.
Phase 3 — Using the Screen (5–7 seconds)

- Player 1 drives hard off the screen, shoulder-to-hip with Player 5 — meaning Player 1's shoulder should brush Player 5's hip as they turn the corner. This tight execution prevents the defender from slipping between the ball-handler and the screener (known as "going under").
- Simultaneously, Player 5 pivots and rolls toward the basket the instant Player 1 clears the screen. The roll is initiated with a reverse pivot on the foot closest to the basket, opening the hips to face the ball. Player 5 should raise the inside hand as a target for the pass while rolling.
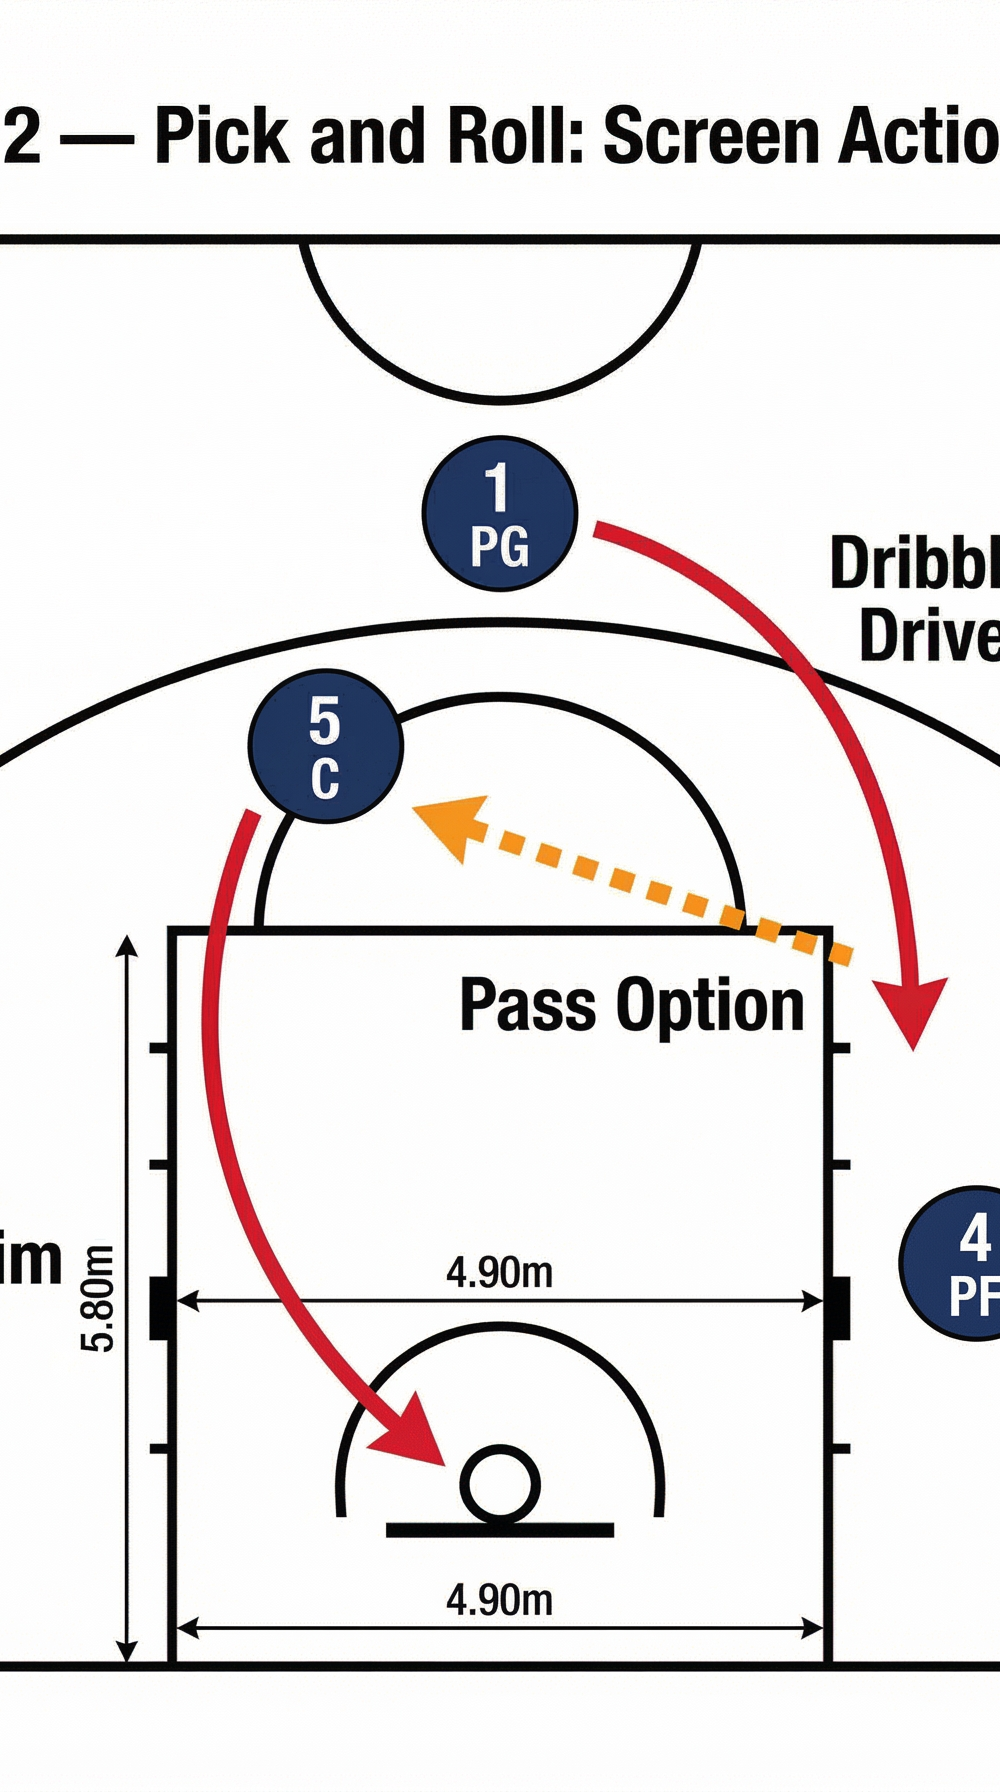
Phase 4 — Reading the Defense and Executing (7–10 seconds)

- Player 1 reads the defensive coverage as they come off the screen and selects from three primary options:
- Option A — Pull-Up Jumper: If the defending big (X5) drops back to protect the rim and Player 1's defender (X1) fights over the screen, Player 1 has a pull-up mid-range jumper at the elbow or short corner. Player 1 must stop on balance and shoot in rhythm.
- Option B — Roll Pass: If X5 steps up to hedge or trap Player 1, Player 5 rolling to the rim is open. Player 1 delivers a pocket pass or a lob over the top, depending on X5's position. This is the "reward" for a hard hedge — the roller is open.
- Option C — Kick-Out Three: If both X1 and X5 collapse on the ball-handler and roller, the defensive rotation has left a corner or wing player open. Player 1 makes the skip pass to Player 3 (SF) in the left corner or Player 2 (SG) at the right wing for an open three-pointer.
- After the play concludes — whether in a shot, pass, or turnover — rotate players. The next group of two (or the same pair if working in a 2-man drill) resets to the starting positions.
Key Coaching Points
1. The Screen Angle Determines the Drive Direction. Coach Player 5 to set the screen at the correct angle — angled toward the side Player 1 wants to attack. A flat screen (perpendicular to the sideline) only works if Player 1 is going directly toward the baseline. For a middle ball screen, the screen should angle toward the paint.
2. "Tight Hips" — No Daylight Between Ball-Handler and Screener. The most common error at youth and intermediate levels is Player 1 leaving too much space between themselves and the screen. Remind players: "If you can fit a person between you and the screen, the screen doesn't exist." Use the phrase "shoulder to hip" as a constant verbal cue.
3. The Roll is a Sprint, Not a Walk. Player 5's roll to the rim must be explosive and purposeful. The moment the screen is used, Player 5 should pivot and accelerate toward the basket with both hands up, making themselves a large, visible target. A slow roll allows the defense to recover and deny the pass.
4. Read Before You React — Eyes Up. Player 1 must keep their head up as they come off the screen. The decision — pull-up, roll pass, or kick-out — must be made in real time based on what the defense gives. Drill this by having coaches or defenders hold up a number (1, 2, or 3) as Player 1 turns the corner, requiring them to execute the corresponding option.
5. Spacing Players Must Be Ready to Shoot. Players 2, 3, and 4 are not spectators. They must be in a "shot-ready" stance — knees slightly bent, hands up, feet set — so that when the kick-out pass arrives, they can shoot without an extra gather step. A defender can close out in the time it takes a player to catch and reset their feet.
6. Communication is Non-Negotiable. Both Player 1 and Player 5 must communicate throughout the action. Player 5 calls "Screen!" when set. Player 1 calls "Coming!" to signal they are using it. This eliminates hesitation and builds the timing that makes the action effective.
Common Mistakes

Mistake 1 — The Moving Screen (Illegal Screen). Player 5 is still moving their feet when Player 1 uses the screen. This results in an offensive foul call in games. Correction: Drill the screen-setting in isolation first. Have Player 5 set 20 stationary screens against a cone or chair before adding Player 1. Use the verbal cue "Feet first, then screen."
Mistake 2 — Player 1 Drifting Wide Instead of Driving Tight. Player 1 veers away from the screen rather than driving shoulder-to-hip, giving the defender room to recover. Correction: Place a cone or a coach's foot at the screen spot and instruct Player 1 to touch it with their hip as they go by. Physical feedback is the fastest way to correct this habit.
Mistake 3 — Player 5 Rolling Too Early (Before the Screen is Used). Player 5 begins the roll before Player 1 has fully used the screen, leaving the screen unset and creating a timing breakdown. Correction: Teach Player 5 the cue: "Roll when you feel the contact" — meaning when Player 1's body brushes past, that is the trigger to pivot and roll.
Mistake 4 — Player 1 Pre-Deciding the Option. Player 1 has already decided to pass to the roller before reading the defense, ignoring an open pull-up or kick-out opportunity. Correction: Use the "number call" coaching method described in Key Coaching Point 4. Alternatively, have the defensive player on Player 5 deliberately drop or hedge on alternate repetitions, forcing Player 1 to genuinely read the coverage.
Mistake 5 — Spacing Players Drifting Toward the Ball. Players 2, 3, and 4 drift toward the ball screen action out of instinct or curiosity, collapsing the spacing and bringing their defenders into the play. Correction: Mark the spacing positions with cones and instruct perimeter players that they may not move from their spot until the ball is passed to them. Introduce a "spacing fine" — any player who drifts loses their spot in the rotation.
Variations and Progressions

Progression 1 — Add Live Defense (2-on-2 Pick and Roll). Remove Players 3, 4, and 5's spacing counterparts and run the pick and roll as a live 2-on-2 action. Player 1 and Player 5 go against two defenders who are free to choose any defensive coverage — hedge, drop, switch, or trap. This forces genuine real-time decision-making and is the most game-realistic version of the drill. Run each pair for 45 seconds, then rotate.
Progression 2 — 3-on-3 Pick and Roll with Kick-Out. Add Player 3 (SF) in the corner with a live defender (X3). Now Player 1 has the roll pass and the kick-out three as live options. This teaches Player 1 to scan the floor quickly and rewards the correct read with an open three-pointer. The defense must decide whether to help on the roll or stay on the corner shooter — there is no correct answer, which is exactly the point.
Variation — The Pop Instead of the Roll (Pick and Pop). Instead of rolling to the basket, Player 5 "pops" back to the three-point line or the short corner after setting the screen. This variation is ideal for stretch-four or shooting big players. It changes the defensive problem entirely — the defending big must now close out on a perimeter shooter rather than protect the rim. Run this variation with a Player 4 (PF) who has a reliable mid-range or three-point shot.
Age Adaptations

| Age Group | Adaptation |
|---|---|
| Under 10 (Mini Basketball) | Remove the decision-making component entirely. Run a simple "screen and go" — Player 5 sets the screen, Player 1 drives to the basket for a layup. Focus only on setting a stationary screen and driving tight. No defenders. |
| Under 12 | Introduce the roll pass (Option B only). Player 1 drives, Player 5 rolls, Player 1 passes. No pull-up or kick-out. Add a passive (token) defender on Player 5 to teach Player 1 to look for the roller. |
| Under 14 | Introduce all three options (pull-up, roll, kick-out) but run without live defense first. Use the "coach calls the option" method — the coach shouts "A", "B", or "C" as Player 1 turns the corner. This builds the habit of reading before reacting. |
| Under 16 | Run the full drill with live 2-on-2 and 3-on-3 progressions. Introduce defensive coverages by name ("hedge", "drop", "switch") and require players to identify the coverage verbally before executing the correct counter. |
| Open / Senior | Add a secondary action — for example, Player 4 setting a back-screen for Player 3 on the weak side simultaneously with the ball screen. This mirrors the complexity of real game situations and requires all five players to read and react in concert. |