"DIAMOND BREAK" — Press Break Play Against Full-Court Pressure
Master the Diamond Break: a structured, five-player press break system that reliably advances the ball against full-court pressure and converts defensive chaos into a numbers-advantage attack.

Equipment Needed
Overview
The Diamond Break is a structured, five-player press break system designed to neutralise full-court man-to-man or zone pressure and convert it into an immediate offensive advantage. Rather than simply surviving the press, this play is built on the philosophy that a well-executed press break is one of the most efficient ways to generate easy transition baskets — because the pressing team has committed defenders far from their own basket.
Use this play whenever the opposition applies full-court pressure after a made basket, a free throw, or a turnover. It is equally effective against man-to-man presses, 2-2-1 zone presses, and trapping half-court presses. The play is named for the diamond shape formed by players 1, 2, 3, and 4 as they space the court in the backcourt, creating passing angles that are almost impossible to deny simultaneously.
When to call it: Signal "Diamond" from the bench or use a verbal call from the point guard whenever the opposition sets a full-court press. The inbounder (5) should recognise the press and immediately move to the baseline to begin the play.
Setup

Equipment Required
A full FIBA-regulation court (28m × 15m) is required to run this play at full intensity. For partial-court training, a minimum of 20m of court length is needed to replicate the spacing demands. You will need one basketball, five offensive players, and ideally five defensive players to simulate the press.
Player Positions
| Position | Role | Starting Location |
|---|---|---|
| 1 — Point Guard (PG) | Primary ball-handler; press break engine | Ball-side, ~4–5m from baseline, near the key |
| 2 — Shooting Guard (SG) | Secondary outlet; weak-side safety valve | Weak-side, ~4–5m from baseline, near the key |
| 3 — Small Forward (SF) | Mid-court ball-side runner | Ball-side, ~13–14m from baseline (near half-court) |
| 4 — Power Forward (PF) | Mid-court weak-side runner | Weak-side, ~13–14m from baseline (near half-court) |
| 5 — Centre (C) | Inbounder; transitions to weak-side outlet | Out of bounds at the baseline, directly behind the basket |

Diagram 1 — Initial setup positions. Note the diamond spacing of players 1–4 across the court, with 5 as the inbounder. Defenders (red X) are matched up on each offensive player.
Step-by-Step Instructions

Phase 1 — Inbound & Immediate Outlet
Step 1 — Set the Diamond (0–2 seconds). As soon as the basket is scored or the referee hands the ball to player 5 at the baseline, all five players sprint to their designated starting positions. Player 1 sets up ball-side at the edge of the key, approximately 4m from the baseline. Player 2 mirrors on the weak side. Players 3 and 4 sprint immediately to their mid-court positions — this sprint must happen before the press sets up, denying defenders the chance to deny the outlets.
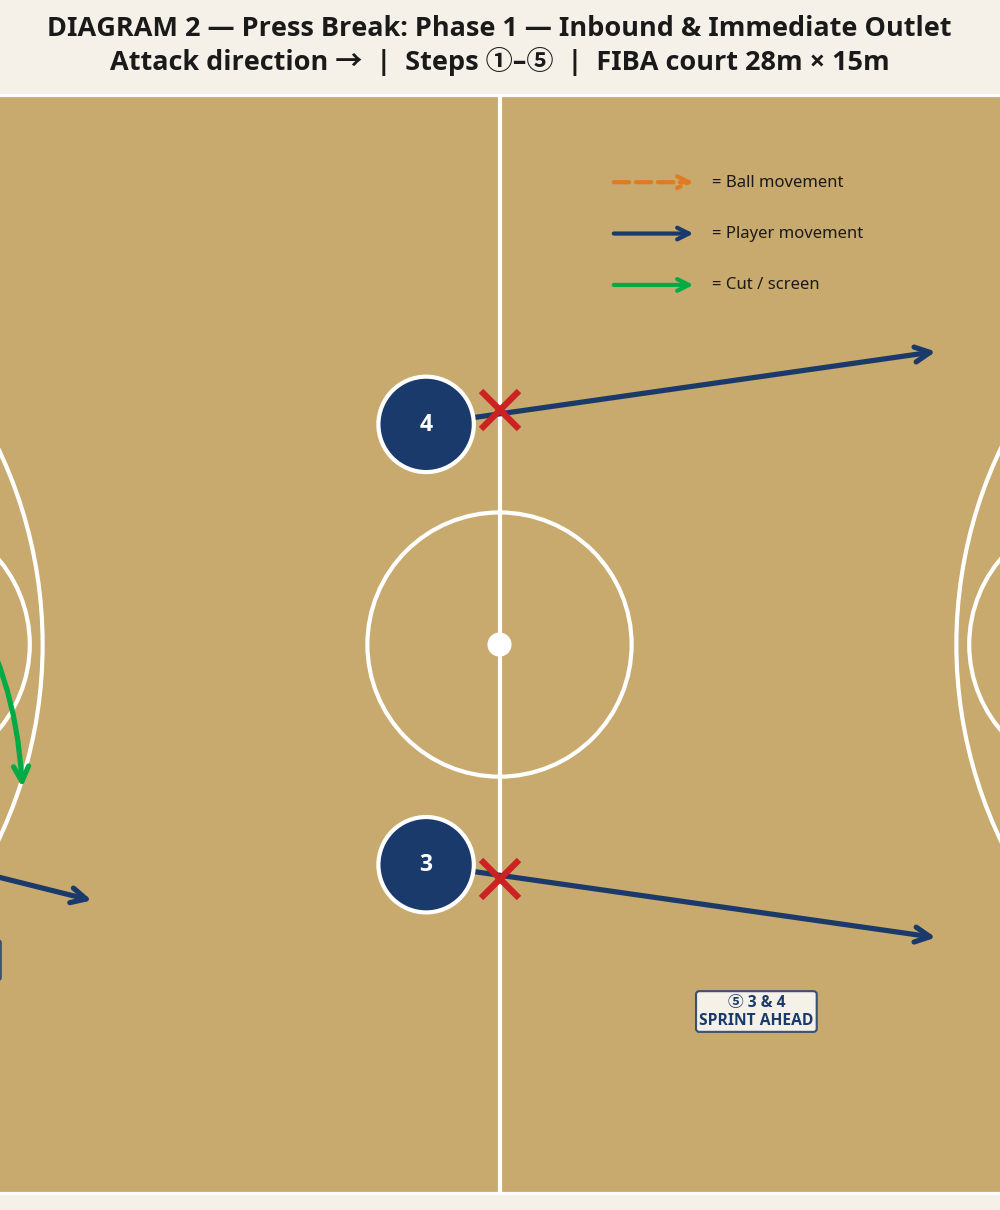
Step 2 — Inbound to 1 (2–3 seconds). Player 5 looks first to player 1 on the ball side. Player 1 uses a V-cut — two hard steps toward the baseline, then an explosive push back toward the sideline — to create separation from their defender. The inbound pass should be a firm, flat chest pass or a bounce pass to the outside hand of player 1, away from the defender. Player 5 has 5 seconds to inbound; do not rush, but do not hesitate once the target is open.
Step 3 — 2 Cuts to the Outlet (simultaneous with Step 2). The moment player 5 picks up the ball to inbound, player 2 executes a diagonal cut from the weak-side key area toward the ball-side short corner (~7–8m from the baseline). This cut serves two purposes: it provides an emergency outlet if player 1 is denied, and it occupies the defender who might otherwise help trap player 1.
Step 4 — 5 Sprints Inbounds (immediately after passing). The instant player 5 releases the inbound pass, they sprint inbounds along the weak-side lane line. This is a critical and often neglected step — player 5 becomes the safety valve and prevents a 4v5 situation if the ball is turned over. Player 5 targets the weak-side mid-court area (~10–12m from the baseline).
Step 5 — 3 and 4 Sprint to Frontcourt (continuous). Players 3 and 4 do not wait for the inbound to be completed. They sprint continuously toward the frontcourt — player 3 to the ball-side corner (approximately 24m from the left baseline) and player 4 to the weak-side wing (approximately 24m from the left baseline, opposite side). Their job is to be ahead of the press and ready to receive a long pass if the middle of the court opens.
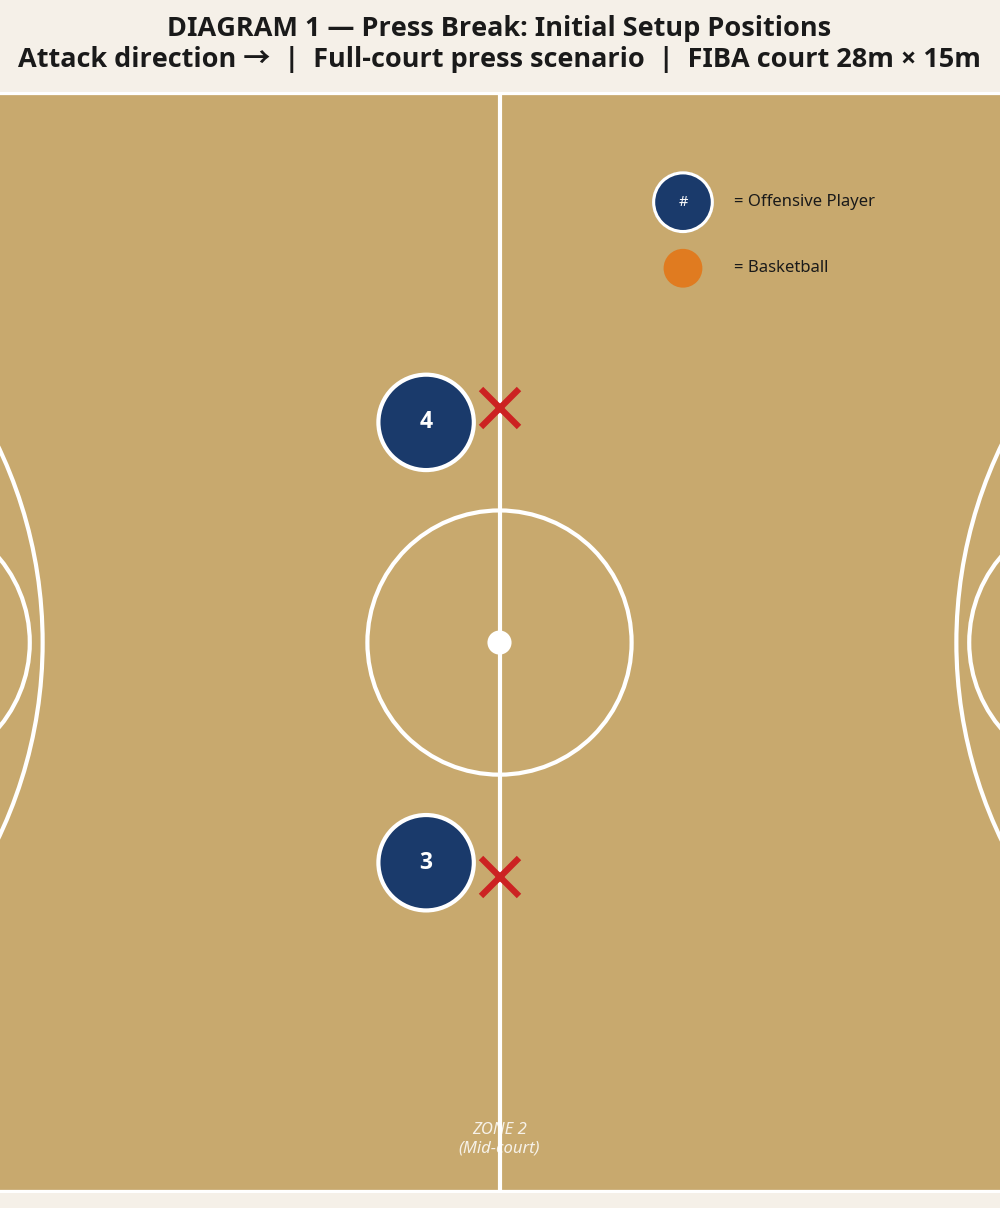
Diagram 2 — Phase 1 in action. The inbound pass (dashed orange) goes to 1. Player 2 cuts to the outlet (green arrow). Player 5 sprints inbounds. Players 3 and 4 sprint ahead to the frontcourt.
Phase 2 — Mid-Court Advance & Attack
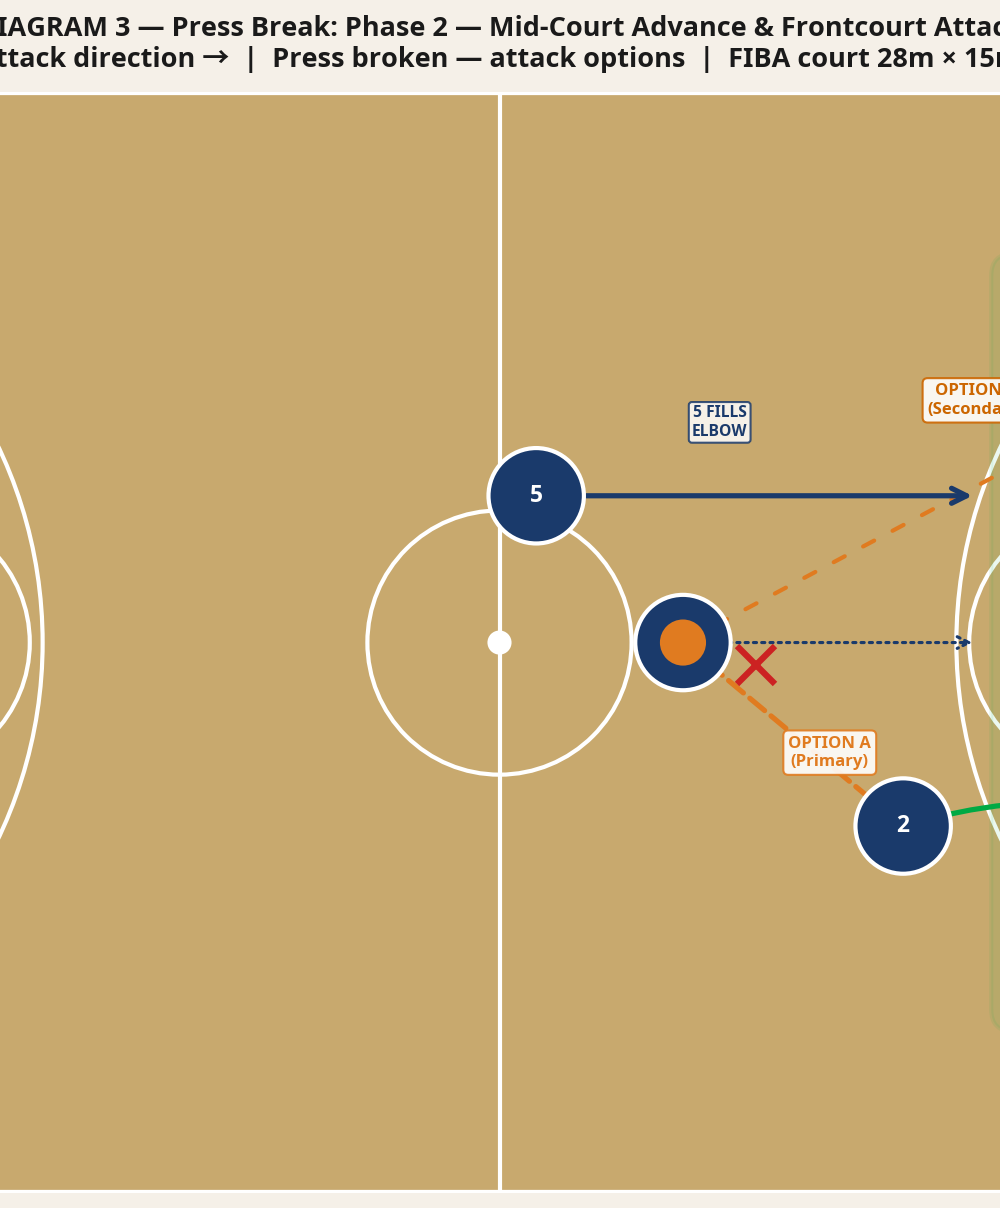
Step 6 — Advance Past Half-Court. Once player 1 receives the inbound pass, they immediately look to advance. If the sideline is open, player 1 dribbles hard up the sideline. If a trap forms in the corner, player 1 pivots and looks for player 2's outlet cut or player 5 coming up the weak side. The key rule: never pick up the dribble under pressure. Keep the dribble alive until a pass is available.
Step 7 — Read the Press and Advance. As player 1 advances, they read the defence. If the press has collapsed and only 2 defenders are back, player 1 pushes the pace and looks for the primary option — a pass to player 2 on the ball-side wing. If player 4 is open on the weak-side wing, that is the secondary option. The goal is a 4v2 or 3v2 numbers advantage in the frontcourt.
Step 8 — Attack the Basket. With a numbers advantage established, the play finishes as a transition attack. Player 2 drives baseline toward the basket. Player 3 cuts from the corner to the low post. Player 5 fills the high post/elbow. Player 4 holds the weak-side wing for a kick-out three-point opportunity. Player 1 trails for a mid-range pull-up or a reset if the initial attack is stopped.

Diagram 3 — Phase 2: The press is broken. Player 1 has the ball at mid-court. Option A (primary) is a pass to player 2 on the wing; Option B (secondary) is a skip pass to player 4. A 4v2 numbers advantage zone is highlighted in the frontcourt.
Key Coaching Points
1. Sprint to Position Before the Press Sets. The single most important habit in press breaking is early positioning. Players 3 and 4 must be moving toward their mid-court spots the moment the ball goes through the basket — not after the referee hands the ball to the inbounder. Coaches should drill this as a conditioned response: basket scored = sprint to position.
2. The Inbounder is a Weapon, Not a Spectator. Too many teams leave player 5 standing at the baseline after the inbound pass. In the Diamond Break, player 5 becomes an active player the instant the ball is released. Their sprint up the weak side creates a 5v4 situation in the backcourt and is often the pass that breaks the press wide open.
3. Read the Gaps, Not the Defenders. Teach player 1 to look through the press for open space, not to fixate on individual defenders. The press creates gaps — the job of the ball-handler is to find those gaps with their eyes before their feet. A simple coaching cue: "Look long first, then short." Check players 3 and 4 in the frontcourt before committing to a short outlet.
4. Never Pick Up the Dribble Under Pressure. A live dribble gives the ball-handler options. The moment the dribble is picked up in the backcourt against a press, the offence is in serious trouble. Drill this relentlessly: if a trap forms, keep dribbling and pivot to find an outlet. Only stop the dribble when a pass is ready to be made.
5. Attack the Numbers Advantage Decisively. Once the press is broken and a numbers advantage exists, players must attack with conviction. Hesitation allows the press to recover. Coaches should set a clear rule: if you have a 2v1 or 3v2, you have 2 seconds to get a shot or a layup. No resetting, no holding the ball.
6. Spacing is Everything. The Diamond Break lives and dies by spacing. If players 1 and 2 are too close together, one defender can cover both. If players 3 and 4 are not wide enough in the frontcourt, the defence can recover. Emphasise court width — players 3 and 4 should be within 1–2m of the sideline in their frontcourt positions.
Common Mistakes
Mistake 1 — Players Bunching in the Backcourt. The most common error is players drifting toward the ball, collapsing the spacing and making it easy for the press to trap. Correct this by physically marking player positions on the court with cones during practice and insisting players hold their spots until their cut is triggered.
Mistake 2 — Inbounder Freezing After the Pass. Player 5 often completes the inbound pass and stands still, watching the play develop. This is a critical error that leaves the team a player short. Use a verbal cue — "Go!" — that player 5 calls out themselves as they release the pass, triggering their own sprint inbounds.
Mistake 3 — Picking Up the Dribble in Traffic. Player 1 picking up the dribble when trapped is a game-stopper. Drill the response: if trapped, keep dribbling, spin away from pressure, and find player 5 on the weak side. Run a dedicated "trap escape" drill where player 1 is deliberately trapped and must find an outlet without stopping the dribble.
Mistake 4 — Not Sprinting Hard Enough to Frontcourt. Players 3 and 4 jogging rather than sprinting to their frontcourt positions defeats the purpose of the play. The threat of a long pass to a sprinting player 3 or 4 is what stretches the press and creates the gaps that player 1 exploits. Time players 3 and 4 in practice — they should reach the frontcourt corner within 3 seconds of the inbound signal.
Mistake 5 — Failing to Finish the Numbers Advantage. Breaking the press and then resetting in the half-court is a wasted opportunity. Coaches must train players to be aggressive finishers in transition. If the numbers advantage is there, the play is not over until a shot is taken. Use a "finish the break" rule in practice: any time the press is broken in a drill, the play must end with a shot attempt within 4 seconds.
Variations & Progressions

Variation 1 — "Diamond Long" (Long-Pass Option). In this variation, player 5 looks for a direct long inbound pass to player 3 or 4 if their defender has cheated up to deny the short outlets. Player 3 and 4 must read the defender's position and signal with a raised fist if they are open for the long pass. This is a high-risk, high-reward option that should only be used when the defender has clearly overplayed the short pass.
Variation 2 — "Diamond Reverse" (Weak-Side Inbound). If the ball-side is completely denied, player 5 pivots and looks to player 2 on the weak side as the primary inbound target. Player 1 then becomes the cutter, crossing from ball-side to weak-side to receive the second pass. This variation is useful against presses that overload the ball-side.
Progression 1 — Add a Trap Defender. Once the base play is running smoothly, add a sixth player as a designated trapper who can double-team player 1 at any point after the inbound. This forces player 1 to practice reading and escaping traps in a live environment and sharpens the decision-making of all five players.
Progression 2 — Live 5v5 Full-Court Press Scrimmage. The ultimate progression is a full 5v5 scrimmage where the defensive team must apply full-court pressure on every possession. The offensive team runs the Diamond Break on every inbound. Score extra points for breaking the press and converting a layup or a shot within 4 seconds of crossing half-court. This builds game-speed decision-making and competitive intensity.
Age Adaptations

| Age Group | Key Adaptations |
|---|---|
| Under 10 | Use a half-court version only. Reduce to 3 players (1, 2, 5). Focus solely on the inbound pass and one outlet pass. No sprint requirements — walk through positions first. |
| Under 12 | Use a shortened court (20m). Introduce players 3 and 4 but allow them to start at the half-court line rather than sprinting from the baseline. Emphasise spacing with cones. |
| Under 14 | Run the full play but allow player 1 to stop the dribble and reset if needed. Focus on the inbound sequence and the outlet cut. Introduce the "Diamond Long" variation once the base is solid. |
| Under 16 | Full play as described. Add the trap progression. Begin timing the break and setting targets (e.g., cross half-court in under 4 seconds). Introduce game-situation decision-making. |
| Open / Senior | Full play with all variations and progressions. Emphasise reading the press type (man vs. zone) and adjusting accordingly. Run at full game speed with competitive scoring rules. |