The 'Crash and Wide' First Phase Strike: Unleashing Your Backs
A highly effective first-phase set play designed to manipulate the defensive line, creating space out wide by committing interior defenders with hard decoy lines.
Equipment Needed
1. Overview
The "Crash and Wide" first-phase strike is a highly effective attacking set play designed to manipulate the defensive line directly from a stable set piece, such as a scrum or a lineout. In modern rugby, defenses are incredibly well-organized and quick to drift wide. To counter this, attacking teams must create genuine threats in the midfield to "fix" or hold the interior defenders.
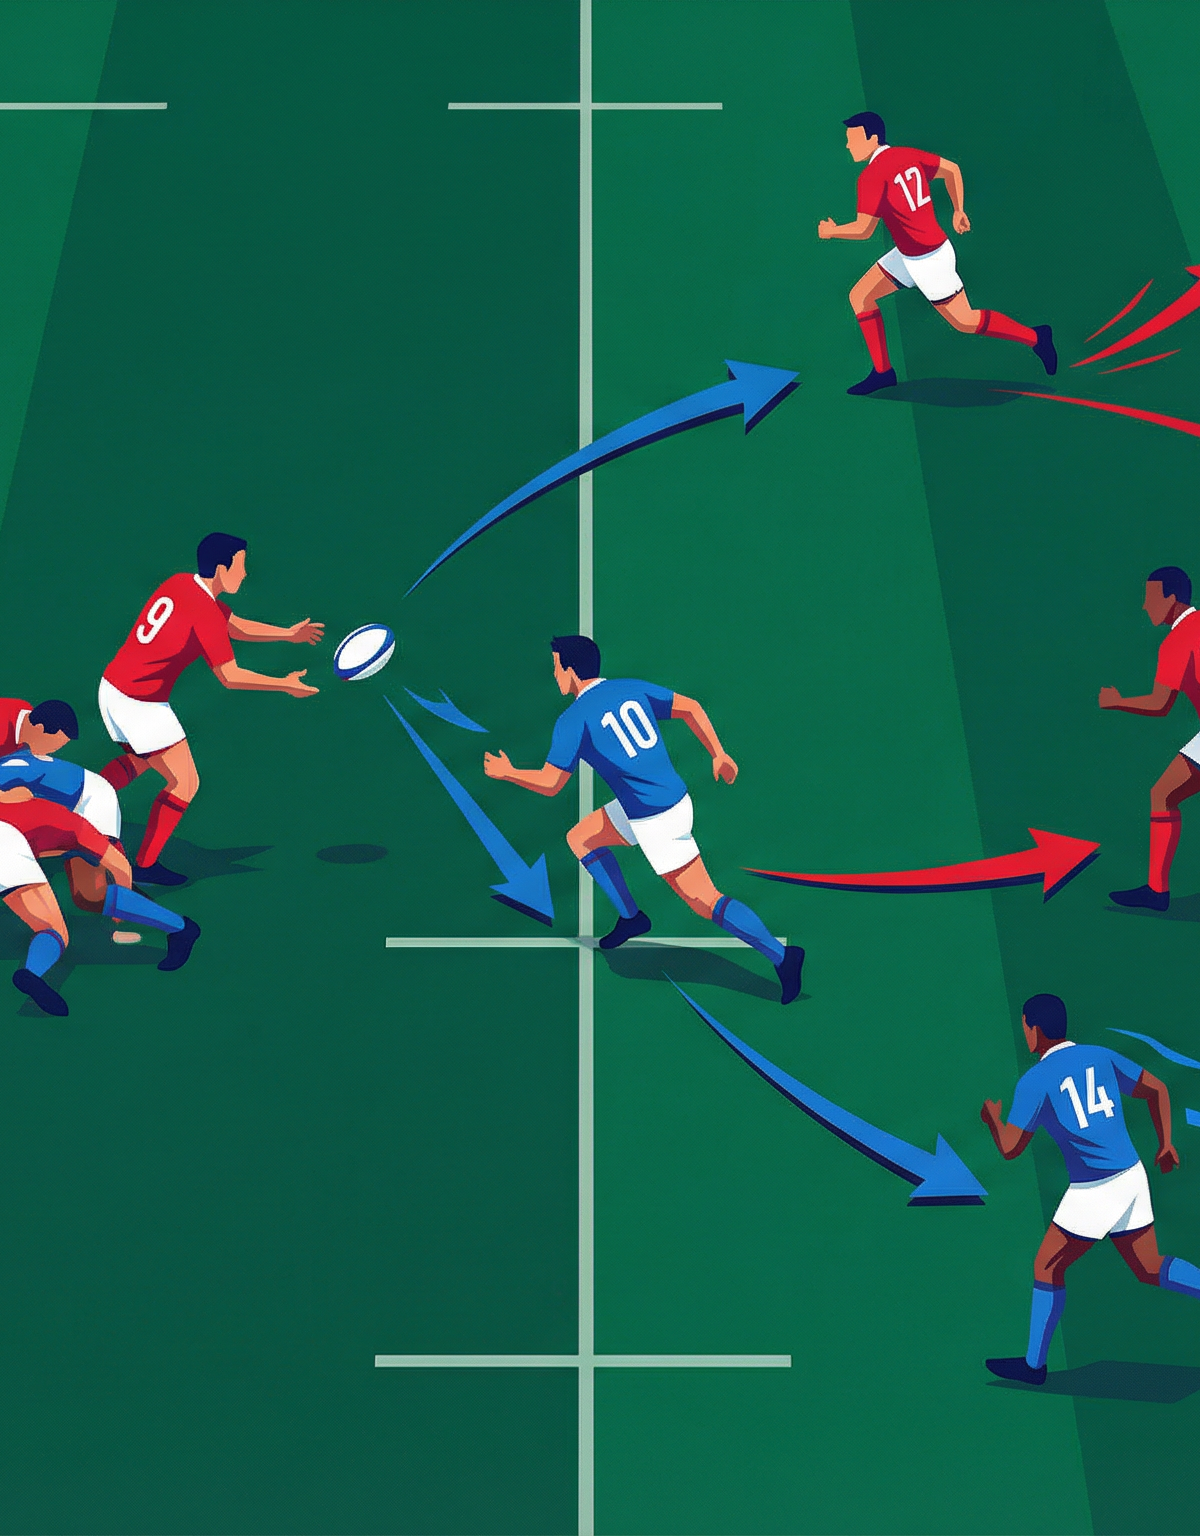
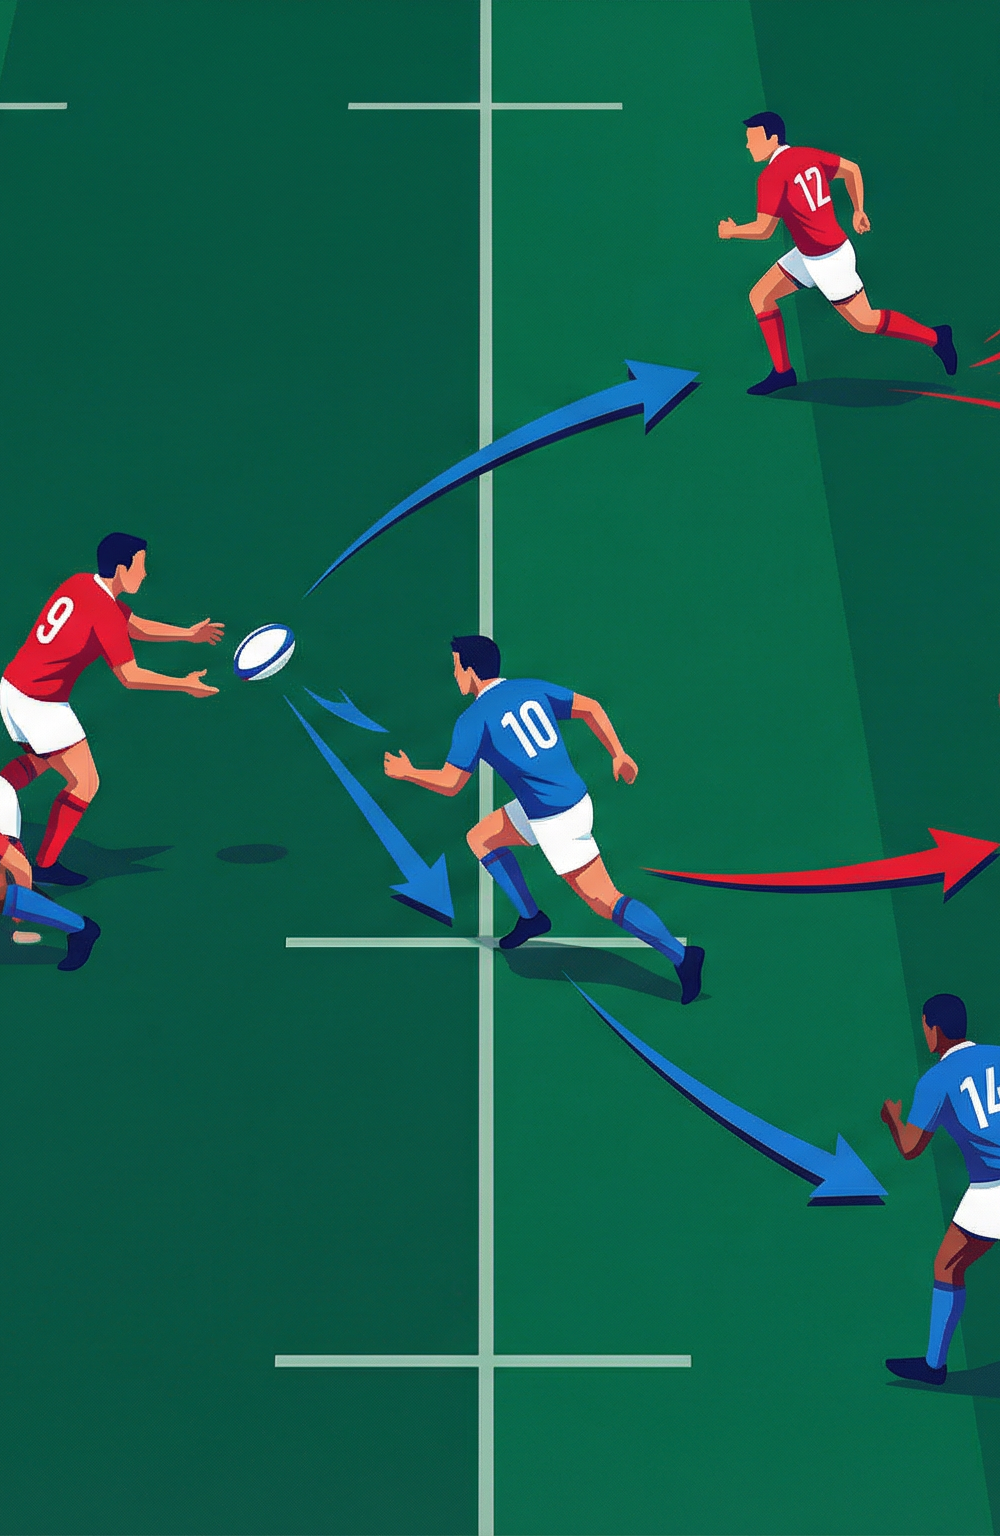
This play utilizes a hard, aggressive decoy run from the inside centre (12) to draw the attention of the opposition's fly-half and inside centre. By committing these key defenders, space is naturally created further out wide. The fly-half (10) plays a pivotal role, taking the ball to the line before executing a precise pass behind the decoy runner to the outside centre (13) or a sweeping fullback (15). When executed with perfect timing and depth, this move consistently breaks the gain line and creates overlap opportunities on the flanks, making it a staple for any ambitious backline.
2. Setup

To effectively run this set play in a coaching session, you will need the following setup:
Equipment Needed:
- 3-4 Rugby balls (to keep the drill flowing without delays)
- 10-15 Cones (for marking starting positions, the gain line, and defensive alignment)
- Bibs (optional, to differentiate attackers and live defenders later in the session)
Pitch Setup:
- Utilize a standard 100m x 70m rugby pitch.
- Mark a clear "gain line" using cones across the width of the pitch.
- Set up a simulated scrum or lineout position on the 15-metre line, approximately 30 metres out from the try line. This gives the backs plenty of open side space to attack.
Player Positions:
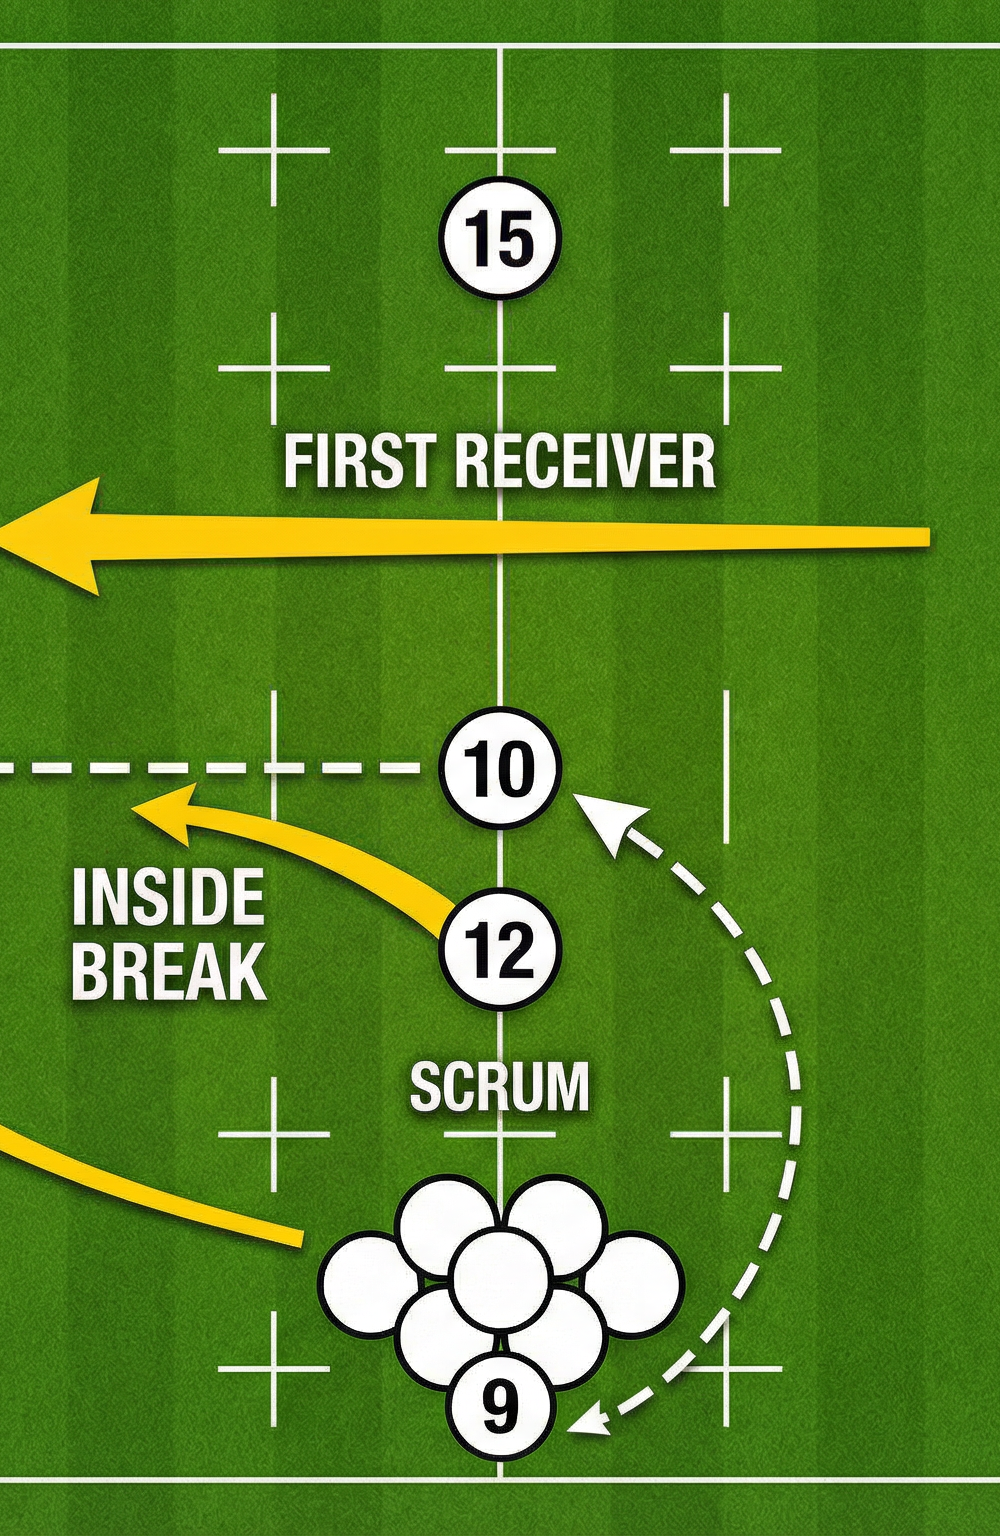
- 9 (Scrum-half): Positioned at the base of the simulated scrum or lineout.
- 10 (Fly-half): Standing 5-7 metres deep, aligned slightly wider than normal to encourage the defense to spread.
- 12 (Inside Centre): Positioned 2-3 metres outside the 10, but starting slightly flatter to hit the line at pace.
- 13 (Outside Centre): Positioned 3-4 metres outside the 12, starting deep to allow for adjustment and acceleration.
- 11 (Left Wing) & 14 (Right Wing): Holding width on their respective touchlines.
- 15 (Fullback): Positioned 15 metres deep, ready to inject pace into the line as the extra man.
3. Step-by-Step Instructions

Follow these precise steps to execute the "Crash and Wide" move:
Step 1: The Delivery
The scrum-half (9) clears the ball rapidly from the base of the set piece with a crisp, spinning pass directly to the fly-half (10). The pass must be out in front of the 10, allowing them to take the ball on the sprint rather than standing still.
Step 2: Squaring Up
As the 10 receives the ball, they must immediately square their shoulders toward the opposition's try line. Running a hard, straight line for 2-3 steps is crucial. This action forces the opposing 10 and 12 to plant their feet and respect the immediate running threat, preventing them from drifting early.
Step 3: The Decoy Line
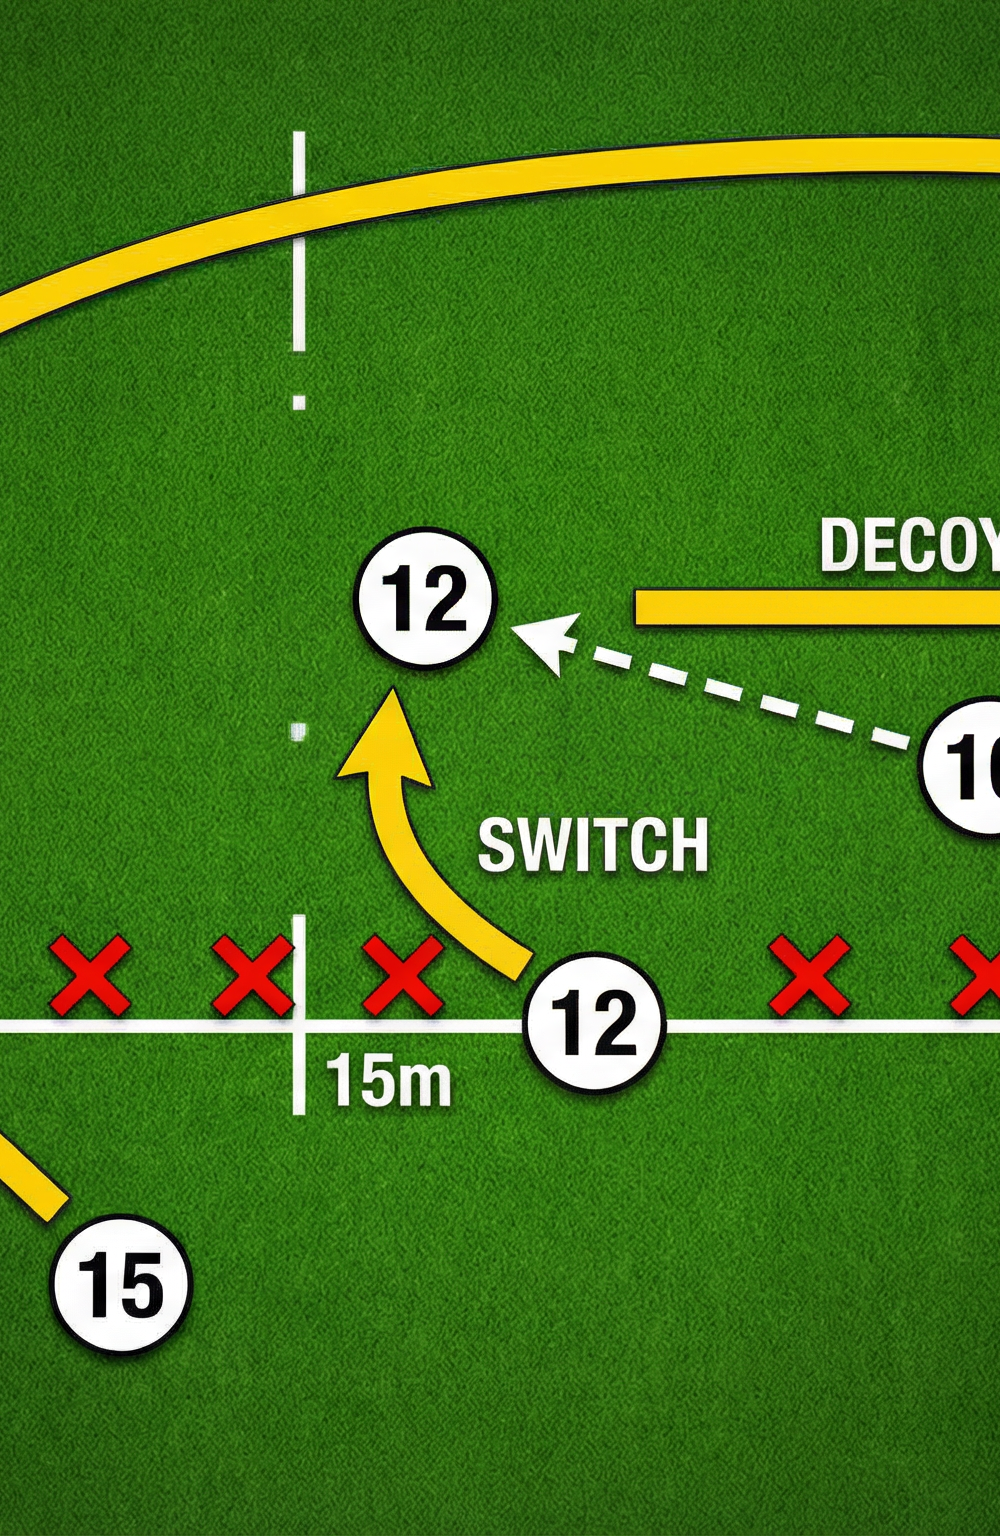
Simultaneously, the inside centre (12) accelerates on a hard "crash" or "switch" line, aiming for the inside shoulder of the opposing 12. The 12 must call for the ball loudly and genuinely expect to receive it. Their body language must sell the deception.
Step 4: The Pull-Back Pass
Just before making contact with the defensive line, the 10 executes a pull-back pass (often a pop or a short sweeping pass) behind the decoy run of the 12. The pass is directed to the outside centre (13), who has held their depth and is now accelerating into the space created by the decoy.
Step 5: The Extra Man Injection
As the 13 receives the ball, the fullback (15) sweeps around from deep, injecting themselves into the line at maximum pace outside the 13. The 13 now has the option to carry, step inside a drifting defender, or pass to the 15, creating a 2-on-1 against the opposition winger.
Step 6: Finishing the Move
The 15 draws the final defender and executes a simple draw-and-pass to the winger (14) on the touchline to finish the play and score.
4. Key Coaching Points
To ensure this set play is successful on match day, focus on these critical coaching points during practice:
- Timing of the Decoy: The inside centre (12) must hit the gain line exactly as the fly-half (10) makes the pass. If 12 is too early, the defense will ignore them; if too late, the pass will be intercepted or the 10 will be tackled.
- Squaring the Shoulders: The 10 must attack the line squarely. Drifting sideways before passing simply pushes the defense across the pitch and kills the space for the outside backs.
- Depth is Non-Negotiable: The 13 and 15 must start deep. It is impossible to accelerate onto a flat pass. Starting deep allows them to read the play, adjust their lines, and hit the ball at top speed.
- Selling the Dummy: The decoy runner (12) must run with intent, hands up, calling for the ball. They must brace for contact, as a good defense will tackle the decoy anyway.
5. Common Mistakes

Watch out for these frequent errors and correct them immediately:
- The 10 Drifting: If the fly-half runs laterally toward the touchline, it makes it incredibly easy for the defense to slide. Correction: Place a channel of cones the 10 must run through straight ahead.
- Flat Alignment: Backs lining up too flat will result in static catches and lost momentum. Correction: Force players to start 2 metres deeper than they think they need to.
- Quiet Decoys: A decoy runner who silently jogs their line will not attract any defenders. Correction: Demand loud, aggressive communication from the 12.
- Forcing the Pass: Sometimes the defense reads the play perfectly. If the 10 sees the pass to 13 is covered, they must be prepared to take the tackle or hit the 12 with a short ball. Correction: Encourage decision-making over robotic execution.
6. Variations & Progressions

Once the team has mastered the basic movement, introduce these variations to keep the defense guessing:
Progressions:
- Add Passive Defenders: Introduce coaches or reserve players holding tackle shields to act as a passive defensive line.
- Live Defense: Progress to full-contact, live defense. Start with the defense at 50% speed, building up to match intensity.
- The "Hit" Option: Give the 10 the green light to actually pass to the 12 if the opposing fly-half drifts too early, turning the decoy into a genuine crash ball.
Variations:
- Lineout Strike: Run the exact same shape off a lineout. The 10 will have slightly less time, so the 9's pass must be exceptionally fast and accurate.
- Blindside Winger Injection: Instead of the fullback (15) sweeping around, have the blindside winger (11) run the extra man line. This allows the 15 to stay deep for defensive cover in case of a turnover.
7. Age Adaptations

This set play can be adapted for various age groups and skill levels:
- Under 10s / Minis: Focus purely on the 9-10-12 passing sequence. Introduce the concept of running straight and passing backward. Omit the complex pull-back pass and simply have 12 pass to 13.
- Under 12s - Under 14s: Introduce the decoy run. Focus heavily on the timing between 10 and 12. Use touch rugby to practice the spatial awareness without the fear of heavy collisions.
- Under 16s to Open Grade: Execute the full play with all moving parts. Emphasize the speed of the fullback's (15) injection and the precise execution of the pull-back pass under intense defensive pressure.