Foundation Footwork: Mastering the Batting Stance and Weight Transfer
Build the technical foundation every batsman needs — correct stance alignment, balanced weight distribution, and decisive front and back foot movement that creates time against any bowling attack.

Equipment Needed
Overview
The batting stance is the single most important technical element a batsman can develop. Every shot in cricket — from the cover drive to the pull — originates from the quality of the initial stance and the decisiveness of the first foot movement. This drill isolates those two elements and trains them under deliberate, coach-controlled conditions before any live ball is introduced.
Use this drill at the start of any batting session as a technical warm-up, or dedicate a full 30-minute block to it when introducing new batsmen to the game or correcting ingrained technical faults. It is equally effective for junior players learning the basics and senior club players who have developed lazy habits over time. The drill runs across three stations, allowing groups of up to 12 players to work simultaneously while the coach circulates and gives individual feedback.
Setup


Equipment Required
| Item | Quantity | Notes |
|---|---|---|
| Cricket bat (age-appropriate) | 1 per batsman | Harrow or full-size depending on age |
| Cricket stumps (or cone stumps) | 2 sets | One set per live-feed station |
| Tennis balls or incrediball | 12–18 | Safer for beginners and indoor use |
| Flat cones (orange) | 12 | Footwork ladder markers at Station 3 |
| Batting gloves and pads | 1 set per batsman | Full protective gear at Station 1 |
| Coach clipboard and checklist | 1 | For recording individual technical notes |
Pitch and Field Setup
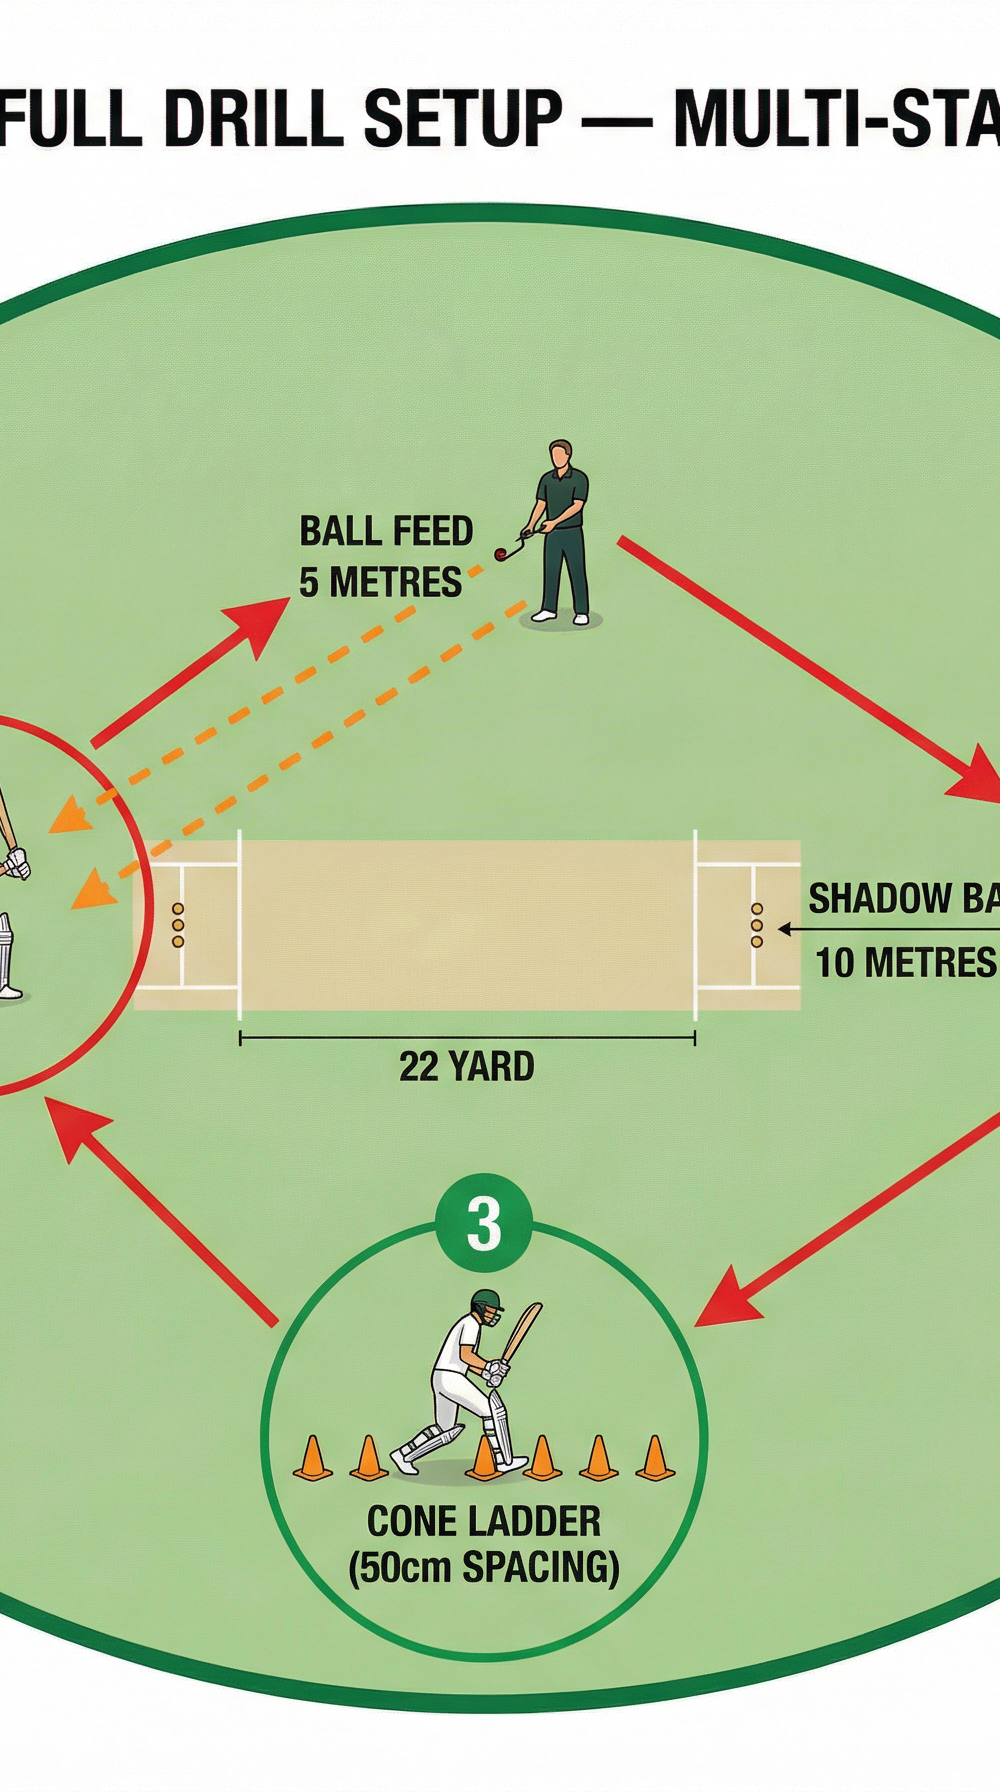
This drill operates on a standard 22-yard (20.1 m) cricket pitch within an oval ground. Set up three stations as shown in Diagram 3:
- Station 1 (Live Feed): At the batting crease of the main pitch. The coach or feeder stands 5 metres in front of the batsman and underarms or drop-feeds balls to a full or short-of-a-length landing zone. The batsman wears full protective equipment.
- Station 2 (Shadow Batting): 10 metres to the side of the pitch on the outfield. No ball is used. The batsman performs shadow footwork movements called by a second coach or a player leader.
- Station 3 (Cone Ladder): At the boundary edge or on a flat grass area. Six orange cones are placed in a straight line, 50 cm apart, simulating the lateral and forward foot placement required in batting footwork.
Step-by-Step Instructions


Phase 1 — Establishing the Correct Stance (5 minutes)
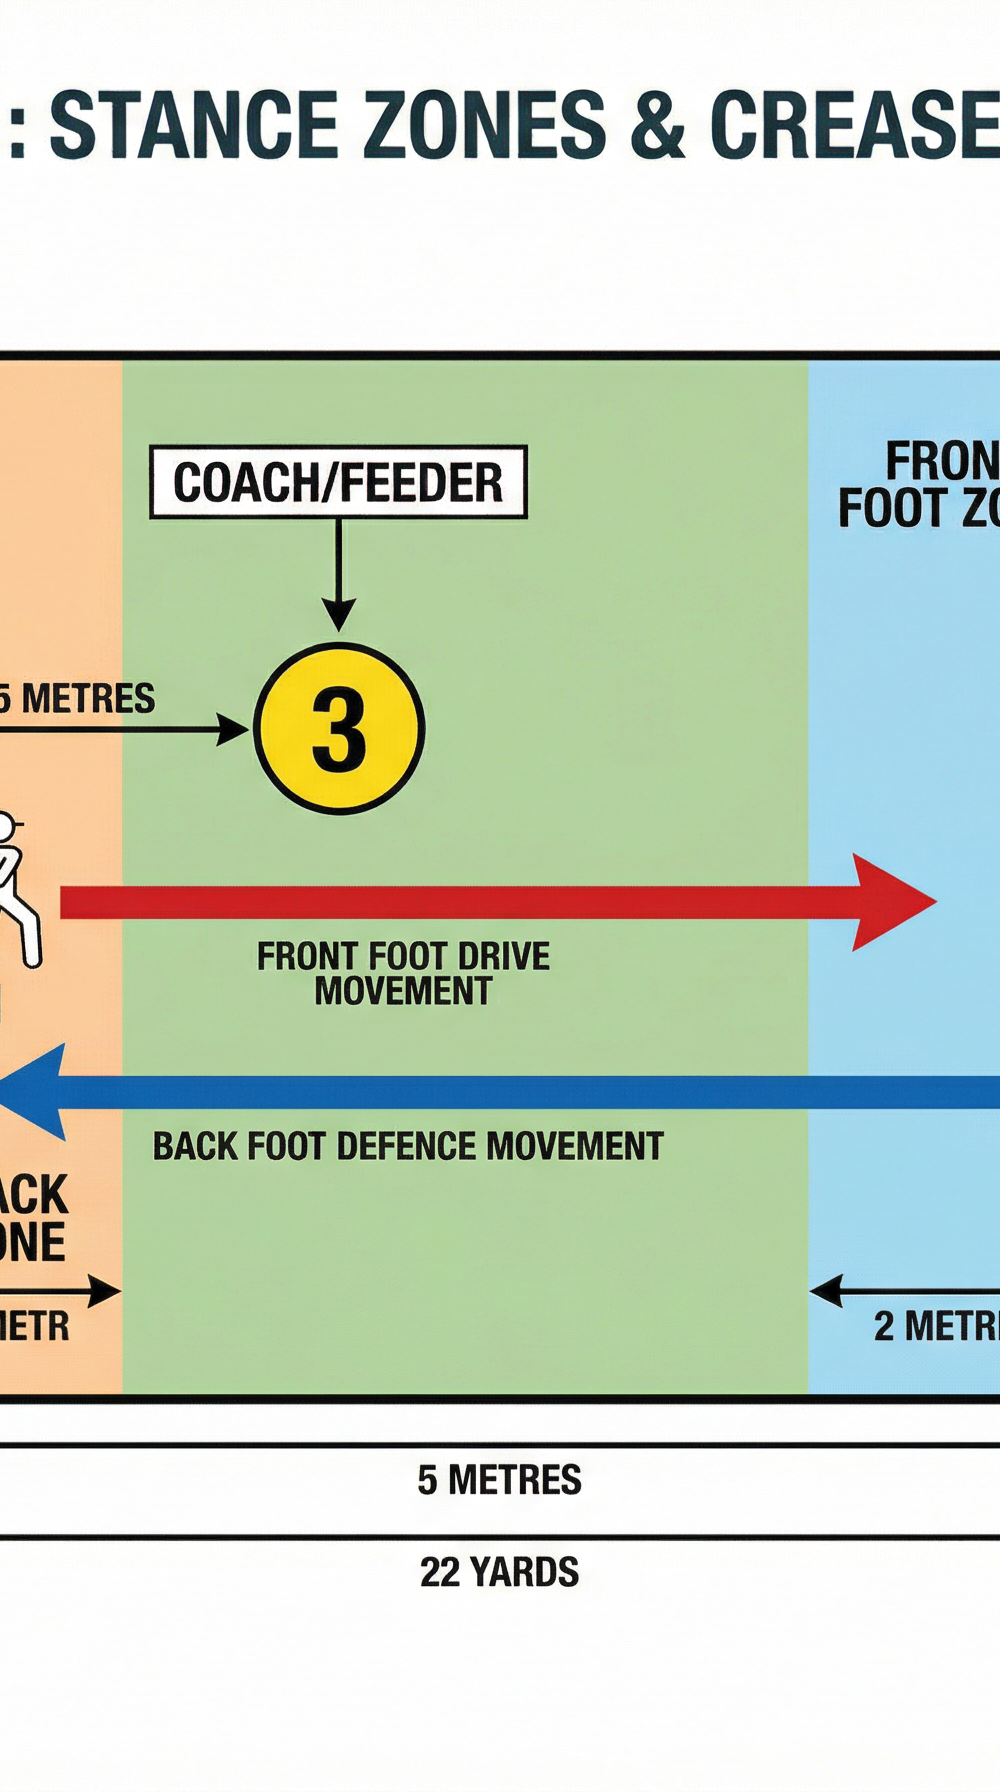
- Position the batsman at the crease. The batsman stands side-on to the coach/feeder, with feet shoulder-width apart (approximately 40–45 cm between heels). The front foot (left foot for a right-hander) points toward mid-on; the back foot runs parallel to the crease.
- Check the guard. The batsman taps the bat on the crease to take guard — typically middle stump or middle-and-leg. The bat face rests lightly on the ground between the feet, with the toe of the bat pointing toward mid-off.
- Set the weight distribution. Weight should be slightly forward — approximately 55% on the front foot, 45% on the back foot. The knees are flexed (not locked), the hips are relaxed, and the head is level with eyes parallel to the ground.
- Check the head position. The chin should be tucked slightly toward the front shoulder. Eyes must be level — a tilted head is one of the most common causes of misjudging line and length.
- Set the backlift. The bat is lifted back toward second slip (not straight up and not toward fine leg), with the face of the bat angled slightly toward the sky. The top hand controls the backlift; the bottom hand is relaxed.
- Hold for 10 seconds. Ask the batsman to hold the stance position while the coach checks each of the five points above. Provide one piece of feedback at a time — do not overwhelm with corrections.
Phase 2 — Front Foot Movement (8 minutes)
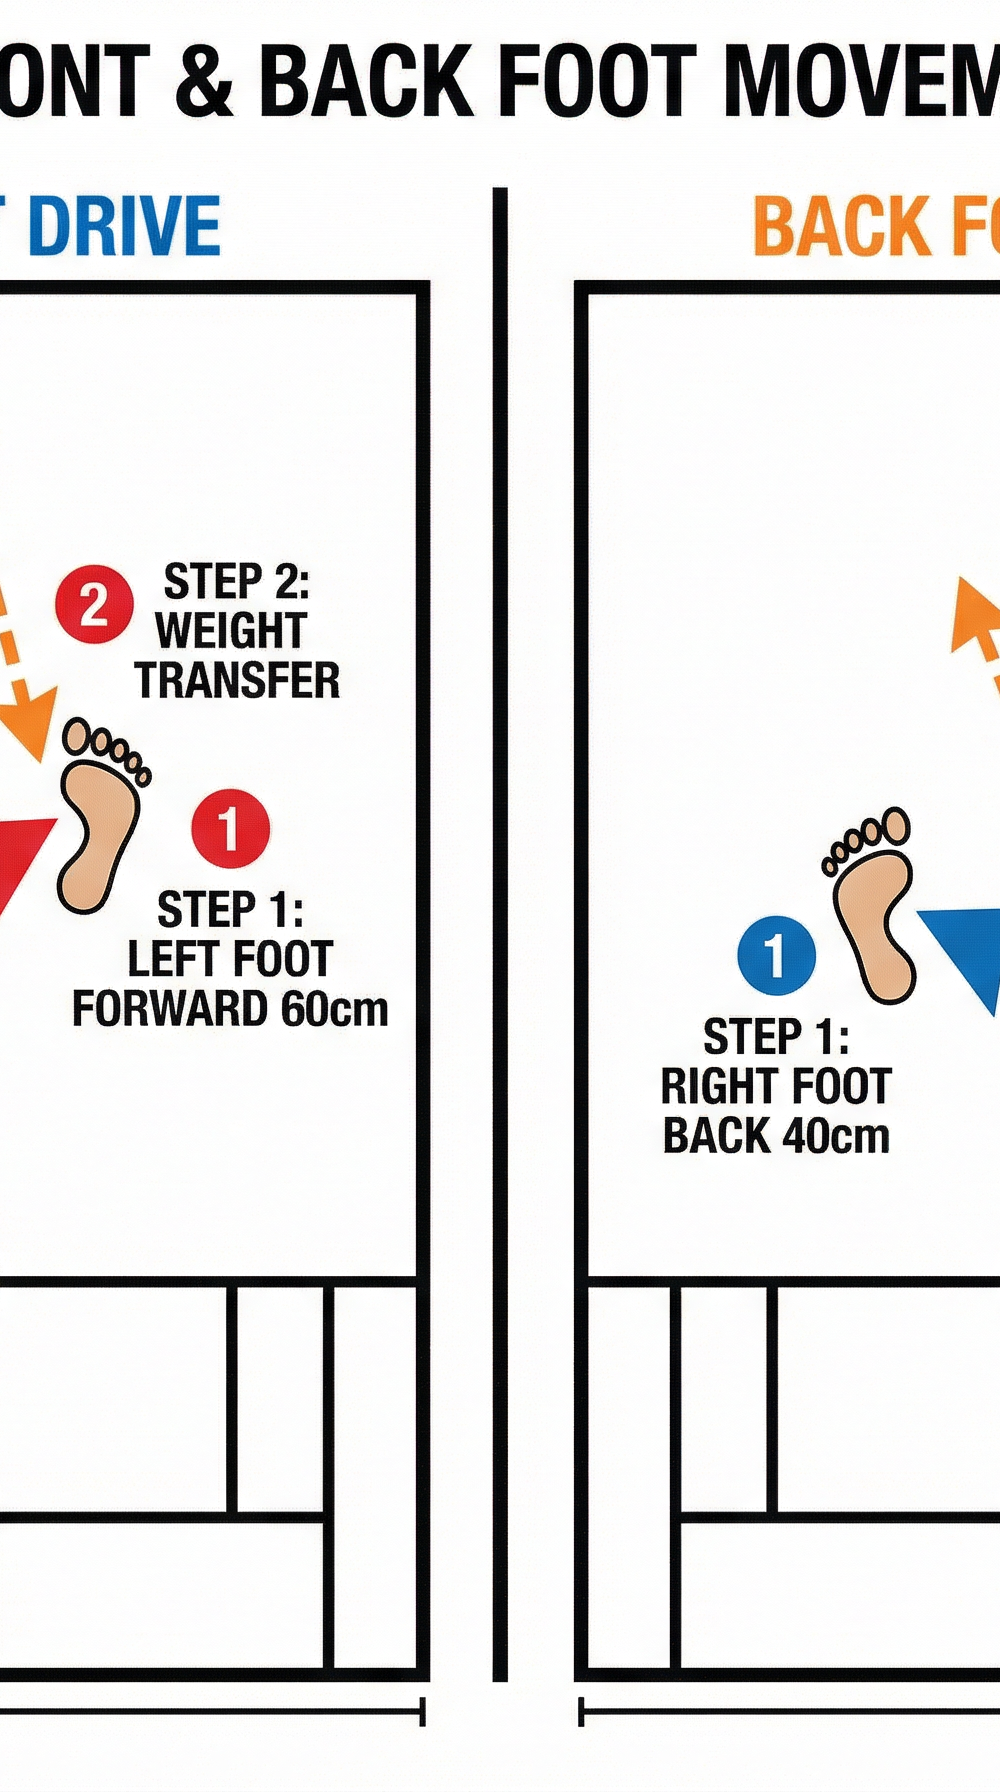
- Call "FULL." The coach calls "full" to signal a full-length delivery. The batsman initiates the front foot stride: the left foot steps forward and across approximately 50–60 cm toward the pitch of the ball, landing with the toe pointing toward mid-off.
- Transfer weight. As the front foot lands, weight transfers fully forward over the front knee. The front knee bends to absorb the movement. The back heel rises naturally off the ground.
- Bat swing. The bat swings down from the backlift position in a straight path, with the face of the bat meeting an imaginary ball at the point of the front foot landing. The head remains over the front knee.
- Reset and repeat. The batsman returns to the starting stance position and repeats the movement 10 times. The coach observes from the side (on-side) to check head position and weight transfer.
Phase 3 — Back Foot Movement (8 minutes)
- Call "SHORT." The coach calls "short" to signal a short-pitched delivery. The batsman initiates the back foot movement: the right foot steps back and across approximately 30–40 cm toward the off stump, landing parallel to the crease.
- Get tall. As the back foot lands, the batsman stands tall and upright, transferring weight onto the back foot. The head stays level and still. The front foot stays grounded — do not allow it to lift.
- Bat position. The bat is held high, with the elbow up, ready to play off the back foot. The batsman watches the imaginary ball from a high, commanding position.
- Repeat 10 times. Alternate between "FULL" and "SHORT" calls to train decision-making and reactive footwork.
Phase 4 — Live Feed Integration (9 minutes)
- Introduce the ball. The coach drop-feeds or underarms balls from 5 metres. The batsman reads the length and commits to either a front foot or back foot response — no half-measures.
- Rotate stations. After every 8–10 balls, rotate players through Stations 1, 2, and 3 as shown in Diagram 3. Each player completes all three stations before the drill concludes.
Key Coaching Points

1. Head position is everything. A still, level head is the foundation of good batting. If the head falls to the off side or tilts, the batsman's entire weight distribution is compromised before the ball is even bowled. Check this first, every time.
2. Commit to the movement — no half-steps. The most common fault in junior and club cricket is the half-hearted foot movement that leaves the batsman stranded between front and back foot. Demand decisive, full movements in every repetition. A wrong but committed foot movement is easier to correct than a hesitant one.
3. The front foot stride goes ACROSS, not just forward. The front foot must move toward the pitch of the ball — diagonally across the crease — not straight down the pitch. This brings the head and eyes into line with the ball and allows the bat to swing in a straight path.
4. Back foot goes BACK AND ACROSS toward off stump. The back foot movement is not simply backward — it moves toward the off stump, which opens the body up and creates room to play off the back foot. A batsman who steps straight back will be cramped and unable to play through the off side.
5. Top hand controls the bat; bottom hand provides power. During the stance and backlift phase, the top hand (left hand for right-handers) should be firm and in control. The bottom hand should be relaxed. Many beginners grip too hard with the bottom hand, which restricts the backlift and causes the bat to swing across the line.
6. Watch the ball from the bowler's hand. Even in a drill context, train the habit of watching the ball early. Ask batsmen to call out "FULL" or "SHORT" as soon as they pick up the length from the coach's hand — this trains early ball-watching that transfers directly to match play.
Common Mistakes
Mistake 1 — Standing too upright with locked knees. A rigid, upright stance makes it impossible to move quickly in either direction. The knees must be flexed. Cue: "Imagine you are sitting on a bar stool — not standing, not sitting, somewhere in between."
Mistake 2 — Falling across to the off side. Many batsmen, particularly those who have faced a lot of swing bowling, develop a habit of falling toward the off side in their stance. This leaves the leg stump exposed and causes them to play across the line. Cue: "Keep your nose over the middle stump."
Mistake 3 — Lifting the front foot before moving the back foot. When playing back, some batsmen instinctively lift the front foot first, which shifts weight forward at exactly the wrong moment. The back foot must move first and independently. Cue: "Back foot first — always."
Mistake 4 — A closed or straight backlift. A backlift that goes straight up (toward mid-on) or is closed (face pointing toward the ground) forces the bat to come down at an angle, causing edges and mistimed shots. Cue: "Point the face of the bat toward the sky as you lift — like you are showing the bat face to the scoreboard."
Mistake 5 — Not resetting between repetitions. In drill conditions, batsmen often rush to the next repetition without fully resetting their stance. This builds sloppy habits. Insist on a full, deliberate reset between every repetition.
Variations and Progressions
Variation 1 — Coloured Ball Length Zones. Place two coloured cones or tape markers on the pitch: one at the full-length zone (approximately 6–7 metres from the batsman) and one at the short-of-a-length zone (approximately 4–5 metres). The coach feeds to one of the two zones and the batsman must identify the length visually and respond with the correct foot movement. This removes the verbal cue and trains genuine length reading.
Variation 2 — Eyes Closed Stance Check. Ask the batsman to close their eyes, adopt their stance from memory, and then open their eyes. The coach checks the position against the five-point checklist. This builds proprioceptive awareness of what a correct stance feels like — essential for self-correction during a match.
Progression 1 — Live Bowling from Full Length (15 metres). Once the batsman demonstrates consistent footwork in the drop-feed phase, progress to live bowling from the bowling crease (22 yards / 20.1 m). The additional pace and bounce requires faster decision-making and tests whether the footwork patterns have been truly internalised.
Progression 2 — Consecutive Stroke Play. The coach feeds 6 consecutive balls alternating randomly between full and short lengths. The batsman must respond correctly to each without a reset pause. This simulates the demands of an actual over and tests the automaticity of the footwork patterns under mild pressure.
Age Adaptations

| Age Group | Key Modifications |
|---|---|
| Under 8 / Under 10 | Use a tee or stationary ball. Focus only on stance and front foot movement. Remove back foot work entirely until the front foot pattern is stable. Use a junior bat (size 1–3). Shorten the pitch to 12–14 yards for any live feed work. |
| Under 12 / Under 14 | Introduce both front and back foot movements but keep the feed slow (underarm or soft toss from 5 m). Emphasise the "back and across" back foot movement as this is the age at which pace bowling begins to increase. Use incrediball or tennis ball to reduce fear of the ball. |
| Under 16 / Open Age | Run the full drill as described. Add the live bowling progression at full pace. Introduce video analysis — film the batsman from the side and front and review stance and footwork against the five-point checklist together. Challenge senior players to self-coach using the checklist during Station 2 shadow work. |