Wicket-Keeping Agility Drill: The Lateral Shuffle & Multi-Zone Take
A progressive, high-intensity wicket-keeping drill that builds explosive lateral movement, soft hands, and match-ready reflexes through structured cone work and multi-zone ball feeds.
Equipment Needed
Overview
The Lateral Shuffle & Multi-Zone Take is a foundational agility drill designed specifically for wicket-keepers at all levels of the game. Its primary purpose is to develop the explosive lateral movement, balanced body position, and reliable glove work that separates a competent keeper from an exceptional one. Unlike static catching drills, this exercise replicates the unpredictable demands of a real innings — where a keeper must respond instantly to deliveries that deviate off the pitch, swing late, or arrive at varying heights.
This drill is most effective when used in the first 20 minutes of a fielding session, after a thorough warm-up, when the keeper's body is primed but not yet fatigued. It is equally valuable as a standalone skill session of 25–30 minutes. Coaches working with keepers who are transitioning from junior to senior cricket will find this drill particularly useful for bridging the gap between controlled practice and match-intensity demands.
Setup

Equipment Required
| Item | Quantity | Notes |
|---|---|---|
| Cricket stumps & bails | 1 full set | Regulation height: 28 inches (71.1 cm) |
| Wicket-keeping gloves | 1 pair | Match-grade or training gloves |
| Wicket-keeping pads | 1 pair | Full-length pads |
| Cricket balls | 8–12 | Mix of new and used balls recommended |
| Agility cones (orange) | 4 | Placed in lateral arc behind stumps |
| Flat marker discs | 6 | For multi-zone progression |
| Coach/feeder mitt or throw-down bat | 1 | Optional but recommended for accuracy |
| Measuring tape | 1 | For precise cone placement |
Pitch & Field Setup
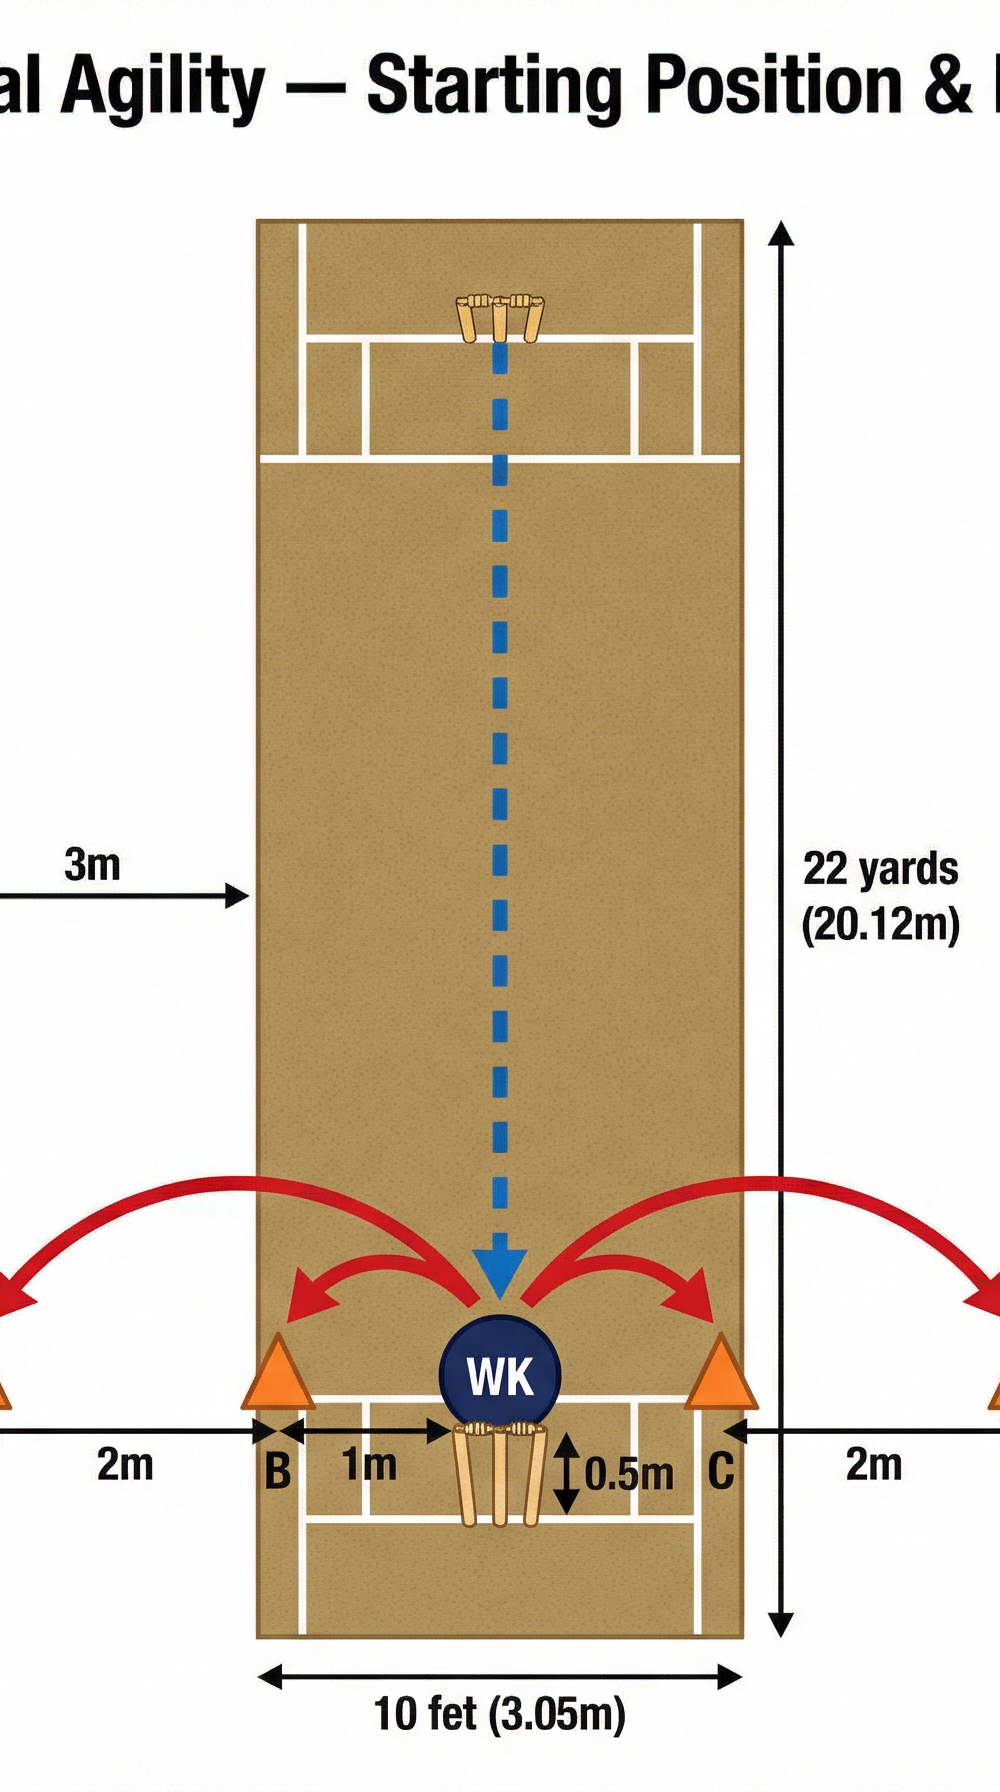
This drill is conducted at one end of a standard 22-yard (20.12 m) cricket pitch. The keeper sets up in their normal stance 0.5 m directly behind the stumps at the batting end. Four orange cones are placed in a horizontal arc 1.5 m behind the stumps (i.e., 1 m behind the keeper's starting position), at the following lateral distances from the centre stump:
- Cone A: 2 m to the leg side
- Cone B: 1 m to the leg side
- Cone C: 1 m to the off side
- Cone D: 2 m to the off side
The coach or feeder stands at the bowling crease (approximately 5 m in front of the keeper) or at the top of the pitch for full-length deliveries, depending on the phase of the drill.
Diagram 1 shows the starting position of the wicket-keeper (WK) relative to the stumps, the four cone positions (A–D), and the lateral shuffle movement pattern. Dashed blue arrow indicates ball path from bowler/feeder.
Step-by-Step Instructions

Phase 1 — Lateral Cone Shuffle (10 minutes)
- The keeper adopts their ready stance behind the stumps: feet shoulder-width apart, weight on the balls of the feet, hips low, gloves resting just above the ground between the legs, eyes level and focused on the feeder's hand.
- The coach calls out a cone letter — "A", "B", "C", or "D" — or points to a cone without verbal cue (to train visual reaction).
- The keeper shuffles laterally using a side-step pattern (not a crossover run) to touch the nominated cone with their outside glove, maintaining a low body position throughout.
- Immediately upon touching the cone, the keeper returns to the centre behind the stumps and re-adopts the ready stance.
- The coach feeds a ball — underarm toss or rolled along the ground — to arrive at the stumps as the keeper returns to centre, forcing them to complete the take in motion.
- Run 10 repetitions per set, mixing cone calls randomly. Allow 60 seconds rest between sets. Complete 3 sets.
Phase 2 — Live Ball Feed with Cone Trigger (10 minutes)
- The coach now feeds the ball first, then immediately calls a cone. The keeper must complete the take cleanly, reset, and shuffle to the cone — simulating the recovery movement after a delivery.
- Vary the ball delivery: some balls should be aimed down the leg side, some straight, some wide off side, and some as bouncers (chest-high tosses).
- After each clean take, the keeper should verbally confirm the ball position — e.g., "Leg side, gloves together" — reinforcing match-day communication habits.
- Run 12 repetitions per set, 2 sets, with 90 seconds rest between sets.
Phase 3 — Multi-Zone Progression (10 minutes)
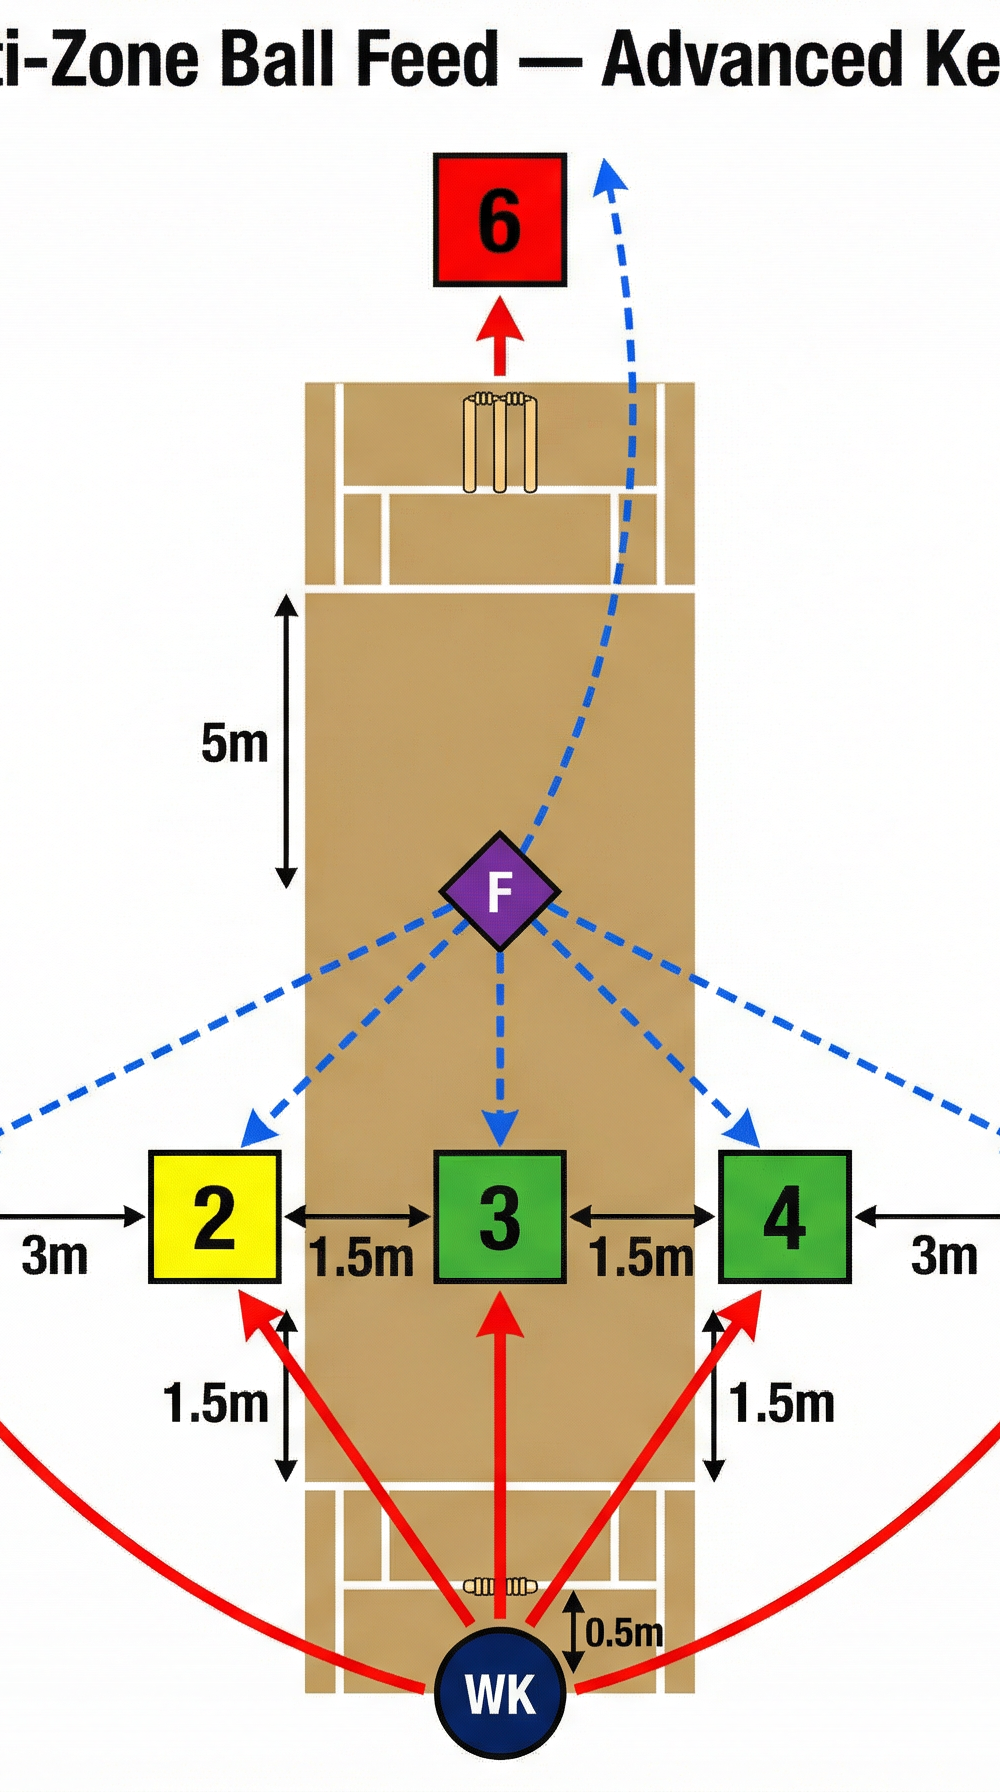
- Replace the four cones with six numbered flat marker discs as shown in Diagram 2. The feeder moves to a position 5 m in front of the keeper at mid-pitch.
- The feeder calls a zone number (1–6) and simultaneously delivers the ball to that zone. The keeper must move to the zone, complete the take, and return to centre.
- Zone 6 (high ball) requires the keeper to rise from their crouch and take the ball above head height — critical for stumping opportunities off full-pitched deliveries.
- For zones 1 and 5 (wide deliveries), the keeper is encouraged to dive and take one-handed if the ball is unreachable with a shuffle.
- Run 15 repetitions, mixing zones unpredictably. No rest between repetitions — this phase is designed to build conditioning alongside skill.

Diagram 2 shows the six-zone feed layout for the advanced progression. Zones 1 & 2 are leg-side (yellow = easier), Zones 3 & 4 are off-side (green = medium), Zone 5 is wide off-side (red = hard), and Zone 6 is a high ball (red = hard). The feeder (F) stands 5 m in front of the keeper.
Key Coaching Points

1. Maintain the Low Base Throughout Movement
The single most common fault in keeper agility is rising out of the crouch during lateral movement. Insist that the keeper's hips remain at the same height from start to finish of every shuffle. A useful cue: "Move under the bar, not over it." Place a horizontal pole or band at hip height if needed to enforce this.
2. Gloves Lead, Feet Follow
The keeper's hands should always arrive at the ball's location fractionally before the feet are fully planted. This "gloves-first" habit prevents the body from getting in front of the hands and causing fumbles. Cue: "Point your gloves at the ball before you stop moving."
3. Soft Hands on Every Take
Aggressive, rigid hands cause the ball to pop out of the gloves. Teach keepers to "give" with the ball on impact — allowing the hands to travel 5–10 cm back toward the body as the ball arrives. This is especially important on fast-moving deliveries from the feeder.
4. Eyes on the Ball, Not the Cone
During Phase 1, some keepers will glance at the cone during the shuffle and lose sight of the ball feed. Reinforce that the cone is found with peripheral vision and muscle memory — the eyes must track the ball from the feeder's hand to the gloves at all times.
5. Reset Stance Before Every Repetition
A keeper who does not fully reset between repetitions will develop sloppy habits that transfer directly into matches. After every take, the keeper must return to the centre, plant both feet, lower the hips, and confirm the ready position before the next feed. Build this reset into the drill's rhythm deliberately.
6. Communicate Every Ball
Encourage keepers to call the ball — "Mine!", "Keeper's!", or "Leg side!" — on every take. This builds the match-day habit of communicating with close fielders and helps the keeper commit decisively to each ball.
Common Mistakes

Mistake 1 — Crossing the Feet During Lateral Shuffle
Many keepers instinctively cross their feet when moving laterally, which creates a split-second moment of imbalance that makes clean glove work nearly impossible. Correct this immediately by demonstrating the proper side-step pattern and, if necessary, running the cone shuffle without a ball feed until the footwork is ingrained.
Mistake 2 — Standing Up Too Early
Keepers who anticipate a short-pitched delivery will rise from their crouch before the ball pitches, leaving them stranded for a fuller delivery. Emphasise that the keeper must read the length after the ball pitches, not before. Use a mix of full-length and short-pitched feeds in Phase 2 to train this patience.
Mistake 3 — Taking the Ball Across the Body
On leg-side deliveries, inexperienced keepers will attempt to take the ball with their right hand crossing the body rather than moving their feet to get behind the ball. This is a technique breakdown that leads to dropped catches and missed stumpings. The correction is simple but requires repetition: "Move your feet so the ball is in front of your body, not to the side of it."
Mistake 4 — Rushing the Return to Centre
In their eagerness to be ready for the next feed, some keepers sprint back to centre without re-establishing their stance. This creates a chaotic, uncontrolled ready position. Slow the drill down if needed and insist on a deliberate, controlled reset after every take.
Mistake 5 — Watching the Feeder's Body, Not the Ball
Keepers who watch the feeder's body language or arm action for cues will be deceived in match conditions. Train them to focus on the point of release — the feeder's hand — and track the ball from that moment. This is a habit that must be built consciously in every drill session.
Variations & Progressions
Progression 1 — Reaction Ball Feed
Replace the standard cricket ball with a hexagonal reaction ball for Phase 1. The unpredictable bounce of the reaction ball forces the keeper to read the ball off the surface rather than anticipating its path, dramatically increasing the difficulty and specificity of the drill. This is an excellent tool for keepers preparing for pitches with variable bounce.
Progression 2 — Batsman Shadow in the Crease
Introduce a shadow batsman (a fielder holding a bat but not playing shots) standing in the batting crease during Phase 3. The keeper must now navigate around the batsman's body to complete leg-side takes, replicating the spatial challenge of match conditions. This also trains the keeper's awareness of the stumping opportunity — they must be able to break the wicket without obstructing the batsman.
Variation — Reduced Cone Distance for Beginners
For keepers who are new to the drill or working through technique issues, reduce the lateral cone distances to 0.75 m (Cones B/C) and 1.5 m (Cones A/D). This shorter range allows the keeper to focus on body position and glove technique without being overwhelmed by the movement demand. Gradually increase the distances as competence grows.
Age Adaptations
| Age Group | Key Modifications |
|---|---|
| Under 10 | Use a softer training ball (Incrediball or Kookaburra Softa). Reduce cone distances to 0.5 m and 1 m. Focus only on Phase 1 (no live ball feed). Emphasise fun and confidence over technique precision. |
| Under 12 | Introduce Phase 2 with underarm feeds only. Use a standard training ball. Keep cone distances at 1 m and 1.5 m. Begin introducing verbal reset cues. |
| Under 14 | Full drill as described, but limit Phase 3 to Zones 1–4 (exclude wide and high ball zones until technique is solid). Begin introducing the reaction ball in Phase 1. |
| Under 16 | Full drill as described. Introduce the shadow batsman variation. Begin timing repetitions with a stopwatch to add performance accountability. |
| Open / Senior | Full drill at match intensity. Use a new cricket ball for Phase 3. Introduce a second feeder to create two-ball sequences, forcing the keeper to reset and react with no recovery time. |
This drill is designed to be run 2–3 times per week during the pre-season preparation phase and at least once per week during the playing season. Track the keeper's clean-take percentage across sessions to monitor development and identify areas requiring additional focus.