The Glove & Go: Wicket-Keeping Lateral Agility Drill
A progressive, multi-phase agility drill that sharpens a wicket-keeper's footwork, glove positioning, and explosive lateral movement — ready to use in your next training session.

Equipment Needed
Overview
The Glove & Go drill is a high-intensity, coach-led session designed to develop the three pillars of elite wicket-keeping: explosive lateral footwork, soft-hands glove work, and rapid reset between deliveries. It replicates the unpredictable demands of a live match — wide deliveries, leg-side glances, and sharp stumping opportunities — in a controlled, repeatable training environment.
Use this drill at the start of a fielding session as a dynamic warm-up for experienced keepers, or as a standalone 20-minute skill block for developing players. It is equally effective on a full 22-yard pitch or in a net/indoor facility. The drill scales from beginner to elite through three clearly defined progressions.
Coach's Note: The wicket-keeper is the only player on the field who is involved in every single delivery. Their agility is not a luxury — it is a match-winning asset. This drill trains the habits that make dismissals look effortless.
Setup

Equipment Required
| Item | Quantity | Notes |
|---|---|---|
| Cricket stumps & bails | 1 set (3 stumps) | Full-size or training stumps |
| Wicket-keeping gloves | 1 pair | Match or training gloves |
| Wicket-keeping pads | 1 pair | Full-size |
| Helmet | 1 | Mandatory for close-range feeds |
| Cricket balls | 8–12 | Mix of new and worn |
| Agility cones | 5 | Bright colours preferred |
| Measuring tape | 1 | For accurate cone placement |
| Coaching clipboard | 1 | For timing and feedback |
| Stopwatch | 1 | For Phase 3 timed sets |
Pitch & Field Setup
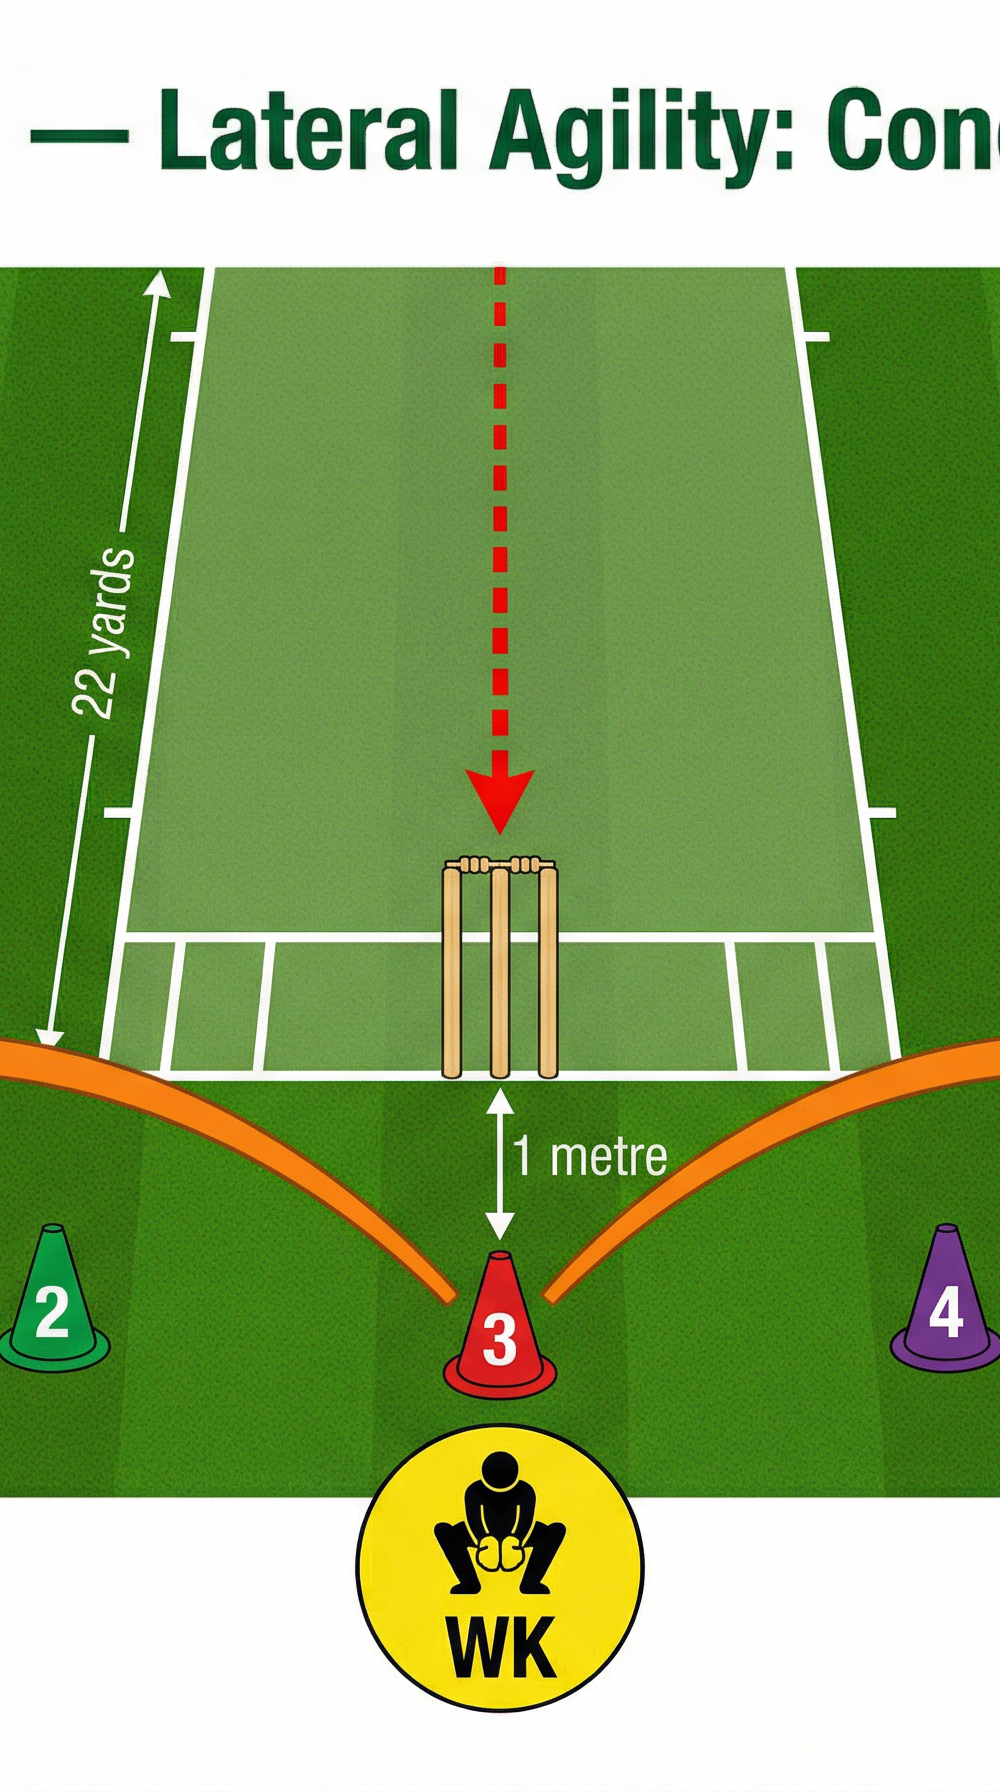
This drill is run at the batting end of a standard 22-yard (20.12 m) pitch. The wicket-keeper sets up 1 metre directly behind the stumps on the popping crease line. Five agility cones are placed in a fan arc 2 metres behind the stumps, spaced at the following positions:
- Cone 1 — Far leg-side (2 metres left of centre from keeper's perspective)
- Cone 2 — Mid leg-side (1 metre left of centre)
- Cone 3 — Centre (directly in line with middle stump)
- Cone 4 — Mid off-side (1 metre right of centre)
- Cone 5 — Far off-side (2 metres right of centre)
The coach/feeder stands 5 metres in front of the stumps on the pitch, holding a bucket of 8–10 balls. An optional second feeder stands at a first-slip position (2 metres behind and to the off-side of the keeper) for Phase 3.

Diagram 1 shows the cone arc setup and the keeper's lateral movement pattern between cones.
Step-by-Step Instructions
Phase 1 — Footwork Foundation (5 minutes)
1. The keeper adopts the ready position behind the stumps: weight evenly distributed on the balls of both feet, knees bent to approximately 90 degrees, gloves resting just above ground level between the legs, eyes level and focused on the feeder's hand.
2. The coach calls a cone number aloud (e.g., "Two!") before each feed. The keeper shuffles laterally to that cone using a side-step pattern — never crossing feet — touches the cone with the outside glove, then immediately shuffles back to the centre (Cone 3) ready position.
3. Once back at centre, the coach delivers the ball underarm at a comfortable pace to the keeper's gloves. The keeper receives the ball with soft hands, allowing the gloves to give slightly on impact.
4. The keeper returns the ball to the coach and resets to the ready position. The coach calls the next cone. Complete 10 repetitions (5 left, 5 right, randomised).
5. Rest 60 seconds. Repeat for a second set of 10 reps, this time the coach does not call the cone before the feed — the keeper must react to the direction of the ball alone.
Phase 2 — Multi-Ball Feed Sequence (8 minutes)
6. The keeper resets to the ready position 1 metre behind the stumps. The coach now feeds three balls in rapid succession without pause:
- Ball 1: Straight delivery, keeper receives standing.
- Ball 2: Wide off-side delivery (1.5 metres outside off stump), keeper dives or lunges right.
- Ball 3: Wide leg-side delivery (1.5 metres outside leg stump), keeper dives or lunges left.
7. After each set of three balls, the keeper has 5 seconds to reset to the ready position before the next set begins. Complete 4 sets (12 balls total), then rest 90 seconds.
8. On the second round, the coach varies the order of the three ball types unpredictably. The keeper must read the release point, not anticipate the direction.

Diagram 2 illustrates the multi-ball feed sequence and the keeper's response movement patterns for off-side and leg-side deliveries.
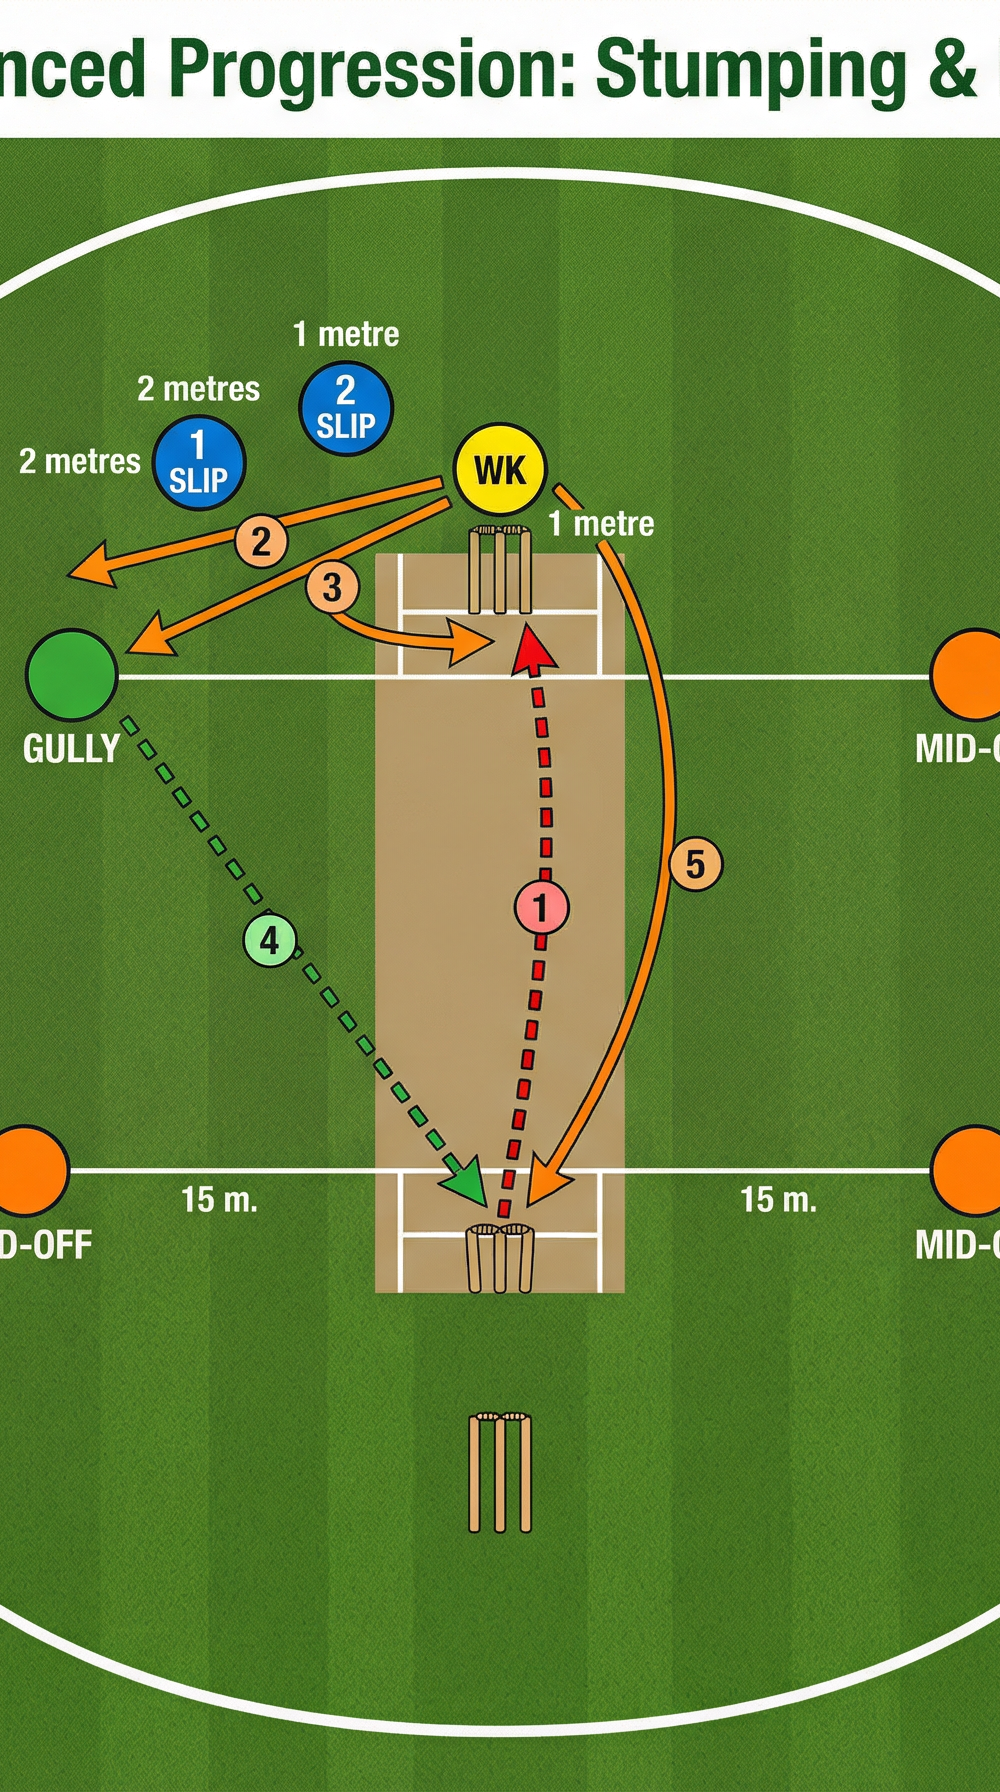
Phase 3 — Stumping & Run-Out Simulation (7 minutes)
9. A second feeder (or senior player) takes position at first slip, 2–3 metres behind and to the off-side of the keeper.
10. The coach delivers a wide off-side ball. The keeper collects and immediately breaks the stumps (removes a bail with gloves). This simulates a stumping off a wide delivery.
11. Immediately after the stumping attempt, the second feeder throws a ball to the bowling end stumps. The keeper sprints from the batting end to the bowling end (22 yards) to collect the throw and break the stumps — simulating a run-out backing-up scenario.
12. Complete 6 repetitions of the full stumping + sprint sequence. Time each repetition with a stopwatch. Target time: stumping within 1.5 seconds of collection; full sprint and stump-break within 8 seconds.
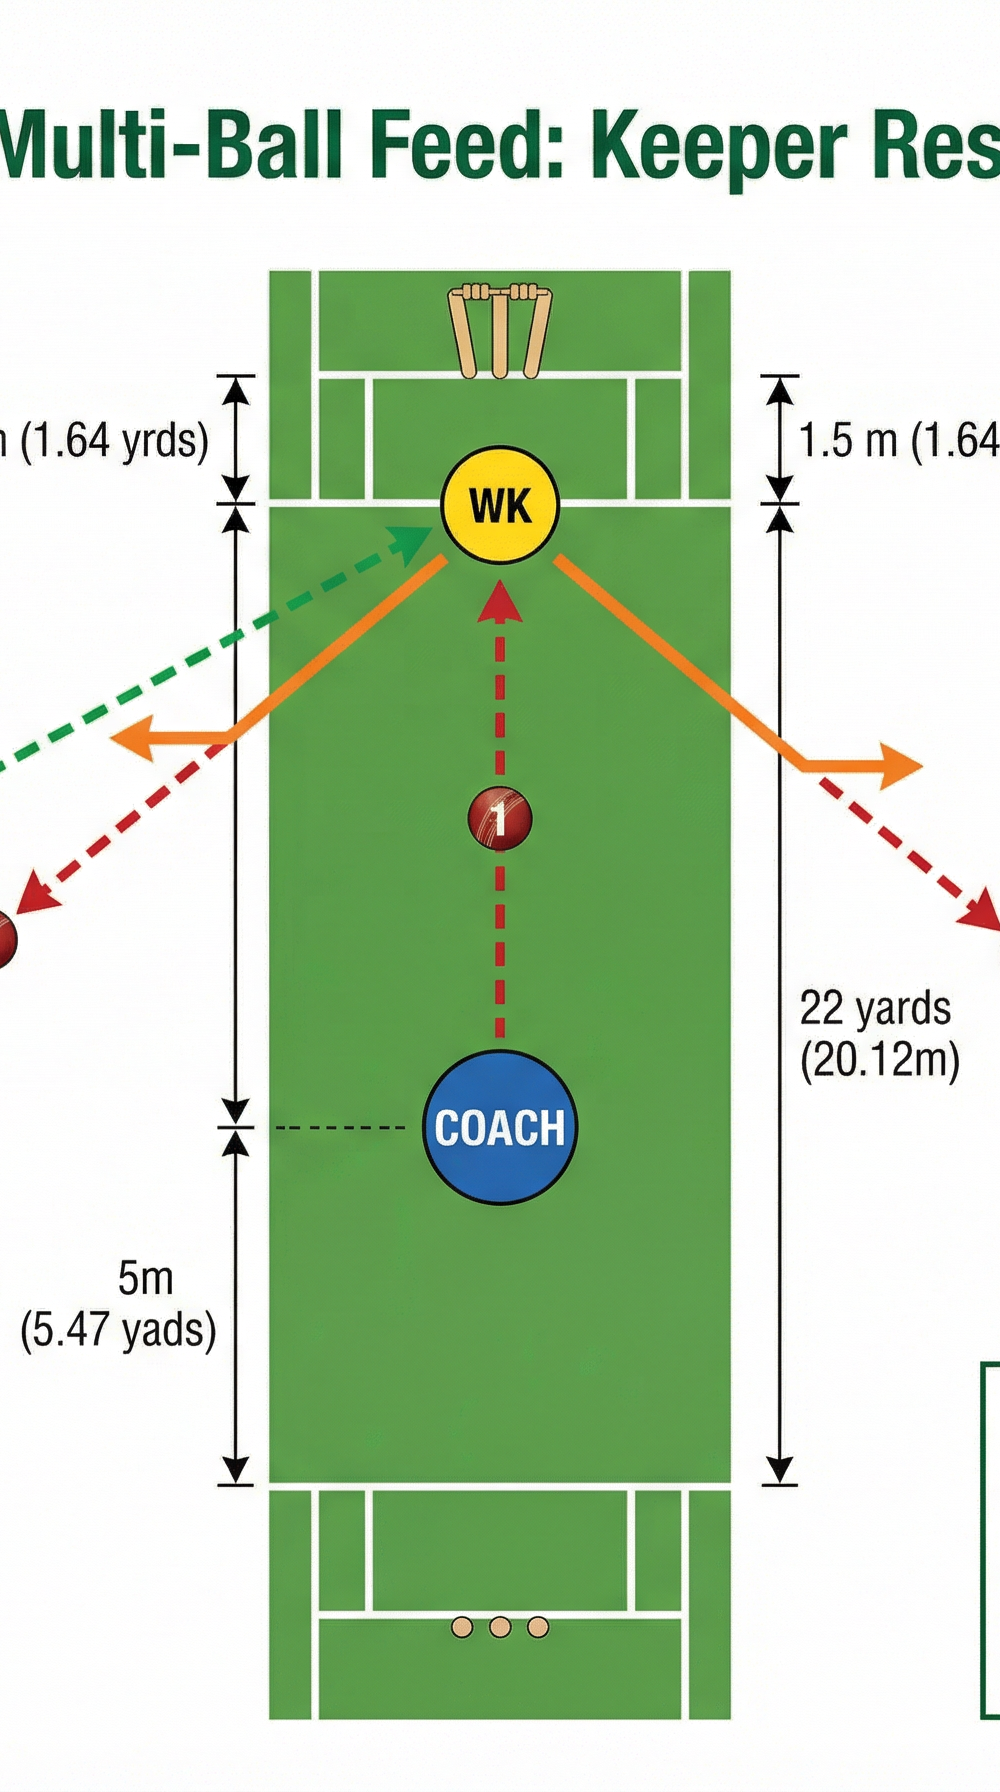
Diagram 3 shows the advanced progression with stumping simulation and the keeper's 22-yard sprint to the bowling end for the run-out scenario.
Key Coaching Points

The following six points represent the non-negotiables of elite wicket-keeping technique. Return to these throughout the session and use them as the basis for your feedback.
1. Head Still, Eyes Level. The keeper's head must remain absolutely still through the collection. Any head movement shifts the visual focal point and causes mistimed glove work. Cue: "Watch the ball into the gloves — not through the gloves."
2. Gloves Together at the Point of Collection. Both gloves must be presented as a single catching surface. Fingers point downward for balls below the waist; fingers point upward for balls above the waist. The transition point is at the hip. Cue: "Make one big glove, not two small ones."
3. Soft Hands — Give with the Ball. The gloves must travel slightly in the direction of the ball on impact to absorb pace. Rigid hands cause the ball to pop out. This is the single most common error in junior keepers. Cue: "Catch it like an egg — don't break it."
4. Low Base, Explosive First Step. All lateral movement must begin from a low, balanced base. The first step is a push-off from the inside foot — never a lean or a rock. Cue: "Stay low, push wide — don't stand up to move."
5. Reset Immediately After Every Ball. The keeper must return to the ready position — gloves down, weight forward, eyes up — within 2 seconds of every collection. Fatigue is not an excuse for a slow reset. Cue: "Every ball is the first ball."
6. Communicate with Slip Fielders. In Phase 3, the keeper must call "Mine!" or "Yours!" clearly on every ball that goes past the bat. This habit, trained in the drill, prevents collision and confusion in match conditions.
Common Mistakes
The following errors are the most frequently observed across all age groups. Coaches should position themselves at an angle behind and to the side of the keeper to observe these clearly.
Mistake 1 — Standing Up Too Early. Many keepers rise out of their crouch as the ball approaches, especially on deliveries that bounce higher than expected. This causes the gloves to be too high and the keeper to reach down awkwardly. Correction: Place a cone or marker at the keeper's knee height and instruct them to keep their gloves below the marker until the ball reaches the stumps.
Mistake 2 — Crossing Feet on Lateral Movement. Crossing the feet during a lateral shuffle creates instability and slows recovery. Correction: Use the cone arc (Phase 1) specifically to reinforce the side-step pattern. Slow the drill down until the footwork is clean, then rebuild pace.
Mistake 3 — Snatching at the Ball. Keepers who snatch — moving the gloves aggressively toward the ball rather than allowing it to arrive — will drop catches and miss stumpings. This is often caused by anxiety or lack of confidence. Correction: Reduce the pace of the feed significantly and focus on the "give" motion. Use the phrase: "Wait for it, then take it."
Mistake 4 — Gloves Too High at Setup. Keepers who hold their gloves at waist height in the ready position are slow to react to balls that skid through low. Correction: Insist that gloves rest just above ground level at the start of every delivery. Use video review if available.
Mistake 5 — Neglecting the Non-Dominant Side. Most keepers are significantly more comfortable diving to their dominant side. In match conditions, bowlers and batters will expose the weaker side. Correction: In Phase 2, deliberately over-index feeds to the keeper's weaker side (70% weak-side, 30% strong-side) until the gap closes.
Variations & Progressions

Easier — Stationary Glove Work
Remove the cone arc entirely. The keeper stands stationary 1 metre behind the stumps and the coach feeds 20 consecutive balls at varying heights (ankle, knee, hip, chest) from 3 metres away. The sole focus is glove positioning and soft hands. Ideal for beginners or as a warm-up for injured keepers returning to training.
Harder — Reaction Ball Feed
Replace the standard cricket ball with a reaction ball (hexagonal rubber ball) for Phase 1 and Phase 2. The unpredictable bounce eliminates the keeper's ability to anticipate trajectory, forcing genuine reactive footwork and glove adjustment. This is the single most effective progression for developing elite-level keepers.
Match-Simulation — Live Bowling Integration
Replace the coach feeder with a live bowler delivering from 22 yards at match pace. Add a batter at the crease (with a bat, no hitting — or with hitting for senior players). The keeper must now manage all the visual noise of a real delivery: the bowler's run-up, the batter's movement, and the ball's trajectory simultaneously. This is the final progression before match play.
Age Adaptations

| Age Group | Key Modifications |
|---|---|
| Under 10 | Use a soft foam ball or tennis ball. Remove the cone arc — focus only on stationary glove work. No helmet required with foam ball. Keep sets to 5 balls. Emphasise fun and confidence over technique. |
| Under 12 | Use a softer training ball. Cone arc reduced to 3 cones (left, centre, right). Phase 2 only (no Phase 3 sprint). Feeder stands 3 metres away. 8-ball sets. |
| Under 14 | Full drill as written but use a worn ball (less pace). Phase 3 stumping only — no bowling-end sprint. 10-ball sets. Begin introducing coaching points 1–3. |
| Under 16 | Full drill as written. Introduce reaction ball in second half of session. Begin timing Phase 3 stumpings. All six coaching points applied. |
| Open / Senior | Full drill at match pace with live bowling. Reaction ball mandatory in at least one set. Phase 3 timed and recorded. Add a second keeper to create competitive repetition pressure. |
This drill was designed to be run in a single 20-minute block within a broader fielding session, or as a standalone 30-minute wicket-keeping specialist session when combined with a 10-minute warm-up. Adjust rest periods based on the fitness level and age of your keeper.