Wicket-Keeper Lateral Agility & Glove-Work Drill
A high-intensity, cone-based agility drill that sharpens a wicket-keeper's lateral footwork, glove positioning, and explosive reaction speed across all delivery lines.

Equipment Needed
Overview
The Wicket-Keeper Lateral Agility & Glove-Work Drill is a purpose-built conditioning and skills exercise designed to develop the explosive lateral movement, soft hands, and rapid glove-to-ball coordination that separates elite keepers from average ones. At its core, this drill replicates the unpredictable nature of match deliveries — wide outside off stump, down the leg side, and everything in between — forcing the keeper to move decisively from a set base position before every ball.
Use this drill as the centrepiece of any dedicated wicket-keeping session, or as a high-quality warm-up activation block before a full team fielding session. It is equally effective for developing junior keepers learning the fundamentals of footwork and for senior keepers looking to sharpen match-specific reactions under fatigue. A single set takes approximately 6–8 minutes, making it easy to repeat across multiple rounds within a 30-minute session.
Setup

Equipment Required
| Item | Quantity | Notes |
|---|---|---|
| Cricket stumps (full set) | 1 set | Planted at the batting crease |
| Agility cones | 4 | Placed in semi-circle behind stumps |
| Cricket balls (red or white) | 6–10 | Coach/feeder holds supply |
| Wicket-keeping gloves | 1 pair | Match-standard inner and outer gloves |
| Wicket-keeping pads | 1 pair | Full-length or short |
| Helmet (optional) | 1 | Recommended for junior keepers |
| Measuring tape | 1 | For accurate cone placement |
Pitch & Field Setup
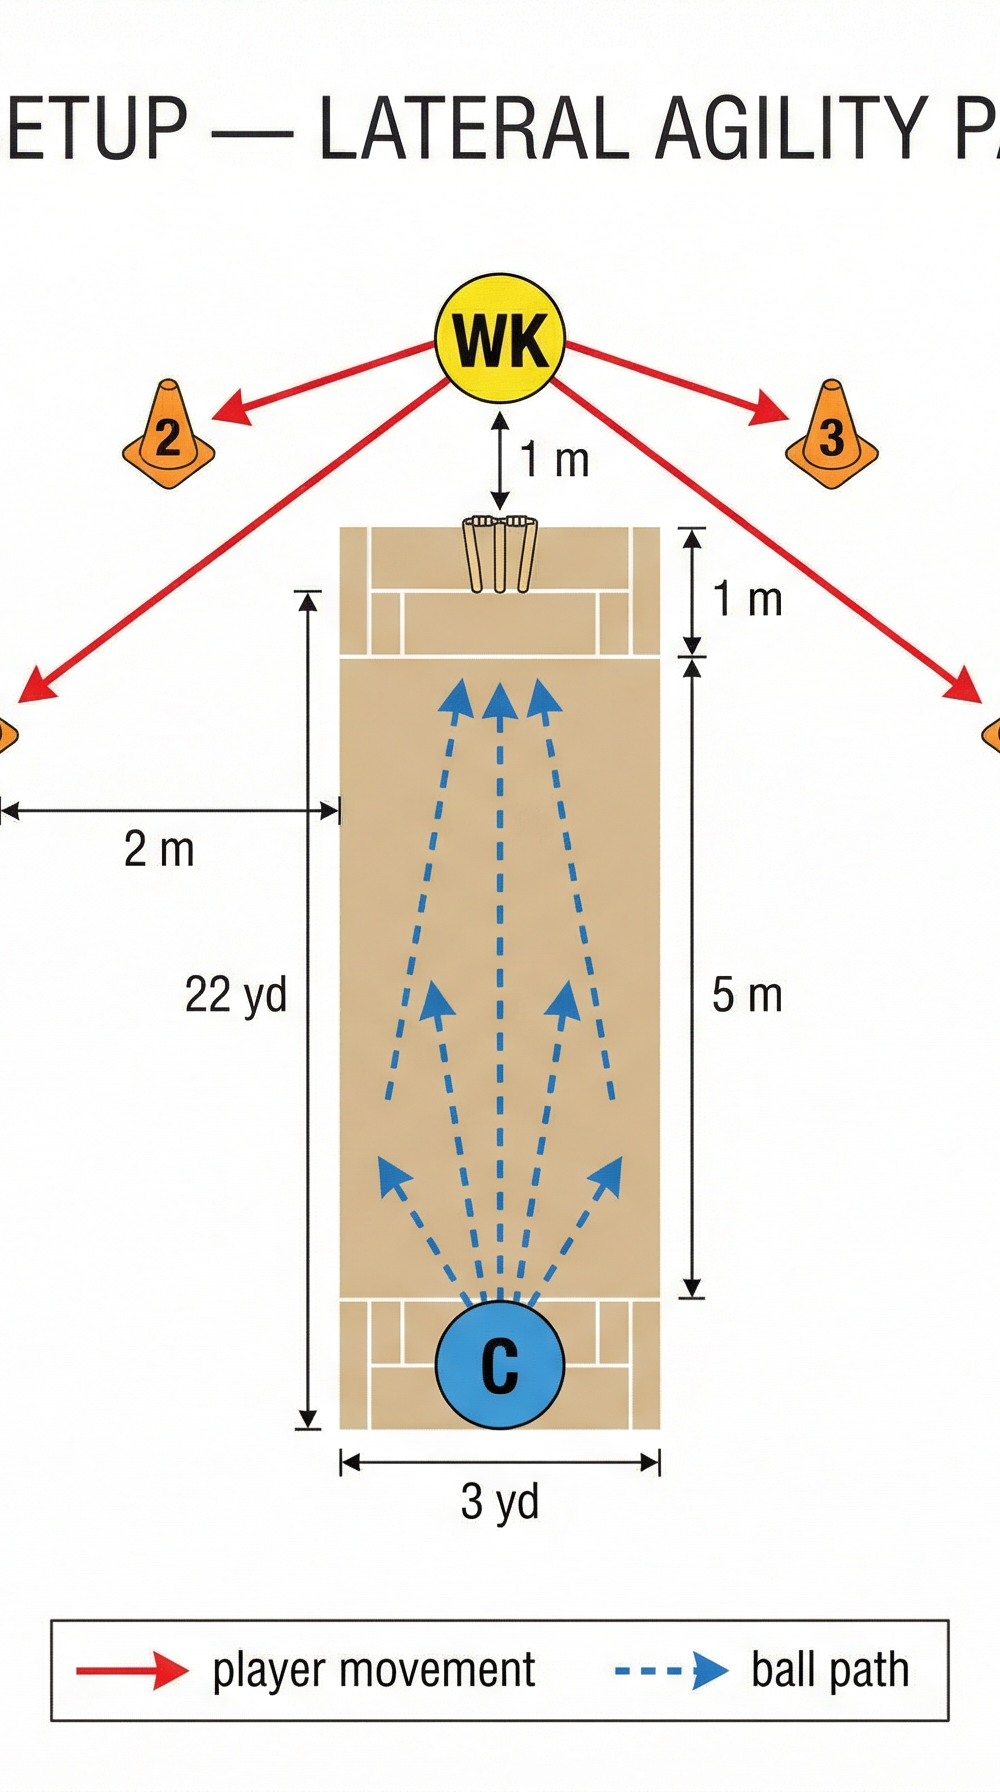
This drill is run on a standard 22-yard (20.12 m) cricket pitch. Set up a full set of stumps at the batting end crease. The wicket-keeper (WK) starts in their standard ready position, 1 metre directly behind the stumps, in a low athletic crouch — weight on the balls of the feet, gloves forward, eyes level.
Place 4 agility cones in a semi-circle arc behind and to either side of the stumps, measured from the WK's starting position:
- Cone 1 — 2.5 m to the far left (leg side)
- Cone 2 — 1.5 m to the near left (leg side)
- Cone 3 — 1.5 m to the near right (off side)
- Cone 4 — 2.5 m to the far right (off side)
The coach/feeder (C) stands at the bowling crease end, approximately 5 metres in front of the stumps, and feeds balls underarm or with a short-arm throw to simulate varied delivery lines.
Step-by-Step Instructions
Phase 1 — Activation (2 minutes)
- The keeper assumes the ready position 1 metre behind the stumps: feet shoulder-width apart, knees bent to approximately 90 degrees, gloves resting just above the ground in front of the body, head still and eyes forward.
- The coach calls out a cone number (1–4) without feeding a ball. The keeper side-steps explosively to touch the cone with their glove, then returns to the base position. Repeat 8 times, randomising the cone calls.
- This phase primes the lateral movement pattern and warms up the hips, ankles, and glove reaction before ball contact is introduced.
Phase 2 — Cone Touch + Catch (Core Drill, 4–6 minutes)
- The keeper resets to the base position behind the stumps.
- The coach simultaneously calls a cone number and feeds a ball in a corresponding direction: Cone 1/2 = leg-side delivery; Cone 3/4 = off-side delivery. The ball should be fed at a realistic pace — medium-paced underarm roll or low throw to replicate a ball coming off the pitch.
- The keeper moves laterally to touch the called cone with their outside glove, then immediately repositions to take the ball cleanly. The key is to move first, then gather — not to wait and reach.
- After each take, the keeper returns the ball to the coach and resets to the base position within 3 seconds. This active recovery is part of the drill.
- Complete 10 repetitions per set, with the coach varying the cone calls and delivery lines unpredictably. Do not allow the keeper to anticipate the direction.
- Rest 60–90 seconds between sets. Complete 3 sets per session.
Phase 3 — Cool-Down Repetition (1 minute)
- Finish with 6 slow, deliberate takes — 2 leg side, 2 off side, 2 straight — focusing entirely on soft hands and clean glove technique rather than speed. This reinforces correct mechanics after the fatigue of the core drill.
Key Coaching Points

1. The Ready Position is Non-Negotiable
Every repetition must begin from a correct base: low crouch, weight forward, gloves presented. A keeper who stands tall between deliveries will always be late to the ball. Demand the reset after every single take.
2. Move the Feet First — Gloves Follow
The single most common error in keeping is reaching with the gloves before the feet have moved. Coach your keeper to initiate every movement with a lateral step, not a glove extension. The feet position the body; the gloves simply complete the take.
3. Soft Hands on Contact
The gloves should "give" slightly on contact, absorbing the ball's momentum rather than snatching at it. Encourage the keeper to think of catching an egg — firm enough to secure it, soft enough not to break it. Listen for the sound: a clean, quiet take indicates soft hands; a loud slap indicates hard hands.
4. Eyes Level Through the Take
The head must remain still and level throughout the movement and the take. Head movement causes misjudgement of the ball's line and length. Cue: "Watch the ball into the gloves."
5. Outside Edge of the Foot on Lateral Steps
When moving to the leg side or off side, the keeper should push off the inside foot and land on the outside foot — not cross their feet. Crossing the feet kills momentum and makes a second movement almost impossible.
6. Communicate and Reset Quickly
In a match, a keeper who resets slowly between deliveries loses concentration and misses cues from the bowler. Build the habit of a sharp, purposeful reset in training so it becomes automatic in the middle.
Common Mistakes

Mistake 1 — Standing Too Tall in the Ready Position
Many keepers, especially juniors, stand upright between deliveries to rest their legs. This means they must drop their body weight before they can move, costing them critical reaction time. Correction: Use a cone or marker at knee height as a visual reference. If the keeper's knees are above the marker, they are too high.
Mistake 2 — Reaching Instead of Moving
Keepers who reach laterally with their gloves without moving their feet will drop balls that should be comfortable takes. Correction: Place a cone directly beside the keeper's starting position. If they take a ball without their outside foot passing the cone, they have reached rather than moved.
Mistake 3 — Snatching at the Ball
Hard, snatching hands are caused by tension in the forearms and a desire to "grab" the ball early. This leads to dropped catches and missed stumpings. Correction: Slow the drill down and have the keeper focus on the moment of contact. Introduce a verbal cue such as "soft" that the coach calls as the ball arrives.
Mistake 4 — Watching the Coach, Not the Ball
Some keepers watch the coach's hand or body language to anticipate the delivery direction. This is a training habit that will not transfer to match conditions. Correction: Have the coach use a screen or turn slightly sideways so the release point is the only readable cue.
Mistake 5 — Slow Reset After Each Take
A lazy reset between repetitions means the keeper is not building the habit of sustained concentration. Correction: Introduce a 3-second reset rule. If the keeper is not back in position within 3 seconds of completing the take, the repetition does not count.
Variations & Progressions

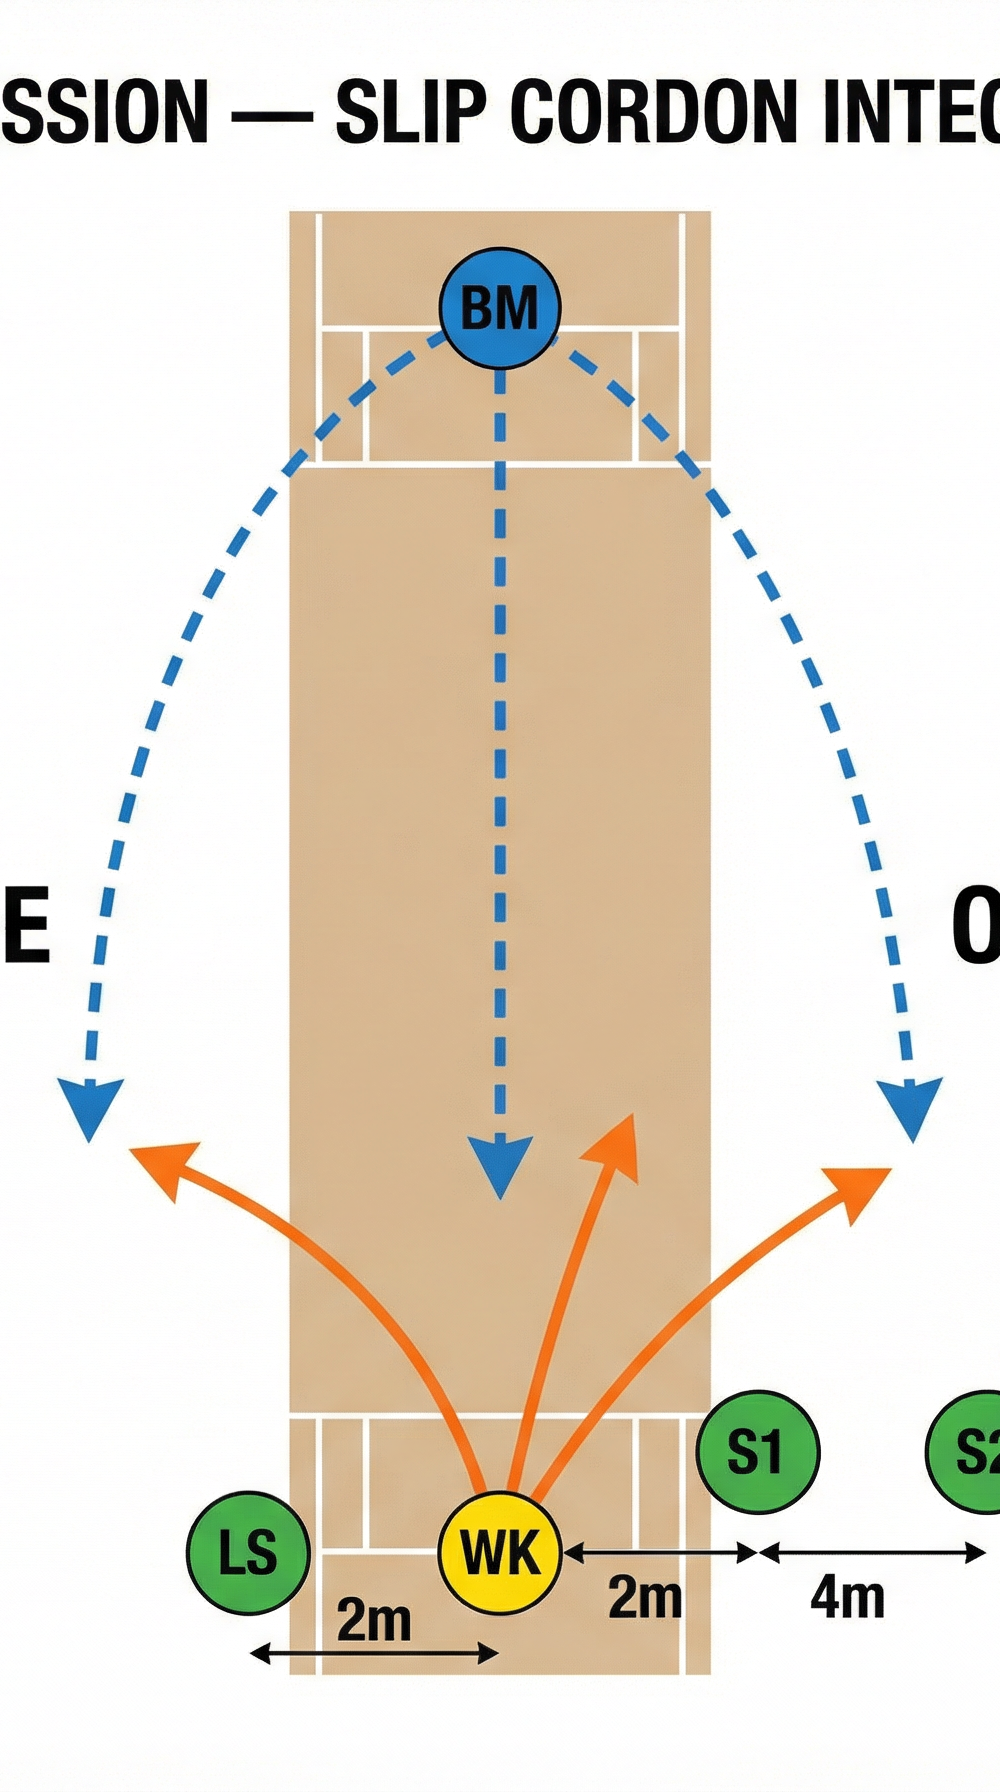
Progression 1 — Slip Cordon Integration
Add a 1st slip (S1) and 2nd slip (S2) positioned 2 m and 4 m to the off side of the keeper, and a leg slip (LS) 2 m to the leg side. The coach now feeds balls that may be taken by the keeper OR by the slip fielders. The keeper must call "keeper's" or "yours" to direct the catch, replicating the communication demands of match play. This progression develops decision-making under pressure and is ideal for intermediate to advanced keepers.
Progression 2 — Fatigue-State Drill
Immediately after a 30-second sprint or 10 squat jumps, the keeper must complete a full set of 10 cone-touch catches. This replicates the physical state a keeper is in during the final overs of a long innings — tired legs, elevated heart rate — and trains them to maintain technique under physiological stress. Reduce the number of repetitions to 6–8 for junior players.
Regression (Easier Variation) — Stationary Glove-Work
For beginners or players new to keeping, remove the cones entirely. The keeper stands in the base position and takes 20 consecutive balls fed from 3 metres away, focusing solely on soft hands and correct glove presentation. Once 20 clean takes are achieved consistently, reintroduce the lateral movement component.
Age Adaptations
| Age Group | Key Modifications |
|---|---|
| Under 10 | Use a tennis ball or incrediball. Remove cones — focus only on base position and soft hands. Feed from 2–3 m. No helmet required. |
| Under 12 | Use a leather ball on a hard surface or a softer training ball. Introduce Cones 2 and 3 only (near left and near right). 6 reps per set, 2 sets. |
| Under 14 | Full cone setup. Introduce Progression 1 (slip cordon) in the second half of the session. 8 reps per set, 3 sets. |
| Under 16 | Full drill as described. Introduce Progression 2 (fatigue-state) in the final set. Coach should increase feed pace to simulate medium-fast bowling. |
| Open/Senior | Full drill with both progressions. Introduce a live bowler feeding off a short run-up to replicate authentic match-condition delivery pace and movement. |