Gegenpressing Mastery: Counter-Pressing Immediately After Losing Possession
Master the art of the immediate counter-press — teach your players to transform the moment of ball loss into your most dangerous attacking weapon by swarming the opposition within 5 seconds.

Equipment Needed
Overview
The counter-press — popularised at the elite level by coaches such as Jürgen Klopp and Pep Guardiola — is arguably the most effective transition tool in modern football. The core principle is deceptively simple: the moment your team loses possession, the players nearest the ball immediately press with maximum intensity to win it back before the opposition can organise. Rather than retreating into a defensive shape, your team uses the 3–5 seconds immediately after losing the ball — the window in which the opposition is most disorganised and least prepared to play forward — as your primary attacking opportunity.
This play is most effective when your team loses the ball in the opposition's half or in the central third, where a quick recovery can immediately create a high-quality chance on goal. It is less appropriate when possession is lost in your own defensive third, where the risk of being caught high outweighs the reward. Used correctly, the counter-press reduces the number of times your goalkeeper is called into action, keeps the game in the opponent's half, and creates a relentless, energetic identity that is extremely difficult to play against.
Setup
Equipment Required
- Full-size or 3/4-size pitch (minimum 60m × 40m for training; full pitch 100–110m × 64–75m for match application)
- 2 full-size goals (or 4 mini-goals for small-sided versions)
- 20 bibs in two contrasting colours
- 1 ball per pair for warm-up; 6–8 balls for the main session
- Cones to mark press zones and trigger lines
- Coaching board or tablet for pre-session tactical walkthrough
Pitch Setup
- Mark a Trigger Line with cones across the pitch at approximately 35m from the opposition goal (roughly the edge of their defensive third).
- Mark a Press Zone with cones: a 20m × 15m rectangle in the area where possession is most commonly lost during build-up play.
- Set up a High Defensive Line for the defending team at 40m from their own goal, reinforcing the compactness required to support the press.
Player Positions (4-3-3 Formation)
| Number | Position | Press Role |
|---|---|---|
| 1 | Goalkeeper (GK) | Sweeper-keeper — steps up to 25m from goal to cover in behind |
| 2 | Right Back (RB) | Tucks in to cover central channel; steps into press if ball is on right flank |
| 3 | Left Back (LB) | Mirrors RB on left side; covers touchline escape route |
| 4 | Centre Back (CB) | Holds high defensive line; does NOT press unless ball is within 10m |
| 5 | Centre Back (CB) | Holds high defensive line; communicates line height to teammates |
| 6 | Defensive Midfielder (DM/6) | Screens the space behind the press; intercepts any balls played through |
| 7 | Right Winger (RW) | First presser if ball is lost on right side; cuts off back-pass to RB |
| 8 | Central Midfielder (CM/8) | Second wave presser; covers opposition CM receiving the ball |
| 9 | Centre Forward (CF) | Triggers the press by closing the ball-carrier; sets the angle to force play wide |
| 10 | Attacking Midfielder (AM/10) | Cuts central passing lanes; presses second ball |
| 11 | Left Winger (LW) | First presser if ball is lost on left side; mirrors No. 7 on opposite flank |
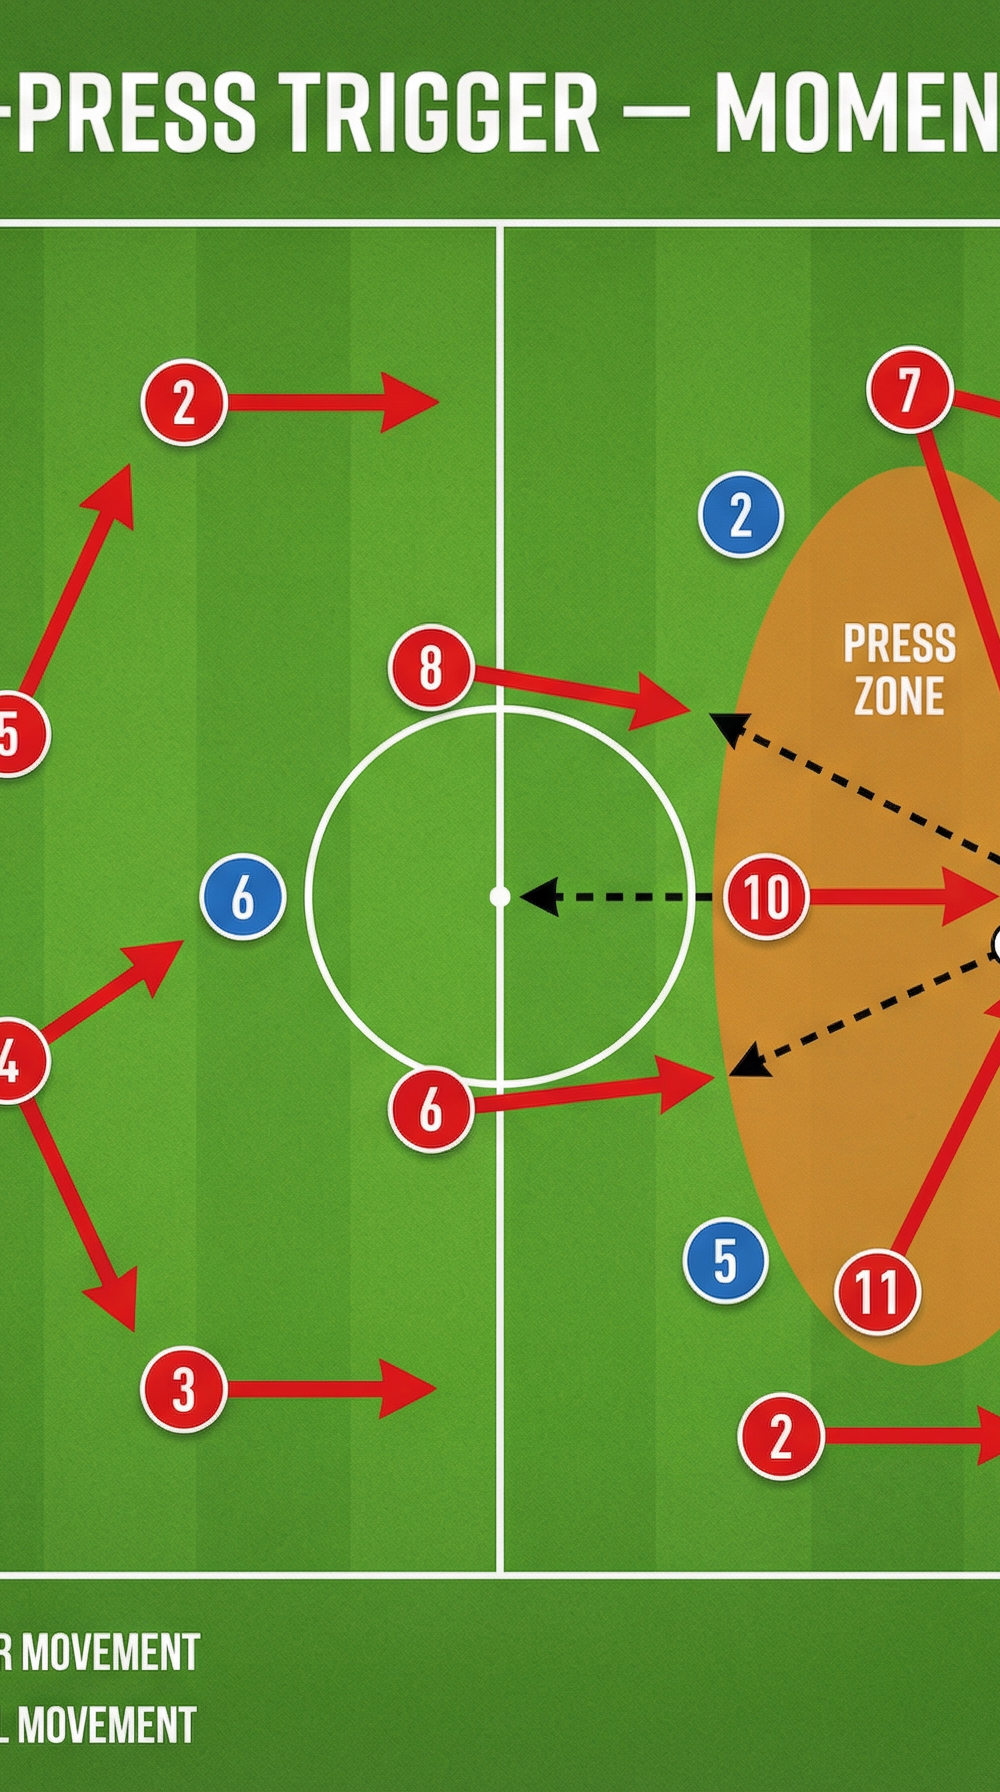
Diagram 1 — Counter-Press Trigger: The moment possession is lost (Player 9), players 7, 10, and 11 converge immediately into the Press Zone while midfielders 6 and 8 step up to block central escape routes. The back four compress the space behind the press.
Step-by-Step Instructions

Step 1 — Establish the Trigger Signal (Pre-Session)
Before the session begins, define the press trigger clearly with your players. The trigger is the moment the ball is intercepted or miscontrolled by the opposition. Every player must recognise this moment simultaneously. Use a verbal cue in training — shout "PRESS!" initially, then progress to players self-organising without a cue.
Step 2 — The Nearest Player Presses the Ball-Carrier Immediately
The player closest to the ball at the moment of loss — typically the No. 9 or a winger — sprints directly at the ball-carrier within 1–2 seconds. The angle of approach is critical: approach from a slight angle to show the ball-carrier only one direction (ideally toward the touchline or back toward their own goal). Do not sprint straight at the player — this allows them to play around you.
Step 3 — Second and Third Pressers Form a Pressing Triangle
The two nearest teammates to the first presser immediately form a triangle around the ball-carrier. One covers the pass back to the goalkeeper or nearest centre-back; the other cuts the pass into the central midfield. The triangle should be no larger than 5–6 metres between each presser — tight enough to eliminate all short passing options.
Step 4 — Midfielders Step Up to Block the Second Line
The No. 6 and No. 8 step forward aggressively to mark the opposition's central midfielders, preventing the ball-carrier from playing through the press. The No. 6 in particular must not press the ball — their role is to screen the space immediately behind the front three pressers and intercept any ball played through.
Step 5 — Defensive Line Holds High and Compresses
The back four hold their high line — approximately 40m from their own goal — and compress laterally toward the ball. The two centre-backs (No. 4 and No. 5) must resist the temptation to step into the press. Their job is to remain compact, hold the offside line, and be ready to win any second ball played over the top.
Step 6 — Win the Ball or Force a Long Ball
The press has two successful outcomes: (a) winning the ball cleanly in the opposition's half, leading directly to a goal-scoring opportunity; or (b) forcing the opposition into a long, inaccurate clearance that your centre-backs can win in the air, resetting possession. Both outcomes are victories. Communicate this to your players — the press does not always have to result in a clean turnover.
Step 7 — Immediate Transition to Attack
The moment the ball is won, the player in possession looks forward immediately. The No. 10 or No. 9 should already be making a run in behind the disorganised defence. The instruction is simple: play forward within two touches. If no forward option is available, recycle quickly to maintain the tempo advantage.

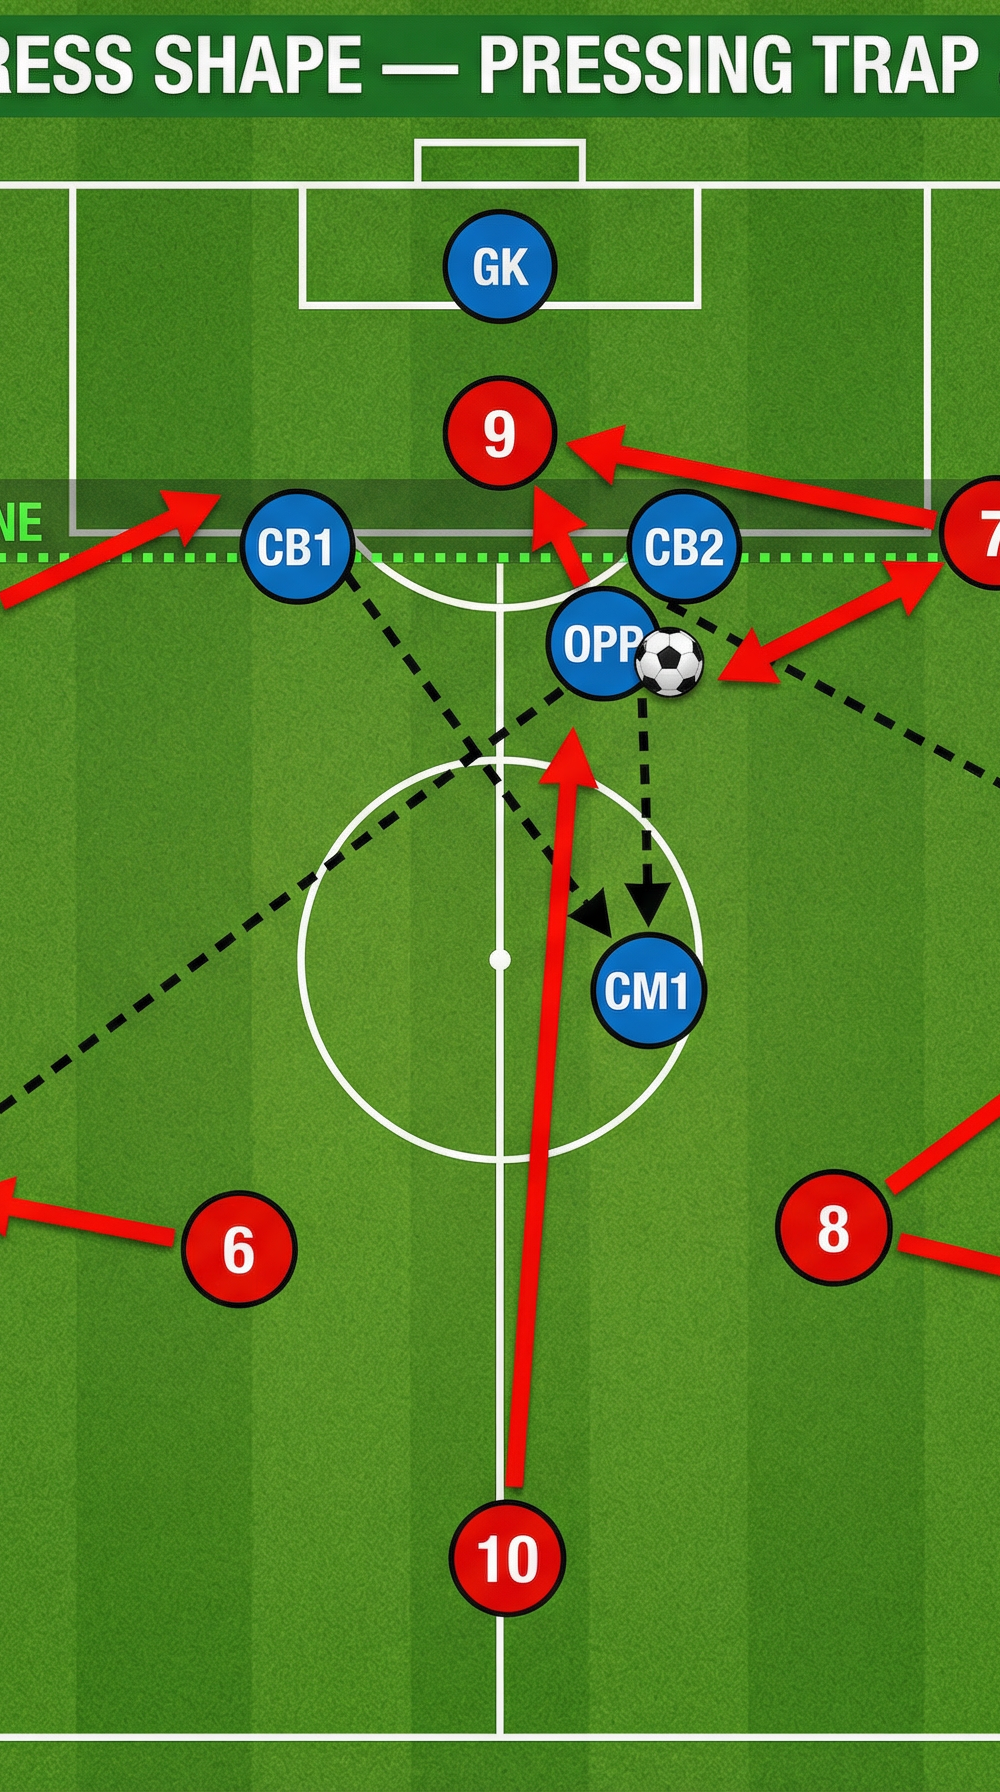
Diagram 2 — Pressing Trap and Recovery Shape: Players 7, 9, and 11 form the pressing triangle around the opposition ball-carrier (OPP), forcing play toward the Trap Zone on the right flank. Player 10 cuts the central lane, while 6 and 8 cover the second line. The Press Line (green dotted) shows the high defensive shape maintained by the back four.
Key Coaching Points

1. Speed of Reaction is Everything — The 5-Second Rule
The counter-press only works if it is executed within 5 seconds of losing the ball. After 5 seconds, the opposition has reorganised and the press becomes ineffective — and dangerous. Drill this into your players: the trigger is immediate. Use a stopwatch in training to make this tangible.
2. Press With Purpose — Angle and Body Shape
Players must approach the ball-carrier at an angle that removes one passing option before they even arrive. Arriving flat or straight gives the ball-carrier two directions to play. Teach players to "show" the ball-carrier toward the touchline or backward — never centrally.
3. Compactness Wins Battles — Stay Tight
The pressing triangle must remain compact. If the gaps between pressers exceed 6 metres, the ball-carrier can play through or around the press. Use shadow pressing drills without opposition to build the habit of tight spacing before adding defenders.
4. The No. 6 Must NOT Chase the Ball
One of the most common breakdowns in counter-pressing occurs when the defensive midfielder abandons their screening role to join the press. Emphasise repeatedly: the No. 6 screens, intercepts, and covers. They are the safety net behind the press. If they press the ball, the entire shape collapses.
5. Communication and Collective Effort
The counter-press is a team action, not an individual one. Players must communicate constantly — calling "press!", "mine!", and "cover!" to coordinate the collective effort. Silence during a press is a warning sign that players are not connected.
6. Know When NOT to Press
Teach your players the situations where the counter-press should not be triggered: when the ball is lost in your own defensive third; when three or more players are out of position; or when the opposition has already played the ball forward past the press. Recognising the "no press" situation is as important as executing the press itself.
Common Mistakes

Mistake 1 — Pressing Too Slowly (Waiting to See What Happens)
Players hesitate for 2–3 seconds after the ball is lost, watching rather than reacting. By the time they press, the opposition has already played through. Correction: Use rondo drills where the pressing team must react within 2 seconds of losing the ball — award a point for every press initiated within the time window.
Mistake 2 — Pressing in Straight Lines (No Angle)
Players sprint directly at the ball-carrier, allowing them to play around the press easily. Correction: Set up cone gates that players must run through before pressing — the gates force an angled approach. Emphasise the "show them one way" coaching cue.
Mistake 3 — The Pressing Triangle is Too Wide
The three pressers spread out too far, leaving gaps for the ball-carrier to play through. Correction: Place cones 5m apart to define the maximum size of the pressing triangle. If the ball-carrier can see daylight between the pressers, the triangle is too wide.
Mistake 4 — The Back Four Dropping Too Deep
The defensive line drops back when the press is triggered, creating a large gap between the press and the defensive line that the opposition can exploit with a simple pass through. Correction: Use a rope or cone line to mark the minimum defensive line height. Defenders must hold the line unless the ball is played directly over the top.
Mistake 5 — No Forward Pass After Winning the Ball
Players win the ball but then slow the tempo, allowing the opposition to recover their shape. The advantage of the counter-press is lost. Correction: Implement a "two-touch forward" rule immediately after winning the ball in training. The player who wins possession must play forward within two touches.
Variations and Progressions

Progression 1 — Conditioned Rondo (Easier)
Set up a 15m × 10m rondo with 6 attackers vs. 4 defenders. When the defending team wins the ball, they immediately counter-press to win it back. Limit the attacking team to two touches to increase the speed of play and the frequency of turnovers. This isolates the pressing trigger in a small, controlled environment before scaling to a full pitch.
Progression 2 — Zonal Counter-Press Game (Intermediate)
Divide a 60m × 40m pitch into three horizontal zones. Play 8v8. When a team loses the ball in the middle or attacking zone, they must press immediately and win it back within 5 seconds or concede a point. If the ball escapes to the defensive zone, the press is called off and the team reorganises. This teaches players to distinguish between press and no-press situations.
Progression 3 — Full 11v11 Counter-Press Match (Advanced)
Play a full 11v11 game on a full-size pitch (100m × 64m minimum). Award 3 points for a goal scored directly from a counter-press turnover (ball won within 5 seconds of loss and a goal scored within 10 seconds of winning it). Award 1 point for a standard goal. This scoring system incentivises players to press aggressively and transition quickly, replicating match conditions.
Age Adaptations
Under 10 and Under 12 — Simplified Press ("Chase the Ball")
At this age, focus only on the concept of immediate reaction — do not introduce pressing angles or triangles. Use a simple rule: "the two nearest players always chase the ball when we lose it." Play on a reduced pitch (40m × 25m) with 5v5 or 6v6. Reward effort and reaction speed rather than tactical precision. The goal is to build the habit of pressing as a reflex.
Under 14 and Under 16 — Introduce Pressing Angles and Roles
Introduce the concept of pressing angles and the pressing triangle. Assign specific roles (first presser, second presser, screener) and use positional games to reinforce them. Play on a 3/4-size pitch (70m × 50m) with 9v9. Begin introducing the "no press" trigger situations so players develop tactical decision-making alongside pressing instinct.
Open Age / Senior — Full Tactical Counter-Press System
Implement the full system as described above, including the high defensive line, the No. 6 screening role, and the immediate forward transition after winning the ball. Use video analysis to review press triggers and outcomes from matches. Introduce opposition-specific press traps — for example, deliberately inviting the opposition to play into wide areas where your press is strongest.