The Decoy Runner & Far Post Delivery: Attacking Free Kick Masterclass
Master the art of disrupting the defensive wall and delivering a devastating curling ball to the far post with this fully drilled, immediately usable attacking free kick routine.
Equipment Needed
Overview
This attacking free kick set play is designed to exploit the space behind the defensive wall and target the vulnerable far post area. By deploying a convincing decoy runner to shift the goalkeeper's focus and disrupt the wall's jump timing, the routine creates a clear delivery window for a curling ball that drops into the most dangerous zone on the pitch. It is most effective when the free kick is positioned 20–25 metres from goal, slightly right of centre (for a right-footed in-swinger), and is best used against teams that set a high, compact wall and push their goalkeeper to the near post.
The play works at all levels of the game because it exploits two universal defensive instincts: the goalkeeper's tendency to shade the near post and the wall's habit of jumping as a unit. By attacking both of those habits simultaneously, you create a moment of genuine chaos in the penalty area — and chaos, managed correctly, is where goals are scored.
Setup
Equipment Required
| Item | Quantity | Purpose |
|---|---|---|
| Footballs | 5–6 | Multiple repetitions without delays |
| Mannequins or cones | 4 | Represent the defensive wall |
| Marker cones | 6 | Mark starting positions for runners |
| Full-size goal | 1 | Realistic delivery practice |
| Goalkeeper | 1 | Live reaction to the delivery |
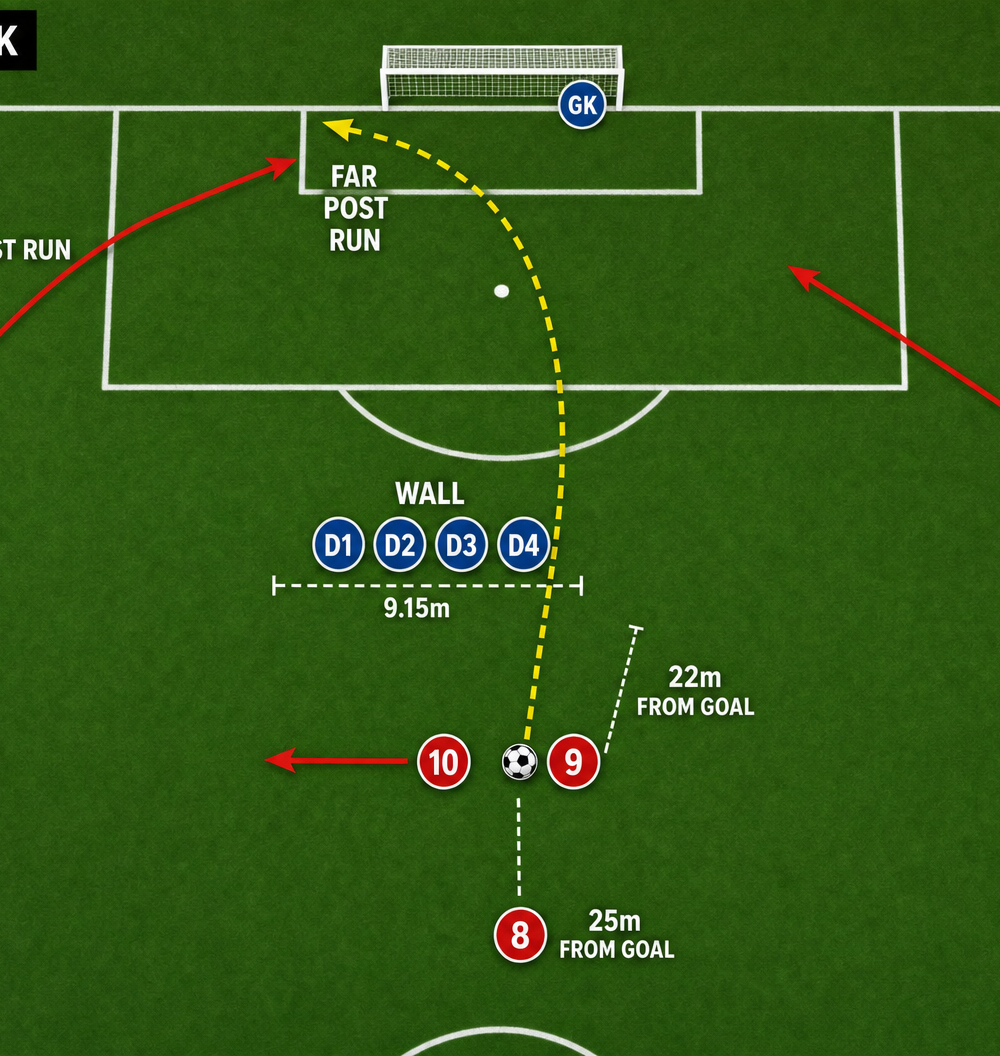
Pitch Setup: Use a standard 11v11 pitch (100–110m × 64–75m). Place the ball 22 metres from the goal line, approximately 3 metres right of the centre of the goal. Set the mannequin wall 9.15 metres from the ball, aligned to block the near-post angle. Place cones to mark the starting positions of all five attacking players.
Player Positions
- No. 9 (Primary Taker): Stands directly over the ball. Right-footed player preferred for this right-of-centre position to generate an in-swinging delivery to the far post.
- No. 10 (Decoy Runner): Stands immediately next to the ball, slightly behind No. 9, facing the wall.
- No. 7 (Far Post Runner): Positioned on the right edge of the penalty area, 18 metres from goal.
- No. 11 (Near Post Runner): Positioned on the left edge of the penalty area, 16 metres from goal.
- No. 8 (Late Arrival / Second Ball): Positioned centrally, 25 metres from goal, ready to arrive into the box late or receive a short pass option.
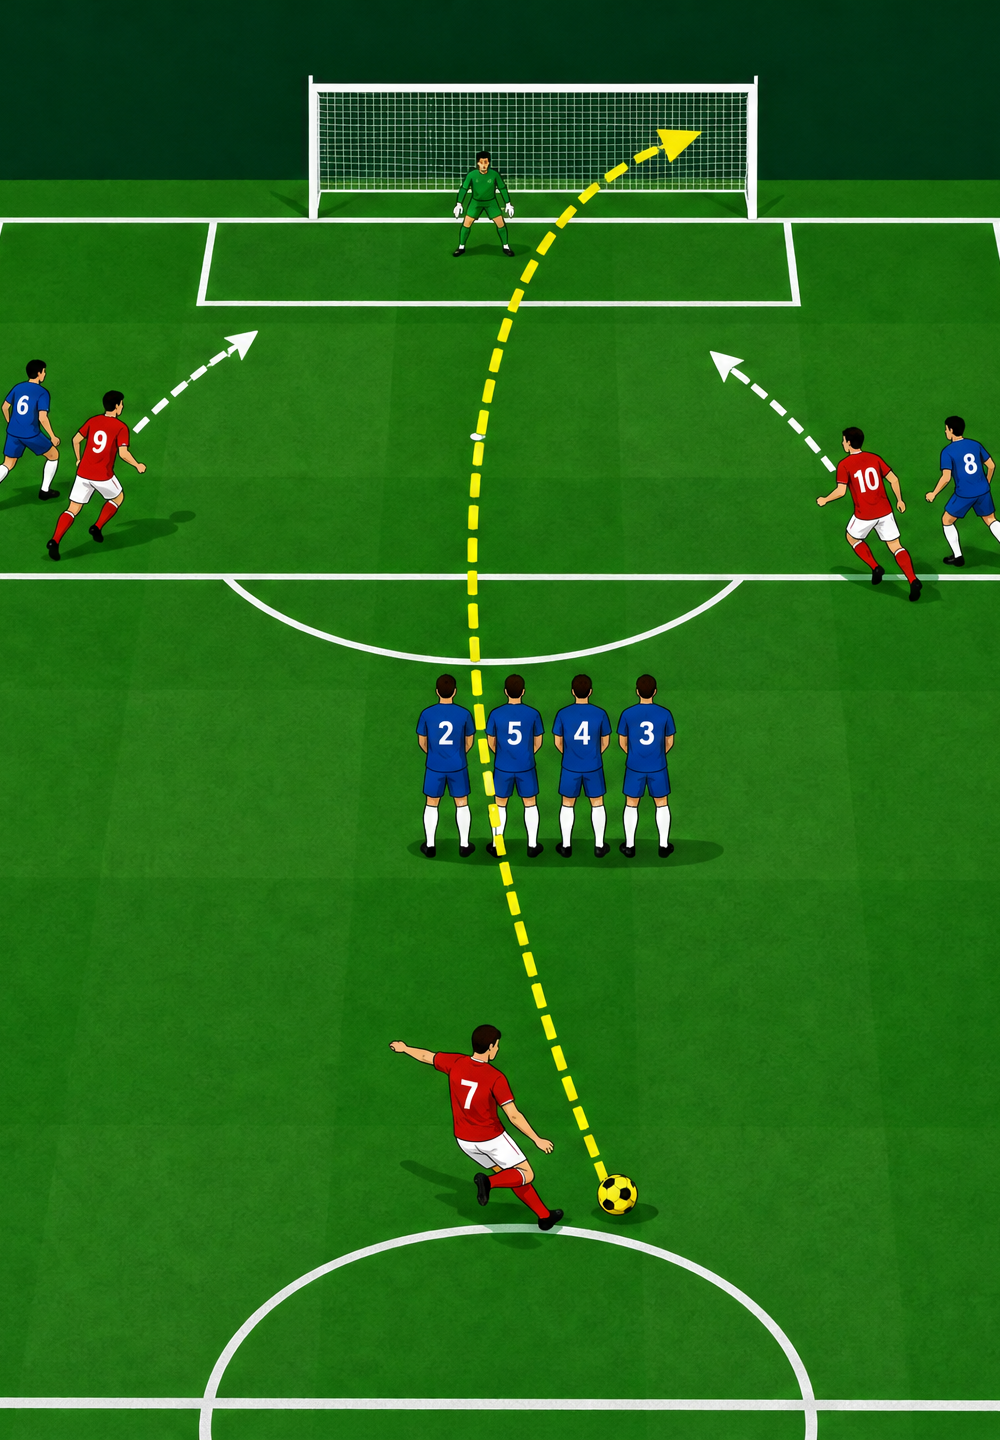
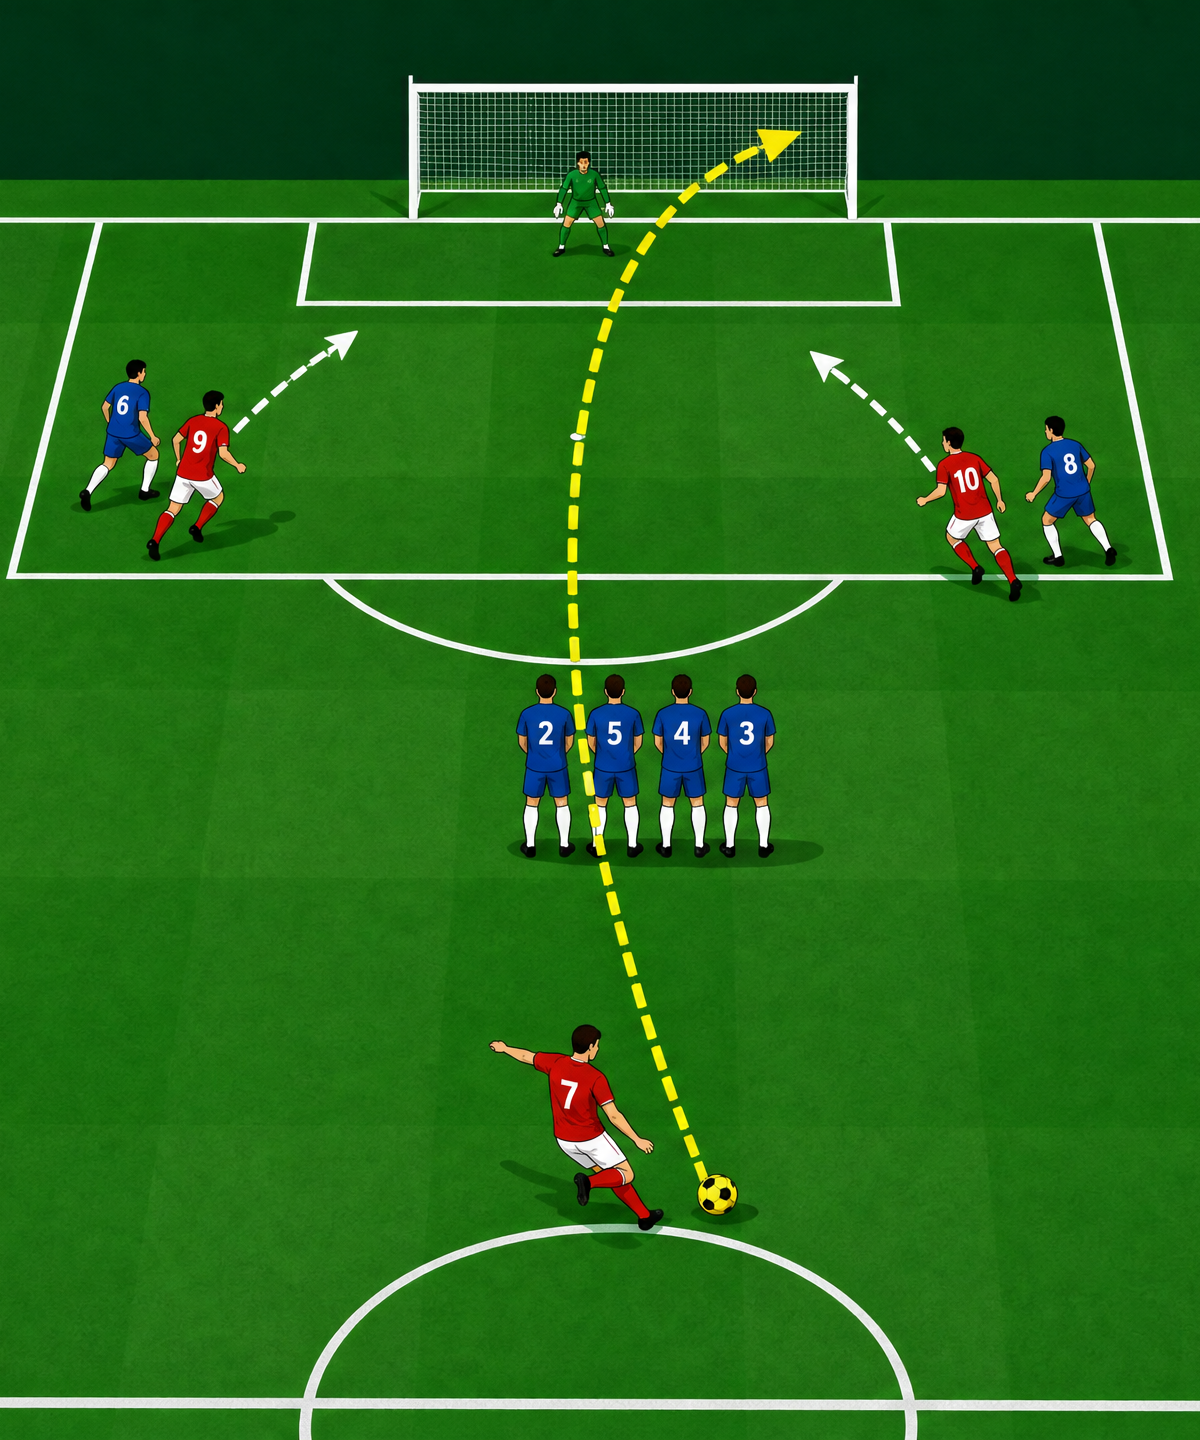
Diagram 1 — Phase 1: Initial Setup. Red circles = attacking team. Blue circles = defensive wall and goalkeeper. Dashed yellow arrow = planned ball trajectory. Solid red arrows = player movement runs.
Step-by-Step Instructions
Set the Wall. As soon as the referee awards the free kick, No. 9 places the ball immediately and stands over it. This pressures the opposition to set their wall quickly, often in a suboptimal position.
Position the Runners. No. 7 jogs to the right edge of the penalty area. No. 11 takes a position on the left edge. No. 8 holds deep, 25 metres out, maintaining a central position. No. 10 stands next to the ball.
The Signal. No. 9 gives the pre-agreed trigger — a subtle gesture such as adjusting a sock, placing both hands on hips, or a specific verbal call. All runners must be watching for this signal.
The Decoy Run. On the signal, No. 10 takes a short run-up and steps over the ball, continuing their run diagonally to the left. This run must look completely convincing — full sprint, eyes on goal. The goalkeeper will instinctively track this movement.
Simultaneous Runner Movements. At the exact moment No. 10 steps over the ball, No. 7 begins a sharp curved run from the right edge of the box towards the far post. No. 11 makes a direct run towards the near post, pulling the last defender away from the far post zone. No. 8 begins a late run from deep, targeting the penalty spot area.
The Delivery. No. 9 strikes the ball with the instep of the right foot, generating an in-swinging trajectory. The ball must clear the wall (minimum height of approximately 2.5 metres at the wall) and then dip sharply into the space between the penalty spot and the far post — a zone roughly 6 metres wide and 5 metres from the goal line.
The Finish. No. 7 attacks the dropping ball aggressively, aiming to head or volley it back across goal or directly into the far corner. No. 8 arrives at the penalty spot to attack any knockdowns or goalkeeper spills. No. 11 holds their near-post position to create a second option if the delivery is overhit.

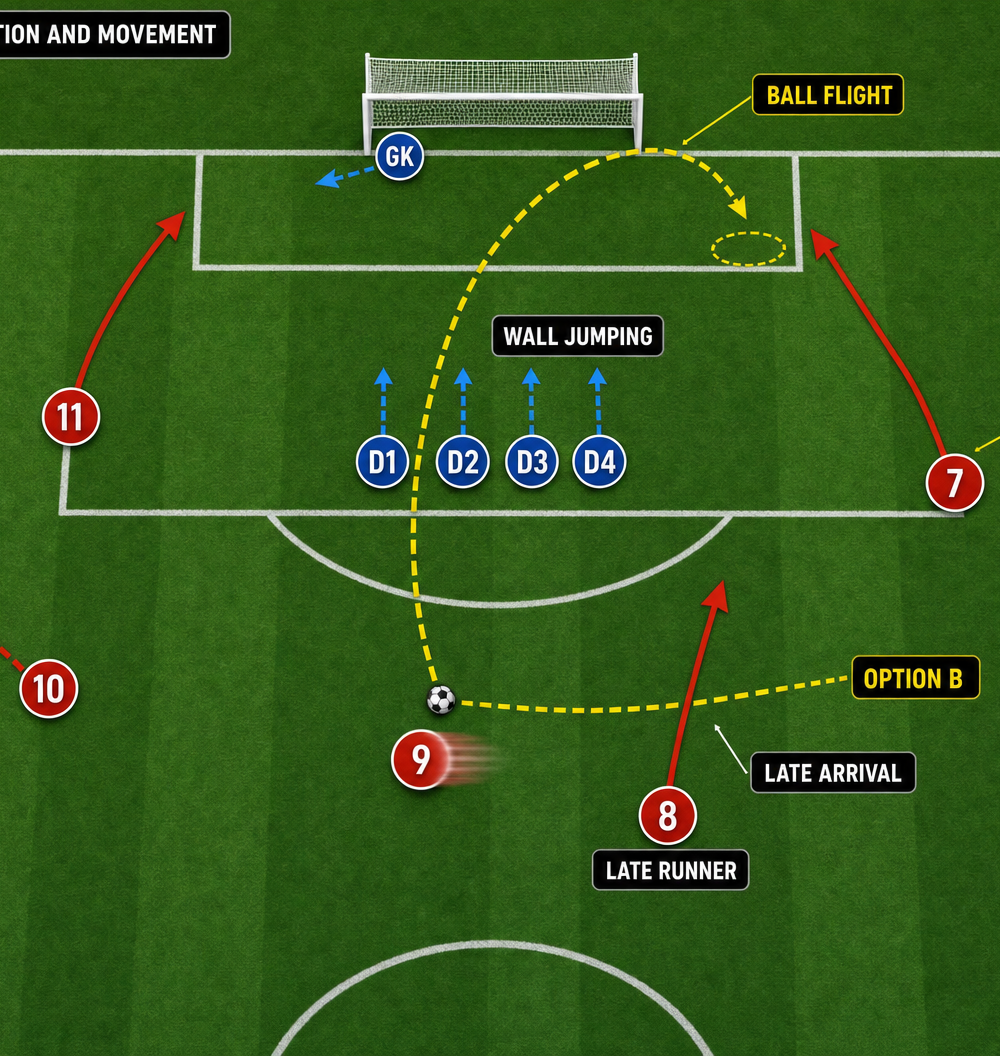
Diagram 2 — Phase 2: Execution and Movement. Option A = in-swinging delivery to far post (No. 7). Option B = low driven pass to late runner (No. 8). Blue upward arrows = wall jumping. GK movement shown tracking the decoy.
Key Coaching Points

The Decoy Must Commit. A half-hearted step-over fools nobody. No. 10 must sprint through the ball as if they intend to strike it with maximum power. Rehearse this in isolation until it looks indistinguishable from a real strike.
Delivery Height and Dip. The ball must have sufficient height to clear the wall but enough backspin or topspin to dip sharply before the goalkeeper can claim it. Encourage No. 9 to strike through the lower half of the ball with a slightly open foot to generate both height and curl.
Run Timing is Everything. No. 7 must begin their run at the moment No. 10 steps over the ball — not before (offside risk) and not after (they will miss the delivery). Walk through the timing repeatedly in slow motion before running it at full pace.
Attack the Space, Not the Ball. Runners must sprint to where the ball is going to land, not to where it currently is. Teach players to read the delivery trajectory and adjust their run accordingly.
Second Ball Mentality. No. 8's late run is not an afterthought — it is a critical part of the play. Goalkeepers spill deliveries, defenders head the ball back into danger, and the player arriving late from deep is often completely unmarked.
Rehearse Under Pressure. Run this routine with a live defensive wall and goalkeeper as soon as players understand the mechanics. Decision-making under realistic defensive pressure is what converts training-ground routines into match-day goals.
Common Mistakes

1. Hitting the Wall. The most common error. Usually caused by No. 9 striking too flat or aiming too close to the wall's edge. Fix: use a mannequin wall in training and demand the ball clears it by at least half a metre on every repetition.
2. Static or Predictable Runs. Runners who jog rather than sprint, or who start their runs too early, are easily tracked by defenders. Fix: emphasise explosive acceleration from a standing start and reinforce the timing trigger.
3. Offside. No. 7 or No. 11 stepping past the defensive line before the ball is struck. Fix: use an offside line in training (a cone or flat marker) and penalise any run that crosses it before the ball is played.
4. Goalkeeper Claiming the Ball. Delivery landing too high or too central, allowing the goalkeeper to take a comfortable catch. Fix: target the far post zone specifically — the ball should arrive at a height between 1.5 and 2 metres at the far post.
5. Neglecting the Rebound. Players watching the delivery rather than anticipating a spill. Fix: make it a rule that No. 8 must always arrive at the penalty spot, regardless of whether the delivery looks on target.
Variations & Progressions

Variation 1 — The Short Option (Option B). If the opposition wall is well-organised and the goalkeeper is positioned well, No. 9 plays a short, disguised pass to No. 8, who has made a late run into the space vacated by No. 10's decoy run. No. 8 then has a shooting opportunity from 20 metres with a disorganised defence. This variation is most effective when used after establishing the main routine — the defence will be anticipating the cross.
Variation 2 — The Direct Strike. If the goalkeeper consistently moves early to cover the far post, No. 9 drives the ball low and hard to the near post, aiming for the gap at the end of the wall. This requires No. 9 to read the goalkeeper's movement in the final moment before striking.
Progression — Live Defensive Pressure. Once the routine is established with a static wall and passive defenders, introduce a full defensive unit (4 defenders + goalkeeper). Defenders are instructed to track runners and the goalkeeper is encouraged to claim everything. This forces attackers to sharpen their timing and delivery quality under realistic conditions.
Age Adaptations

| Age Group | Adaptation |
|---|---|
| Under 10 – Under 12 | Remove the decoy runner. Focus solely on delivery technique and one simple far-post run. Use a 3-player mannequin wall. Reduce distance to 15–18 metres. |
| Under 14 – Under 16 | Introduce the decoy runner. Focus on timing of runs and delivery trajectory. Use a live goalkeeper. Introduce the offside concept explicitly. |
| Open Age / Senior | Implement the full routine including Option B and the direct strike variation. Add a live defensive unit. Introduce verbal and non-verbal signal systems. |
For younger age groups, prioritise enjoyment and the basic concept of creating confusion in the defence. The technical precision of the delivery and the tactical nuance of the timing can be developed progressively as players mature.