Wall Breaker: Free Kick Wall and Delivery Play
Master the art of the direct free kick with a multi-option wall-and-delivery system that exploits both the near post and far post simultaneously, giving your team a decisive edge in the attacking third.
Equipment Needed
Overview
The Wall Breaker free kick routine is a structured attacking set play designed for direct free kicks awarded between 18 and 28 metres from goal, typically in central or half-central positions on the pitch. It combines the threat of a direct strike over or around the defensive wall with coordinated runner movements that stretch the defensive shape and create second-ball opportunities inside the penalty area.
This play is most effective when the opposition has committed a foul in a dangerous area and your team has a technically proficient set-piece taker — ideally a player capable of bending the ball with pace and accuracy. The dual-threat nature of the routine (direct delivery plus runners) means the defending goalkeeper and wall cannot fully commit to blocking both options simultaneously, creating exploitable gaps.
Use this set play whenever your team wins a free kick in the attacking half within the central corridor (between the two penalty area posts extended), at distances of 18–28 metres from goal. It is equally effective against a four-man wall or a three-man wall.
Setup
Equipment Required
| Item | Quantity | Purpose |
|---|---|---|
| Full-size footballs | 6–8 | Primary delivery and spare balls |
| Cones (small, disc) | 12 | Mark wall position, run channels, and zones |
| Bibs (two colours) | 11 + 5 | Distinguish attackers from defenders |
| Full-size goal | 1 | Target for delivery |
| Mannequins or poles | 4 (optional) | Simulate wall in unopposed practice |
Pitch Setup
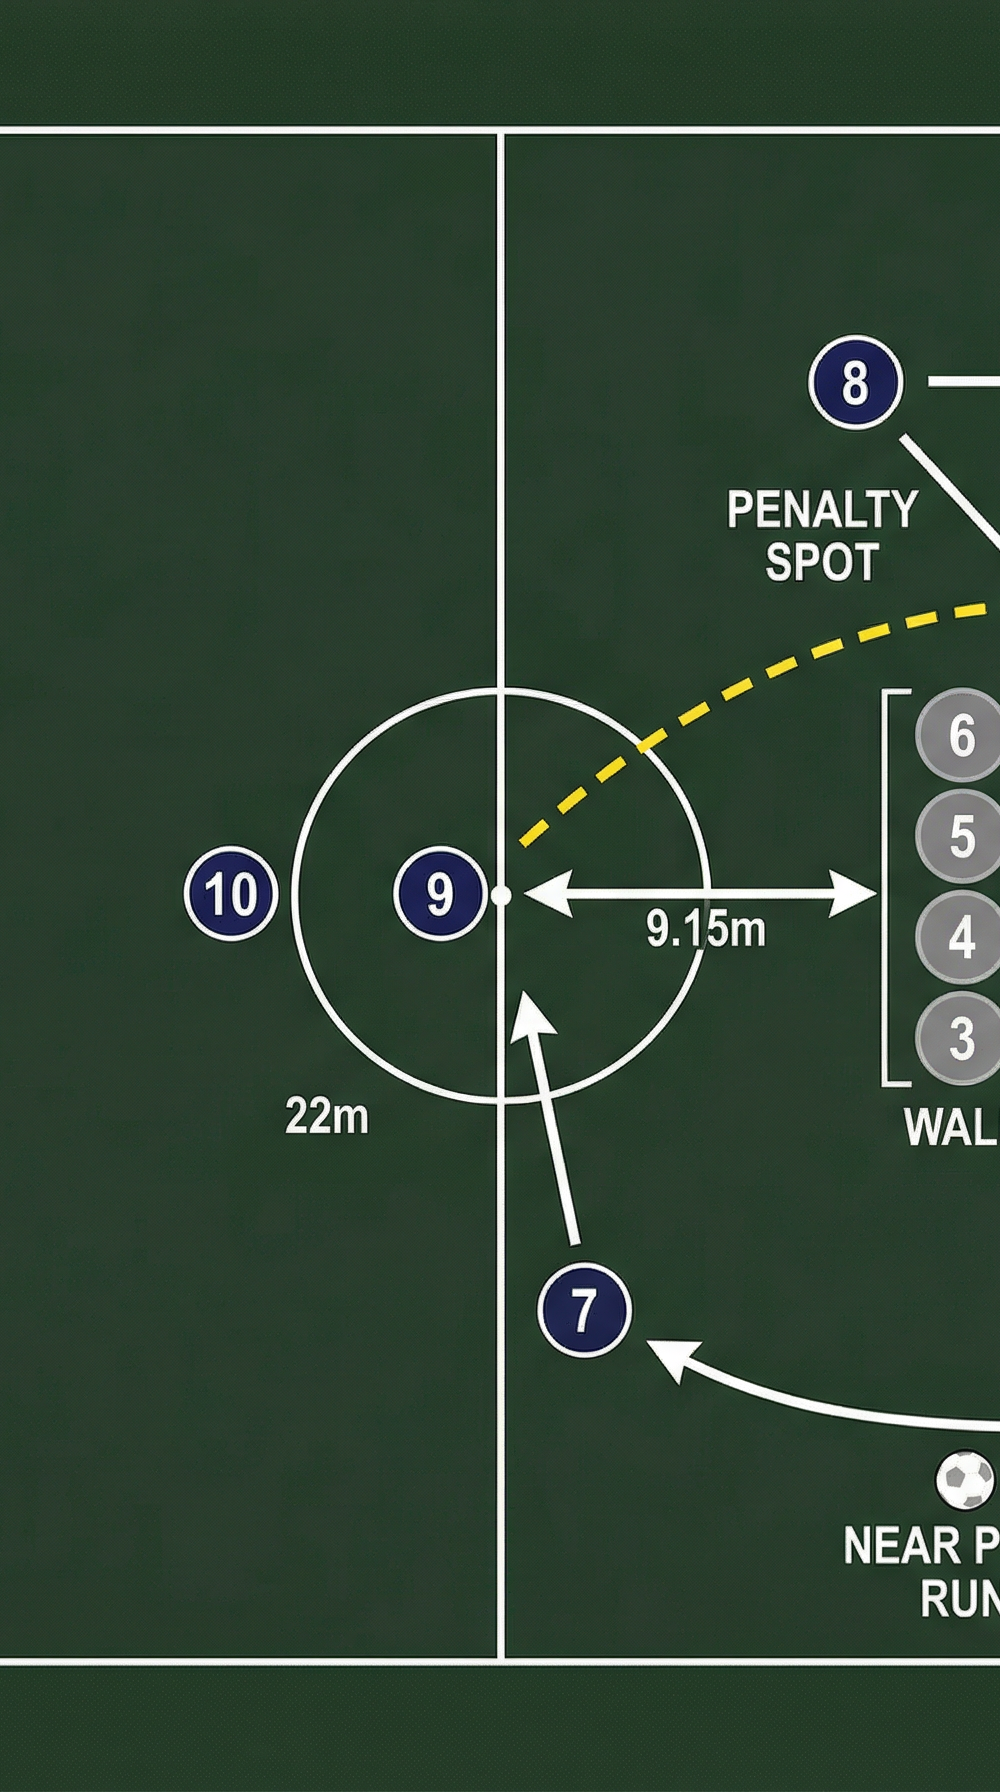
This routine is rehearsed on a full-size pitch (100–110m × 64–75m). Place the ball at a free kick position 22 metres from goal, slightly right of centre (approximately 5 metres right of the penalty spot extended). Mark the mandatory 9.15-metre exclusion zone with a cone arc if training without a referee. Set up a four-player defensive wall aligned to cover the goalkeeper's near post.
Player Positions
| Player | Position | Starting Location |
|---|---|---|
| No. 9 (Striker) | Primary taker | Standing over the ball |
| No. 10 (Attacking Mid) | Dummy runner / secondary taker | 2m directly behind the ball |
| No. 7 (Right Winger) | Near post runner | 3m outside the right edge of the penalty area |
| No. 11 (Left Winger) | Far post runner | 5m outside the left edge of the penalty area |
| No. 8 (Central Mid) | Penalty spot arrival | Top of the penalty area, 20m from goal |
| No. 6 (Defensive Mid) | Safety / second ball | 25m from goal, central |
| No. 3, 4, 5 (Defenders) | Held back | Halfway line — do not commit forward |
Step-by-Step Instructions
Step 1 — Award and Setup (0–15 seconds)
The moment the free kick is awarded, No. 9 and No. 10 immediately walk to the ball. No. 9 places the ball precisely and stands over it. No. 10 positions 2 metres directly behind. No. 7, No. 11, and No. 8 take their starting positions as described above. No. 6 drops to a holding position. The team must be set and ready before the referee signals play can resume.
Step 2 — The Trigger Signal (pre-kick)
No. 9 uses a pre-agreed visual signal — typically a raised hand or a glance — to confirm which delivery option is being executed: Option A (direct curl over the wall) or Option B (short combination). This signal is given subtly to No. 10 and the runners before the approach run begins.
Step 3 — The Approach Run (Option A — Direct Delivery)
No. 9 takes a curved, three-step approach run from a 45-degree angle. Simultaneously:
- No. 10 makes a dummy run to the left of the ball, drawing one defender out of the wall or pulling the goalkeeper's attention.
- No. 7 begins a sharp near-post run, entering the penalty area from the right at pace, targeting the near post at the moment of delivery.
- No. 11 begins a far-post run from the left, curling around the back of the defensive line to arrive at the far post 1–2 seconds after delivery.
- No. 8 holds position until the ball is struck, then drives forward to the penalty spot to attack any clearance or deflection.
Step 4 — The Delivery
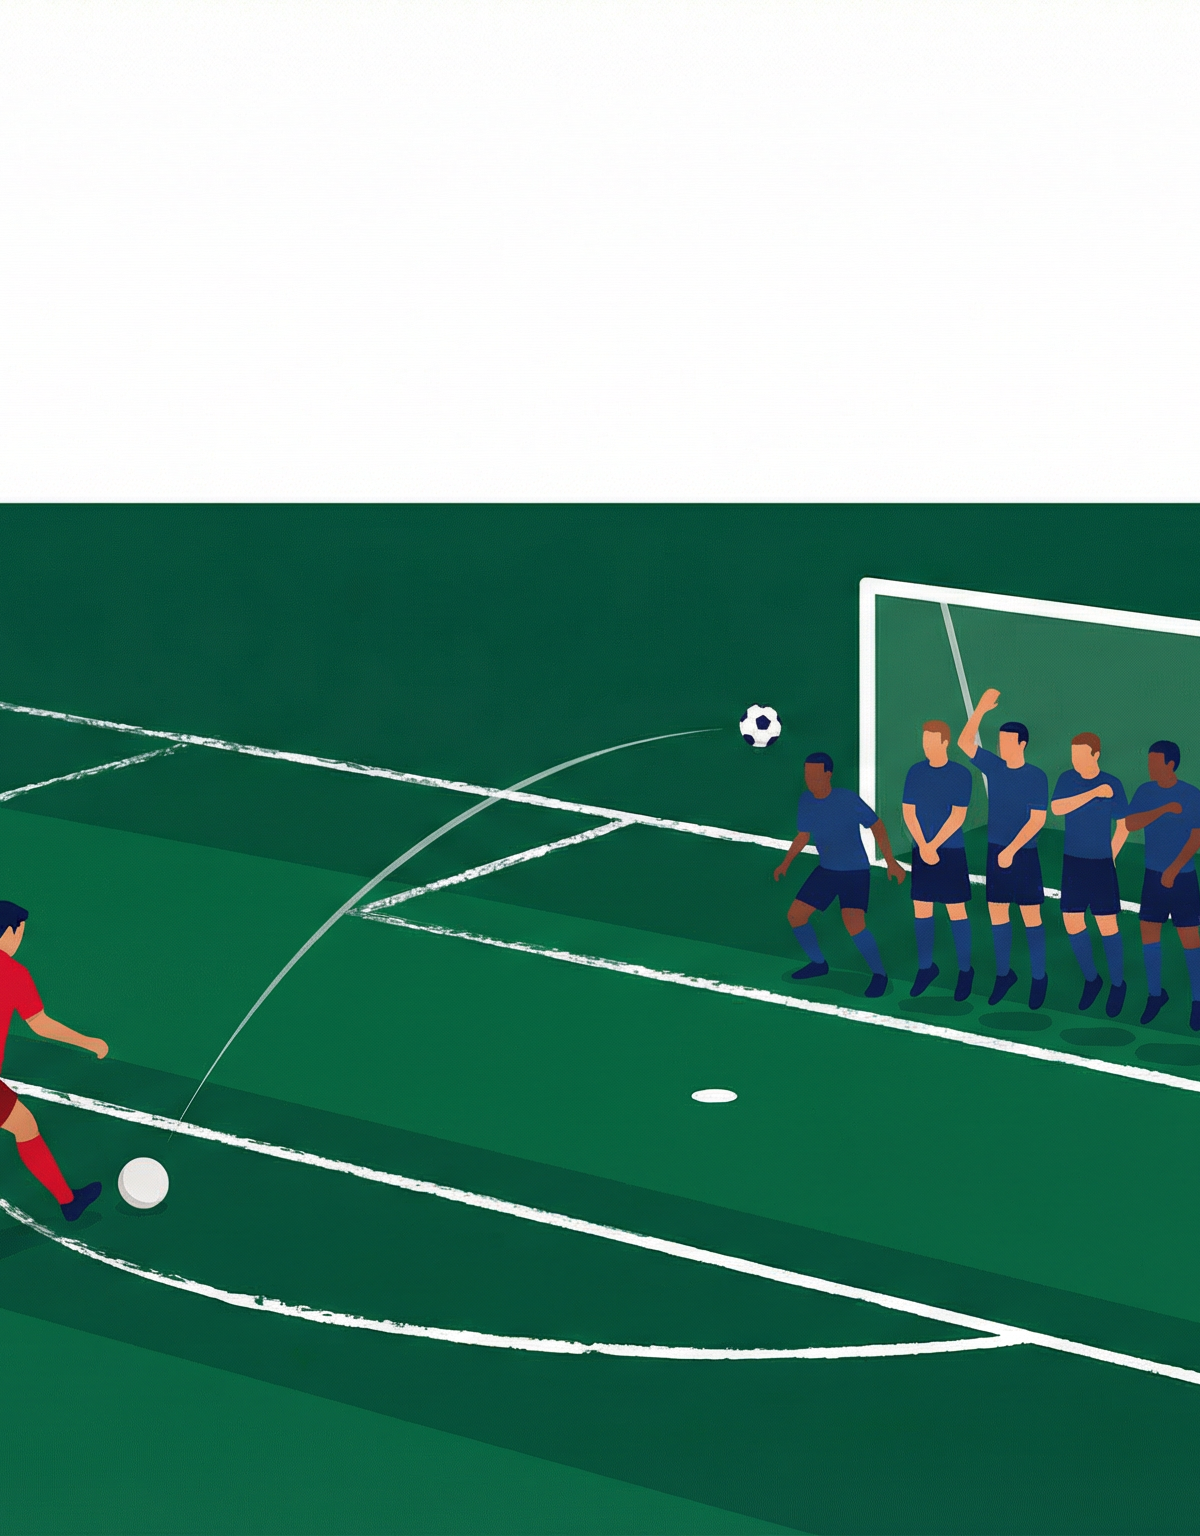
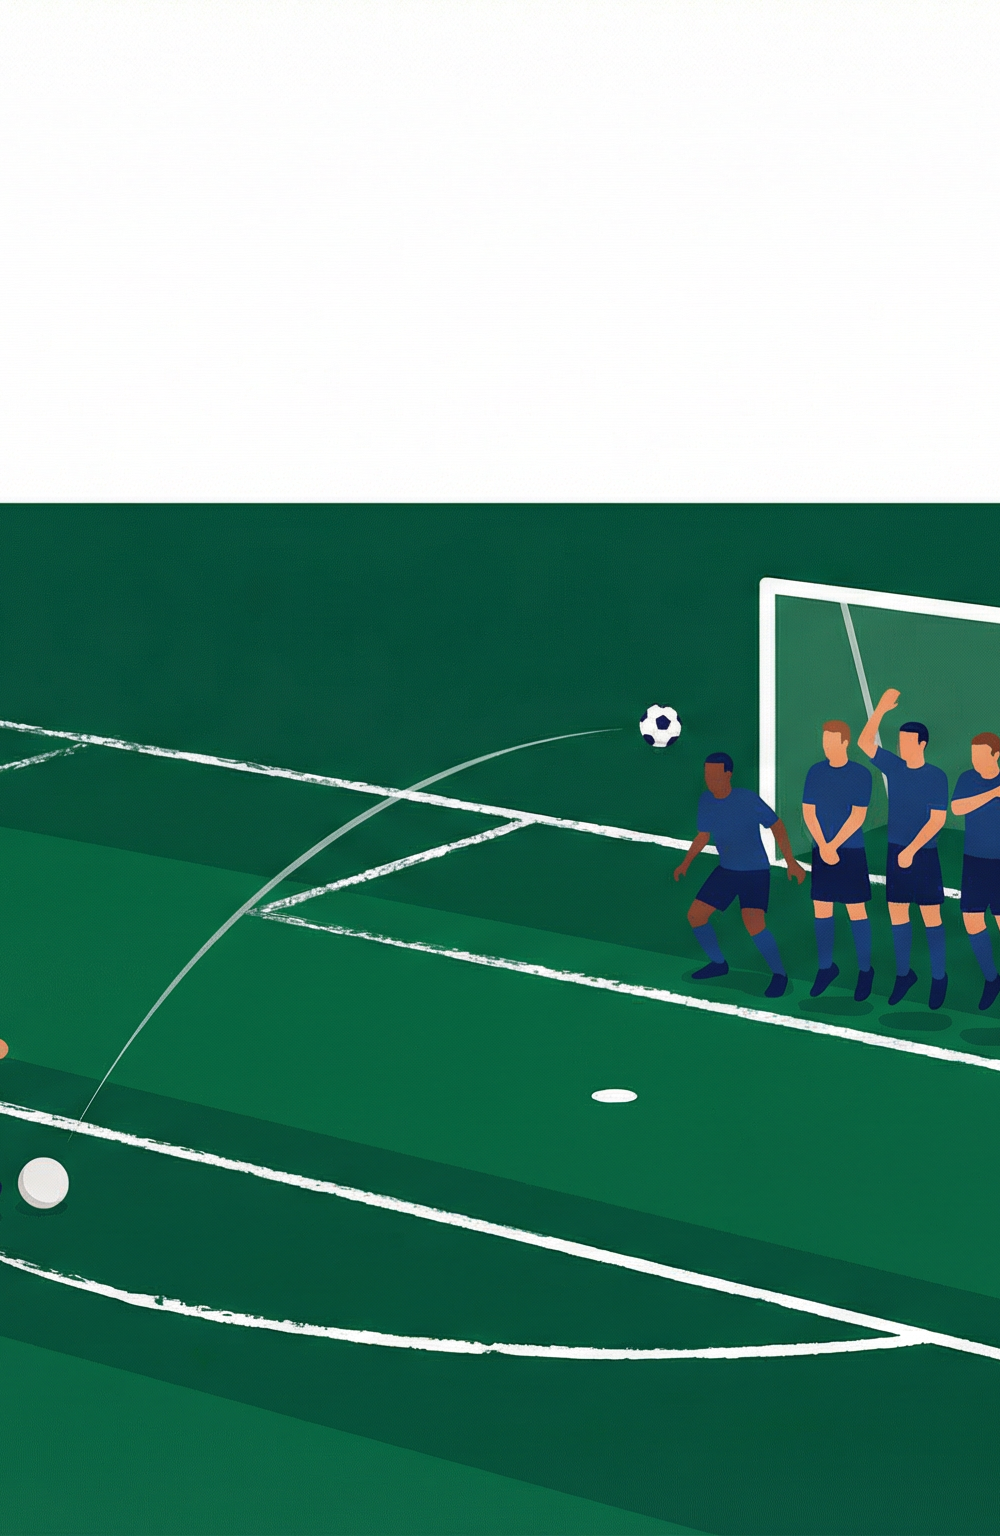
No. 9 strikes the ball with the inside of the right foot, generating a left-to-right curl that rises over the wall and bends toward the far post. The target delivery zone is the back third of the six-yard box on the far post side. Ball flight time to the target is approximately 1.2–1.5 seconds — runners must time their entry to arrive as the ball does.
Step 5 — Attacking the Delivery
No. 7 attacks the near post and can flick or redirect the ball on if it is delivered slightly short. No. 11 attacks the far post and is the primary finishing target. No. 8 arrives at the penalty spot to convert any parried or deflected ball. No. 10 positions for a second-phase ball outside the area.
Step 6 — Transition to Defence
If the ball is not converted, No. 6 and the back three immediately push up to compress space and prevent a counter-attack. No. 9 and No. 10 press the goalkeeper if the ball is caught. The team must be organised to defend within 3 seconds of the ball leaving the penalty area.
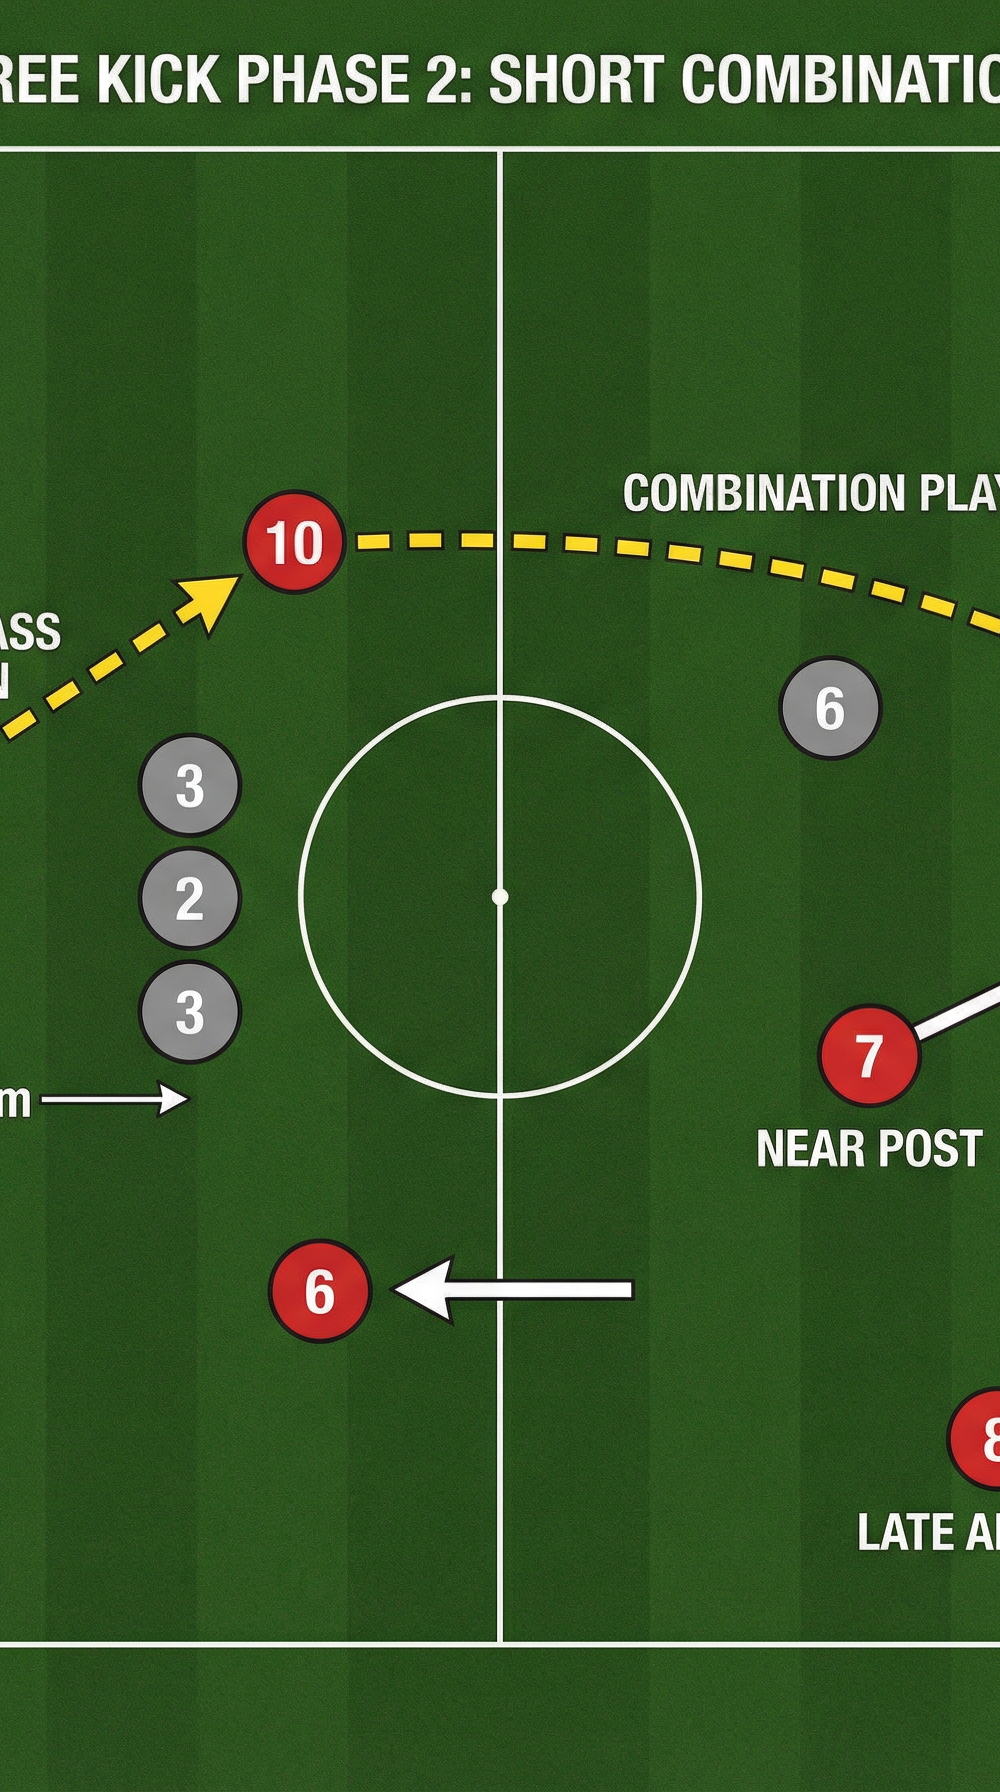
Short Combination Option (Option B)


When the defensive wall is particularly well-organised or the direct angle is unfavourable, No. 9 plays a short, firm pass to No. 10 who has made an angled run to receive. No. 10 takes one touch to set the ball and delivers a first-time cross or driven pass into the penalty area. This option is most effective when the wall shifts to block the direct route, opening space for a wider delivery angle. No. 7 attacks the near post, No. 11 the far post, and No. 8 arrives late at the penalty spot. No. 6 holds as a safety valve.
Key Coaching Points

1. Timing of Runs is Everything. Runners must not enter the penalty area before the ball is struck — this risks an offside flag and wastes the opportunity. Emphasise that the run begins on No. 9's final step of the approach, not before.
2. Ball Placement Precision. The taker must place the ball on a flat, stable surface and take time to position it correctly. A poorly placed ball affects the strike angle and reduces the likelihood of achieving the intended curl. Coaches should drill this habit until it is automatic.
3. The Dummy Runner Must Commit. No. 10's dummy run is only effective if it is convincing. A half-hearted jog will not draw a defender or distract the goalkeeper. No. 10 should accelerate as if genuinely expecting the ball.
4. Wall Awareness for the Taker. No. 9 must identify the gap between the wall and the goalkeeper before striking. The ball should be aimed to curl through or over the wall's outside shoulder — not directly at the wall's centre.
5. Second-Ball Mentality. No. 8's role is often undervalued. Statistically, a significant proportion of free kick goals come from rebounds and second balls. No. 8 must arrive at the penalty spot with the intention of scoring, not merely watching.
6. Communication and Calm. The entire routine breaks down under pressure if players rush. Coaches must train players to take their time, communicate the option clearly, and execute with composure — even in high-pressure match situations.
Common Mistakes

Mistake 1 — Runners Going Too Early. The most common error at all levels. Players get excited and begin their penalty-area runs before the ball is struck, giving defenders time to track and mark them. Correction: Use a cone gate at the edge of the penalty area in training and enforce that no player may pass through the gate until the taker's foot makes contact with the ball.
Mistake 2 — Taker Striking Directly at the Wall. Without a clear target in mind, takers default to striking at the wall's centre, which is easily blocked. Correction: Place a cone 1 metre outside the wall's right shoulder as a visual target. The ball should pass that cone in flight. Repeat until the taker can consistently find this line.
Mistake 3 — No. 8 Arriving Too Late. The central midfielder either holds too long or starts the run too late, arriving at the penalty spot after the ball has already been dealt with. Correction: Identify the exact trigger point (No. 9's final approach step) and drill No. 8's run timing in isolation before combining with the full routine.
Mistake 4 — Neglecting Defensive Transition. Teams celebrate the attack and forget to transition. A quick goalkeeper distribution can catch three or four players out of position. Correction: Designate No. 6 as the transition anchor and run defensive transition drills immediately after every set-piece rehearsal.
Mistake 5 — Poor Communication on Option Selection. Players are unsure which option (A or B) is being played, leading to confusion and mistimed runs. Correction: Establish a clear, simple signal system and rehearse it until it becomes second nature. Keep signals subtle — a raised hand, a nod, or a verbal codeword.
Variations and Progressions

Variation 1 — Left-Footed Mirror Play. Execute the same routine from the left side of the pitch using a left-footed taker (e.g., No. 11). The curl direction reverses, targeting the near post on the goalkeeper's right. All runner assignments mirror accordingly. This variation prevents the opposition from preparing a single-sided defensive setup.
Variation 2 — Three-Man Combination. Add a third player to the short combination option. No. 9 plays to No. 10, who lays off to a third player (No. 8) arriving from deep. No. 8 then delivers into the area. This extra touch draws the wall out of position and creates a wider delivery angle, but requires precise timing and is best used against a well-drilled, compact wall.
Progression — Live Defensive Pressure. Begin the routine with mannequins as the wall, then progress to passive defenders, then to a fully active defensive unit including a goalkeeper. Each progression adds decision-making pressure and forces players to read and react to real defensive movements rather than static obstacles.
Age Adaptations

| Age Group | Key Modifications |
|---|---|
| Under 10 / Under 12 | Reduce to a two-player routine (taker + one runner). Focus on ball placement and a single delivery target. Use a smaller goal and reduce the free kick distance to 14–16 metres. Remove the wall entirely in early sessions. |
| Under 14 / Under 16 | Introduce the full three-runner structure but use a two-man wall initially. Emphasise run timing and the dummy runner concept. Allow players to self-select Option A or B based on what they see. |
| Open / Senior | Run the full routine as described. Introduce live opposition pressure early. Add a goalkeeper to all rehearsals. Develop player ownership — let the taker and runners make in-game decisions without coaching interruption. |
Coach's Note: At every age group, the priority is confidence and clarity. A simple routine executed with conviction will always outperform a complex one executed with hesitation. Build the habit of composure under pressure before adding tactical complexity.