Mastering the Goal Line: A Dynamic Shot-Stopping Drill
A comprehensive guide for coaches to develop goalkeeper agility, positioning, and shot-stopping technique through a series of progressive, game-realistic scenarios.
Equipment Needed
1. Overview
This dynamic shot-stopping drill is designed to sharpen a goalkeeper's core responsibilities: positioning, agility, handling, and decision-making under pressure. It moves beyond static shots, creating a more game-realistic environment where the keeper must constantly adjust their set position, react to varied strikes, and control rebounds. It is an essential drill for any training session focused on defensive solidity and goalkeeper development, suitable for weekly inclusion to maintain and enhance fundamental skills.
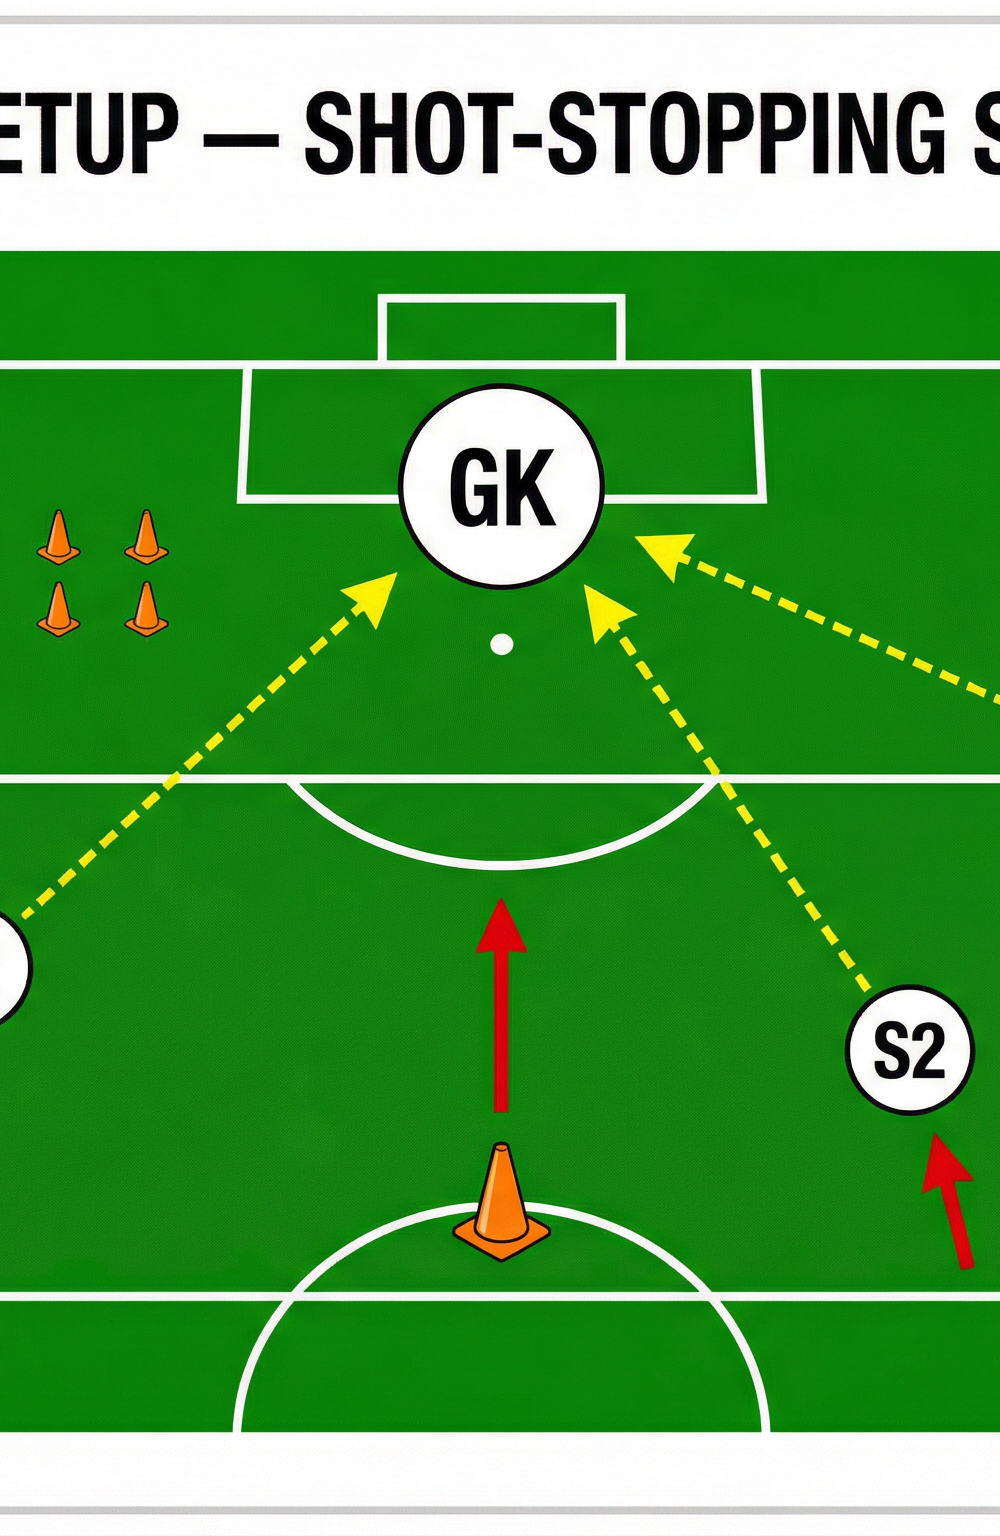
2. Setup
Equipment:
- 1 Full-size goal (24ft x 8ft)
- A large supply of footballs (minimum 10-15), placed near the coach.
- 5-7 cones to mark shooting stations.
Pitch Setup:
- The drill is set up in one half of the pitch, focused around the penalty area.
- Place three cones to act as shooting stations (S1, S2, S3) in an arc approximately 16-20 yards from the goal line. S1 and S3 should be near the corners of the penalty area, with S2 positioned centrally.
- The Goalkeeper (GK) starts in a central position on the goal line.
- The Coach (C) is positioned centrally, just outside the penalty area, to direct the drill and supply balls.
Player Positions:
- Goalkeeper (GK): The primary focus of the drill.
- Shooters/Servers (3): Positioned at each of the three cone stations (S1, S2, S3). These can be other goalkeepers, outfield players, or coaches.
3. Step-by-Step Instructions
- Starting Position: The Goalkeeper (GK) begins in a central, balanced 'set' position on the goal line, ready for the first shot.
- First Shot: The drill commences on the coach's command. The player at Station 1 (S1) takes a shot aiming for the near or far post. The GK must react, make the save, and secure the ball.
- Recovery and Reset: After the save, the GK quickly returns the ball to the coach and immediately resets their position relative to the next shooter at Station 2 (S2).
- Second Shot: The player at S2 takes their shot. The shot should be varied—it could be low and hard, a curler, or aimed directly at the keeper to test their handling.
- Third Shot: After saving and returning the ball, the GK shuffles across to get in line with the final shooter at Station 3 (S3). The player at S3 delivers the final shot of the sequence.
- Rotation: After one full cycle (3 shots), the GK rests for 30-60 seconds while another keeper steps in, or they repeat the drill after a brief recovery. Each keeper should complete 4-6 full sets.
4. Key Coaching Points
- Aggressive Set Position: The GK should be on their toes, with knees bent, weight forward, and hands in a ready position. They should not be flat-footed or leaning back. Emphasize being ready to move explosively in any direction.
- Efficient Footwork: Watch for quick, sharp movements across the goal. The keeper should use shuffle steps to cover lateral distances, ensuring their feet do not cross over, which would unbalance them. The final step should be a power step into the dive.
- Positive Hand Shape: Reinforce the 'W' (for balls at the chest/face) and 'Cup' (for balls below the waist) techniques. Hands should be strong and firm, getting behind the line of the ball to secure it cleanly.
- Control the Rebound: A clean catch is ideal, but not always possible. The second priority is to parry the ball away from danger—wide of the goal or over the bar. A rebound parried back into the shooting zone is a failure. Coach the keeper to direct the parry with the palm.
- Communication: Even in a drill, encourage the GK to be vocal. A sharp “Keeper!” call asserts their presence and is a good habit for game situations.
5. Common Mistakes
- Late Set: The goalkeeper is still moving or is not balanced when the shot is taken. Correction: Use a verbal cue (“Set!”) just before the shooter strikes the ball to remind the keeper to get into their ready position.
- Spilling the Ball into Danger: Parrying or spilling saves directly in front of the goal. Correction: Emphasize angling the hands and body to direct the ball into the “safe zones” wide of the posts.
- Diving Backwards: Goalkeepers diving parallel to the goal line or slightly backwards, reducing their coverage. Correction: Use cones as a visual aid, encouraging the keeper to move forward into the save, attacking the ball.
- Poor Recovery: Being slow to get up after a save. Correction: Incorporate a follow-up action, such as a quick sprint to a cone after each save, to build explosive recovery into their muscle memory.
6. Variations & Progressions
Variation 1: Add a Finisher
- Place an extra attacker inside the six-yard box. Their job is to pounce on any rebounds or parried saves from the goalkeeper, forcing the GK to not only make the initial save but also recover quickly to make a second, close-range block.
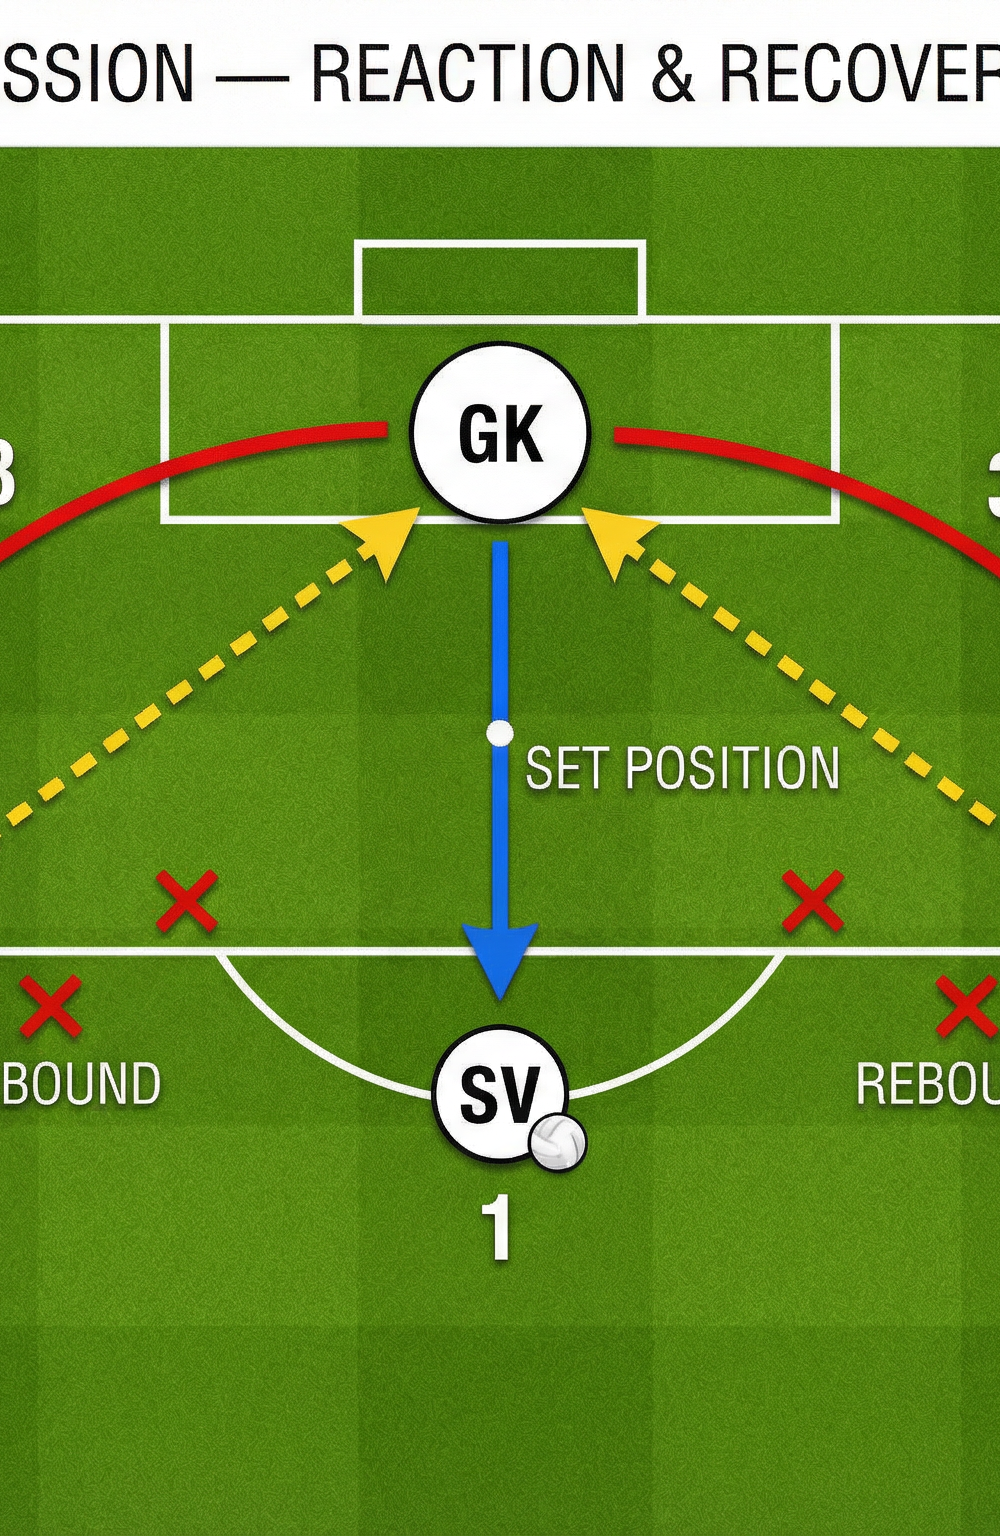
Progression 1: Reaction & Recovery
- This progression focuses on second saves. The coach or a central server (SV) starts with a simple volley or driven shot at the keeper. As soon as the GK makes the save, a second ball is fired in from a wide feeder (F1 or F2). This forces the keeper to recover their position and make a reactive save from an unexpected angle.
Progression 2: Add Deflections
- Place a player or a mannequin 8-10 yards from goal. Shooters must now aim to use the obstruction to create a deflection, forcing the goalkeeper to adjust their body shape and reaction time at the last second. This is an advanced progression that simulates a crowded penalty area.
7. Age Adaptations
- Under 8 / Under 10: Focus on fundamentals. Use softer balls (size 3 or 4) and have servers throw or pass the ball rather than shoot. Reduce the distance to 10-12 yards. The primary goal is building confidence and correct hand shape, not power saves.
- Under 12 / Under 14: Introduce more powerful, dynamic shots. Increase the distance and pace of the shots. Emphasize diving technique (power step, launch) and introduce the concept of parrying shots into safe areas. The drill can be run as described.
- Under 16 / Open Age: The drill should be run at full match intensity. Demand explosive movements, clean handling, and tactical decision-making (e.g., when to catch vs. when to parry). Incorporate the advanced progressions with deflections and second-phase attacks to challenge the keeper mentally and physically.