Rondo Passing & Possession Drill: The 6v2 Foundation
Master the art of possession football with this classic Rondo drill — the cornerstone of elite passing development used by top clubs worldwide.
Equipment Needed
Overview
The Rondo is one of the most effective and widely-used drills in modern football coaching. At its core, it is a keep-ball exercise where a group of players in possession (the "outside" group) work to maintain the ball against a smaller group of defenders (the "inside" group). The drill was popularised at FC Barcelona's La Masia academy and has since become a staple warm-up and technical training tool at every level of the game.
The 6v2 Rondo is the ideal starting format for players aged 10 and above. It develops first-touch quality, passing weight and accuracy, spatial awareness, and the ability to play under pressure. Crucially, it also trains defenders in pressing mechanics and working as a unit to win the ball. Use this drill at the start of any session to activate technical habits, or as a standalone possession unit within a larger tactical session.
Coach's Note: The Rondo is not just a warm-up. When coached with intent, it directly replicates the decision-making demands of a match — recognising when to play forward, when to recycle, and how to support the ball-carrier.
Setup
Equipment Required: 8 flat cones or markers, 2–3 footballs, training bibs (2 colours).
Grid Size: Mark out a 10m x 10m square using flat cones at each corner. This is the standard size for a 6v2 Rondo. Adjust to 12m x 12m for younger or less experienced players.
Player Positions:
| Role | Number of Players | Bib Colour | Position |
|---|---|---|---|
| Outside Possessors | 6 | Blue | Around the perimeter of the grid |
| Central Defenders | 2 | Red/Orange | Inside the grid |
Starting Formation: Position the 6 outside players around the perimeter — space them evenly so each player has at least 2 clear passing options at all times. The 2 defenders start in the centre of the grid.

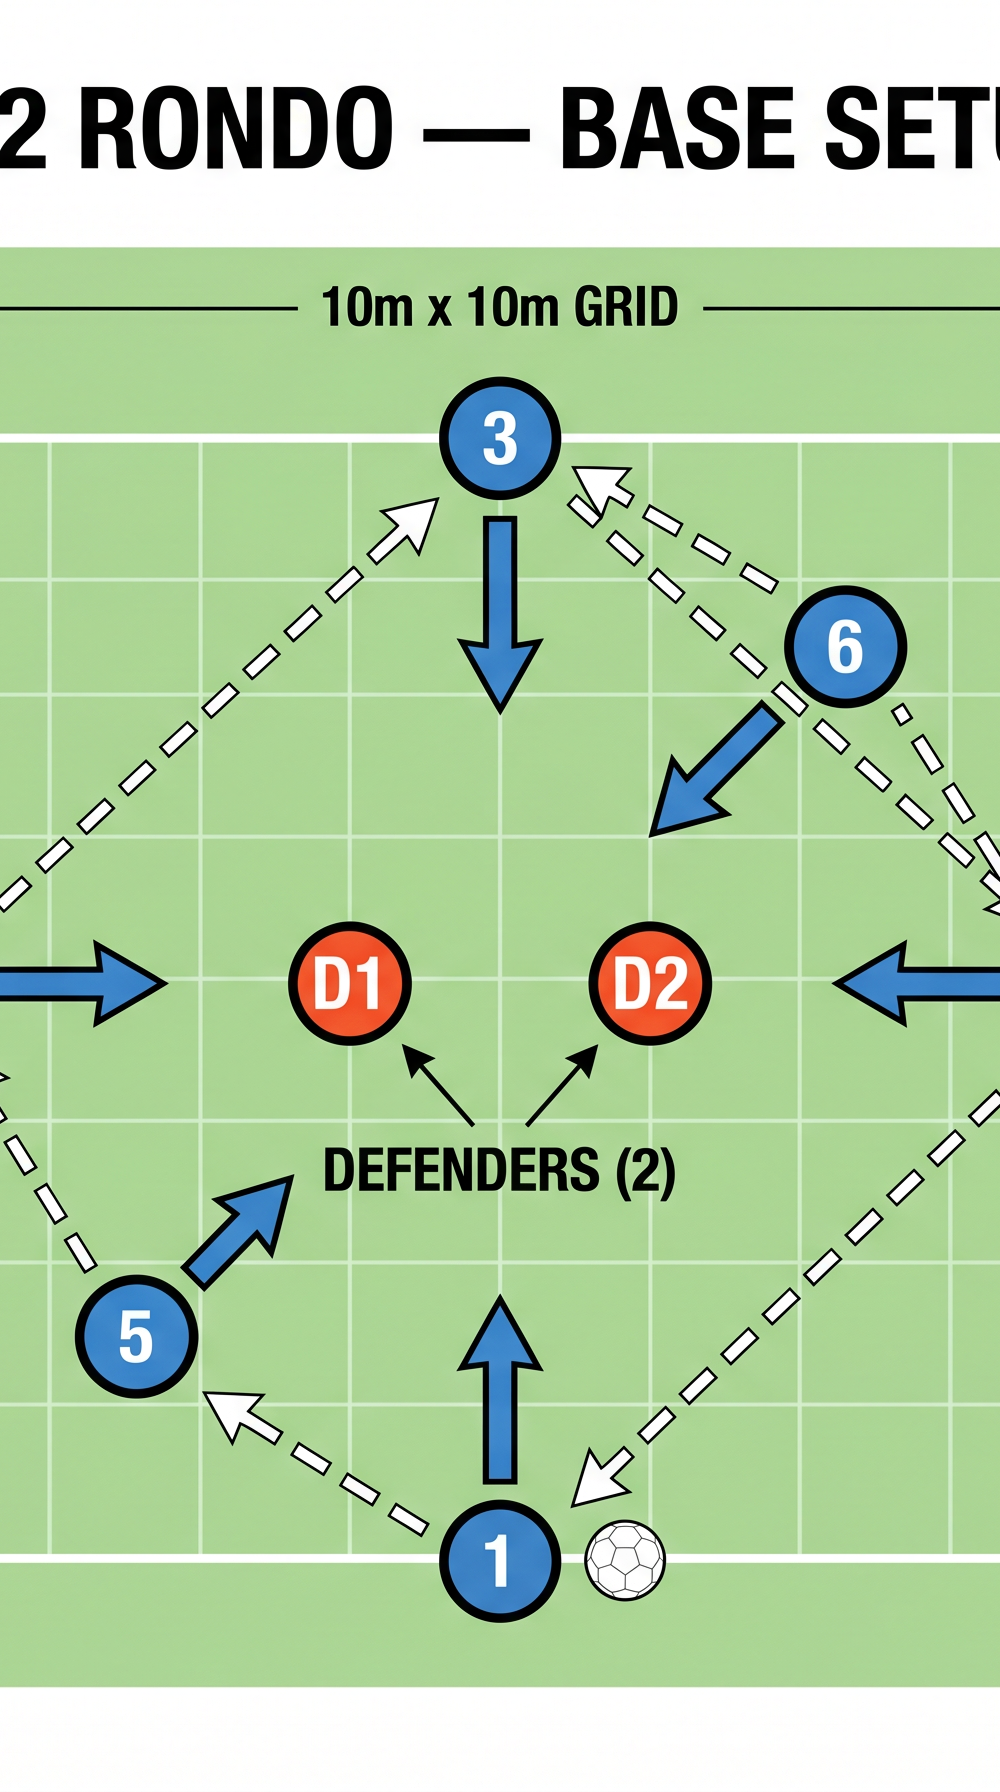
Diagram 1: 6v2 Rondo — Base Setup. Blue circles (1–6) show outside possessors positioned around the 10m x 10m grid. Red circles (D1, D2) are the central defenders. Dashed arrows indicate ball movement; solid arrows indicate player movement.
Step-by-Step Instructions
Step 1 — Introduce the Grid and Roles. Gather players around the grid and explain the two roles clearly: outside players keep the ball; inside defenders try to win it. Emphasise that the outside players have a numerical advantage — use it.
Step 2 — Start with a Free Pass. Player 1 (designated by the coach) starts with the ball. The two defenders may begin pressing from the moment the first pass is played.
Step 3 — Keep Possession. Outside players pass the ball around the perimeter and through the grid, always looking to move the ball away from the nearest defender. Players may pass to any other outside player — direct, diagonal, or switching the play entirely.
Step 4 — Rotation on Turnover. If a defender wins the ball, the player who made the error swaps roles with that defender and enters the middle. If the ball goes out of the grid, the player who last touched it goes in.
Step 5 — Encourage Movement. After playing a pass, outside players should take 1–2 adjustment steps to create a better angle for a return pass. They must never stand directly behind a defender.
Step 6 — Count Consecutive Passes. Count consecutive passes aloud as a group. Set a target (e.g., 10 passes in a row) and celebrate when it is reached.
Step 7 — Rotate Defenders Regularly. Even if no turnover occurs, rotate the defenders every 60–90 seconds so all players experience the pressing role.
Key Coaching Points
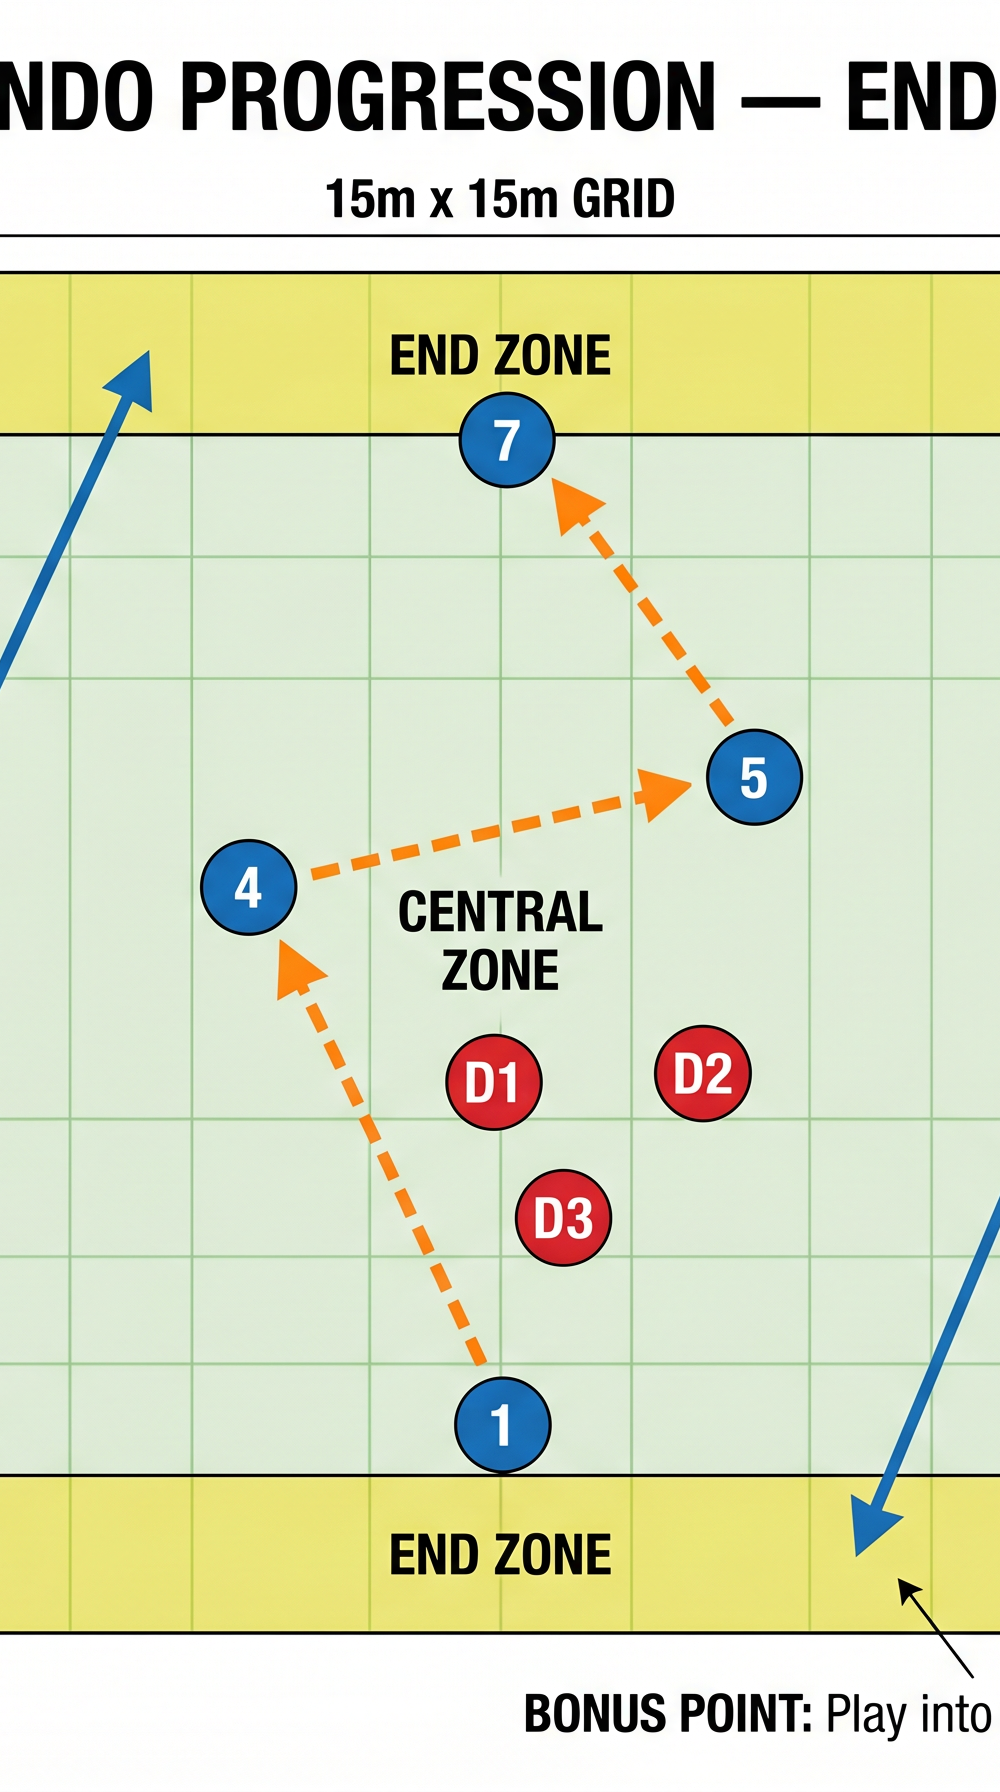

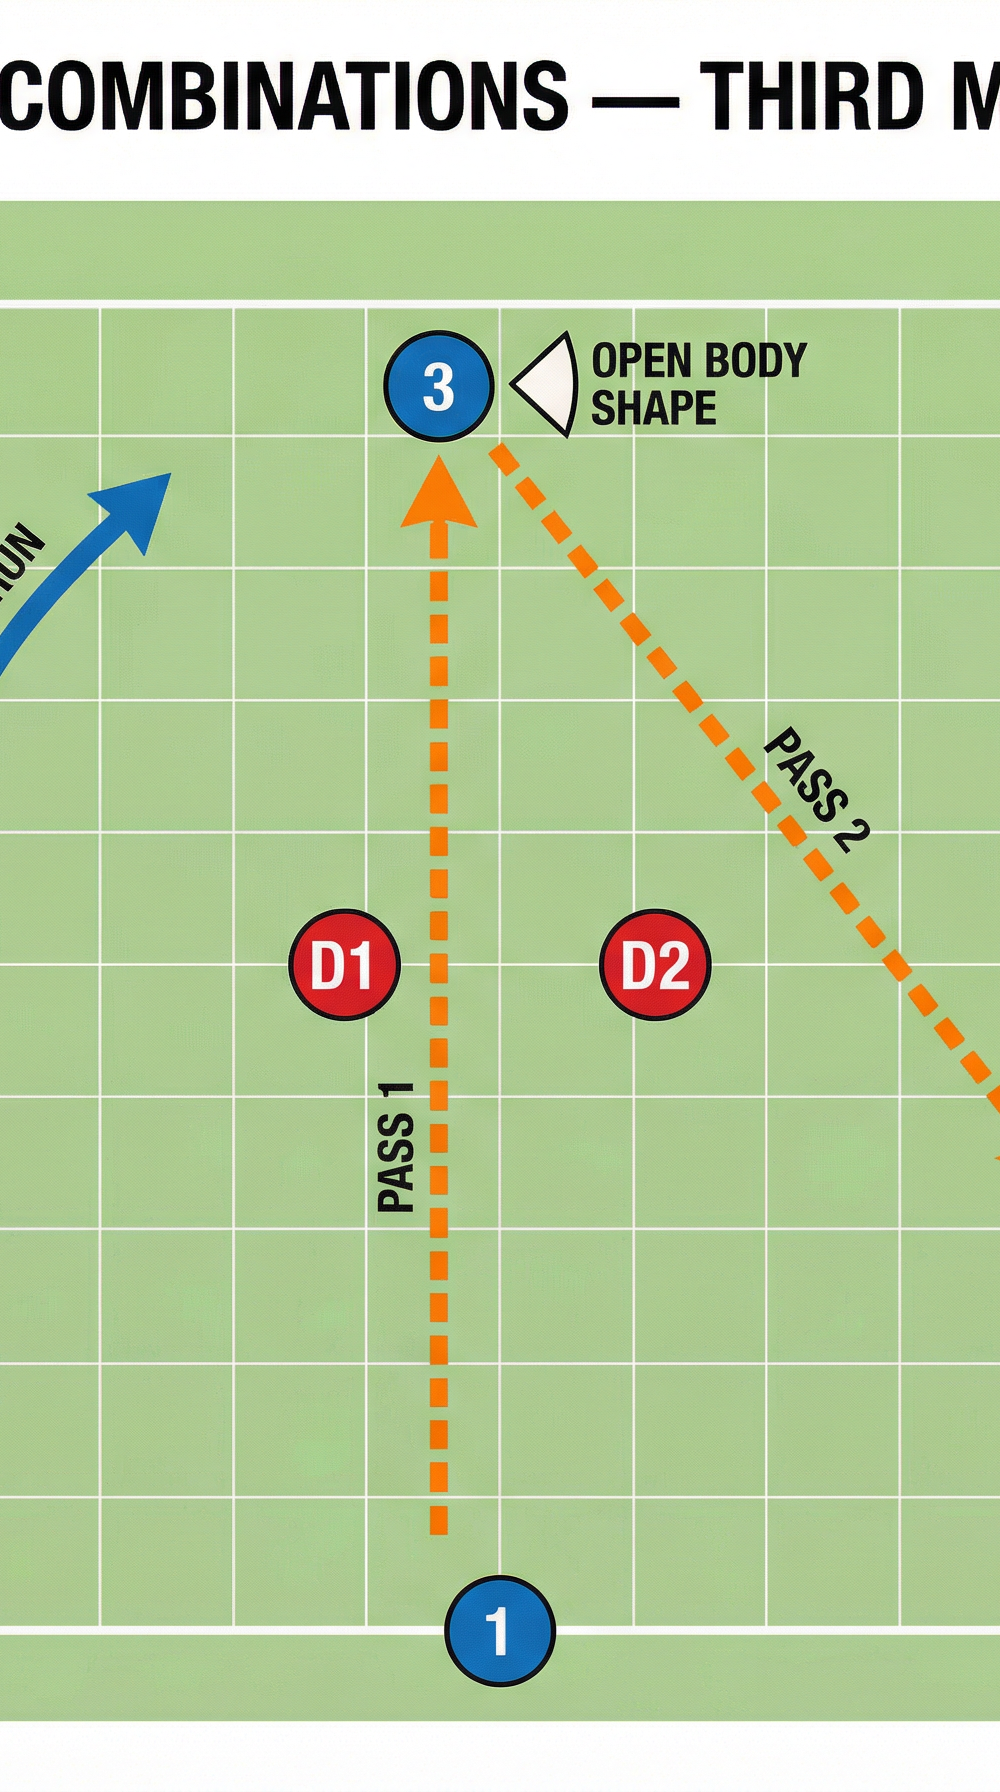
Diagram 2: Passing Combinations — Third Man Runs. Shows a three-pass sequence (Pass 1 → 2 → 3) with Player 2 making a diagonal support run to create a new passing option. Note the 'Open Body Shape' indicator at Player 3.
1. Body Shape on Reception. Players must receive the ball with an open body shape — hips turned to see as much of the grid as possible. Demand that players check their shoulder before the ball arrives.
2. Pass Weight and Accuracy. The weight of every pass must be firm enough to travel cleanly but not so hard that the receiver is put under unnecessary pressure. "Give your teammate a gift, not a problem."
3. Support Angles. The two players nearest the ball-carrier must position themselves at angles — not in a straight line. Angles create triangles; triangles create options.
4. Play Away from Pressure First. The default decision should always be to play away from the pressing defender. Teach players to recognise the "safe" pass and the "risky" pass.
5. Defenders Must Press as a Pair. One presses the ball, the other covers the most dangerous passing lane. Defenders who both chase the ball leave large gaps.
6. Speed of Play. Use the cue: "Think before it arrives, decide when it arrives, execute instantly."
Common Mistakes

Mistake 1 — Playing Square or Backwards Under No Pressure. Challenge players to always look for the most progressive option first.
Mistake 2 — Receiving with a Closed Body Shape. Stop the drill, demonstrate the correct open body shape, and restart.
Mistake 3 — Static Positioning After Passing. The moment the ball leaves their foot, players must move to create a new angle.
Mistake 4 — Forcing the Pass Through the Defender. Coach the mantra: "If in doubt, play out."
Mistake 5 — Defenders Losing Shape. Coach defenders to communicate: one presses, one covers.
Variations & Progressions


Diagram 3: 8v3 Rondo Progression — End Zones. An expanded 15m x 15m grid with 8 outside players and 3 defenders. Yellow end zones (2m deep) at each end reward the possession team for playing through the grid.
Progression 1 — Touch Restrictions. Introduce a two-touch maximum rule. For elite groups, progress to one-touch only.
Progression 2 — 8v3 with End Zones. Expand the grid to 15m x 15m and add a third defender. The possession team scores a point by successfully playing the ball into a teammate standing in an end zone.
Progression 3 — Joker Player. A neutral joker (one-touch only) always plays with the possession team, creating a permanent overload and rewarding quick combination play.
Age Adaptations

| Age Group | Grid Size | Format | Touch Rule | Key Focus |
|---|---|---|---|---|
| Under 10 | 12m x 12m | 5v1 | Unlimited | Fun, basic passing, first touch |
| Under 12 | 10m x 10m | 6v2 | Unlimited | Body shape, support angles |
| Under 14 | 10m x 10m | 6v2 | 3-touch max | Speed of play, decision-making |
| Under 16 | 10m x 10m | 6v2 | 2-touch max | Pressing coordination, combinations |
| Open/Senior | 12m x 12m | 8v3 | 1–2 touch | All elements, end zone variant |