Horns Set Play: The Ultimate Three-Pointer Action
Master the Horns set play to create high-percentage three-point shooting opportunities through effective screening and spacing.
Equipment Needed
1. Overview
The Horns set is a staple in modern basketball, renowned for its versatility and excellent floor spacing. Originating from the need to counter aggressive perimeter defense, the Horns formation places two big men at the elbows and two shooters in the corners, leaving the middle of the court wide open. This specific variation of the Horns set is designed to generate a high-quality three-point shot. By utilizing a sequence of ball screens, off-ball screens, and precise spacing, this play forces the defense into difficult decision-making situations, often resulting in an open look from beyond the arc. It is particularly effective against man-to-man defenses and can be used as a quick hitter or a reliable late-game action when a three-pointer is desperately needed.
2. Setup
Equipment Needed:
- 1 Basketball
- Half-court with standard FIBA markings (28m x 15m)
- 5 Players
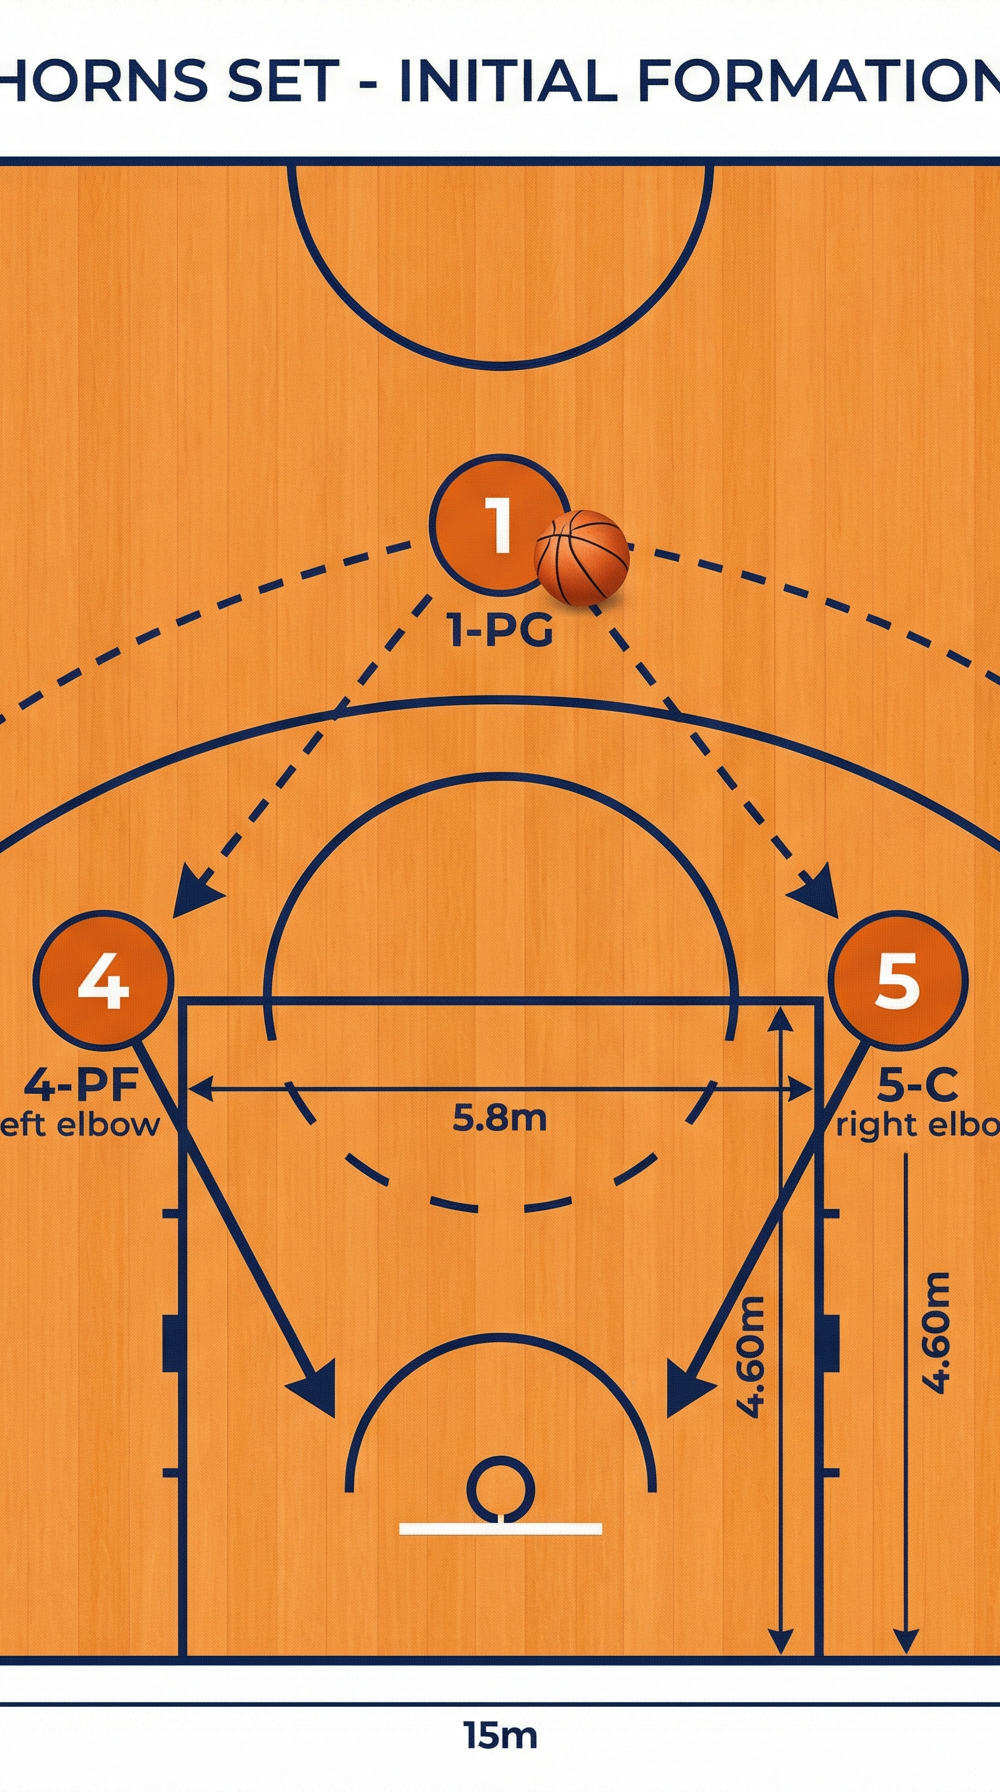
Court Setup & Player Positions:
- Player 1 (Point Guard - PG): Starts at the top of the key with the basketball, initiating the offense.
- Player 4 (Power Forward - PF): Positioned at the left elbow (high post, free throw line extended).
- Player 5 (Center - C): Positioned at the right elbow.
- Player 2 (Shooting Guard - SG): Positioned deep in the right corner, near the three-point line.
- Player 3 (Small Forward - SF): Positioned deep in the left corner, near the three-point line.

3. Step-by-Step Instructions
Step 1: The Entry and Initial Read
Player 1 dribbles the ball across half-court and approaches the top of the key. The initial formation must be set early to force the defense to commit to their matchups. Player 1 analyzes the defense, specifically looking at how the defenders are playing the elbow players (Players 4 and 5).
Step 2: The Action Initiation
Player 1 chooses a side to attack. For this example, Player 1 dribbles aggressively toward the left elbow, where Player 4 is positioned. This movement is designed to draw the attention of both Player 1's defender and Player 4's defender.
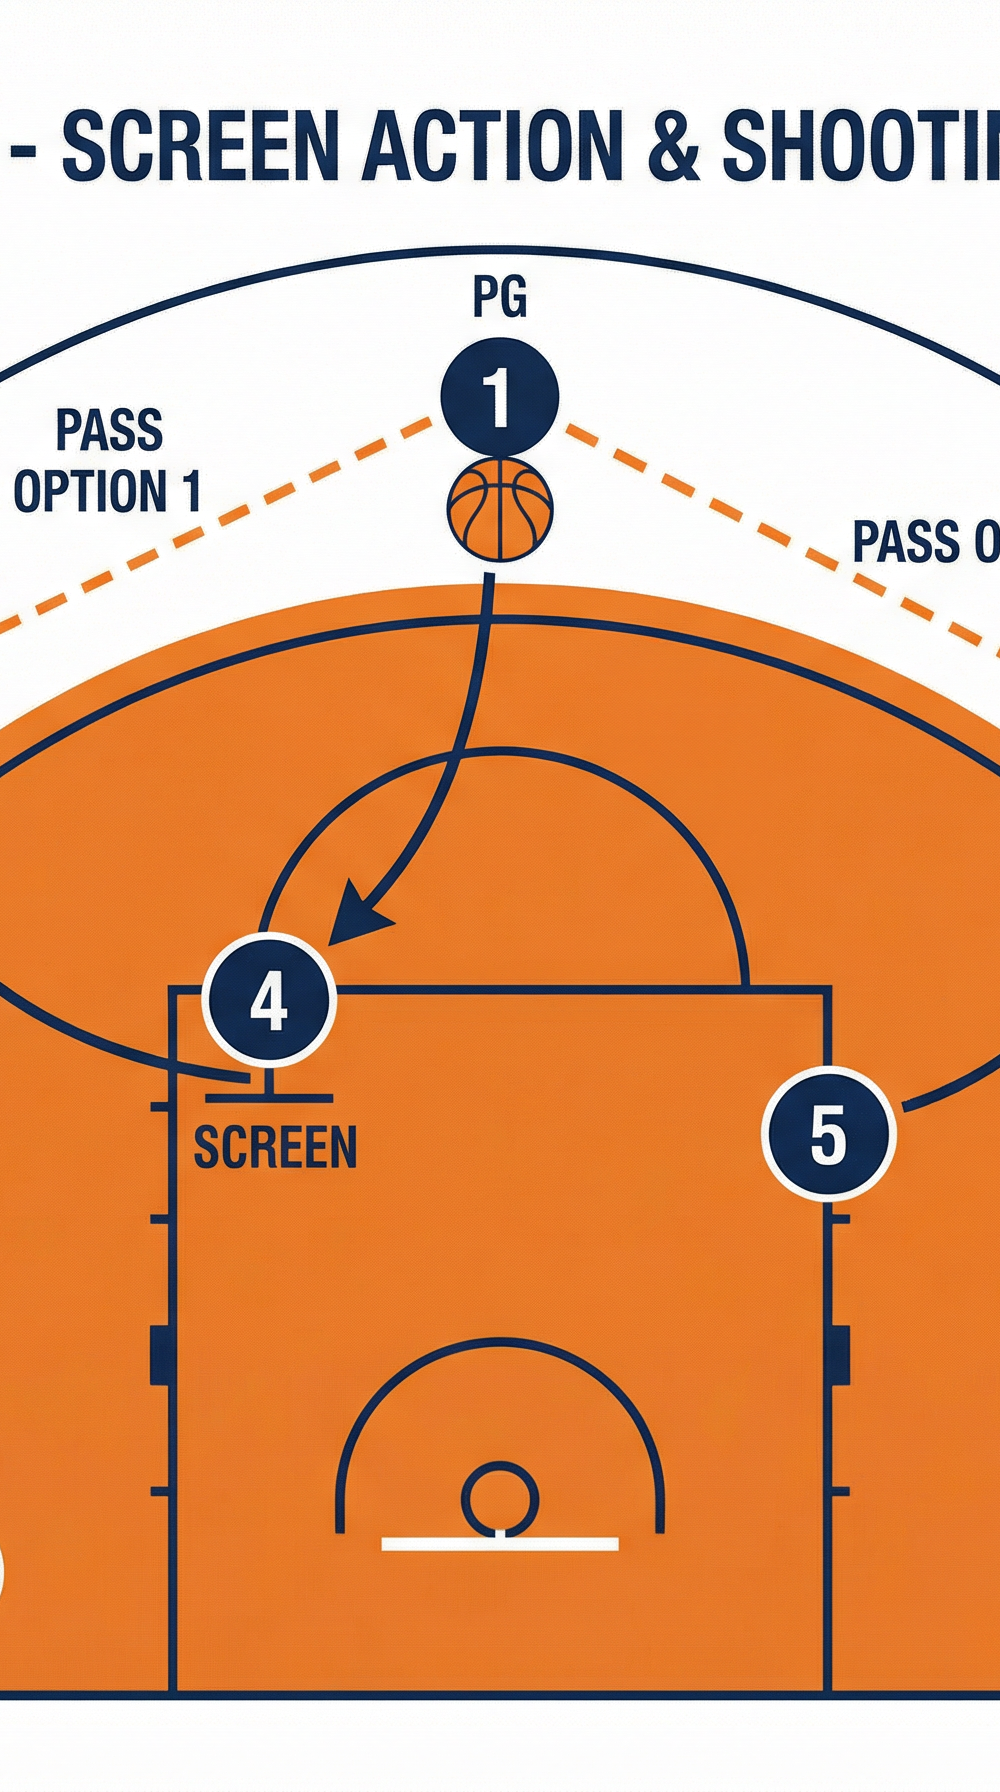
Step 3: The Flare Screen and Cut
As Player 1 approaches the left elbow, Player 4 sets a solid flare screen for Player 3, who is positioned in the left corner. Player 3 uses the screen to cut sharply toward the left wing area, looking for a pass from Player 1. Simultaneously, Player 2 in the right corner begins to drift or relocate slightly higher along the three-point arc to maintain spacing and prepare for a potential skip pass.
Step 4: The Pop and Read
While the action is happening on the left side, Player 5 (at the right elbow) steps out or "pops" toward the right wing three-point line. This movement is crucial as it stretches the defense and provides a secondary shooting option. Player 1 now has multiple reads: the primary option is the pass to Player 3 coming off the flare screen. The secondary option is a skip pass to Player 5 popping to the right wing, or a cross-court pass to Player 2 if the defense over-rotates.
4. Key Coaching Points
- Screening Angle and Contact: Player 4 must set a wide, solid base for the flare screen. The angle of the screen should force the defender to go under or trail the play, creating separation for Player 3.
- Patience and Timing: Player 3 must wait for the screen to be fully set before making the cut. Cutting too early will negate the effectiveness of the screen.
- Point Guard Vision: Player 1 must keep their head up and read the defense. If the primary option (Player 3) is covered, Player 1 must quickly locate the secondary options (Player 5 or Player 2).
- Spacing: The players not directly involved in the primary screening action (Players 2 and 5) must maintain excellent spacing. This prevents their defenders from helping on the main action without giving up an open shot.
- Shot Readiness: All players receiving a pass on the perimeter must be in a shot-ready position (knees bent, hands ready) to release the ball quickly upon catching it.
5. Common Mistakes
- Slipping the Screen Too Early: Player 4 slips the screen before making contact, allowing the defender to easily recover and contest the shot.
- Poor Spacing by the Corners: Players 2 and 3 creep up too high along the sideline, bringing their defenders closer to the elbow action and clogging the passing lanes.
- Telegraphing the Pass: Player 1 stares down the primary target (Player 3), allowing the defense to anticipate the pass and intercept it.
- Lack of Aggressiveness from the PG: Player 1 casually dribbles toward the elbow without forcing the defense to react, making the subsequent screening action less effective.
6. Variations & Progressions
- Horns Flare to Pick and Roll: If the initial flare screen does not result in an open shot, Player 4 can immediately transition into setting an on-ball screen for Player 1, initiating a traditional pick-and-roll action.
- Horns Hand-Off: Instead of a pass, Player 1 can execute a dribble hand-off (DHO) with Player 3 coming off the screen, creating a dynamic attacking situation on the wing.
- Horns Post Entry: If the defense switches aggressively on the perimeter actions, Player 4 or 5 can look to seal their smaller defender in the post for a high-low passing opportunity.
7. Age Adaptations
- Under 10 / Under 12: Focus heavily on the basic spacing (two at the elbows, two in the corners) and the fundamental mechanics of setting and using a screen. Simplify the reads for the point guard, perhaps limiting it to one primary option.
- Under 14 / Under 16: Introduce the secondary reads (the pop by the opposite big man) and emphasize the timing of the cuts. Begin teaching players how to read defensive coverages (e.g., switching vs. fighting through screens).
- Open / Advanced: Incorporate the variations (pick-and-roll, DHO) and demand high-level execution regarding screening angles, passing precision, and shot readiness. Focus on exploiting specific defensive matchups.