

Basketball
The 'Lightning' Buzzer Beater: A Game-Winning Set Play
Master the 'Lightning' set play to secure game-winning shots in high-pressure, end-of-game situations with less than 5 seconds on the clock.
What you need
Basketballs, Half-court
1. Overview
The 'Lightning' set play is designed specifically for end-of-game situations where you have the ball at half-court (or sideline out-of-bounds advanced to the frontcourt) with less than 5 seconds remaining. The primary goal is to create an open catch-and-shoot opportunity from beyond the arc for your best shooter, utilizing misdirection and a solid screen. If the defense overplays the primary action, the play features built-in secondary options for a lob at the rim or a quick drive.
2. Setup
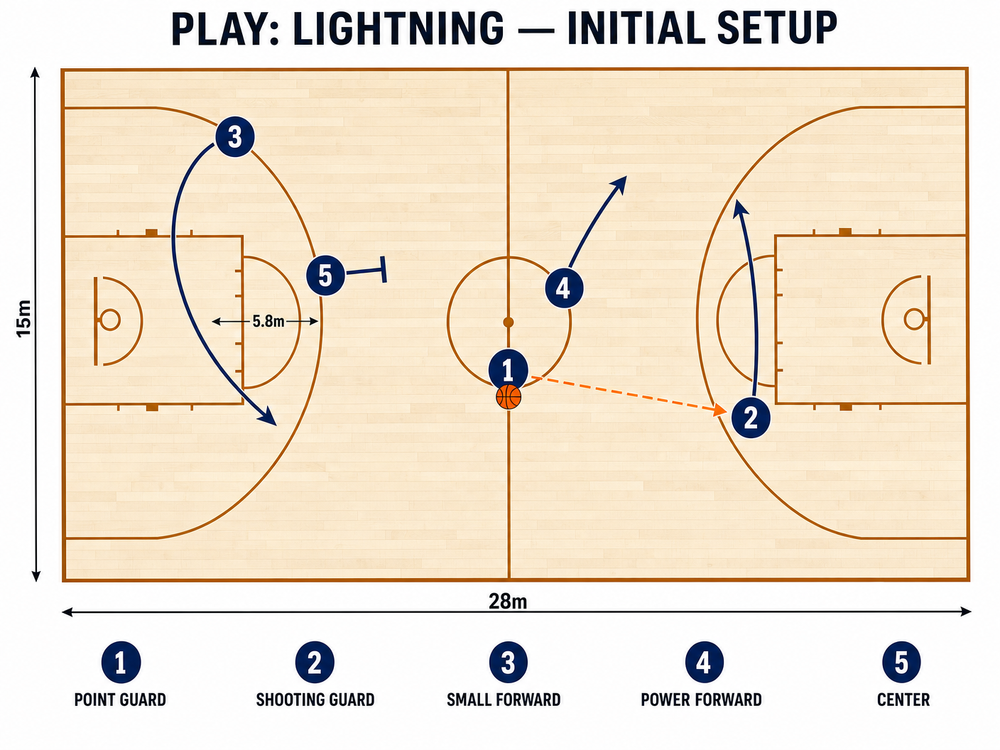
Court Setup: Half-court offensive alignment (28m x 15m FIBA court dimensions).
Player Positions:
- 1 (Point Guard): Inbounding the ball at half-court or top of the key.
- 2 (Shooting Guard): Positioned initially at the right wing, near the three-point line.
- 3 (Small Forward): Positioned at the left wing or left corner as a floor spacer.
- 4 (Power Forward): Positioned at the right elbow.
- 5 (Center): Positioned at the left block or left elbow.
3. Step-by-Step Instructions
- The Misdirection: As the referee hands the ball to the 1 (Point Guard), the 3 (Small Forward) makes a hard cut along the baseline toward the basket. This initial movement forces the defense to shift and communicate, creating a momentary distraction.
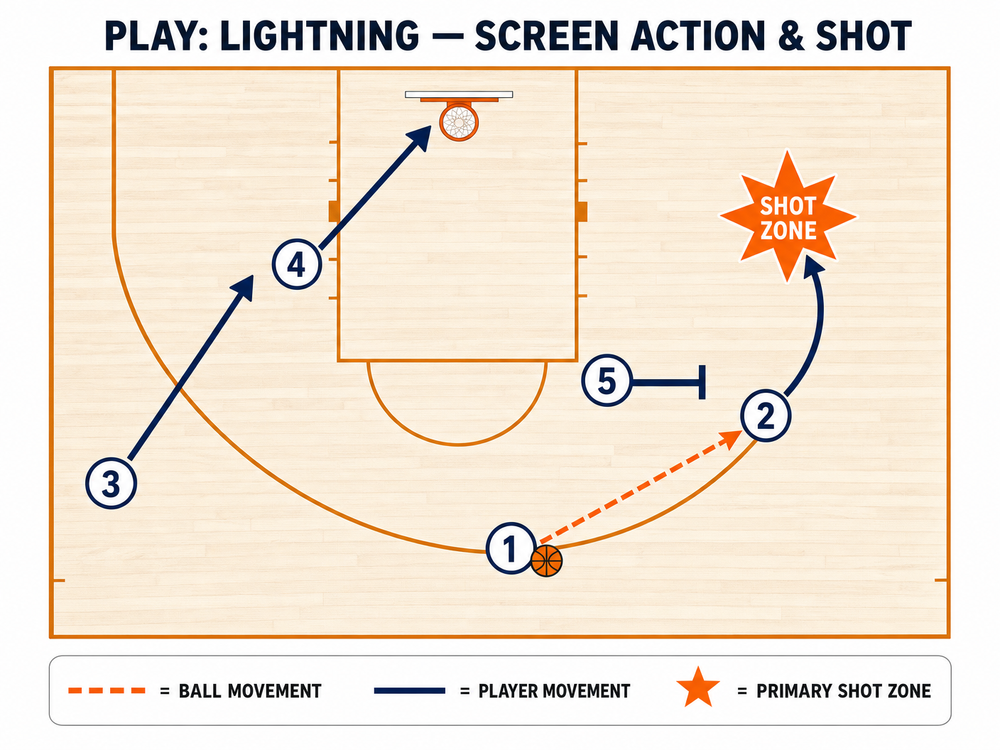
- The Screen: Simultaneously, the 5 (Center) sprints up from the block to set a hard, wide-based screen for the 2 (Shooting Guard) near the right elbow or right wing area.
- The Curl: The 2 (Shooting Guard) fakes a cut toward the baseline, then explodes off the 5's screen, curling tightly toward the top of the key or the designated 'Shot Zone' just beyond the three-point arc.
- The Pass and Shot: The 1 (Point Guard) delivers a crisp, on-target pass to the 2. The 2 catches the ball ready to shoot, elevates, and takes the shot in one fluid motion.
- Offensive Rebounding: As the shot goes up, the 4 (Power Forward) and 5 (Center) immediately crash the offensive glass to secure any potential rebound for a put-back.
4. Key Coaching Points
- Screening Angle: The 5 must set the screen at an angle that forces the defender trailing the 2 to go over the screen, not under. A flat screen is ineffective.
- Pacing and Timing: The 2 must not leave too early. They need to wait for the 5 to set their feet completely before making the curl cut to avoid an offensive foul.
- Pass Accuracy: The inbounder (1) must deliver the pass exactly where the 2 can catch it in their shooting pocket. A poor pass ruins the timing of the quick release.
- Shooter's Footwork: The 2 must use 1-2 step footwork or a quick hop to be balanced and ready to shoot the moment the ball touches their hands.
5. Common Mistakes
- Slipping the Screen Too Early: The 5 slips the screen before making solid contact, allowing the defender to stay attached to the shooter.
- Telegraphing the Pass: The 1 stares down the 2 the entire time, allowing the defense to anticipate the play and jump the passing lane.
- Lack of Spacing: The 3 and 4 drift too close to the primary action, bringing extra defenders into the passing and shooting lanes.
6. Variations & Progressions
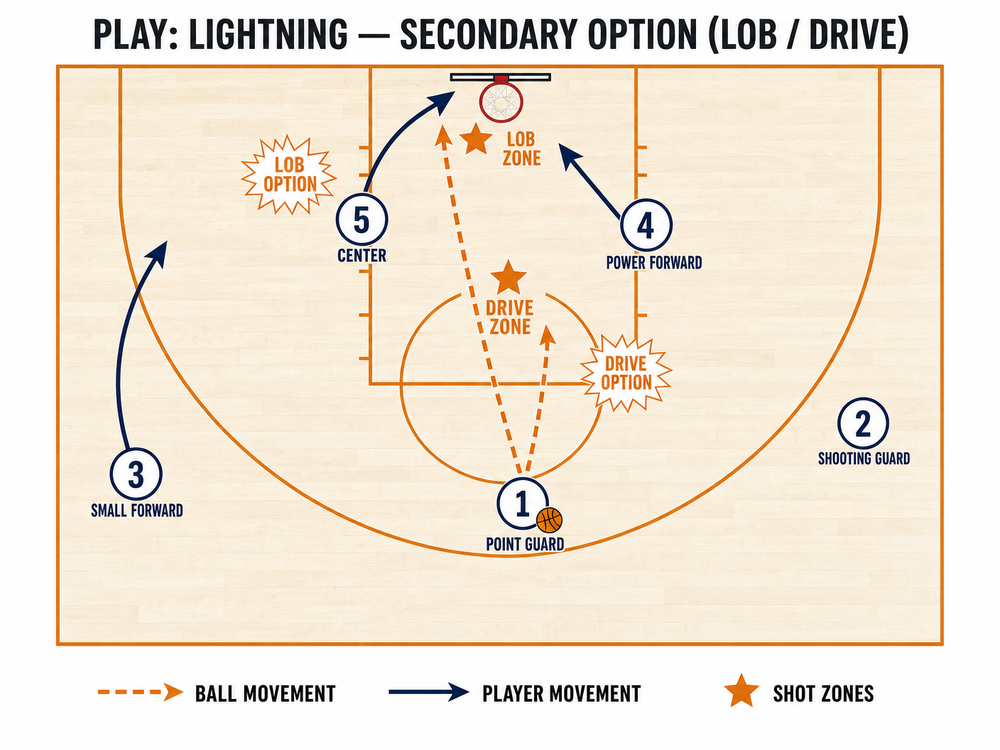
- The Lob Option: If the defense switches hard onto the 2, the 5 can immediately slip the screen and dive to the rim for a lob pass from the 1.
- The Drive Option: If the defender trails the 2 aggressively but over-commits to the shot, the 2 can catch, pump fake, and drive hard into the paint.
7. Age Adaptations
- Under 12s: Simplify the action. Remove the decoy cut by the 3. Focus entirely on setting one good screen and making an accurate pass.
- Under 14s/16s: Introduce the secondary lob option. Teach the 5 how to read the defensive switch and slip the screen effectively.
- Open/Advanced: Incorporate multiple screens (e.g., staggered screens) or a hand-off action if the initial pass is denied.
