Mastering the 7-Man Lineout: Setup and Attacking Strike Move
A comprehensive guide to executing a dominant 7-man lineout, securing clean possession, and launching a devastating first-phase strike move.

Equipment Needed
1. Overview
The lineout is a critical set piece in modern rugby, offering a structured platform to restart play and launch coordinated attacks. This drill focuses on the fundamental setup of a standard 7-man lineout and progresses into a basic but highly effective first-phase strike move. The objective is to secure clean, fast ball from the touchline and immediately stress the opposition's defensive line with hard, direct running lines. This resource is designed to help coaches build a reliable lineout structure that not only retains possession but also generates attacking momentum.
2. Setup
To effectively run this drill, you will need a standard rugby pitch or a suitably marked training area. The setup requires a full forward pack (8 players) and the key playmakers in the backline (scrum half, fly half, and centres).
- Pitch Area: A 100m x 70m pitch is ideal, but a marked 50m x 50m grid with a touchline, 5-metre line, and 15-metre line is sufficient.
- Player Positions:
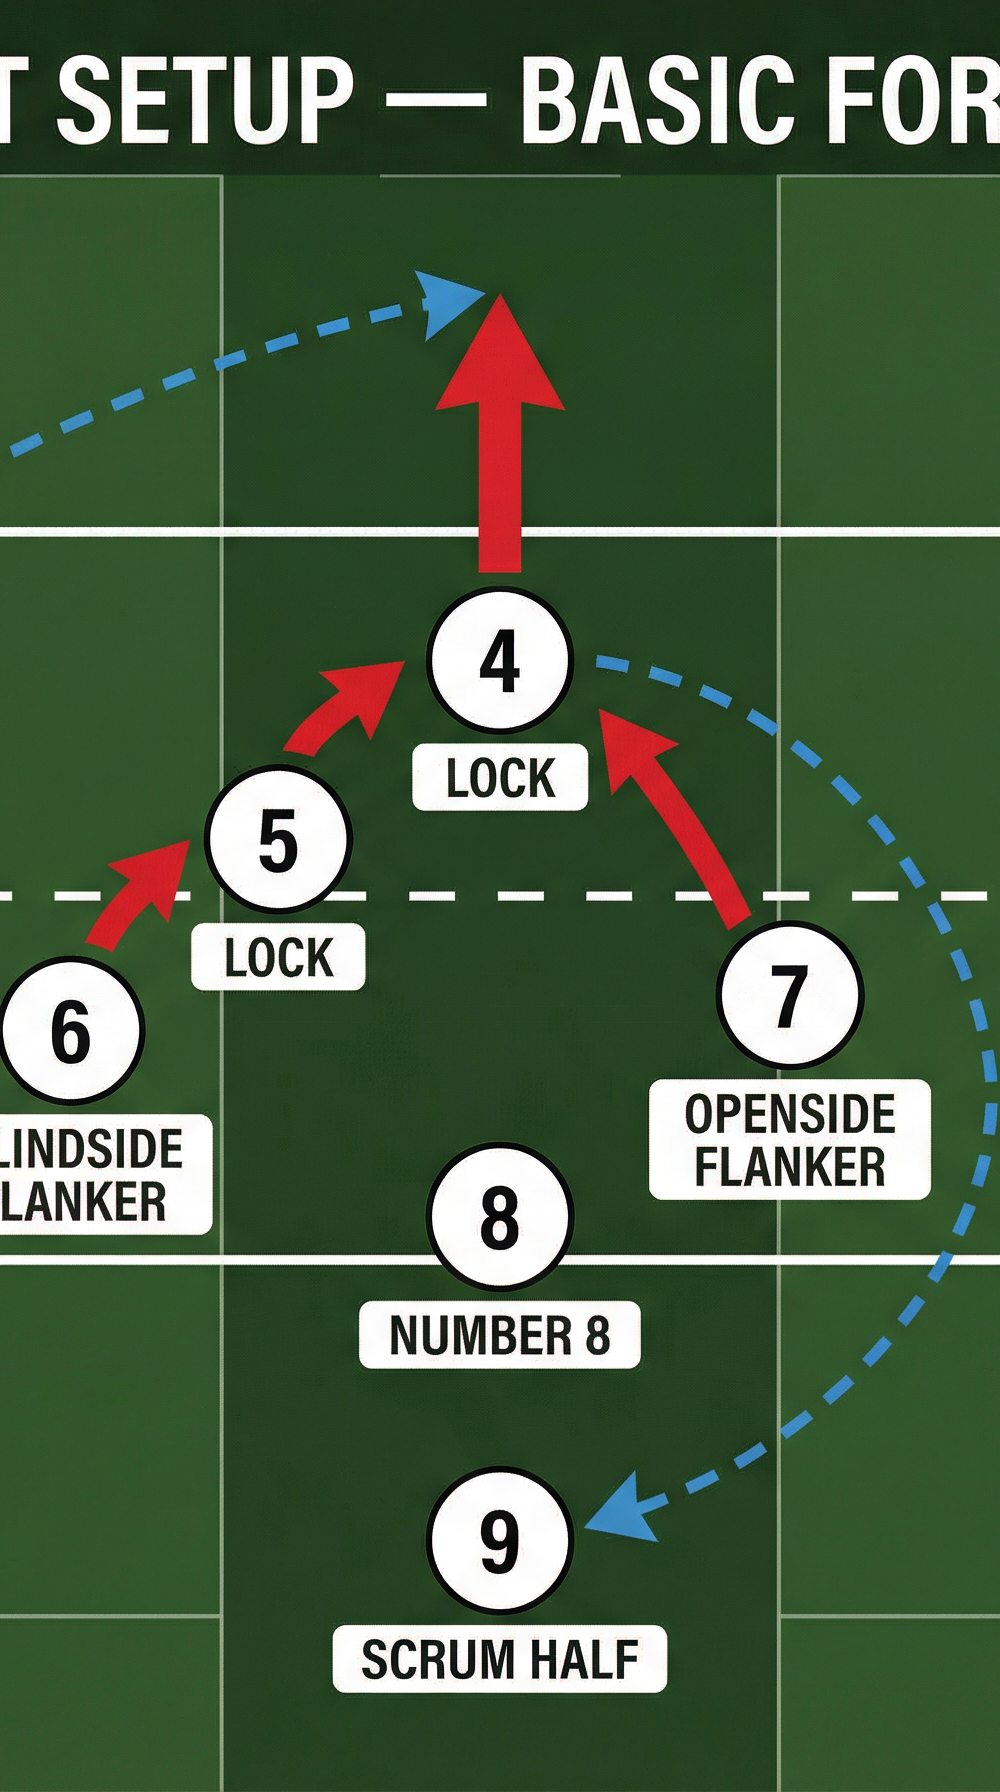
- 2 (Hooker): Positioned on the touchline, ready to throw.
- 4 & 5 (Locks): The primary jumpers, positioned centrally in the lineout.
- 1 & 3 (Props): The primary lifters, positioned either side of the jumpers.
- 6 & 7 (Flankers): Secondary lifters or jumpers, positioned towards the front and back.
- 8 (Number 8): Positioned at the back of the lineout, ready to secure overthrow or support the drive.
- 9 (Scrum Half): Positioned 2 metres behind the lineout, ready to receive the ball.
- 10, 12, 13 (Backs): Positioned flat and deep, ready to execute the strike move.
3. Step-by-Step Instructions

Phase 1: The Setup and Catch

- The Call: The lineout caller (usually the 4, 5, or 8) assesses the defensive setup and makes a clear, concise call indicating the target jumper (e.g., the 4) and the type of throw.
- The Movement: Upon the call, the forwards execute their pre-planned movement to create space for the jumper. This often involves dummy jumps or shifting positions to confuse the opposition.
- The Lift: The lifters (typically 1 and 3, or 6 and 7) quickly position themselves and explosively lift the designated jumper (4) by gripping the lower thighs/above the knees. The lift must be synchronized and powerful.
- The Throw: The hooker (2) delivers a flat, accurate throw to the apex of the jumper's reach. The throw must be timed perfectly with the lift.
- The Catch and Delivery: The jumper (4) catches the ball cleanly with two hands at the highest point. As they descend, they immediately deliver a fast, downward pass to the waiting scrum half (9).
Phase 2: The Attacking Strike

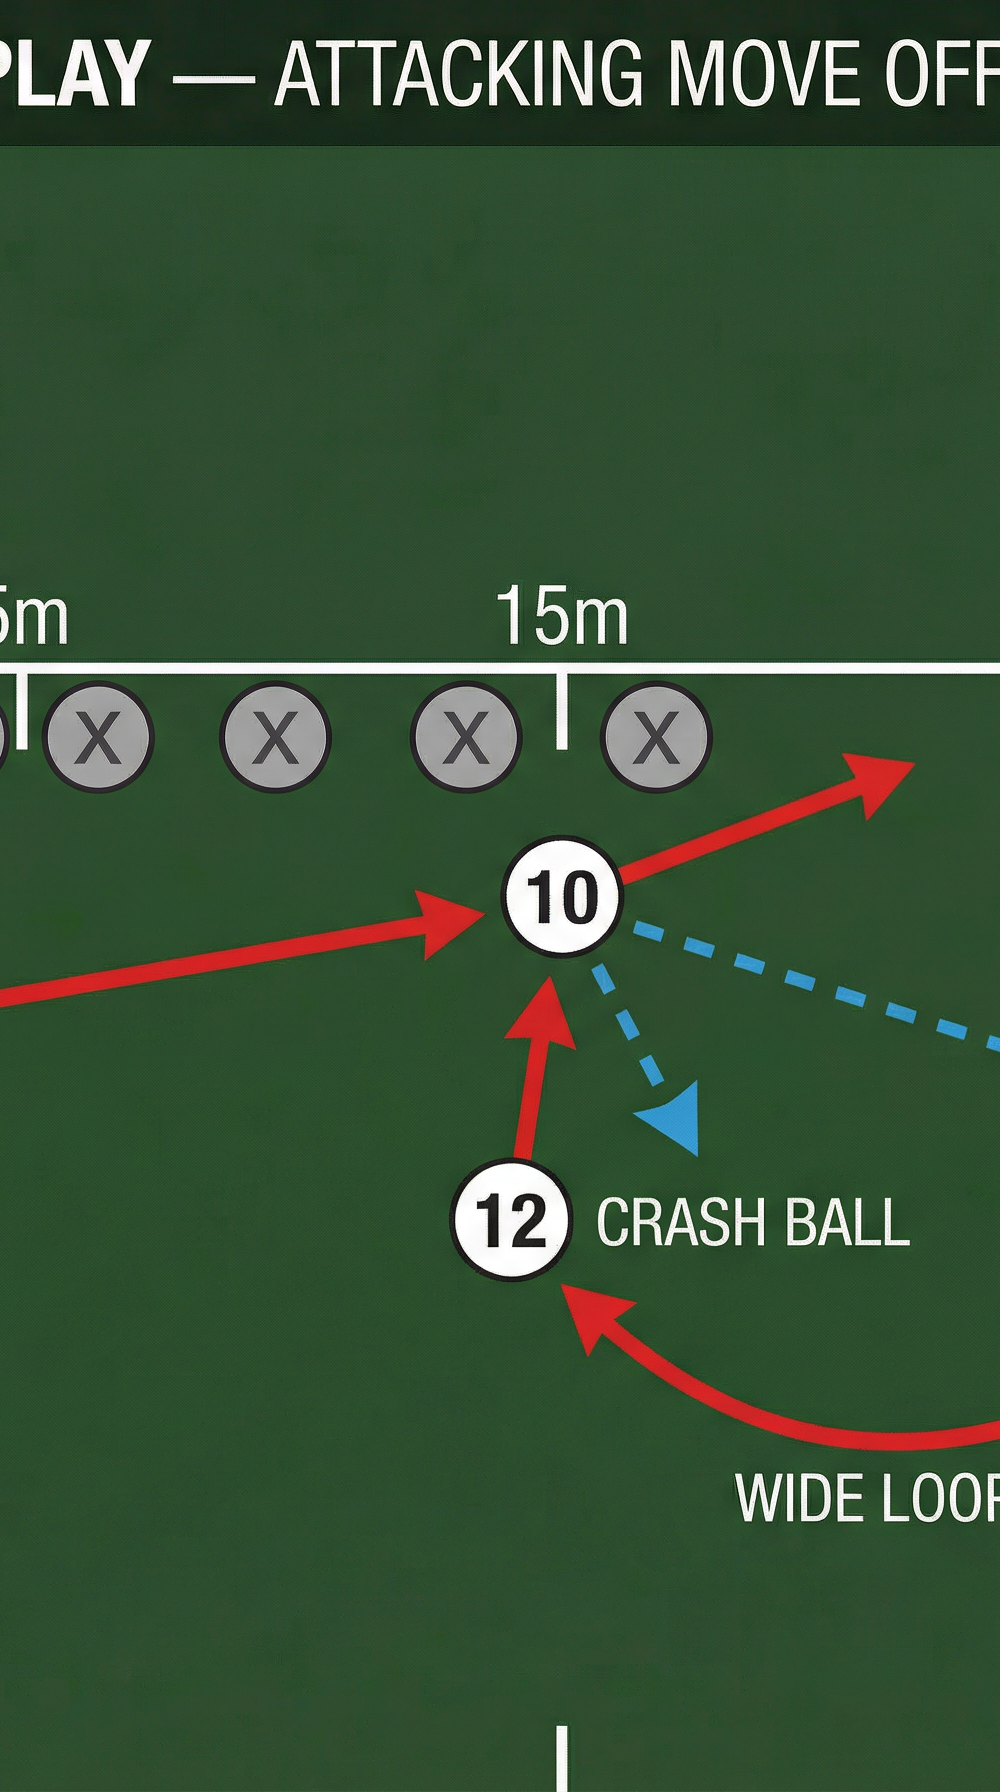
- The Clearance: The scrum half (9) receives the ball and immediately fires a fast, flat pass to the fly half (10), who is positioned approximately 10 metres deep and moving forward.
- The Decoy: The inside centre (12) runs a hard, direct 'crash ball' line straight at the opposition's fly half or inside centre, aiming to fix the inside defenders and draw them in.
- The Strike: The fly half (10) takes the ball to the line, engaging the defence, before executing a short, disguised pass behind the decoy runner (12) to the outside centre (13).
- The Break: The outside centre (13) receives the ball at pace on a wide, looping line, exploiting the space created outside the fixed inside defenders. They aim to break the gain line and link up with the back three.
4. Key Coaching Points

- Speed of Movement: The transition from the call to the lift must be explosive and immediate. Sluggish movement allows the opposition to contest the throw.
- Quality of the Lift: Lifters must maintain a strong, straight back and use their legs to generate power. A stable platform is crucial for the jumper to catch the ball cleanly.
- Accuracy of the Throw: The hooker's throw must be consistently accurate, hitting the target at the apex of the jump. Poor throws undermine the entire set piece.
- Speed of Delivery: The jumper must deliver the ball to the scrum half as quickly as possible upon descent. Slow ball allows the defence to organize and apply pressure.
- Timing of the Runs: The decoy runner (12) and the strike runner (13) must time their runs perfectly. Arriving too early or too late ruins the deception and allows the defence to drift.
5. Common Mistakes
- Telegraphing the Throw: The hooker or the caller giving away the intended target through body language or predictable patterns.
- Poor Lifting Technique: Lifters using their backs instead of their legs, resulting in a weak, unstable lift that endangers the jumper and loses possession.
- Slow Ball Delivery: The jumper holding onto the ball too long upon landing, allowing the opposition forwards to disrupt the scrum half.
- Flat Backline Alignment: The backline standing too flat, giving them no time or space to execute the strike move against a rushing defence.
6. Variations & Progressions
- Variation 1: The Driving Maul: Instead of delivering the ball to the scrum half, the jumper brings the ball down and the forwards immediately bind around them to form a driving maul, aiming to push the opposition back and draw in defenders.
- Variation 2: Front or Back Ball: Change the target of the throw to the front (e.g., the 2 or 6) or the back (e.g., the 8) of the lineout to keep the opposition guessing and exploit different areas of the pitch.
- Progression 1: Contested Lineouts: Introduce opposition forwards to contest the throw, forcing the attacking team to execute under pressure and improve their speed and accuracy.
7. Age Adaptations
- Under 12s: Focus purely on the mechanics of the throw and the catch without lifting. Emphasize basic handling and the transition to the scrum half.
- Under 14s: Introduce basic lifting techniques (if permitted by local regulations) focusing on safety and correct posture. Keep the strike moves simple (e.g., straight pass to the 10).
- Under 16s and Open: Full lifting and contested lineouts. Introduce more complex movement patterns in the lineout and sophisticated multi-phase strike moves in the backline.