Mastering Body Height: The Foundation of Safe and Dominant Tackling
Equip your players with the crucial skills to execute safe, low, and dominant tackles through progressive body height mechanics.

Equipment Needed
1. Overview
Establishing correct body height is the cornerstone of effective and safe tackling in modern Rugby. This progressive drill is designed to build a player's confidence and technical proficiency in lowering their center of gravity before contact. By isolating the mechanics of the tackle—from a static, controlled environment to dynamic, live-action scenarios—coaches can systematically eliminate the dangerous habit of upright tackling. This drill is ideal for use during the early phases of a training session, serving as a primer for defensive alignment and contact readiness. It emphasizes the "ring of steel" wrap, cheek-to-cheek contact, and leg drive, ensuring that defenders can safely dominate the collision area while adhering to the latest high-tackle directives.
2. Setup
To run this drill effectively, you will need a well-organized grid on a standard 100m x 70m Rugby pitch. The setup is designed to be scalable depending on your squad size.
Pitch Dimensions:
Create a 30m x 20m main grid, subdivided into three parallel 10m x 20m channels.
Equipment Required:
- 20-30 bright orange cones to mark the channels and starting positions.
- 1 Rugby ball per channel (minimum 3 balls total).
- Tackle shields or hit shields (optional for the initial progression, but highly recommended for younger age groups).
- Colored bibs (e.g., Red for Attackers, Blue for Defenders) to easily identify roles.
Player Positions:
Divide your squad into groups of 4 to 6 players per channel. Assign attackers (ATT) to one end of the channel and defenders (DEF) to the opposite end, starting approximately 10 meters apart.
3. Step-by-Step Instructions
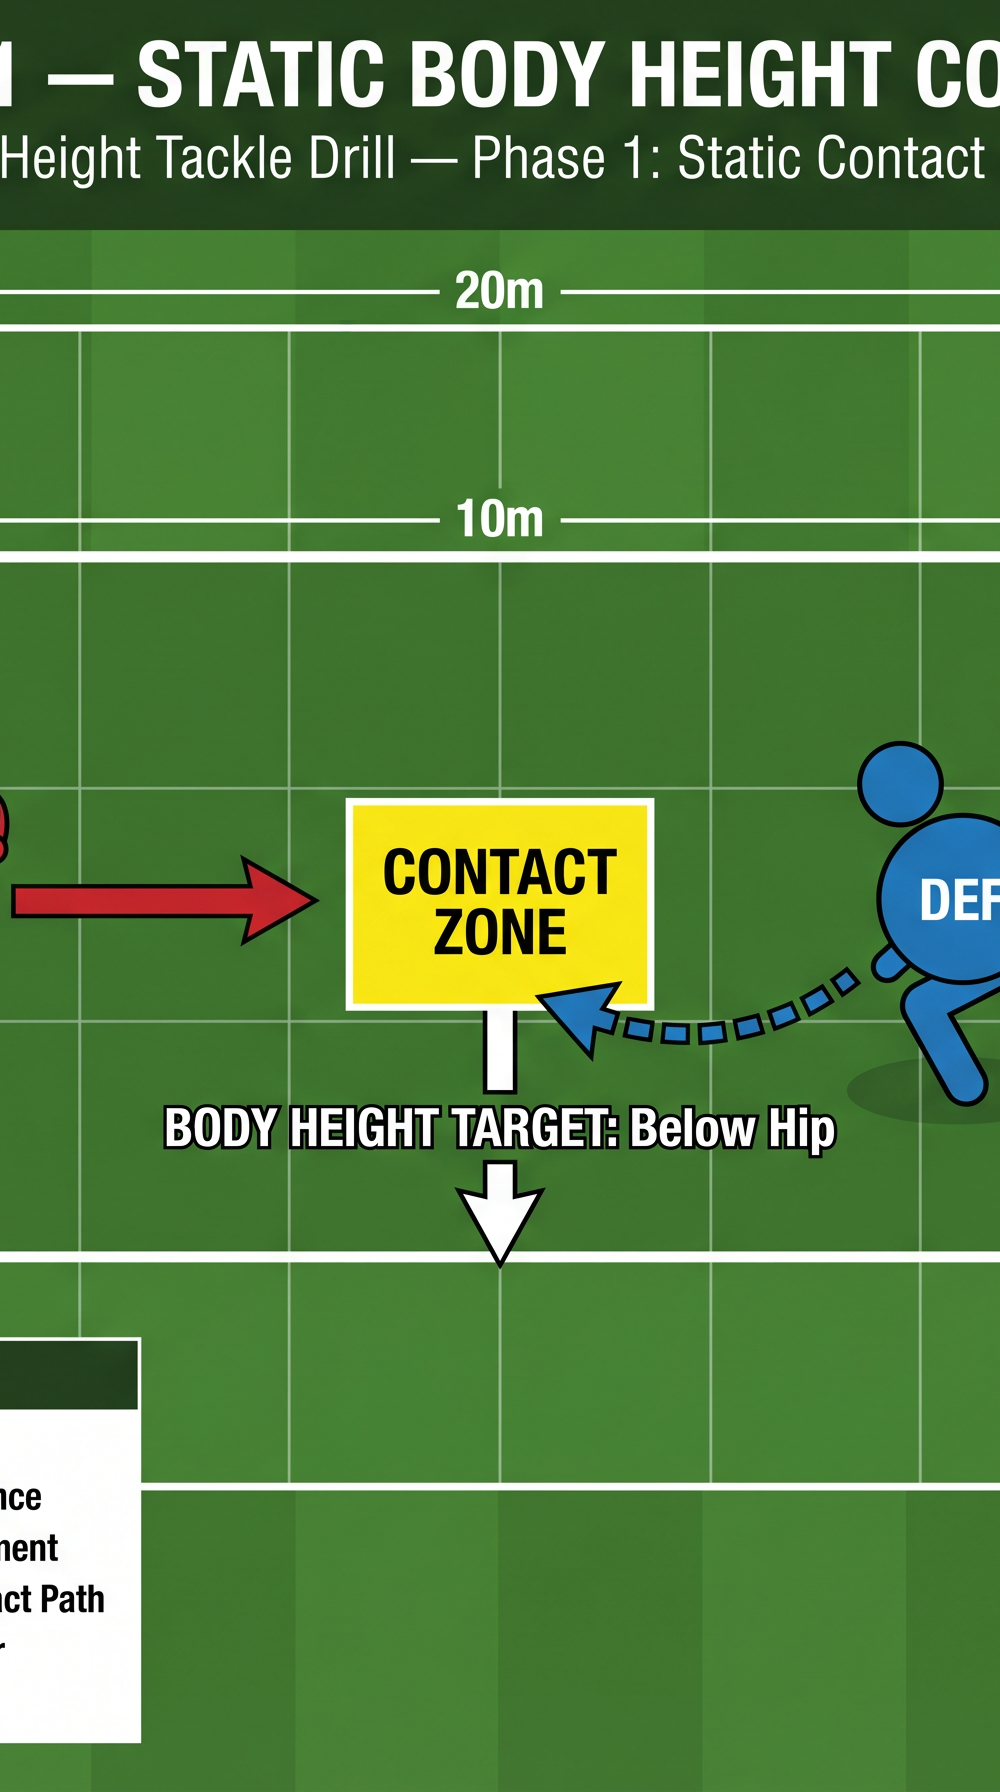
Phase 1: Static Contact Setup (The Foundation)

- Positioning: Pair up players within a 10m x 10m grid. One player acts as the ball carrier (ATT), standing perfectly still with the ball secured in two hands. The other acts as the tackler (DEF).
- The Approach: The tackler starts 2 meters away and takes two small, choppy steps toward the ball carrier to close the distance, simulating the final approach.
- Dropping Height: On the coach's whistle, the tackler must drop their body height by bending at the knees and hips (not the waist), keeping their back straight and eyes up.
- The Engagement: The tackler steps in tight with their lead foot (same foot as the tackling shoulder) placed directly alongside the ball carrier's feet. They make firm shoulder contact squarely on the ball carrier's thighs, ensuring their head is positioned safely to the side (cheek to cheek).
- The Wrap and Squeeze: The tackler wraps both arms tightly around the ball carrier's legs, squeezing the knees together to eliminate the carrier's base of support.
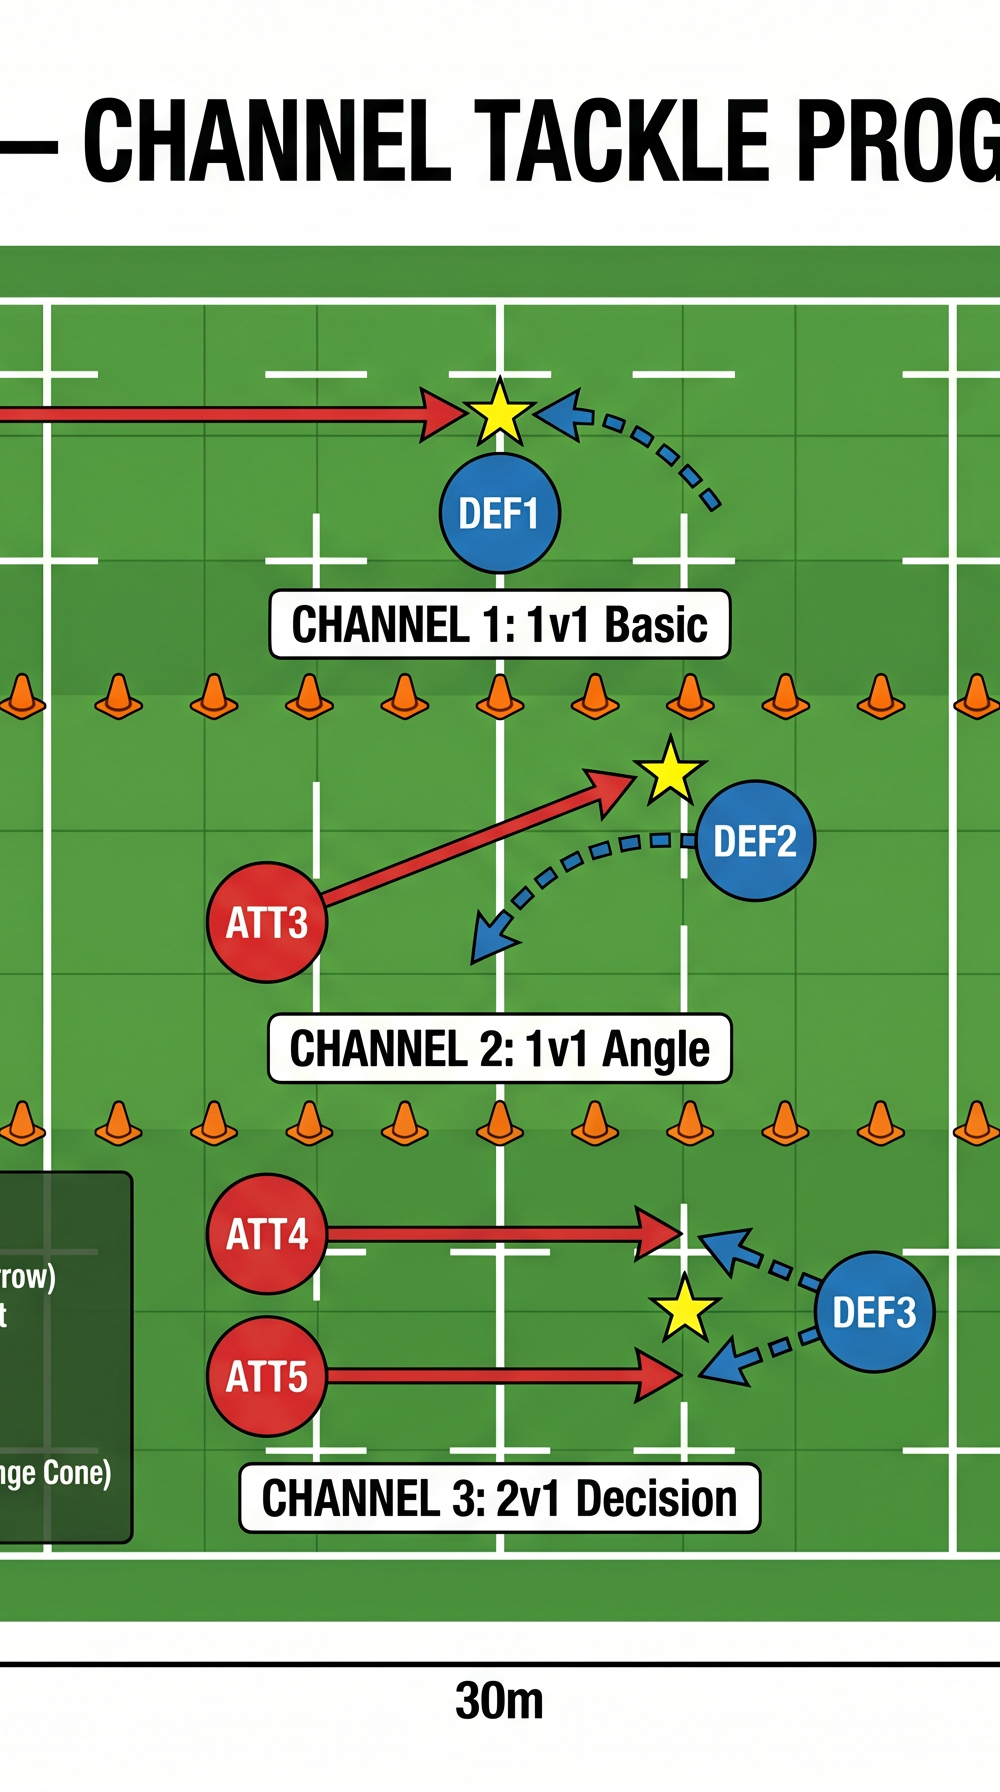
Phase 2: Channel Tackle Progression (Adding Movement)
- Channel 1 (1v1 Basic): The attacker jogs forward at 50% pace in a straight line. The defender tracks forward, drops their height early, and executes a full tackle to the ground, focusing on the wrap and a strong leg drive post-contact.
- Channel 2 (1v1 Angle): The attacker is instructed to run a diagonal line across the 10m channel. The defender must adjust their tracking angle, maintaining an inside shoulder position. As the attacker attempts to step, the defender drops their height and executes a profile tackle, driving through the contact.
- Channel 3 (2v1 Decision): Introduce a second attacker. The defender must communicate, press forward, identify the primary ball carrier, and execute a low tackle while the second attacker attempts to run a support line. This forces the defender to maintain body height while processing peripheral information.
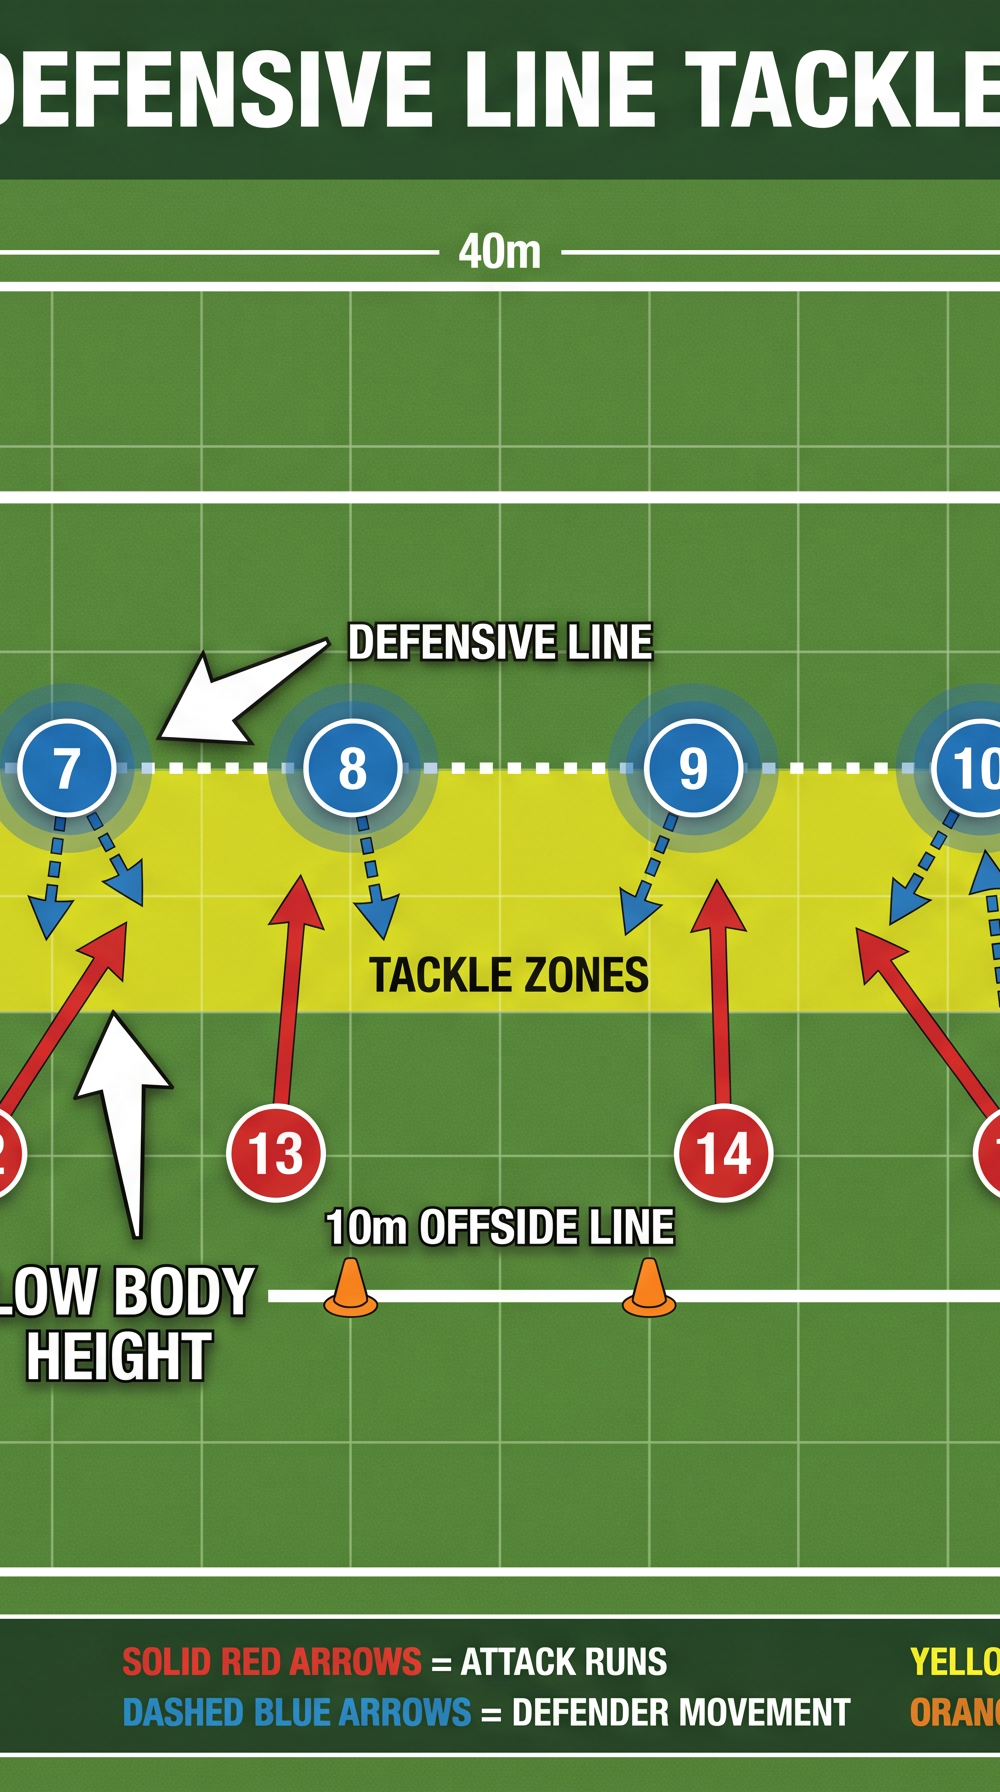
Phase 3: Defensive Line Tackle Technique (Game Application)
- Line Alignment: Set up a defensive line of 6 players (e.g., forwards 6, 7, 8 and backs 9, 10, 11) spaced evenly across a 40m width. Set an attacking line of 5 players opposite them.
- The Press: On the coach's call, the defensive line moves forward as a cohesive unit, maintaining their spacing and a slight "umbrella" shape to cut off the outside attack.
- Target Identification: The attackers pass the ball down the line. As the ball moves, the corresponding defender must step up, identify their target, and drop their body height in preparation for contact.
- Execution: The designated tackler executes a low, dominant tackle on the ball carrier. The adjacent defenders must rapidly adjust to either secure the ruck area or prepare for an offload, emphasizing the transition from tackle to breakdown.
4. Key Coaching Points
- Eyes Up, Back Straight: Players must never drop their head or look at the ground before contact. A straight back ensures power transfer and protects the spine.
- Foot in the Hoop: The lead foot must step in close to the attacker. If the foot is too far back, the tackler will overreach, lose power, and risk a head-on collision.
- Cheek to Cheek: The tackler's head must be positioned tightly against the side of the attacker's body (glute or thigh) to prevent head injuries from knees or hips.
- The Ring of Steel: A powerful, aggressive wrap with both arms is non-negotiable. Squeeze the attacker's legs together to immediately neutralize their momentum.
- Leg Drive: The tackle does not end at contact. The tackler must continue to pump their legs and drive through the attacker to ensure dominance and a favorable breakdown position.
5. Common Mistakes
- Bending at the Waist: Players often hinge at the hips rather than bending their knees, resulting in a weak posture and a high risk of head injury.
- Reaching for the Tackle: Tacklers who fail to close the distance with their feet will dive or reach with their arms, leading to weak, easily broken tackles or dangerous head positioning.
- Dropping Height Too Late: Waiting until the moment of impact to lower the body center results in upright collisions. Height must be adjusted during the final approach steps.
- Head on the Wrong Side: Placing the head across the attacker's body (in front of the knees) is the leading cause of concussions in the tackle area.
6. Variations & Progressions
- Fatigue Variable: Have the defenders complete a 10-meter down-and-up (burpee) or a short sprint before engaging in the tackle to simulate late-game fatigue where technique often degrades.
- The Offload Option: Allow the attackers to attempt an offload if the tackle is not dominant. This forces the tackler to not only go low but to complete the tackle quickly to prevent the pass.
- Choke Tackle Option: For advanced groups, call "UP" or "LOW" randomly before the engagement. If "UP" is called, the defender must execute a safe, chest-high wrap to hold the player up and form a maul, teaching decision-making in the contact zone.
7. Age Adaptations
- Under 8 - Under 10: Focus exclusively on Phase 1 and 2 (Channel 1) at a walking pace. Use tackle rings or heavy hit shields instead of live players to build confidence. Emphasize the "cheek to cheek" and "ring of steel" concepts using fun, descriptive language.
- Under 12 - Under 14: Introduce the angle running (Channel 2) and emphasize the leg drive. Ensure that players are comfortable tackling on both their left and right shoulders. Monitor head positioning rigorously.
- Under 16 - Open: Run all phases at full game speed. Incorporate the fatigue variables and 2v1 decision-making scenarios. Demand dominance in the collision and rapid transition to the ruck.