Mastering the Defensive Drift: A Comprehensive Guide to Lateral Defence
Equip your players with the spatial awareness and communication skills necessary to execute a flawless defensive drift, neutralising wide attacking threats.

Equipment Needed
1. Overview
The defensive drift is a cornerstone of modern rugby defence, particularly when defending wider channels or when outnumbered on the outside. This drill focuses on teaching players how to maintain their defensive line integrity while moving laterally across the pitch. By drifting as a cohesive unit, the defence forces the attacking team toward the touchline, using it as an extra defender. This drill is essential for developing the communication, spacing, and decision-making required to shut down overlap situations and prevent line breaks on the edges.
2. Setup

Proper setup is crucial for simulating realistic match scenarios. For this drill, you will need a designated area on a standard 100m x 70m rugby pitch.
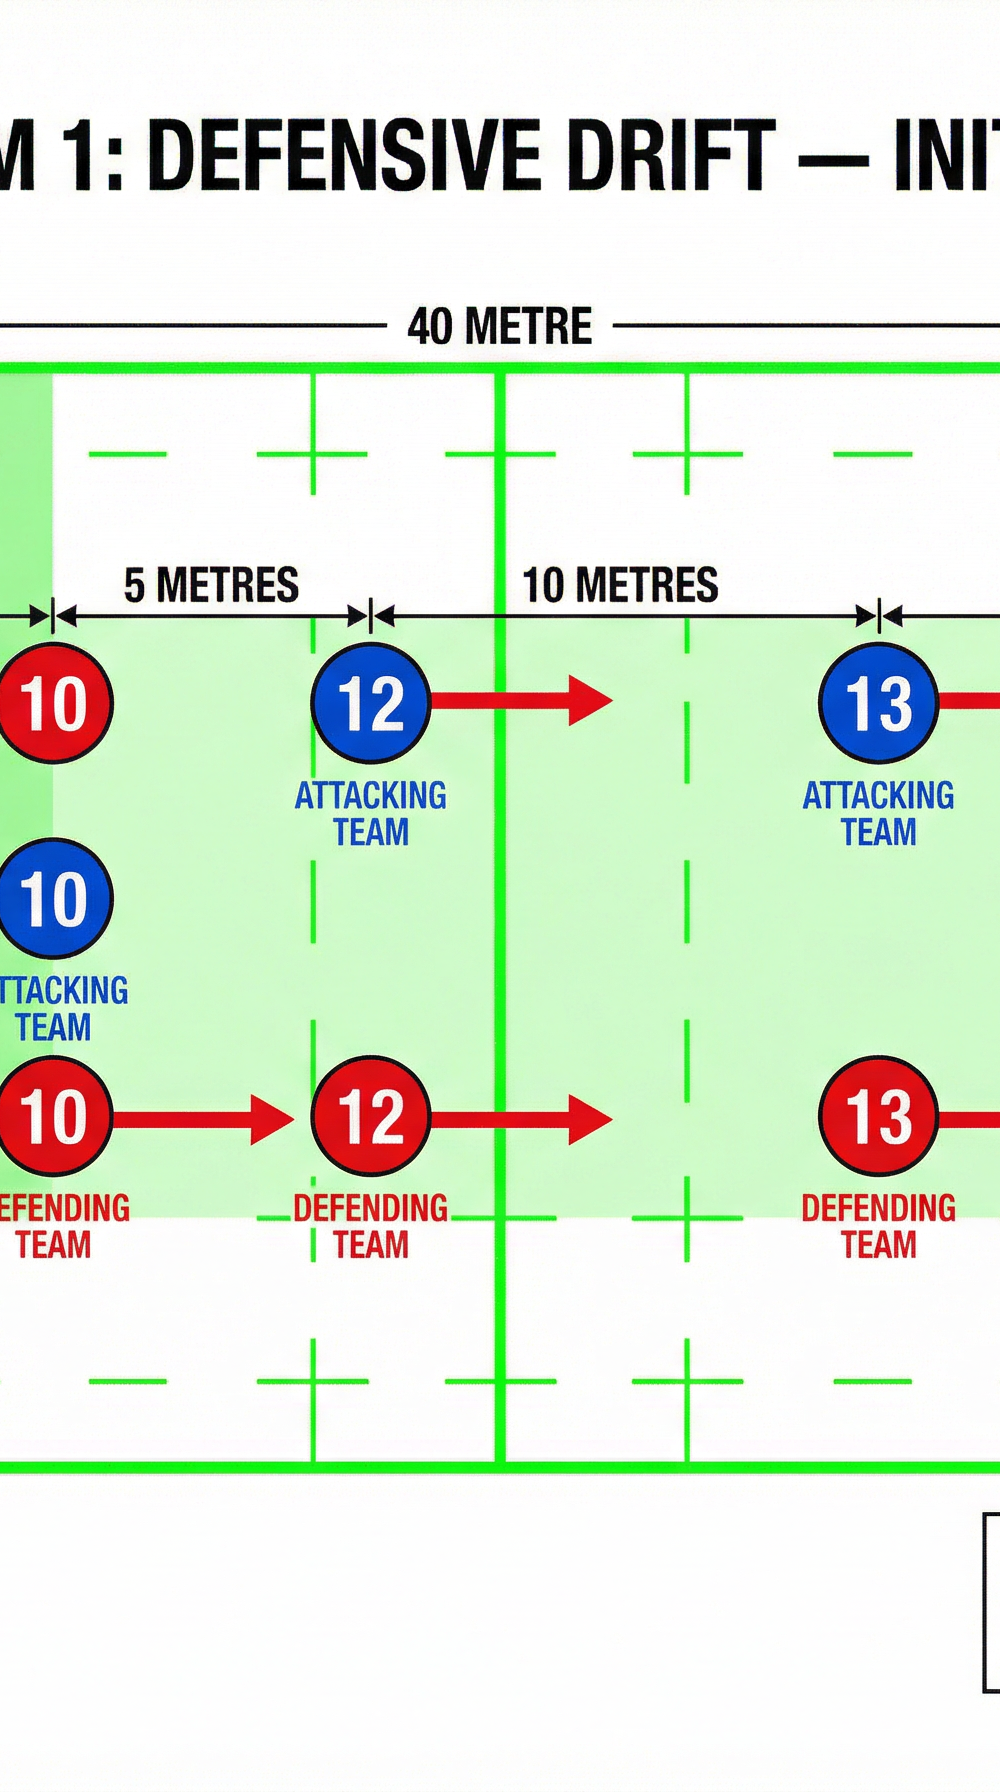
- Area Dimensions: Mark out a grid approximately 40 metres wide by 30 metres deep.
- Equipment Needed: 10-15 cones to mark the grid and starting positions, 2-3 rugby balls, and coloured bibs to distinguish attackers from defenders.
- Player Numbers: Minimum of 8 players (4 attackers vs 4 defenders), plus a scrum-half (9) to feed the ball.
- Initial Positions:
- Set a starting point to represent a ruck on the left side of the grid.
- The attacking team (Blue) lines up flat, with the fly-half (10) receiving the ball from the 9. The inside centre (12), outside centre (13), and winger (14) space themselves appropriately across the 40-metre width.
- The defending team (Red) mirrors the attackers but starts slightly narrower. The first defender (D1) aligns on the inside shoulder of the attacking 10. Subsequent defenders (D2, D3, D4) align on the inside shoulders of their opposite numbers.
3. Step-by-Step Instructions
- The Call and Set: The coach or the defensive captain calls "Set!" Defenders must immediately adopt a strong, balanced athletic stance with their weight on the balls of their feet, ready to move.
- The Feed: The scrum-half (9) passes the ball from the simulated ruck to the attacking fly-half (10).
- Initial Press (Up and Out): As the ball is passed, the defensive line moves forward collectively. The goal is to close down the attacking space quickly, but not so fast that the line becomes disjointed.
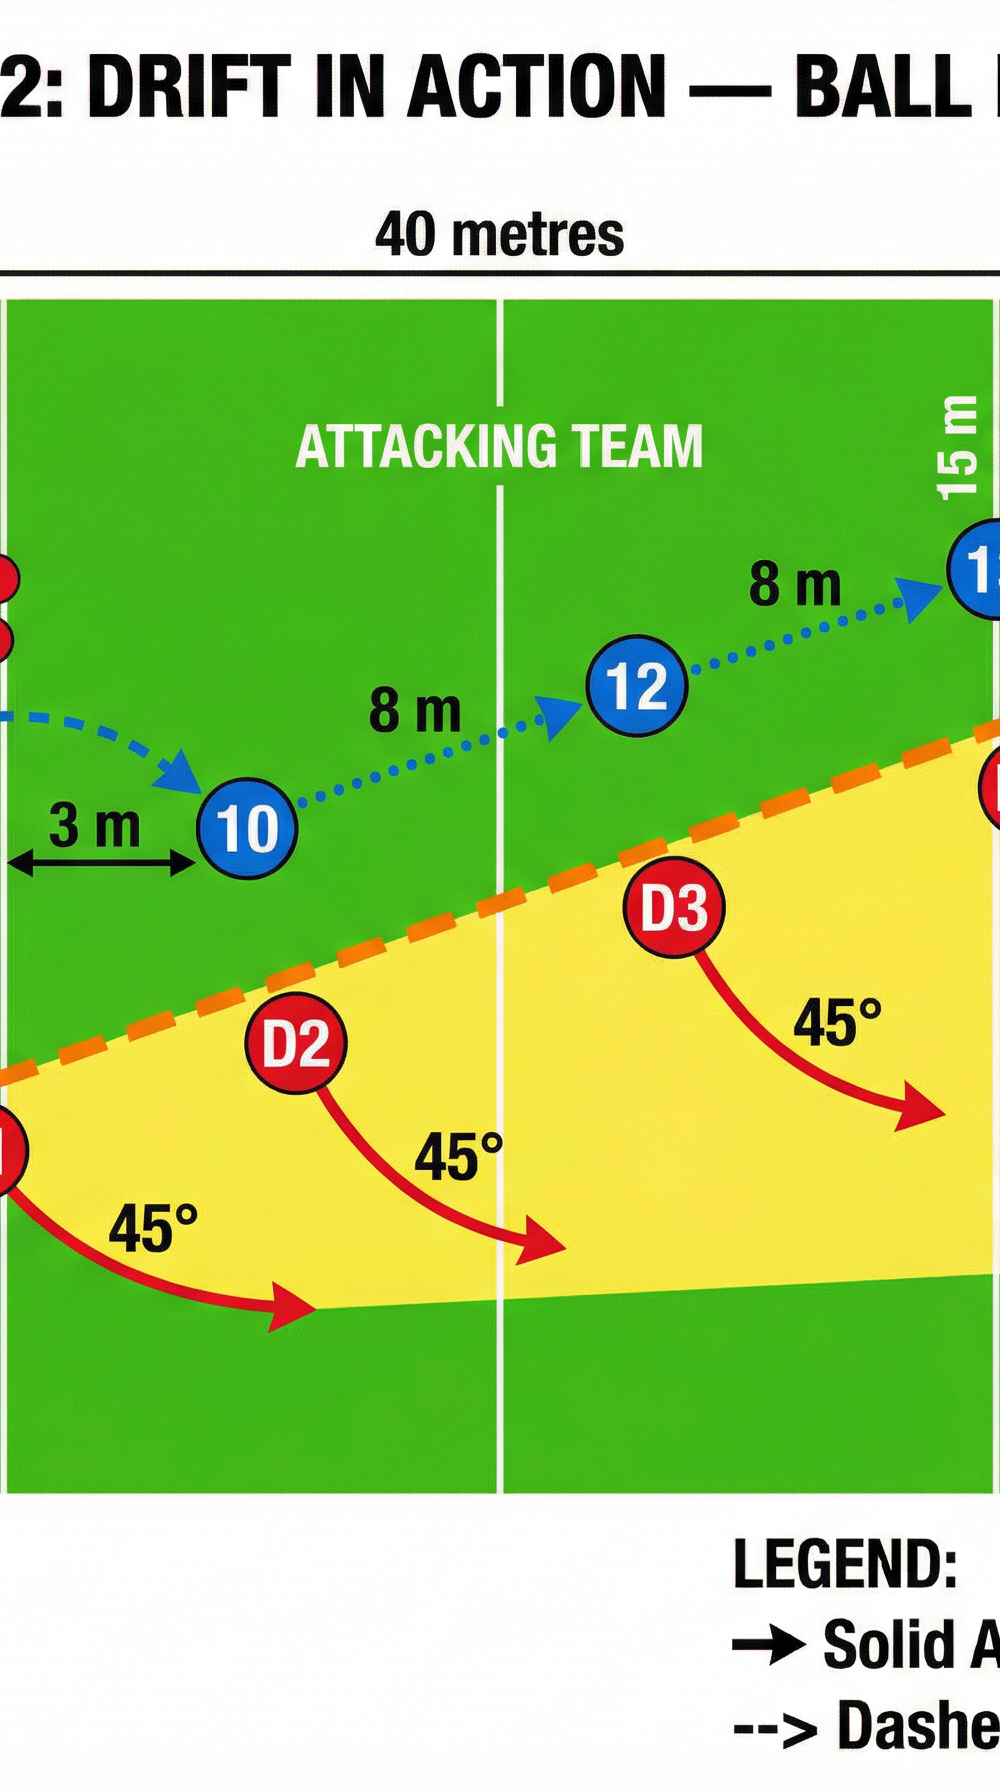
- The Drift Trigger: When the attacking 10 passes the ball wider to the 12, the drift is triggered. The first defender (D1) holds their ground slightly to cover any inside step, while the rest of the line (D2, D3, D4) begins to move laterally (drift) toward the touchline.
- Maintaining Spacing: As the defenders drift, they must maintain a consistent distance between each other (typically 2-3 metres). They should keep their hips square to the opposition for as long as possible.
- The Tackle: The drift continues as the ball moves through the attacking hands. The final defender makes a decisive, low tackle, driving the attacker toward or over the touchline.

4. Key Coaching Points

- Communication is Key: Defenders must constantly talk to each other. Calls like "Up!", "Drift!", and "I've got ball!" ensure everyone is on the same page.
- Inside Shoulder Alignment: Defenders should always align on the inside shoulder of the attacker they are marking, forcing them to the outside.
- Hips Square: Players must resist the urge to turn their bodies completely sideways when drifting.
- Line Speed and Control: The initial forward press must be aggressive, but the subsequent drift must be controlled.
- Trust the System: Defenders must trust that the player inside them will cover the space they leave behind.
5. Common Mistakes

- Dog-Legging: One defender rushes up faster than the rest, creating a staggered formation and opening gaps.
- Turning Shoulders Too Early: Exposing the inside to a switch pass or an inside step.
- Lack of Communication: Silent defences are easily manipulated.
- Over-Tracking: Drifting too far past the ball carrier before the pass is made.
6. Variations & Progressions

- Overload Attack (4 vs 3): Remove one defender to force harder decisions.
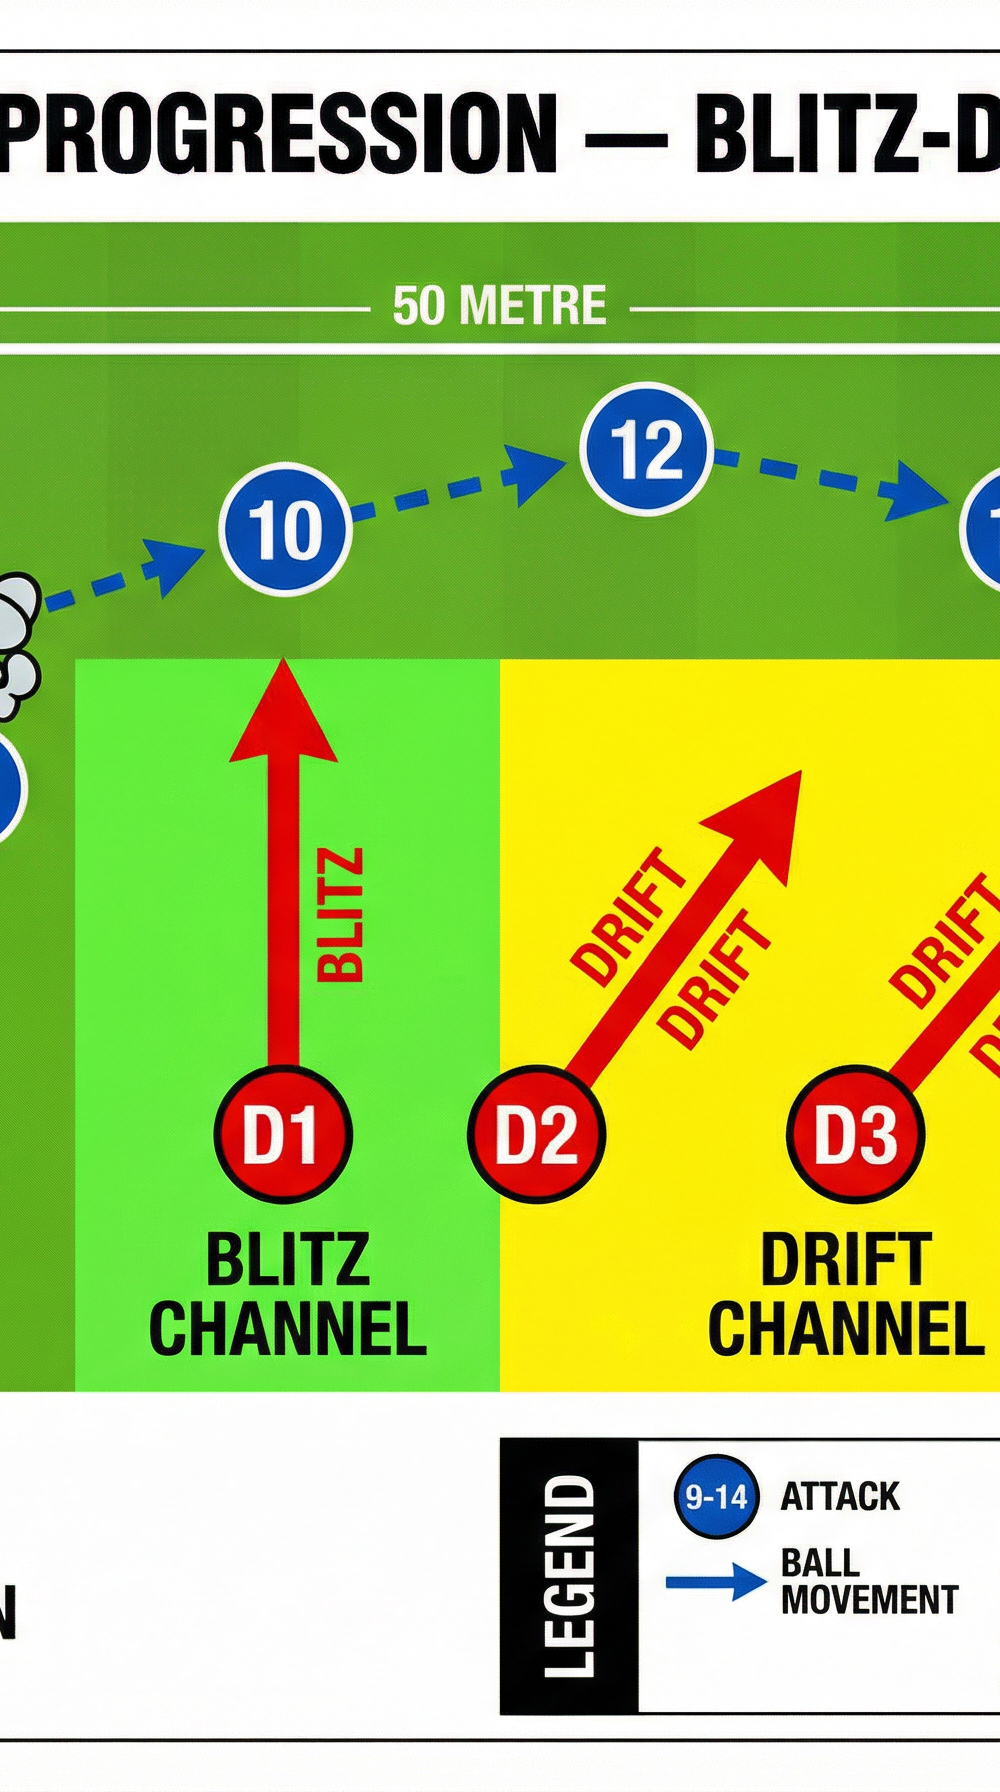
- Blitz-Drift Hybrid: D1 executes an aggressive blitz to shut down the 10, while D2-D4 drift to cover the wider channels.
- Adding Decoys: Have the attacking team run dummy lines or loop plays.
7. Age Adaptations

- Under 8s - Under 10s: Walking/jogging pace. Focus on staying in a straight line.
- Under 12s - Under 14s: Introduce inside shoulder concept and basic communication at jog pace.
- Under 16s - Open Grade: Full match speed with complex attacking structures.