Mastering the Low Tackle: Technique and Body Height Drill
Equip your players with the essential skills to execute safe, effective, and dominant low tackles by mastering body height and contact technique.
Equipment Needed
1. Overview
In modern Rugby, the ability to execute a safe and dominant low tackle is non-negotiable. With the continuous emphasis on player welfare and lowering the legal tackle height, coaches must prioritize drills that instil proper body mechanics and contact technique. This drill, the Mastering the Low Tackle: Technique and Body Height Drill, is designed to isolate and refine the critical components of the tackle: approach, body height, footwork, and the initial point of contact.
This resource provides a structured progression from a controlled environment to a game-like scenario. It aims to build confidence in players of all levels, ensuring they can consistently get their body height low, drive through the target, and complete the tackle safely. By implementing this drill regularly, you will develop a defensive unit that is not only legally compliant but also physically imposing at the breakdown.
2. Setup
To ensure maximum repetitions and a safe learning environment, the setup must be precise. This drill is designed for a standard Rugby pitch (100m x 70m) but can be adapted to smaller training areas.
Equipment Needed
- 12-16 Marker Cones (Orange)
- 4-6 Agility Poles or Tall Cones (Yellow)
- 2-3 Tackle Bags or Shields (Optional for early progressions)
- 1 Rugby Ball per attacking group
Pitch Setup and Player Positions
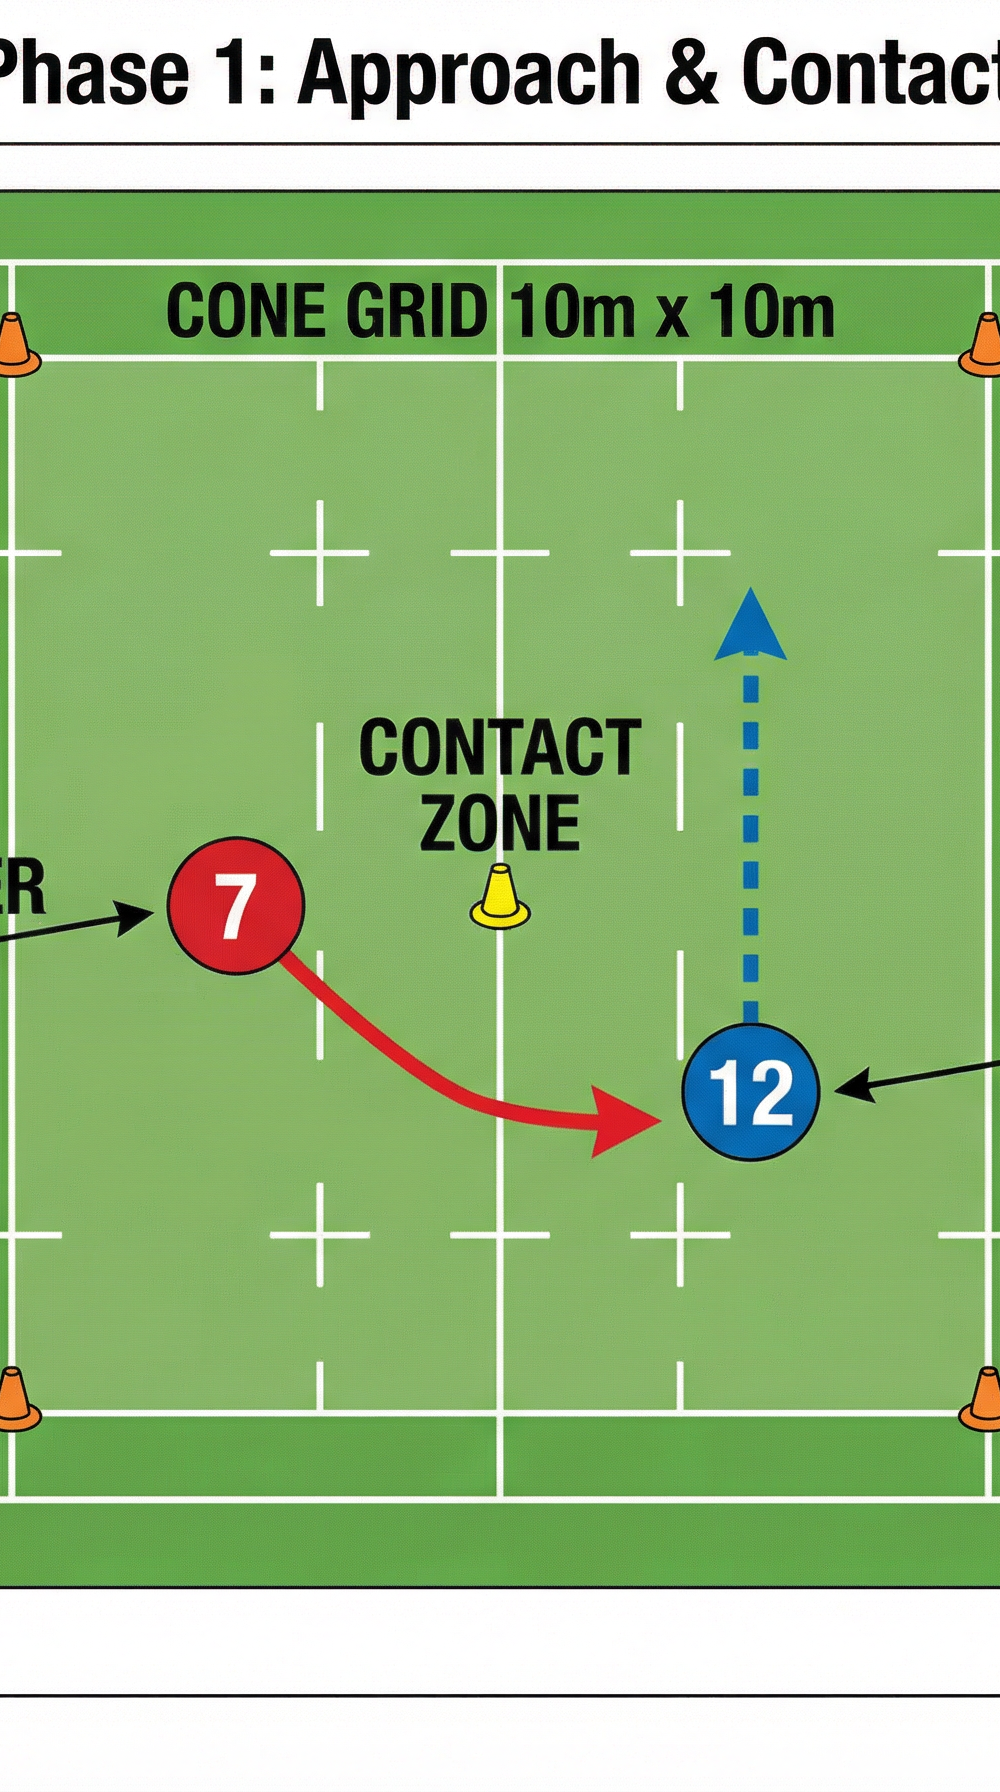
Phase 1: Approach & Contact (10m x 10m Grid)
Set up a 10m x 10m grid using four orange cones. Position one player as the Tackler (e.g., Openside Flanker, 7) on one side of the grid, and another player as the Ball Carrier (e.g., Inside Centre, 12) on the opposite side. Place a yellow cone in the center to mark the intended contact zone.
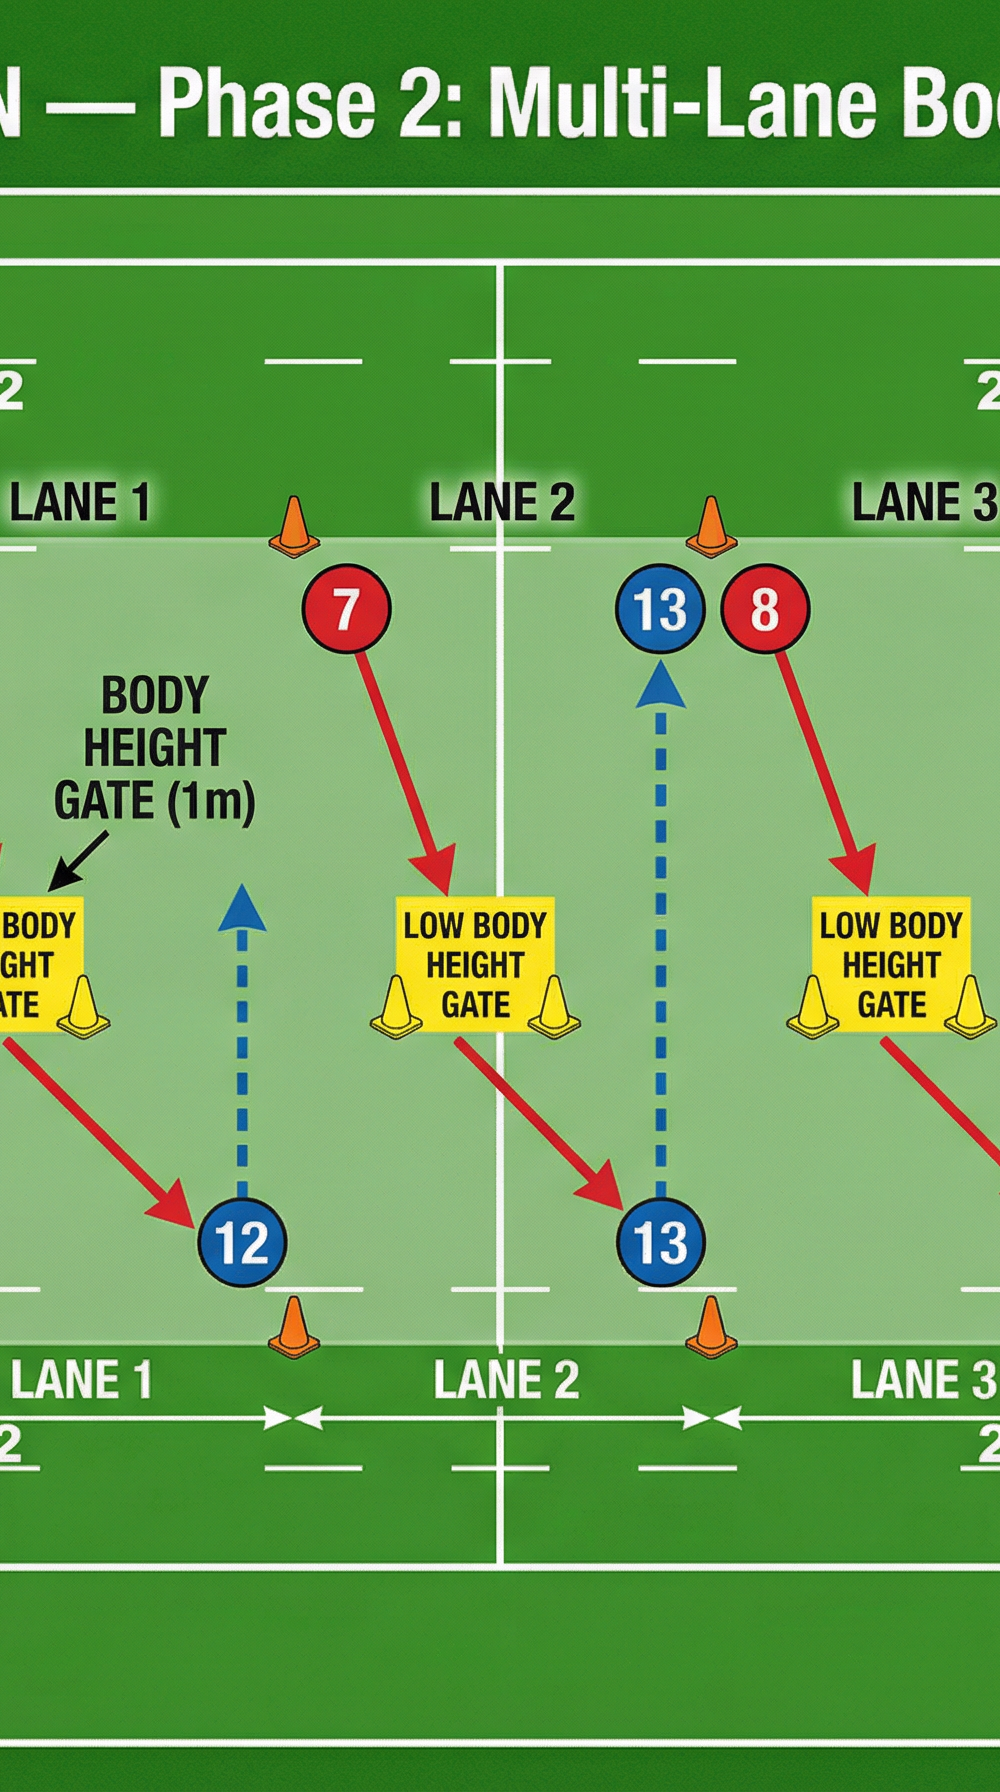
Phase 2: Multi-Lane Body Height Drill (20m x 15m Area)
Create three parallel lanes, each 5m wide and 20m long, using orange cones. In each lane, set up a 'Low Body Height Gate' using two yellow agility poles or tall cones spaced 1m apart, positioned halfway down the lane. Place a Defender (e.g., 6, 7, 8) at one end of each lane and an Attacker (e.g., 12, 13, 14) at the other end.
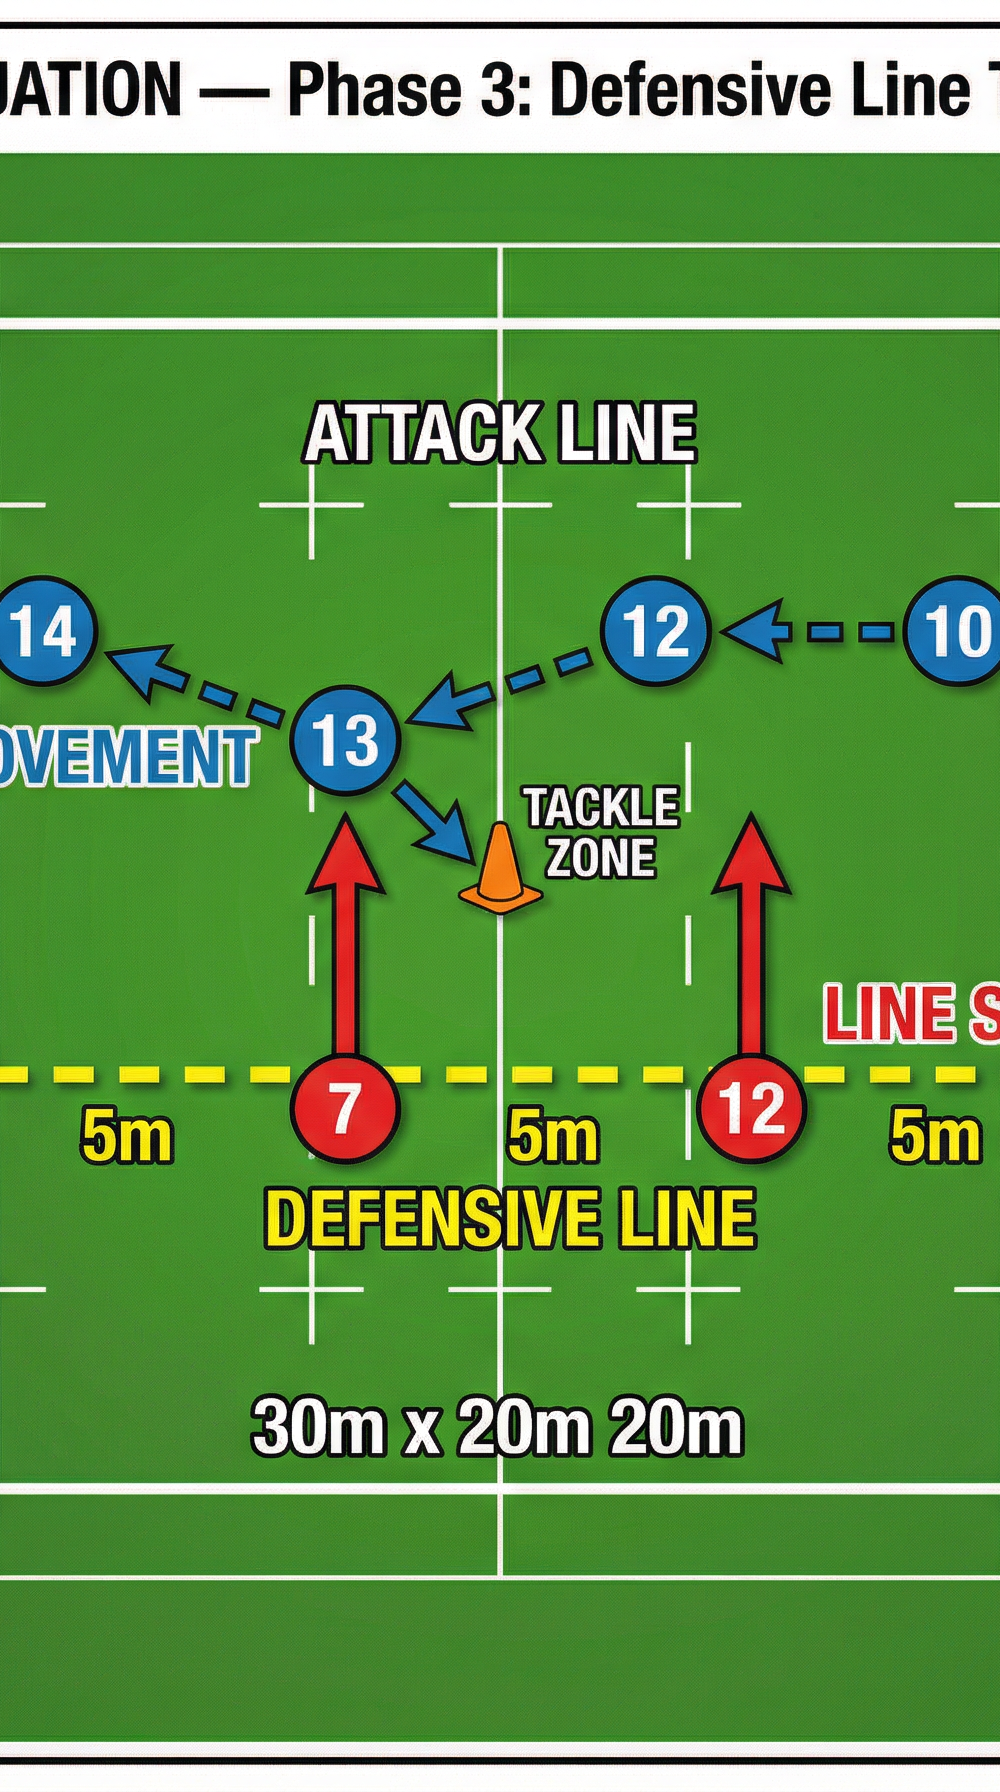
Phase 3: Defensive Line Tackle Drill (30m x 20m Zone)
Mark out a 30m wide by 20m deep game-situation zone. Establish a defensive line with four players (e.g., 6, 7, 12, 13) spaced 5m apart. Position an attacking line of four players (e.g., 10, 12, 13, 14) 10m away from the defensive line. Use an orange cone to designate the initial tackle zone.
3. Step-by-Step Instructions
Follow these sequential steps to run the drill effectively, ensuring players master each phase before progressing.
Phase 1: Approach & Contact (The Fundamentals)
- Starting Position: The Tackler (7) and Ball Carrier (12) start on opposite sides of the 10m x 10m grid.
- The Approach: On the coach's whistle, the Ball Carrier jogs at a moderate pace straight toward the opposite side. The Tackler moves forward, closing the distance quickly but under control.
- Dropping Height: As the Tackler approaches the center yellow cone (Contact Zone), they must visibly drop their body height by bending at the knees and hips, keeping their back straight and eyes open, focused on the Ball Carrier's core (hips/thighs).
- Foot Placement: The Tackler must step in close to the Ball Carrier, planting their lead foot (the 'same foot, same shoulder' principle) as close to the Ball Carrier's feet as possible.
- The Contact: The Tackler drives their shoulder into the target area (thighs), wrapping their arms tightly around the Ball Carrier's legs (the 'ring of steel').
- The Finish: The Tackler drives through the contact using leg drive, taking the Ball Carrier safely to the ground. Both players reset and swap roles.
Phase 2: Multi-Lane Body Height Drill (Adding the Gate)
- Starting Position: Defenders (6, 7, 8) and Attackers (12, 13, 14) face each other in their respective 5m wide lanes.
- The Movement: On the whistle, the Attackers run straight down their lanes at 70% pace. The Defenders move forward to meet them.
- Navigating the Gate: Before making contact, the Defenders must pass under the 'Low Body Height Gate' (the two yellow poles set 1m apart). This forces them to get their body height extremely low while maintaining forward momentum.
- The Tackle: Immediately after passing through the gate, the Defender executes a low tackle on the Attacker, focusing on the shoulder strike and tight wrap.
- Rotation: After the tackle is completed, players rotate lanes to experience different angles and pairings.
Phase 3: Defensive Line Tackle Drill (Game Situation)
- Starting Position: The defensive line (6, 7, 12, 13) is set. The attacking line (10, 12, 13, 14) starts with the ball.
- Line Speed: On the coach's call, the defensive line moves forward together, maintaining their spacing and line integrity.
- Ball Movement: The attacking line passes the ball down the line (e.g., 10 to 12 to 13).
- Target Identification: The defender opposite the ball receiver (e.g., Defender 7 targeting Attacker 13) must identify their target, accelerate, and drop their body height as they approach the Tackle Zone.
- Execution: The identified defender executes a dominant low tackle, while the adjacent defenders fold in to secure the ruck area or prepare for the next phase. Ensure the tackle is legal and safe.
4. Key Coaching Points
To maximize the effectiveness of this drill, coaches should constantly reinforce these critical points:
- Eyes Open and on the Target: The tackler must never take their eyes off the ball carrier's core (hips/thighs). Looking down or away leads to poor technique and potential injury.
- 'Same Foot, Same Shoulder': Emphasize planting the foot on the same side as the tackling shoulder close to the ball carrier. This provides a strong base for the shoulder strike and leg drive.
- Cheek to Cheek: The tackler's cheek should be pressed tight against the side of the ball carrier's thigh or glute upon contact. This ensures the head is in a safe position behind the ball carrier.
- The 'Ring of Steel': The arm wrap must be aggressive and tight around the legs, pulling the ball carrier in to eliminate their leg drive and secure the tackle.
- Leg Drive Through Contact: The tackle doesn't end at contact. The tackler must continue to pump their legs and drive through the ball carrier to finish the tackle dominantly.
5. Common Mistakes
Watch for these common errors and correct them immediately to prevent bad habits from forming:
- Bending at the Waist, Not the Knees: Players often drop their height by simply bending their back, which puts them off balance and exposes their head and neck. Correct this by cueing 'sink the hips' and 'bend the knees'.
- Reaching with the Arms: Tacklers sometimes try to make the tackle with their arms before their shoulder makes contact. This leads to weak, easily broken tackles. Reinforce that the shoulder must strike first.
- Head on the Wrong Side: Placing the head across the front of the ball carrier's body is highly dangerous and illegal. Always ensure the head is safely positioned behind or to the side ('cheek to cheek').
- Stopping Feet Before Contact: Tacklers who plant their feet and wait for the ball carrier lose all momentum and power. Encourage continuous foot movement and stepping into the tackle.
6. Variations & Progressions
Keep the drill challenging and engaging by introducing these variations:
- Introduce Evasion (Progression): Allow the ball carrier in Phase 1 and Phase 2 to use lateral movement (stepping) within their grid or lane to make the tackle more difficult and game-like.
- Tackle Bags to Live Contact (Progression): For less experienced players, start Phase 1 using tackle bags or shields to build confidence in the shoulder strike and body height before moving to live player-on-player contact.
- Fatigue Factor (Variation): Have the tacklers complete a physical task (e.g., 5 burpees or a 10m sprint) immediately before executing the tackle to simulate late-game fatigue and test their technique under pressure.
7. Age Adaptations
Tailor the drill to suit the developmental stage of your players:
- Under 8s - Under 10s (Introduction): Focus entirely on safety and the very basics. Use tackle bags exclusively for Phase 1. Emphasize 'cheek to cheek' and the 'ring of steel' wrap. Do not progress to live tackling until these fundamentals are solid.
- Under 12s - Under 14s (Development): Introduce live tackling in controlled environments (Phase 1 and Phase 2). Focus heavily on foot placement ('same foot, same shoulder') and dropping body height by bending the knees. Introduce the Body Height Gate (Phase 2) to gamify getting low.
- Under 16s - Open (Refinement): Run all phases at high intensity. Emphasize line speed, dominant leg drive through the contact, and rapid resetting. Introduce the fatigue variations and complex game situations (Phase 3) to challenge their decision-making and technique under pressure.