Attacking Baseline Throw-In: The High-Low Split Play
A highly effective baseline throw-in set play designed to create immediate scoring opportunities by isolating the Goal Shooter under the post while pulling defenders out of the circle.

Equipment Needed
1. Overview
The Attacking Baseline Throw-In is a critical moment in any netball match. When your team earns a throw-in on the attacking baseline (the 15.25m line under your own goal), it is an immediate scoring opportunity. However, the confined space and the 3-second rule can easily lead to a held ball or an interception if players do not have a coordinated plan.
The "High-Low Split" set play is designed to combat a crowded goal circle. By utilizing a coordinated double-lead from the Goal Attack (GA) and Goal Shooter (GS), this play forces the defense to make quick decisions, often resulting in an open pass under the post or a high-percentage shot from the top of the circle. This play is best used when the opposition is employing a tight, one-on-one defensive structure.
2. Setup

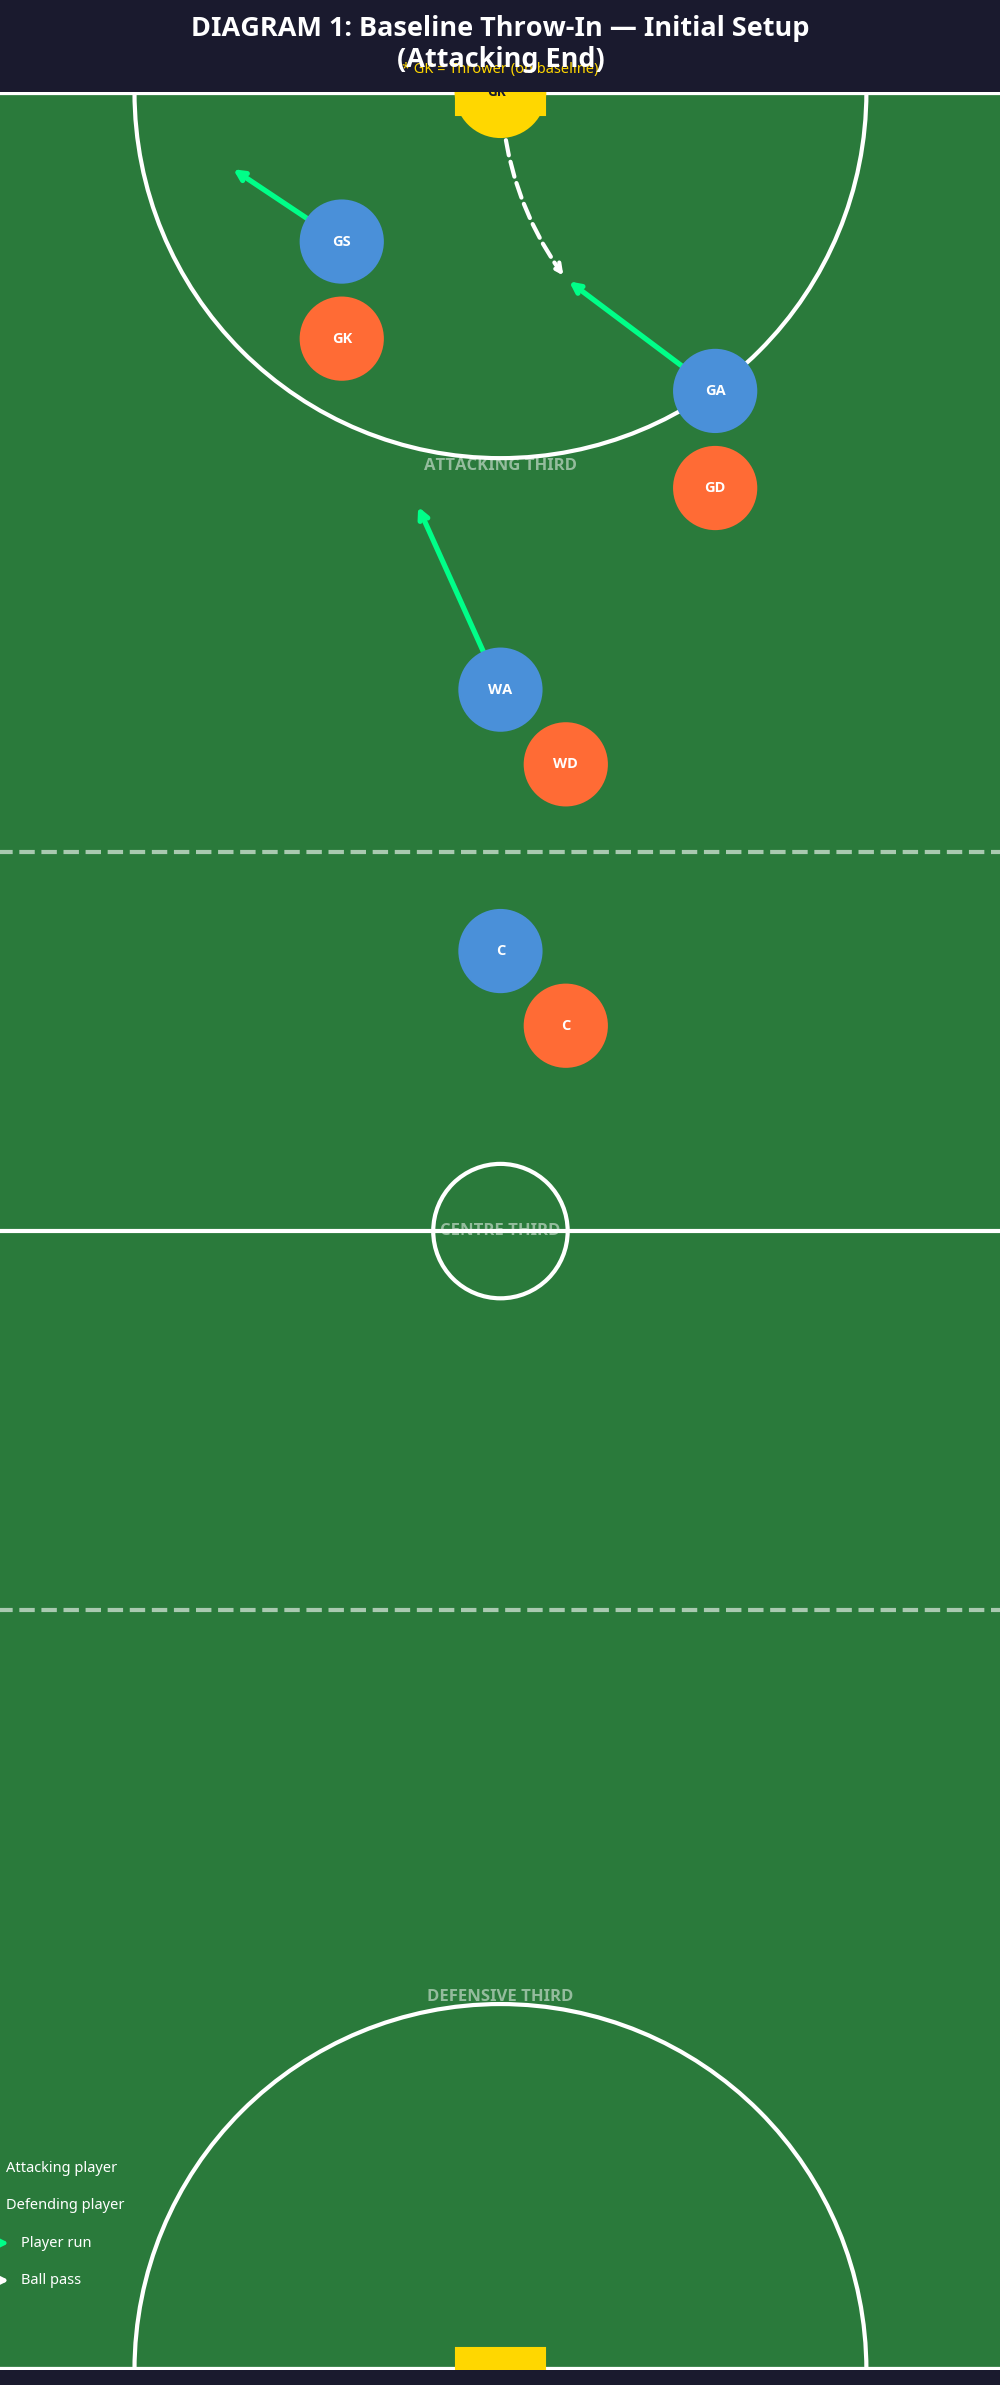
To run this play effectively, precision in the initial setup is paramount. The court dimensions (30.5m x 15.25m) mean that spacing in the goal third is tight, so players must hit their marks exactly.
- Equipment Needed: 1 Netball, full court markings, standard goalposts (3.05m high).
- Player Positions (Initial Setup):
- Goal Keeper (GK): Acts as the thrower. Positions out of bounds on the baseline, roughly 2-3 meters wide of the goalpost to open up the passing angle.
- Goal Shooter (GS): Starts deep in the pocket, near the baseline but on the opposite side of the post from the thrower.
- Goal Attack (GA): Starts high in the goal circle, near the top edge of the 4.9m radius.
- Wing Attack (WA): Positions on the transverse line or just inside the attacking third, ready to offer a reset option.
- Centre (C): Holds near the top of the attacking third, providing defensive cover and a secondary reset.

3. Step-by-Step Instructions
Execution requires sharp timing. The movement should not begin until the umpire blows the whistle to restart play.
- The Trigger: The umpire blows the whistle. The GK (thrower) steps up to the line and makes eye contact with the GA.
- The Clear-Out (GA): The GA makes a hard, aggressive drive out of the goal circle towards the transverse line, aiming for a space around 2 meters outside the top of the circle. This movement is designed to drag the Goal Defence (GD) out of the immediate shooting area.
- The Baseline Drive (GS): As soon as the GA clears the space, the GS makes a sharp, angled drive along the baseline, cutting directly across the face of the goalpost towards the thrower (GK).
- The Primary Pass: The GK delivers a firm, flat chest pass or a perfectly weighted bounce pass to the GS, who should receive the ball in stride, ideally within 1-2 meters of the goalpost.
- The Shot or Reset: The GS immediately turns to face the post. If open, they take the high-percentage shot. If the Goal Keeper (defending) has recovered well, the GS looks to reset the ball to the GA (who has now re-offered at the top of the circle) or the WA.
4. Key Coaching Points
To ensure this play is successful during a match, coaches should focus on the following critical elements during practice:
- Timing is Everything: The GS must not start their drive until the GA has cleared the space. If the GS moves too early, they will run into the GD, clogging the lane.
- Strong Decoys: The GA's initial drive out of the circle must be completely convincing. They must call for the ball and sprint hard to force the defender to follow.
- Pass Quality: The GK must deliver a pass that leads the GS toward the post, not away from it. A bounce pass is often highly effective here to avoid the outstretched arms of the defending GK.
- Immediate Turn: Upon receiving the ball, the GS must land in a balanced position and immediately turn their body and eyes to the goalpost. This forces the defender to react to the shot threat rather than the pass.
5. Common Mistakes
Watch out for these frequent errors when introducing this set play:
- Moving Before the Whistle: Players anticipating the play and breaking before the umpire's whistle, resulting in a free pass to the opposition.
- Weak Decoy Runs: The GA jogging out of the circle, allowing the GD to stay back and double-team the GS under the post.
- Lofted Passes: The thrower (GK) throwing a high, looping pass. This gives the defenders too much time to recover and contest the ball in the air.
- Crowding the Space: The WA or C driving into the same space that the GA is clearing into, bringing extra defenders into the passing lane.
6. Variations & Progressions
Once your team has mastered the basic "High-Low Split", introduce these variations to keep the defense guessing:
- The GA Pop: If the GD decides to stay back and double-team the GS, the GK simply passes the ball to the GA, who is now wide open at the top of the circle for a mid-range shot.
- The WA Wrap: Instead of the GA clearing out, the WA makes a hard drive from the transverse line directly to the top of the circle to receive the first pass, while the GA and GS set a screen for each other inside the circle.
- The Reset and Swing: If the initial options are covered, the GK passes back to the C near the transverse line. The team then swings the ball to the opposite side of the court to attack from a new angle.
7. Age Adaptations
This play can be modified to suit different skill levels and age groups:
- Under 10s / Beginners: Focus purely on the basic movement. Have the GA run out, and the GS run in. Do not worry about complex screens or secondary options. Emphasize strong, two-handed chest passes.
- Under 12s / Intermediate: Introduce the concept of the "decoy" run. Teach the GA how to use their body language and voice to sell the fake drive.
- Under 14s+ / Advanced: Implement the full play with all variations. Require the thrower (GK) to read the defense and make the correct decision between the GS, GA, or a reset option under pressure.