Baseline Throw-In: The 'Diamond Drive' Set Play
Master the Diamond Drive — a structured baseline throw-in set play that uses decoy runs and timed leads to break defensive pressure and transition the ball from your defensive baseline to the attacking third in three decisive passes.

Equipment Needed
Overview
The Diamond Drive is a structured baseline throw-in set play designed for use when your team wins possession from a baseline infringement, an out-of-court ball at the defensive end, or a goalkeeper restart. It is one of the most tactically valuable set pieces in netball because it occurs in a high-pressure zone — your own defensive baseline — where opponents are typically well-organised and looking to intercept.
The play's primary objective is to safely clear the ball from the defensive third while simultaneously creating a structured transition into the attacking end. Rather than relying on a single option, the Diamond Drive builds a diamond-shaped network of passing options that forces defenders to commit, then exploits the space created. When executed with correct timing and sharp leads, the play can move the ball from the defensive baseline to the attacking third in as few as three passes, creating a genuine shooting opportunity within 8–10 seconds of the throw-in.
Use this play in the following game situations: when your GK or GD takes a baseline throw-in in your defensive third; when the opposition has set a tight defensive press around the goal circle; or as a pre-planned restart after a goal has been scored against your team.
Setup
Equipment Required
- 1 full-size netball court (30.5m × 15.25m)
- 7 bibs or training vests (one per player, labelled by position)
- 1 netball (size 5 for players aged 12+; size 4 for under-12s)
- Cones (optional) — 4 cones to mark the corners of the defensive third during training
- Whiteboard or coaching clipboard for pre-session briefing
Court Setup
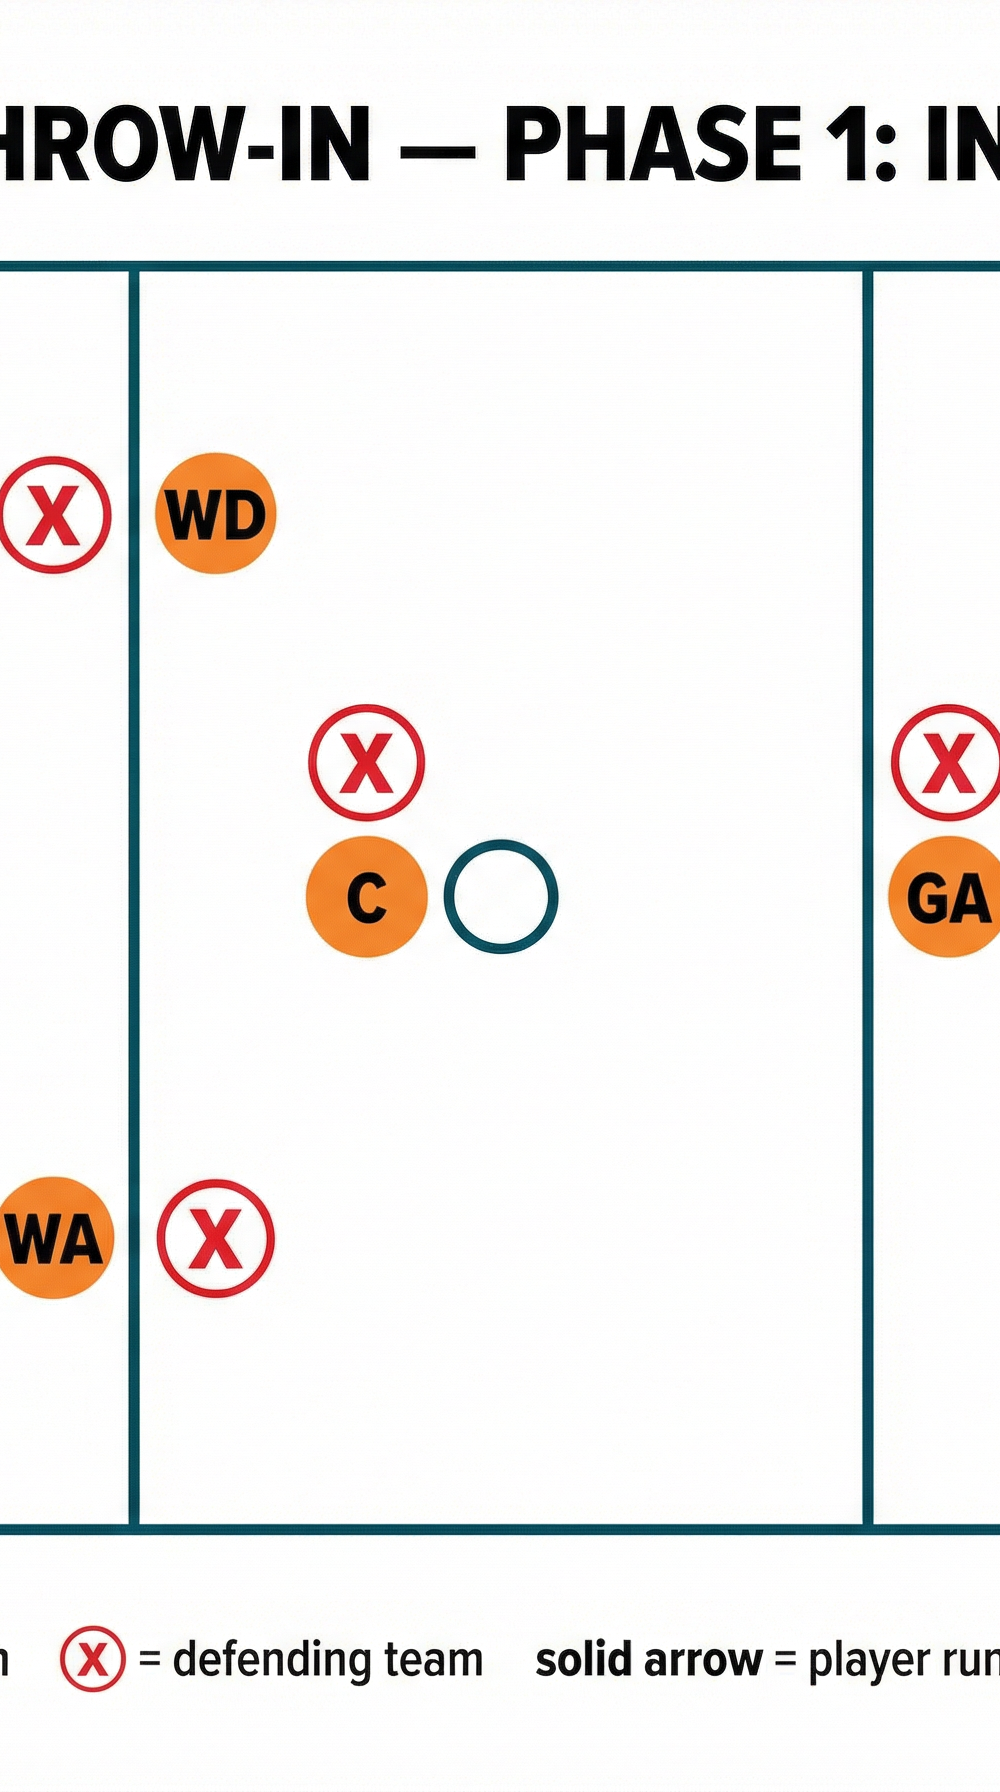
This play is set up from the defensive baseline — the end line behind your own goal circle. The thrower-in (typically the GK) stands outside the court boundary at the baseline, positioned on the left-hand side of the goal post (from the GK's perspective facing the court). All other players must be inside the court and positioned within their legal zones.

Diagram 1 — Phase 1: Initial Setup. The GK takes position outside the baseline on the left side. GD positions 1m inside the court near the baseline. WD positions at the transverse line. C holds in the centre third. WA, GA, and GS take up positions in the centre and attacking thirds.
Player Starting Positions
| Position | Starting Location | Role in Play |
|---|---|---|
| GK (Thrower) | Outside baseline, left of post | Initiates the throw-in |
| GD | 1m inside court, near baseline left | Decoy runner — draws the defender |
| WD | Defensive third, near right transverse line | Primary receiver — lead run |
| C | Centre third, near transverse line | Secondary receiver — support run |
| WA | Centre third, right side | Tertiary option — wide outlet |
| GA | Attacking third, near transverse line | Continuation receiver |
| GS | Inside goal circle, attacking third | Holds space — final target |
Step-by-Step Instructions

Step 1 — Signal the play. Before the GK takes the ball out of bounds, the team uses a pre-agreed verbal or visual cue to confirm the Diamond Drive is being run. A simple call such as "Diamond!" from the GK is sufficient. All players acknowledge and move to their starting positions as described above.
Step 2 — GD sets the decoy. As the GK prepares to throw, the GD makes a deliberate, committed drive diagonally forward toward the centre of the defensive third. This run must look like a genuine lead — it should draw the GD's defender and any nearby opposition player away from the right-hand side of the court. The GD does not expect to receive the ball on this run; their job is purely to create space.
Step 3 — WD times the lead run. Simultaneously with the GD's decoy, the WD executes a sharp change-of-direction lead run from the right transverse line toward the goal circle edge in the defensive third. This is the primary passing option. The WD must time the run so they arrive in space at the same moment the GK is ready to release the ball — approximately 1.5–2 seconds after the signal. The lead should be a minimum of 3–4 metres to create genuine separation from the defender.
Step 4 — GK delivers the first pass. With the GD's decoy having drawn defenders toward the left, the GK delivers a firm, flat pass to the WD on the right side. The pass should be chest-height and lead the WD slightly forward so they can catch in stride. If the WD is not clear, the GK's secondary option is the C, who has moved toward the transverse line as a support option.
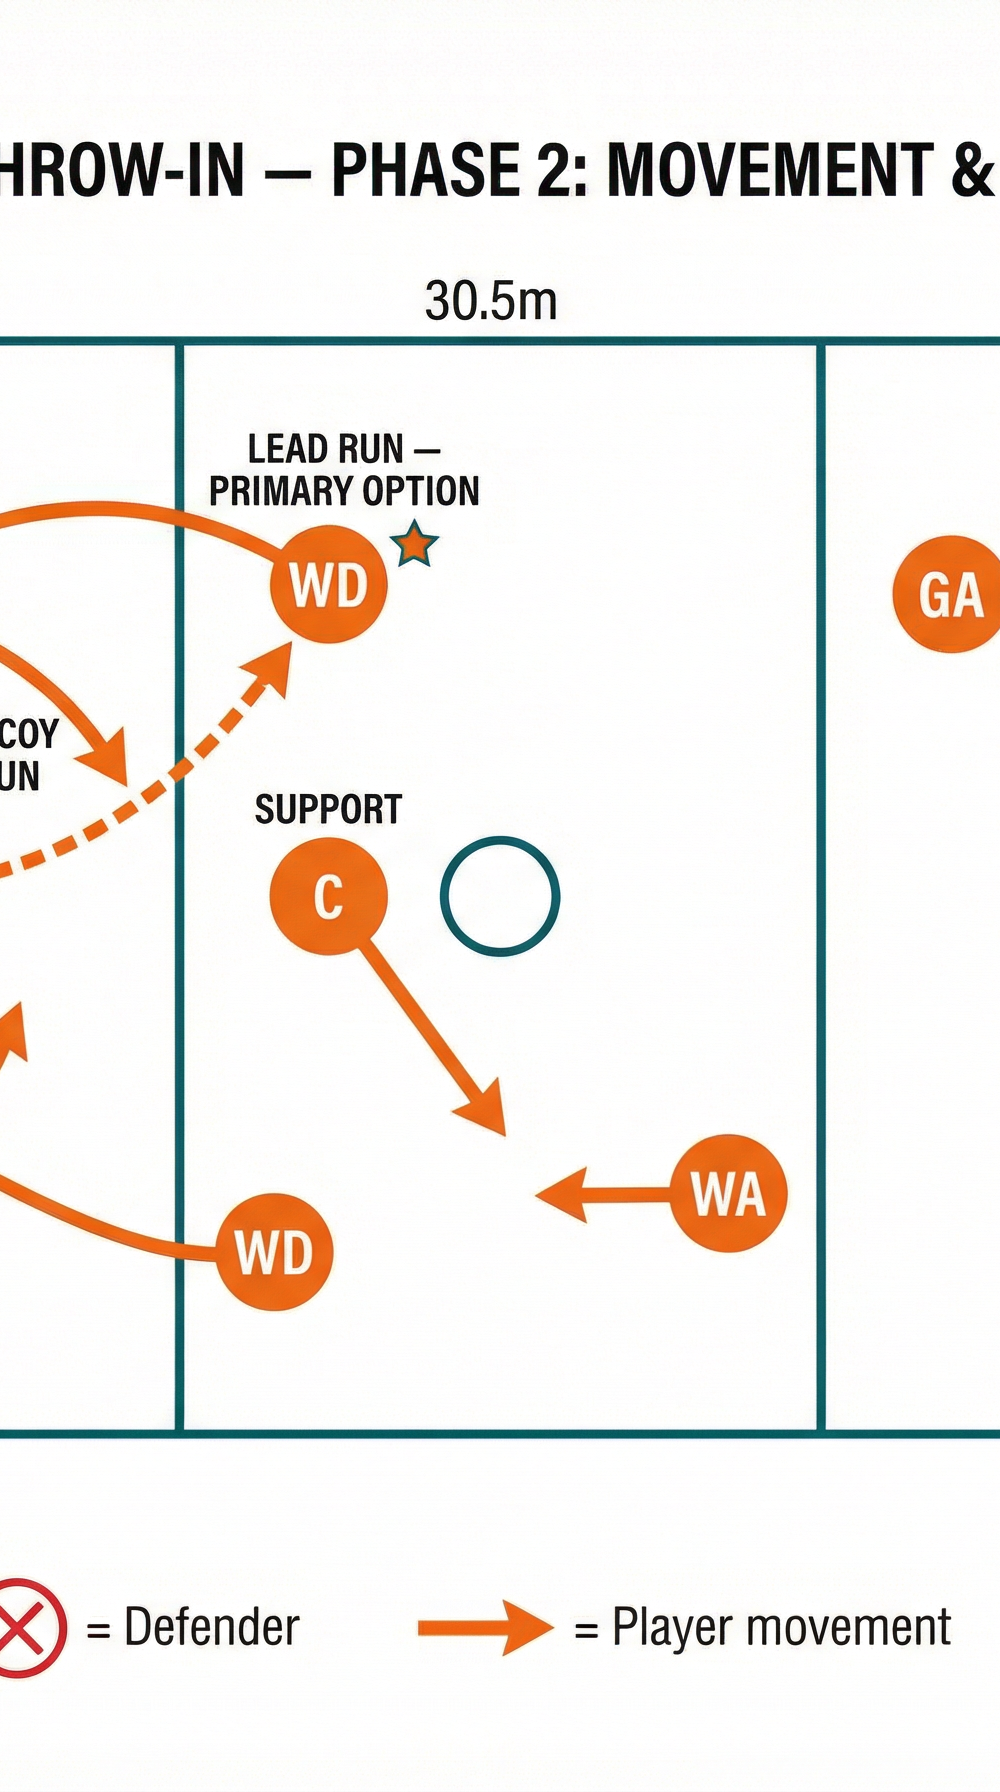
Diagram 2 — Phase 2: Movement and First Pass. The GD's decoy run draws defenders left. The WD leads right to receive the primary pass from the GK (dashed arrow). The C provides a support option in the centre third.
Step 5 — WD receives and immediately looks forward. Upon catching the ball, the WD should land with their leading foot pointing up-court. They have three seconds to release the ball. Their primary target is the C, who has continued their run into the centre third and is now offering a strong forward lead. The WD should not hold the ball — the tempo of this play depends on quick, decisive passing.
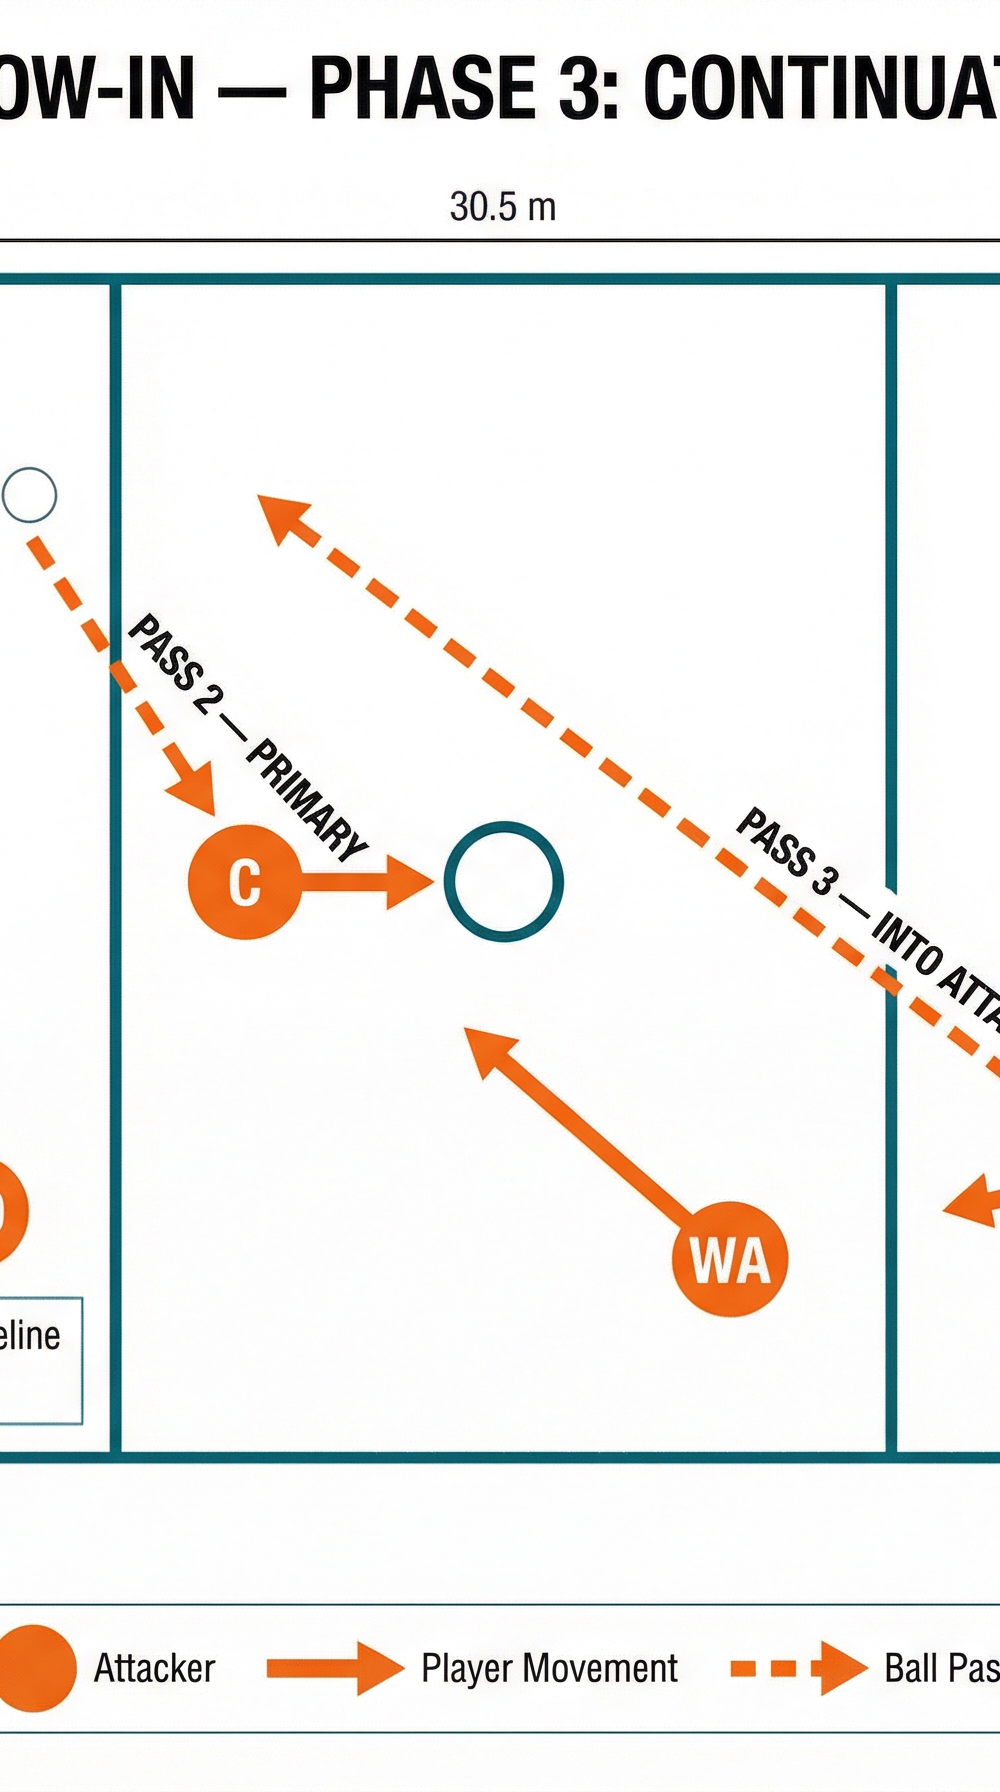
Step 6 — C receives and drives the ball forward. The C catches the pass from WD and immediately looks to the attacking third. The GA has made a lead-out run away from the goal circle toward the transverse line, creating space. The C delivers the third pass to the GA, completing the transition from the defensive baseline to the attacking third.
Step 7 — GA receives and feeds into the circle. The GA catches in the attacking third and looks to feed the GS, who has held their position in the goal circle and is now making a sharp movement across the circle to receive. The GS catches and shoots, completing the full sequence.

Diagram 3 — Phase 3: Continuation and Attack. WD passes to C (Pass 2). C drives the ball to GA (Pass 3 — into attack). GS holds space in the circle for the final feed. The ball travels from the defensive baseline to the attacking third in three passes.
Key Coaching Points

1. Timing is everything — the decoy and the lead must happen simultaneously. The most common reason this play breaks down is that the GD and WD move at different times. Drill this in training by using a clap or whistle as the 'go' signal, requiring both players to initiate their runs at exactly the same moment.
2. The GD's decoy must be committed and convincing. A half-hearted jog will not draw a defender. Coach the GD to sprint at 80–90% effort on the decoy run, driving with their arms and looking directly at the GK as if expecting the ball. The defender must genuinely believe the pass is going there.
3. The WD's lead must create separation, not just movement. Teach your WD to use a two-step fake before the lead — a small step toward the defender to engage them, then an explosive change of direction away. The target is at least 3 metres of clear space before the GK releases the ball.
4. The GK must be decisive — commit to the primary option or move quickly to the secondary. Hesitation by the GK gives defenders time to recover. If the WD is not clear within 2 seconds, the GK should immediately switch their eyes to the C and deliver the pass without further delay. The GK has 3 seconds from when the umpire blows the whistle to release the ball.
5. Ball speed through the chain is critical. Each receiver should aim to release the ball within 1.5–2 seconds of catching it. Slow ball movement allows the defence to reorganise. Use the coaching cue "catch and face" — every player should land facing up-court and ready to pass.
6. GS must hold space, not chase the ball. A common error is the GS drifting out of the circle to get involved in the play. Coach the GS to hold their position and make one sharp movement across the circle only when the GA has received the ball in the attacking third. Patience from the GS creates the scoring opportunity.
Common Mistakes

Mistake 1 — GD runs too early, telegraphing the play. If the GD begins their decoy run before the GK has the ball and is ready, defenders have time to read and recover. Correction: Drill the timing so the GD's run begins only on the agreed signal, not when the GK first walks to the baseline.
Mistake 2 — WD leads in the wrong direction or into a congested area. Some WDs instinctively lead toward the ball rather than away from it, running into the same space the GD is vacating. Correction: Use cones in training to mark the target zone for the WD's lead — a 2m × 2m box on the right side of the defensive third near the goal circle edge. The WD must lead into that box.
Mistake 3 — The C does not offer a support option. If the C stands still waiting to see what happens, the WD is left with no forward pass option after receiving from the GK. Correction: Make it a non-negotiable rule that the C is always moving toward the transverse line as the first pass is made. Use the coaching cue "C is always moving."
Mistake 4 — GA leads too early, losing their defender before the ball arrives. If the GA makes their lead run before the C has received the ball, they will have stopped moving by the time the pass is ready, allowing their defender to recover. Correction: Coach the GA to trigger their lead run the moment the WD catches the ball — not before.
Mistake 5 — Players standing and watching instead of maintaining court structure. After the first pass is made, players not directly involved in the sequence sometimes stop moving and watch. This collapses the court structure and removes secondary options. Correction: Emphasise that every player has a role in every phase — GD becomes a defensive outlet, GK steps into the defensive third to provide width.
Variations and Progressions

Variation 1 — Switch the Throw-In Side
Run the play from the right side of the baseline instead of the left, with the GD making the decoy run to the right and the WD leading to the left. This is particularly effective against teams that have scouted your standard play and are overloading the right side. Introduce this variation once the team has mastered the base play, using a different call word (e.g., "Diamond Switch!").
Variation 2 — GD as Primary Receiver
In this variation, the roles of GD and WD are reversed: the WD makes the decoy run toward the centre, while the GD makes the primary lead run along the baseline and receives the first pass. This is useful when the opposing WA is particularly effective at reading the WD's lead. The continuation sequence remains the same.
Progression — Add Live Defenders
Once the play is running cleanly in unopposed practice, add one defender at a time. Begin by adding a defender on the WD only, then add a defender on the C, and finally run the full play 7-on-7 with all defenders active. This gradual progression allows players to problem-solve within the structure of the play without being overwhelmed.
Age Adaptations
Under 10 and Under 12
Simplify the play to a two-option structure: the GK passes to either the GD (who makes a simple lead along the baseline) or the WD (who leads toward the transverse line). Remove the decoy element entirely at this age — focus on the fundamental skill of making a lead run and receiving the ball in stride. Use half-court width to reduce the distances involved and allow players to build confidence with the concept.
Under 14 and Under 16
Run the full Diamond Drive as described, but spend additional time on the timing drill — use video analysis if available to show players the difference between a well-timed decoy and a poorly-timed one. Introduce Variation 1 (switching sides) once the base play is consistent. At this age, players can also begin to understand the tactical rationale behind each movement, so include brief tactical discussions as part of the session.
Open / Senior
At senior level, add a fourth pass option: after the GA receives in the attacking third, introduce a second movement from the GS — a roll across the circle followed by a drive to the post — to create a direct shooting opportunity from a centre-pass-style feed. Senior players should also be coached to read the defence and make in-play decisions about which option to use, rather than following the sequence rigidly. The Diamond Drive becomes a framework, not a script.