Lightning Strike: Centre Pass Set Play for Quick Goal
Master the Lightning Strike — a three-pass centre pass set play designed to move the ball from the centre circle to a shooting position in under six seconds, exploiting defensive reset time immediately after a goal.
Equipment Needed
Overview
The Lightning Strike is a structured centre pass set play engineered to generate a high-percentage shooting opportunity within the first three passes of possession. It exploits the brief window of defensive disorganisation that occurs in the seconds immediately following a goal, when opposing players are resetting their positions and mental focus is momentarily divided.
This play is most effective when your team has just conceded a goal and needs to respond with immediate intent, or when you hold a narrow lead and want to convert possession into points before the opposition can regroup. At its core, Lightning Strike uses a diagonal first pass to the Wing Attack (WA), a sharp cutting run from the Goal Attack (GA), and a decisive drive from the Goal Shooter (GS) to create a clean shooting lane inside the goal circle.
The play is designed for use on a regulation Netball court (30.5m × 15.25m), and the entire sequence from whistle to shot should be completed in 5–7 seconds at senior level.
Setup
Equipment Required
| Item | Quantity | Notes |
|---|---|---|
| Netball (match ball) | 1 | Size 5 for U14 and above; Size 4 for U12 and below |
| Regulation court | 1 | 30.5m × 15.25m with all markings |
| Bibs (two colours) | 7 + 7 | Attacking team and defending team |
| Cones | 4–6 | Optional — mark starting positions during practice |
| Whistle | 1 | Coach or umpire to signal restart |
Player Positions at Setup
All seven attacking players take their legally permitted starting positions as per the Netball rulebook. The key tactical positioning is as follows:
| Position | Starting Zone | Starting Location |
|---|---|---|
| Centre (C) | Centre circle | Inside centre circle, ball in hand |
| Wing Attack (WA) | Centre third | Upper channel, approximately 2.5m ahead and 3.5m wide of C |
| Goal Attack (GA) | Attacking third | Lower channel, approximately 3m inside the attacking third |
| Goal Shooter (GS) | Attacking third | Deep in goal circle, positioned on the post side |
| Wing Defence (WD) | Centre third | Lower channel, 2m behind and 3.5m wide of C |
| Goal Defence (GD) | Defensive/centre third | Upper channel, 5m behind C |
| Goal Keeper (GK) | Defensive third | Own goal circle |

Diagram 1 shows the initial player setup and the first pass from C to WA, with WA's subsequent drive into the attacking third.
Step-by-Step Instructions

Step 1 — Signal the play (pre-whistle)
The Centre calls the play name or uses a pre-agreed hand signal (e.g., closed fist raised) while walking to the centre circle. Every attacking player must acknowledge the call before the whistle sounds. Do not begin the sequence until all five attacking players are in position.
Step 2 — WA takes the wide channel (pre-whistle)
The Wing Attack positions herself in the upper channel of the centre third, approximately 2.5m forward and 3.5m to the right of the Centre. She should be facing the attacking end, weight on her front foot, ready to explode forward on the whistle.
Step 3 — GA sets the decoy (pre-whistle)
The Goal Attack positions herself in the lower channel of the attacking third, approximately 3m inside the third line. Her role at this stage is to hold her defender's attention by appearing to threaten the upper channel — she should make eye contact with her defender, not the ball.
Step 4 — GS drives to post (pre-whistle)
The Goal Shooter takes a position approximately 7.5m from the post inside the goal circle, on the side away from the main play. She is preparing to drive hard to the post on Step 7.
Step 5 — C passes to WA on the whistle
The moment the umpire's whistle sounds, C delivers a sharp, flat pass to WA in the upper channel. The pass should be timed to arrive as WA takes her first explosive step forward. Aim for a pass travelling no more than 4–5m — short enough to be accurate, long enough to bypass the opposing Centre's reach.
Step 6 — WA drives into the attacking third
Upon receiving, WA takes one controlled landing step and immediately drives forward toward the attacking third line. She should be looking to penetrate to within 1.5–2m of the third line before releasing the ball, maximising the attacking angle for GA.
Step 7 — GA cuts across to receive from WA
As WA receives the first pass, GA executes a sharp diagonal cut from the lower channel to the upper-centre of the goal circle. The cut should be a two-step acceleration — a short step to commit the defender, then a long explosive step to create separation. GA receives the ball from WA approximately 5m inside the attacking third.
Step 8 — GS drives hard to the post
Simultaneously with GA's cut, GS makes a decisive drive from her starting position to the front post position, approximately 1m from the post. She should drive on a diagonal line that takes her away from her defender's body.
Step 9 — GA delivers to GS for the shot
GA receives from WA and, in a single fluid movement, delivers a lob or flat pass to GS at the post. The pass must be timed to arrive as GS plants her feet for the shot — not before, not after. GS shoots immediately.
Step 10 — C and WA follow up
C and WA move into the attacking third as secondary rebounders. C takes the near-post position, WA covers the wide rebound channel. GA holds her position as the primary rebound option if GS misses.

Diagram 2 shows the complete attacking sequence: WA to GA (pass ①), GA to GS (pass ②), and GS driving to the post for the shot (③).
Key Coaching Points

1. Timing is everything — the play lives or dies on the whistle.
The entire advantage of this set play is the speed of execution. If WA is still moving into position when C passes, the play breaks down immediately. Drill the pre-whistle positioning until it is automatic. Use a stopwatch in training — target the ball in the goal circle within 5 seconds of the whistle.
2. GA must sell the decoy before she cuts.
The most common reason this play fails is GA cutting too early, before her defender has committed to the wrong channel. Teach GA to take one deliberate step in the opposite direction before cutting. That single step creates the separation needed to receive cleanly.
3. WA must catch and release in one motion.
WA has no time to reset after receiving. Coach her to catch with her outside hand leading, already turning her body toward GA as the ball arrives. The footwork is: land on outside foot, pivot, release. Practice this footwork pattern in isolation before adding defenders.
4. GS drives on GA's catch, not on GA's pass.
A common timing error is GS waiting to see GA receive before driving. By then, the defender has time to recover. GS should begin her drive the moment WA releases the ball to GA — this gives her a half-second head start on her defender.
5. C must follow up immediately — not watch.
Centres who stand and watch after the first pass are wasting a rebound resource. C should be moving toward the attacking third as soon as the ball leaves her hands. Position her at the near-post for the rebound.
6. Maintain width — do not crowd the goal circle.
A common error under pressure is all players converging on the same space. Remind WD and GD to hold their positions in the centre and defensive thirds respectively. Crowding the goal circle creates obstruction risks and blocks passing lanes.
Common Mistakes

Mistake 1 — C passes before WA is ready.
This results in a rushed catch, a fumble, or a turnover. Correction: In training, make WA call "ready" before C is allowed to pass. Build the habit of eye contact and a nod before release.
Mistake 2 — WA holds the ball too long.
WA sometimes tries to create her own opportunity rather than moving the ball on. Correction: Set a rule in training — WA has a maximum of two seconds to release after receiving. Use a verbal count from the coach to reinforce this.
Mistake 3 — GA cuts into a crowded space.
If GA cuts into the same channel as GS, both players are in the same zone and the passing lane is blocked. Correction: Clearly define GA's cutting zone as the upper half of the goal circle and GS's zone as the lower half / post position. Use cones to mark these zones in early practice.
Mistake 4 — GS shoots before she is balanced.
In the excitement of receiving a fast ball, GS may rush the shot and release off-balance. Correction: Drill the landing footwork separately. GS must land, set her feet, and then shoot. A missed shot from poor balance is worse than a slightly slower play.
Mistake 5 — Players do not reset for the rebound.
If the shot misses and no one is in rebound position, possession is lost. Correction: Make rebound positioning a non-negotiable part of the play. Award a bonus point in training drills for successful rebound recoveries.
Variations & Progressions

Variation 1 — Reverse Lightning Strike (Left Channel)
Mirror the entire play to the left channel, with WA positioned in the lower channel and the cut coming from the opposite side. Use this variation when the opposing Wing Defence is consistently shutting down the right channel, or as a second-half surprise. Call it with a different signal — e.g., open hand instead of closed fist.
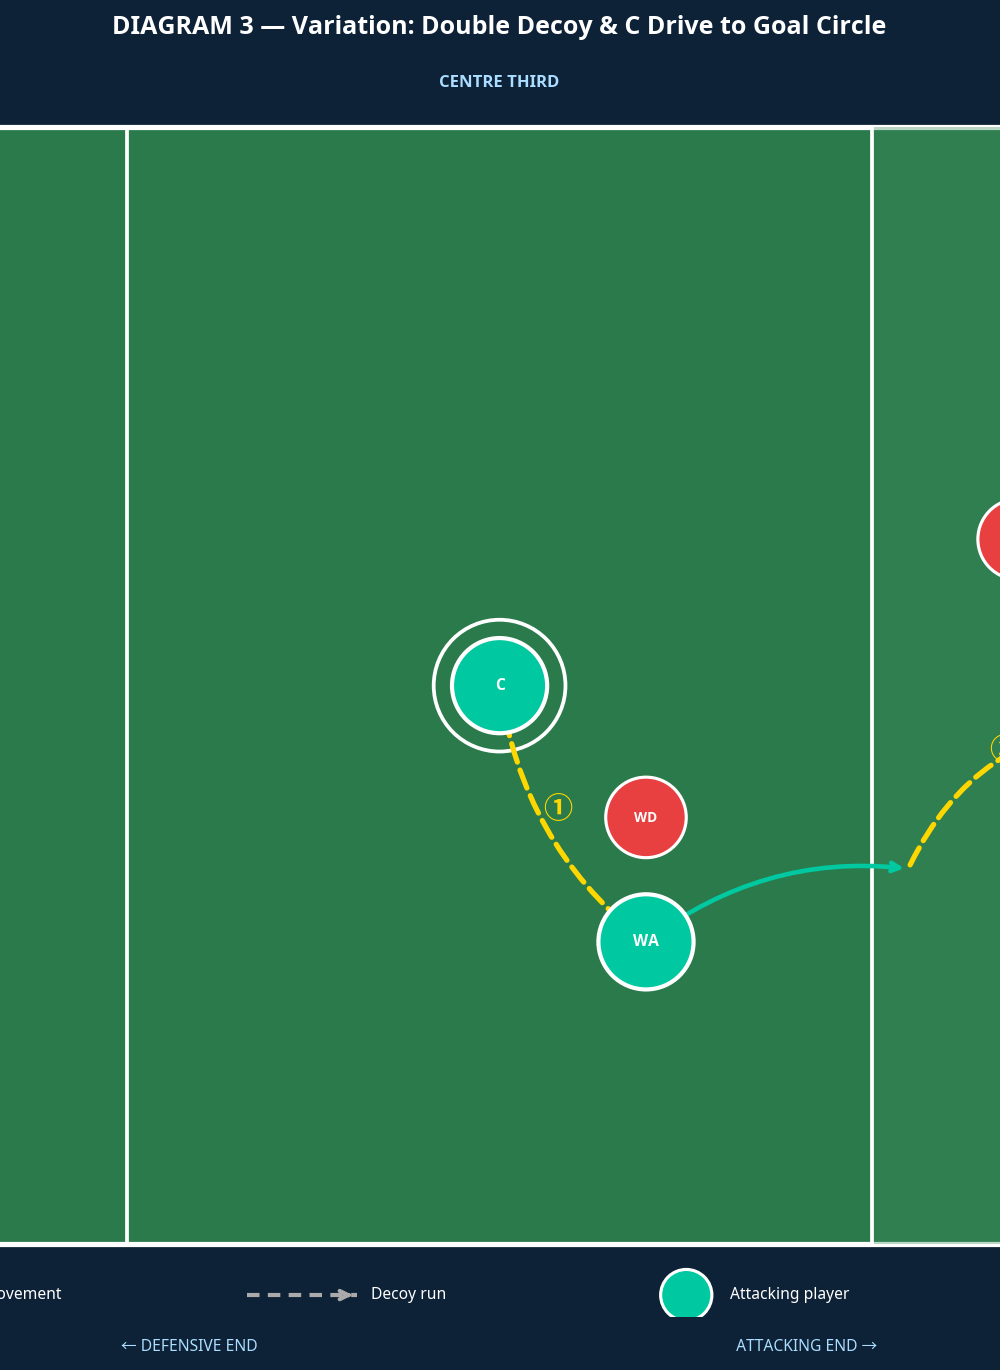
Variation 2 — Double Decoy (C Drive)
In this advanced variation, both GA and GS execute decoy runs to opposite sides of the goal circle, drawing both defenders wide. C, after passing to WA, makes a hard follow-up run into the attacking third to receive the second pass from WA and drive directly to the edge of the goal circle. This works best when the opposing Goal Keeper and Goal Defence are aggressive man-markers who chase decoy runs. See Diagram 3 for the movement pattern.
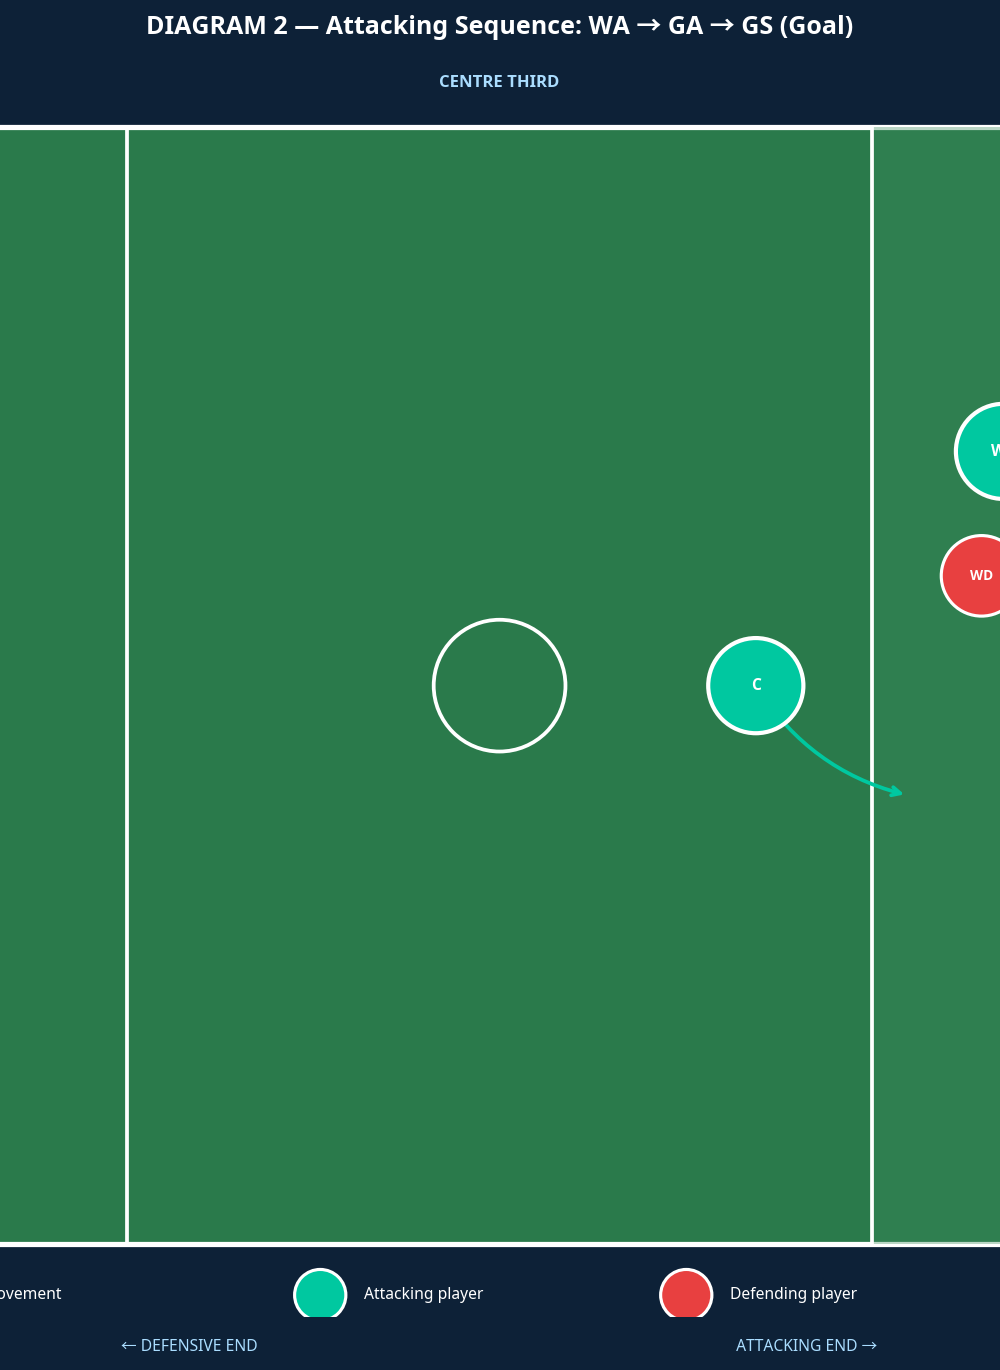
Diagram 3 shows the Double Decoy variation: GA and GS execute decoy runs (grey dashed arrows) to draw defenders wide, while C follows up to receive from WA and drives into the goal circle.
Progression — Add Live Defence
Begin the drill with passive defenders (shadow only), then progress to 50% pressure (defenders can intercept but not contact), then full pressure. Only move to the next level when the attacking team completes the play successfully four out of five attempts at the current level.
Age Adaptations

| Age Group | Key Adaptations |
|---|---|
| Under 8 / Under 10 | Reduce to a two-pass play: C to WA, WA to GA for a shot. Remove the GS drive. Focus on the concept of moving the ball quickly rather than the full sequence. Use a Size 4 ball. Allow players to walk through the play before adding movement. |
| Under 12 | Introduce the three-pass sequence but allow GS to start closer to the post (within 3m). Remove the decoy element — GA cuts immediately. Focus on footwork and timing of the first pass. |
| Under 14 | Run the full play as described. Introduce the Reverse Lightning Strike variation once the core play is consistent. Begin adding passive defenders in Week 2 of learning the play. |
| Under 16 / Open | Full play with live defence from the first session. Introduce the Double Decoy variation and require players to read the defence and choose between the two options in real time. Time the play with a stopwatch and set a 5-second target. |
Coach's Note: The Lightning Strike is most dangerous when it becomes a genuine threat — meaning the opposition knows it is coming but cannot stop it. Drill it until it is fast, clean, and automatic. Then introduce the variations to keep defenders guessing. A set play that is executed with conviction at pace will beat a defence that is merely prepared for it.