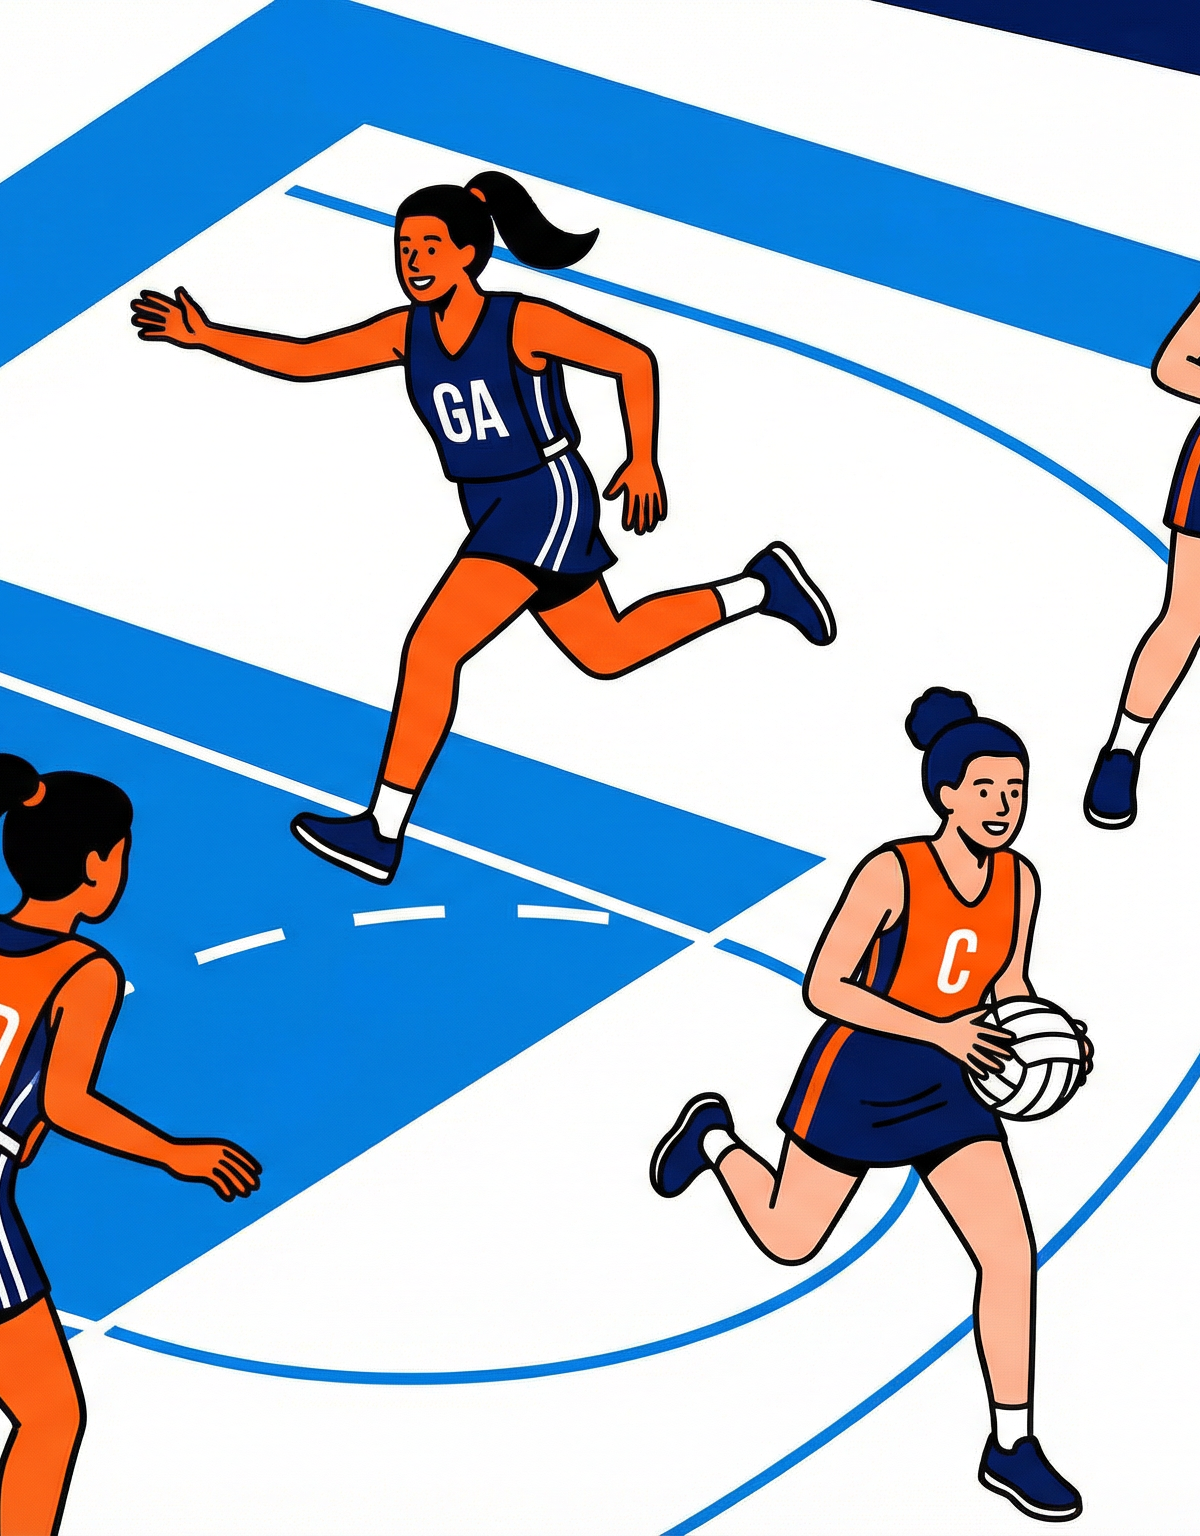
The Double Cut: Attacking Baseline Throw-In Play
A dynamic baseline throw-in strategy that uses decoy runs and sharp changes of direction to create high-percentage shooting opportunities under the post.
Equipment Needed
1. Overview
The "Double Cut" baseline throw-in is a high-tempo attacking set play designed to create space directly under the goal post. When taking a throw-in from the attacking baseline, space in the goal circle is often congested, making it difficult to find a clear passing lane to the shooters. This play utilises a coordinated movement between the Goal Attack (GA) and Goal Shooter (GS) to manipulate the defenders, drawing them away from the prime shooting zone before exploiting the newly created space.
This play is particularly effective when the defending Goal Keeper (GK) and Goal Defence (GD) are employing a tight, one-on-one marking style. By forcing the defenders to react to the initial movements, the attacking team can dictate the pace and direction of the play, resulting in a high-percentage scoring opportunity. The play is best deployed when your team wins a throw-in within 1–2 metres of the baseline, and when the score is close or your team needs to convert possession into goals efficiently.
2. Setup

Court Dimensions: Standard Netball court — 30.5m x 15.25m. The goal circle has a radius of 4.9m. The goal third extends 10.167m from the baseline.
Equipment Required: 1 netball, 7 bibs (GS, GA, WA, C, GD, GK, WD).
Player Positions at Throw-In:
| Position | Role | Starting Location |
|---|---|---|
| GK (Thrower) | Takes the throw-in | Outside court, left baseline corner |
| GA | Primary receiver / decoy | Inside goal third, near baseline, same side as GK |
| GS | Strike runner | Far side of goal circle, near post |
| WA | Secondary outlet | Just outside goal third line, right side |
| C | Deep safety outlet | Centre third, near goal third boundary |
Diagram 1 — Initial player positions and first-phase movement. GK (gold) takes the throw-in from the left baseline corner. GA (orange) drives toward the corner to receive. GS (orange) prepares to cut across the circle.
3. Step-by-Step Instructions
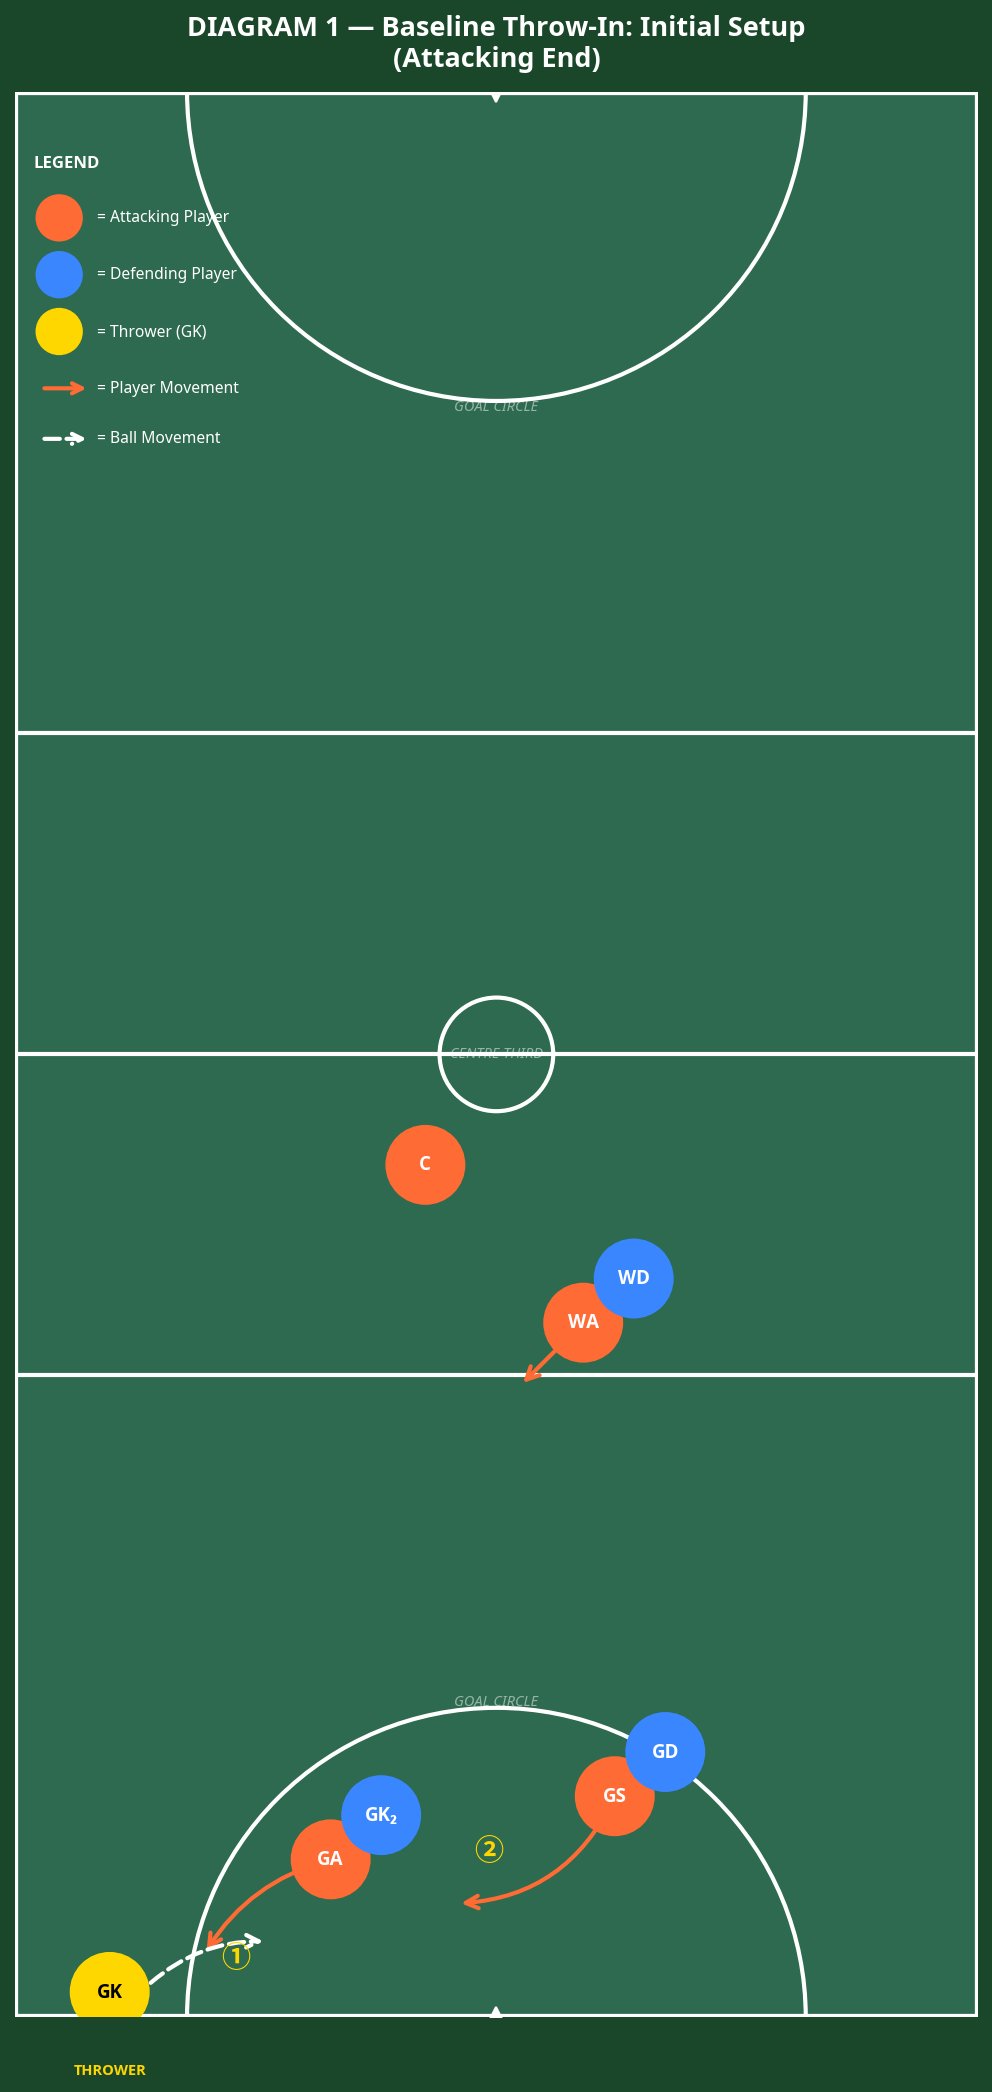
Position and Signal: The GK takes their position just outside the court at the left baseline corner. The GA sets up approximately 2–3 metres inside the court, near the baseline on the same side. The GS positions themselves on the far side of the goal circle, approximately 3 metres from the post. The WA holds a position just outside the goal third line, right side. The C sits at the goal third/centre third boundary as a safety valve.
The Trigger: On the umpire's whistle, all movement begins simultaneously. There must be no movement before the whistle.
The First Cut — GA's Decoy Drive: The GA makes an explosive, decisive drive toward the baseline corner — away from the goal circle. This run must be convincing. The GA should accelerate hard for 2–3 metres, drawing the GD out of the circle with them. The GK delivers a sharp, flat pass to the GA as they reach the corner.
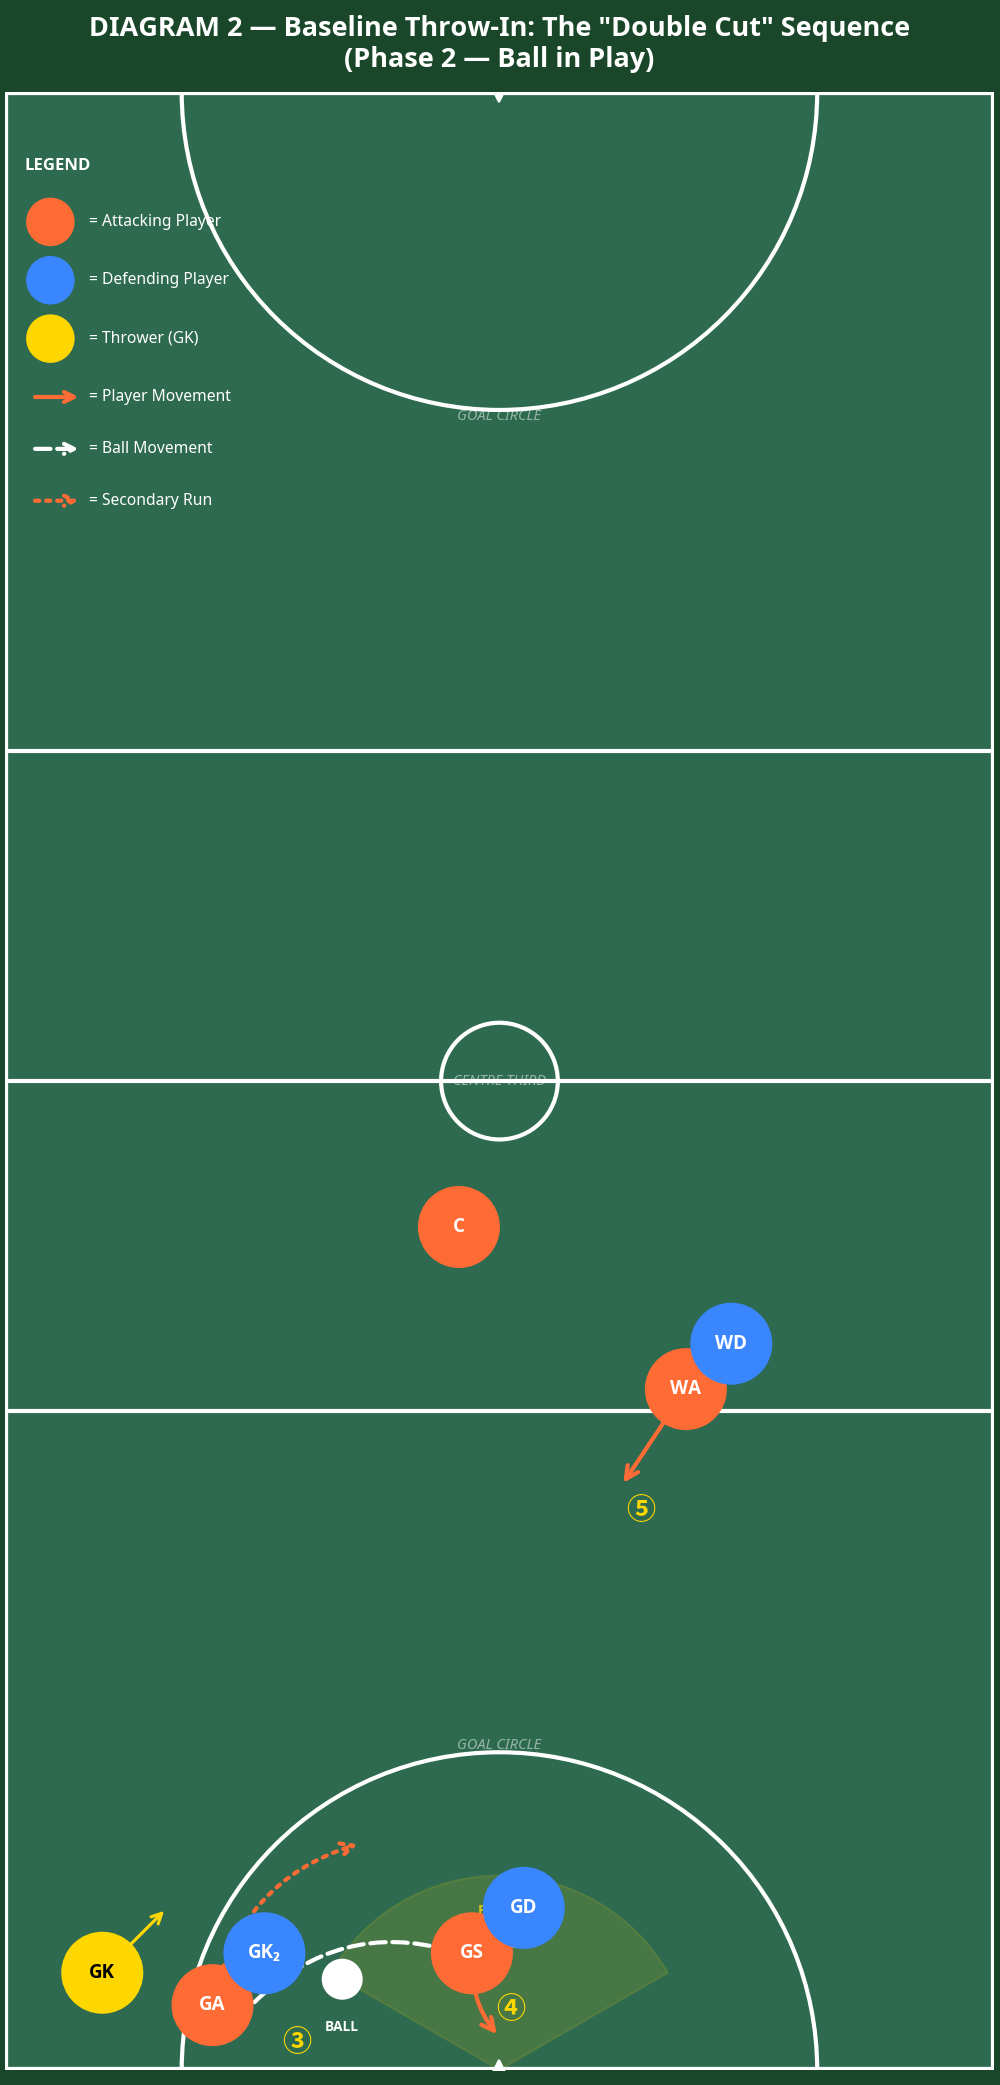
The Second Cut — GS's Strike Run: The moment the GK releases the pass to the GA, the GS executes their cut. They drive hard across the goal circle, cutting in front of their defender (opposing GK) toward the near post. The GS aims to receive the ball within 1.5 metres of the post — the highest-percentage shooting position on the court.
The Feed: The GA, upon receiving the ball, pivots immediately toward the goal circle and delivers a quick, accurate feed to the GS. The GA must not hold the ball — the feed should be released within 1–2 seconds of receiving.
The Shot: The GS secures the ball in the prime shooting zone, establishes a balanced base, and executes a controlled shot. If the GS is not free, they look to hold the ball and wait for the GA to continue their secondary run into the circle.
Safety Outlet: If neither the GS nor the GA is available, the GK looks to the WA (who has dropped toward the goal third line) or the C as a reset option.

Diagram 2 — Phase 2: The "Double Cut" in action. GA has received the pass and is feeding to GS, who cuts into the prime shooting zone (highlighted). WA provides a secondary option by driving into the goal third.
4. Key Coaching Points
Timing is the Heartbeat of This Play. The GS must not begin their cut until the pass to the GA is in the air. If the GS moves too early, the defender will track them and close down the space. Drill this timing repeatedly in training until it becomes instinctive.
Sell the Decoy — GA's First Run Must Be Convincing. A half-hearted drive will not draw the defender. Coach the GA to accelerate hard for at least 2–3 metres, making the defender commit to following. A convincing decoy creates 1–2 metres of separation for the GS's cut.
Quick Hands from the GA. The GA is a conduit, not a shooter in this play. Their job is to receive and release within 1–2 seconds. Coach them to pivot immediately upon receiving and to have their eyes on the GS's cut before the ball even arrives.
GS Must Be Strong in the Hold. Once the GS has established their position under the post, they must use their body to shield the defender. A strong, wide base and active arms will help secure the space and make the catch under pressure.
WA and C Must Stay Active. The WA and C are not spectators. They must be in motion and offering themselves as genuine options. This keeps the defending WD and C occupied and prevents them from helping in the goal circle.
Read and React — The Play Has Multiple Options. Emphasise to your players that this is a structured play with built-in decision points, not a rigid script. If the primary option is closed, the GA must have the vision and confidence to find the WA or reset through the C.
5. Common Mistakes
The GS Moves Too Early. This is the most common error and the one that kills the play. Defenders are trained to read early movement. Enforce a strict rule in training: the GS does not move until the ball leaves the GK's hands.
The GA's Decoy Run Is Weak. If the GA jogs to the corner rather than sprinting, the GD will not follow, and the goal circle remains congested. Demand explosive acceleration from the GA on every repetition.
The GA Holds the Ball Too Long. Some players receive the ball and instinctively look to shoot or hold possession. Remind the GA repeatedly that their role in this play is to feed, not to shoot. A one-second delay can allow the defense to recover and cut off the passing lane to the GS.
The GK's Pass to the GA Is Inaccurate. A poor throw-in that forces the GA to reach, jump, or break stride will disrupt the entire timing of the play. The GK must deliver a flat, accurate pass directly into the GA's hands at chest height.
Players Fail to Read the "No" Option. When the play breaks down, players sometimes force the pass to the GS even when they are covered. Reinforce the decision-making framework: if the primary option is not clearly available, reset through the WA or C.
6. Variations & Progressions

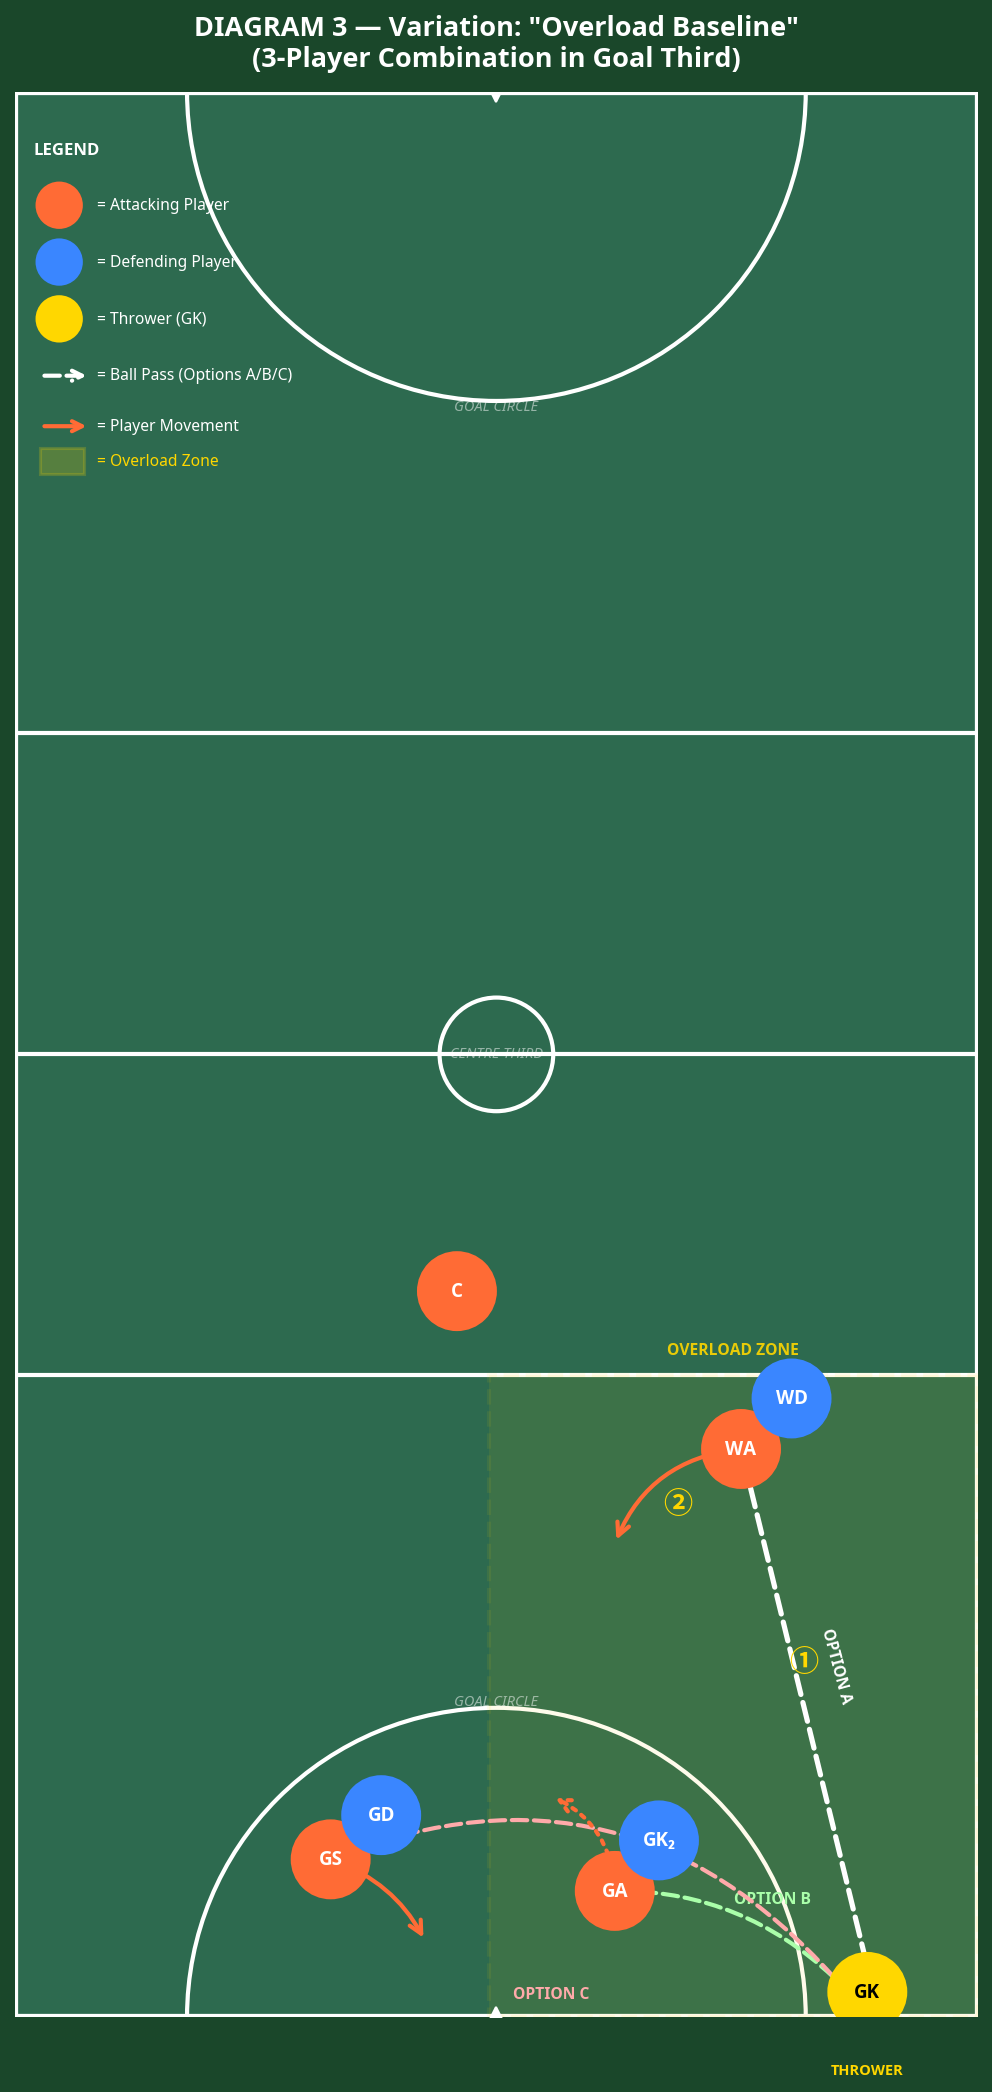
Variation: The Overload Baseline
In this variation, the WA drops deep into the goal third before the whistle, creating a three-player combination on the right side of the court. The GK now throws in from the right baseline corner. The thrower has three clear options: a long diagonal pass to the WA (Option A), a short pass to the GA near the post (Option B), or a direct pass to the GS at the far post (Option C). This variation is highly effective against a defence that has begun to anticipate the standard "Double Cut" and is particularly useful when the WD is slow to track back.

Diagram 3 — The "Overload Baseline" variation. GK throws in from the right corner. The highlighted overload zone shows the 3-player combination, with Options A (long to WA), B (short to GA), and C (far post to GS) all available.
Progression: Adding a Screen
For more advanced teams, the GA can set a legal screen for the GS after delivering the feed. Once the GA passes to the GS, they immediately drive across the path of the opposing GK, creating a momentary screen. This gives the GS an extra fraction of a second to catch and balance for the shot. This progression requires excellent spatial awareness and should only be introduced once the basic play is well-drilled.
Simplified Version: Two-Player Baseline
For teams still learning the play, strip it back to a two-player combination: GK throws to GA, GA feeds GS. Remove the WA and C options initially and focus purely on the timing of the GA decoy and the GS cut. Once this is consistent, layer in the additional players.
7. Age Adaptations

| Age Group | Focus | Modifications |
|---|---|---|
| Under 10 / Under 12 | Basic mechanics | Simplify to 2-player combination (GA + GS only). Focus on accurate passing and catching. No defenders initially. |
| Under 14 | Timing and decoy | Introduce the full 5-player setup. Emphasise the timing of the GS cut and the GA's convincing decoy run. Add passive defenders. |
| Under 16 | Decision-making | Add active defenders. Introduce the WA and C as genuine options. Drill the decision-making framework for reading the defence. |
| Open / Elite | Variations and pressure | Introduce the "Overload Baseline" and screen progressions. Run the play under full match pressure with a 3-second throw-in countdown. |
Coaching Note for Younger Age Groups: At Under 10 and Under 12 level, the emphasis should be on the enjoyment of movement and the basic concept of creating space. Avoid overloading players with tactical detail. Use simple cues such as "drive away, then cut back" to communicate the core idea.