The Double Screen: Unlocking the Shooting Circle
Master the double-screen set play to create a clean shooting opportunity for your Goal Shooter by using coordinated screens from GA and WA to displace the circle defenders.
Equipment Needed
Overview
The Double-Screen Shooting Circle Play is a structured attacking set play designed to free your Goal Shooter (GS) for a high-percentage shot from inside the shooting circle. By deploying two simultaneous screens — one from the Goal Attack (GA) and one from the Wing Attack (WA) — your team forces the Goal Keeper (GK) and Goal Defence (GD) to navigate a physical barrier, creating a decisive half-second of separation that your GS exploits with a sharp cut to the ball.
This play is most effective when used in the following game situations:
| Situation | Why It Works |
|---|---|
| Centre pass into the goal third | Defenders are still organising; screens catch them flat-footed |
| After a turnover won in the mid-court | Defenders are out of their preferred marking positions |
| Following a time-out or break in play | Allows your team to set up the structure deliberately |
| When your GS is being heavily body-marked | The double screen physically removes the defender from GS's path |
The play operates within the shooting circle (radius 4.9 m from the post) and the adjacent goal third (the attacking 10.17 m zone of the 30.5 m × 15.25 m court). It requires no special equipment and can be rehearsed in as little as 10 minutes once players understand their roles.
Setup
Equipment required: 1 netball, 4–6 marker cones (optional, to mark screen positions during training), bibs in two contrasting colours.
Court area: The attacking goal third and shooting circle. Set up with the goal post at the far end. If training in isolation, use cones to mark the shooting circle arc at 4.9 m from the post.
Players required: 5 attackers minimum (GS, GA, WA, C, and one additional feeder). Add 2 defenders (GK, GD) once the movement pattern is understood.
Starting positions are shown in the diagram below.
Diagram 1 — Phase 1: Starting Positions. GS starts on the right side of the circle near the post. GA positions at the top-left edge of the shooting circle. WA holds wide on the left transverse. C carries the ball at the top of the goal third. GD and GK shadow their respective attackers.
| Player | Starting Position | Role in Play |
|---|---|---|
| GS | Right side of shooting circle, near post | Primary shooter — executes the cut |
| GA | Top-left edge of the shooting circle | Screen 1 — holds position to block GK's path |
| WA | Left transverse line, just outside circle | Screen 2 — moves to set second screen on GD |
| C | Top of goal third, ball in hand | Feeder — reads the play and delivers the pass |
| GK | Shadowing GS on the right side of circle | Defender to be screened |
| GD | Marking GA at the circle edge | Defender to be displaced |
Step-by-Step Instructions

Step 1 — Signal the play (0–1 seconds)
The Centre (C) receives the ball at the top of the goal third and gives the pre-agreed signal — either a verbal call (e.g., "Green!") or a raised fist. All five players must recognise this cue immediately. GS, GA, and WA freeze momentarily to allow defenders to settle into their marks. This pause is deliberate: it resets defender positioning and makes the subsequent movement more deceptive.
Step 2 — GA sets Screen 1 (1–2 seconds)
GA moves decisively to a position on the left side of the shooting circle edge, approximately 1.5 m from the circle arc. GA plants their feet shoulder-width apart, arms close to the body (legal screen position), and presents a solid, stationary barrier directly in GK's anticipated recovery path. GA must be set before GS begins their cut — a moving screen is a contact infringement.
Step 3 — WA sets Screen 2 (1–2 seconds, simultaneous with Step 2)
WA drives from the transverse line to a position approximately 1 m to the right of GA, creating a double-screen wall across the top of the circle. WA must time their movement to arrive just as GA is setting, so both screens are stationary when GS cuts. The two screeners should be close enough that a defender cannot pass between them (approximately 0.5–1 m apart).
Step 4 — GS executes the cut (2–3 seconds)
With both screens set, GS makes a sharp, explosive change of direction — driving from the right side of the circle, cutting hard across the face of the double screen toward the left side of the circle or the circle edge. The cut should be tight to the screens (within 0.5 m) to maximise the displacement of GK. GS should accelerate through the cut, not slow down approaching the screens.
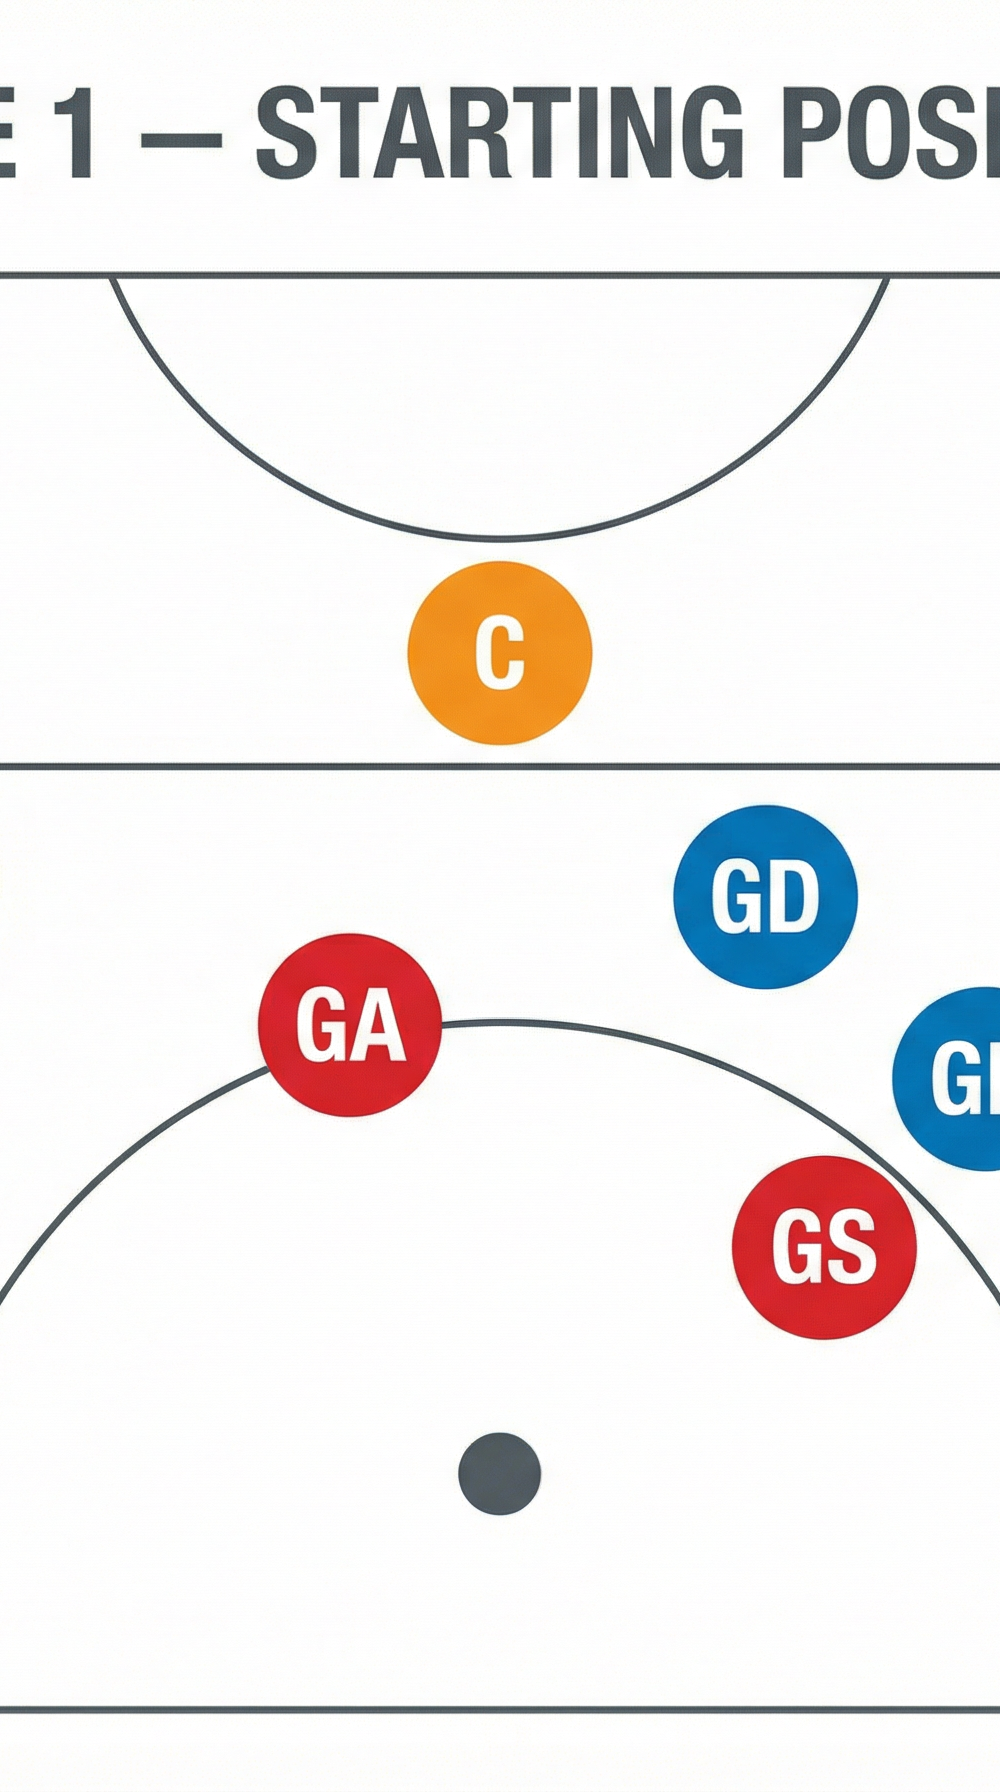
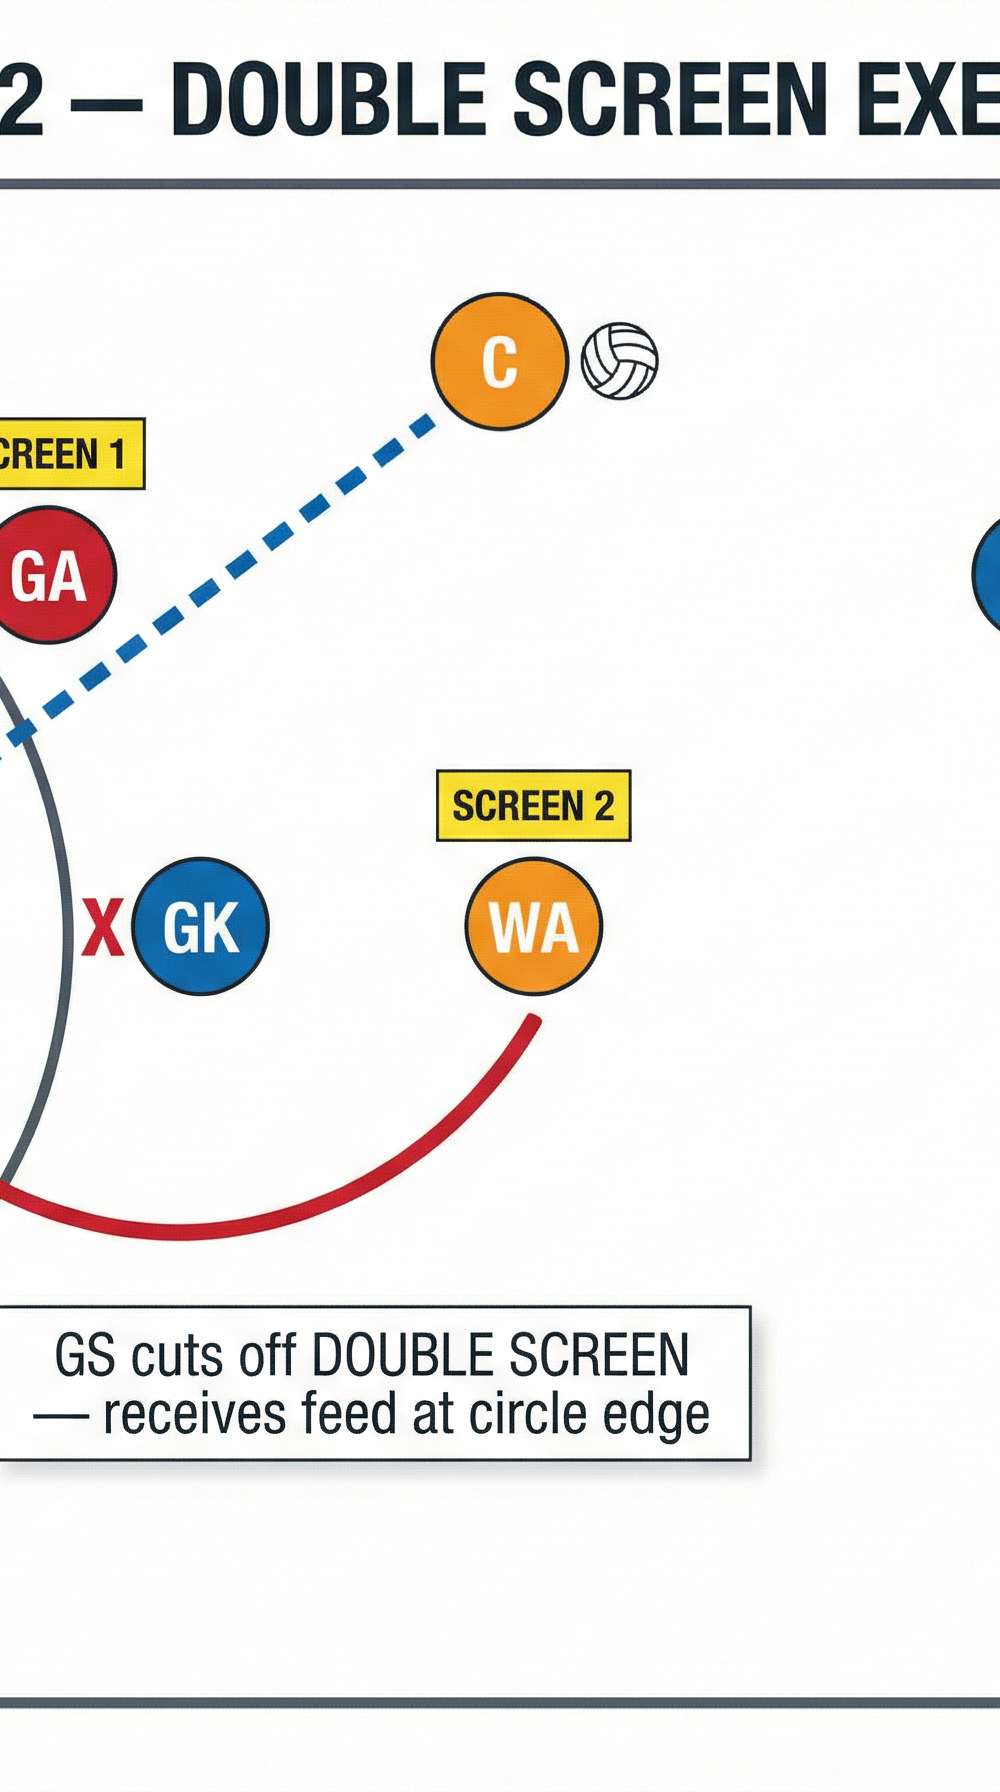
Diagram 2 — Phase 2: Double Screen Execution. GS cuts hard off the double screen (GA = Screen 1, WA = Screen 2). GK is displaced and cannot recover in time. C delivers a flat, direct pass to GS at the circle edge.
Step 5 — C delivers the feed (3–4 seconds)
As GS clears the screen and presents their hands, C delivers a flat, firm pass directly to GS's leading hand at the circle edge or inside the circle. The pass should be released the moment GS shows — any hesitation allows GK to recover. C must read whether GS has achieved separation; if the primary option is covered, C immediately looks to the secondary option (see Step 6).
Step 6 — Secondary option: GA rolls to space (3–4 seconds)
If GS does not achieve clean separation, GA executes a roll — pivoting off their screen position and driving into the right side of the shooting circle, where GD has been drawn out of position. This roll creates a second clean shooting option and ensures the play has a built-in safety valve. WA holds their screen position until the ball is released, then rolls to the circle edge as a third option.

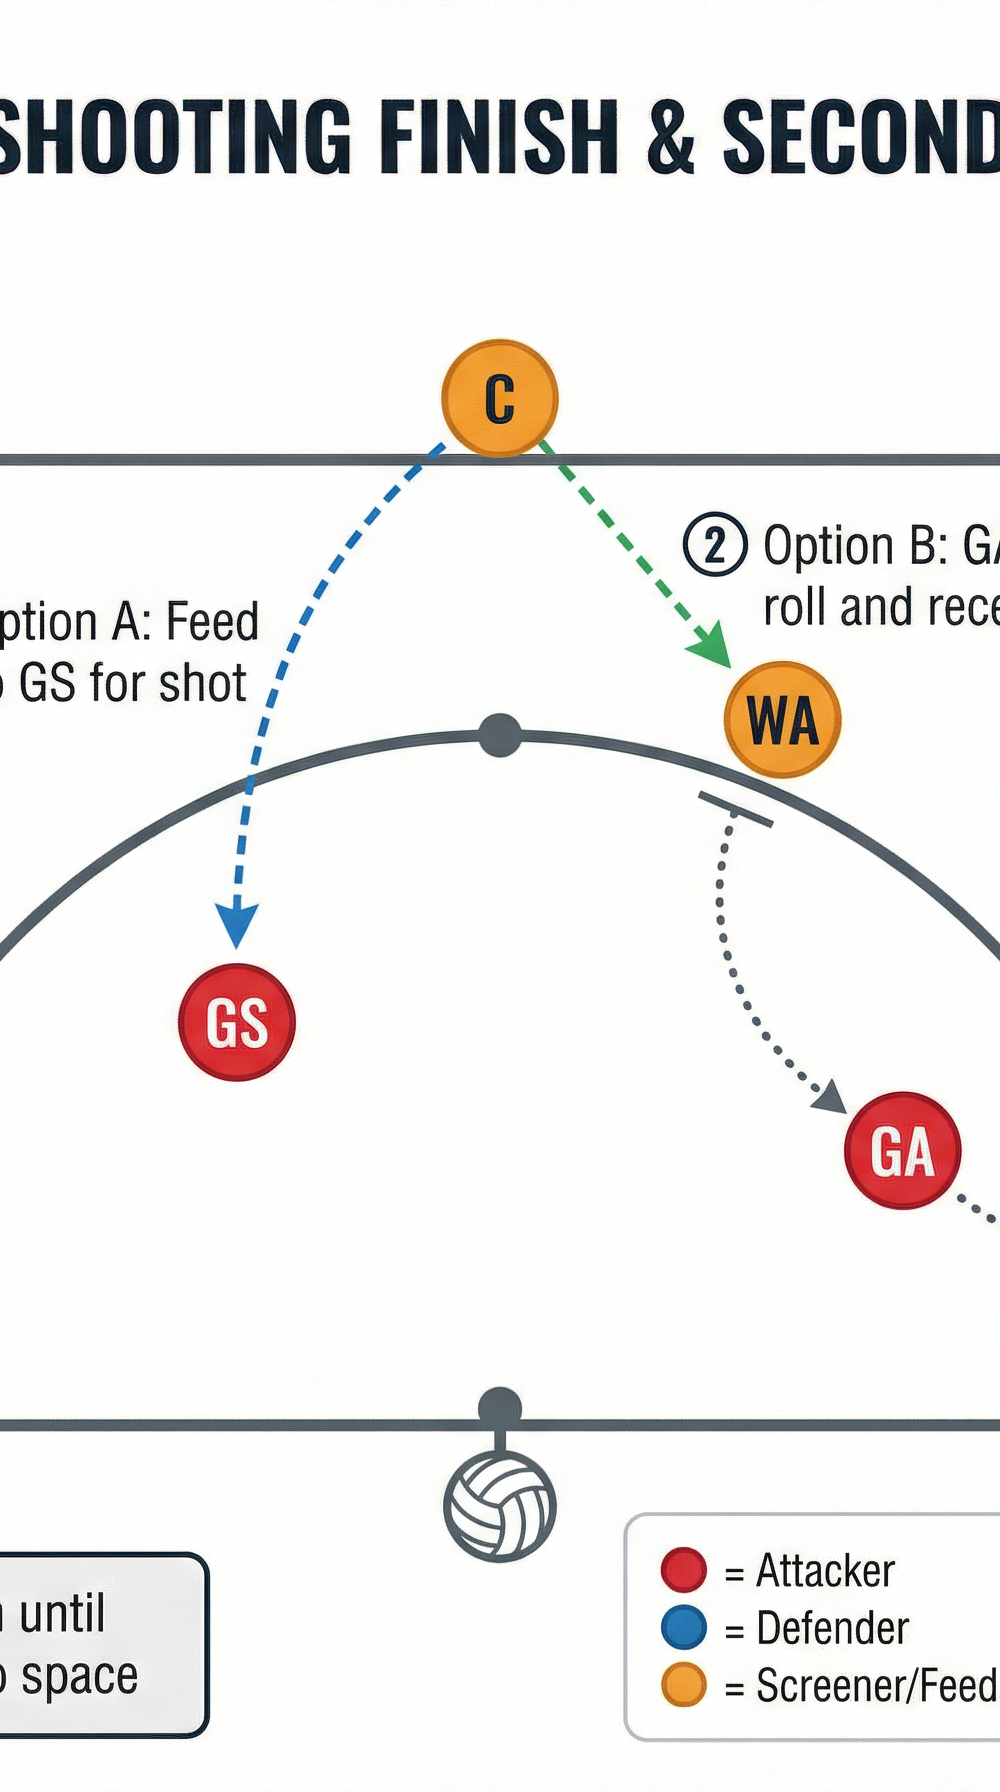
Diagram 3 — Phase 3: Shooting Finish and Secondary Option. Option A: C feeds GS inside the circle for a direct shot. Option B: GA rolls off their screen into space on the right side of the circle, receiving from C if GS is covered. Screeners hold until the ball is released, then roll to available space.
Step 7 — GS shoots (4–5 seconds)
GS receives the ball, stabilises their footwork, and takes the shot. The entire play from signal to shot should take no longer than 4–5 seconds. Remind your GS that receiving the ball is only half the job — a composed, balanced shot under pressure is the goal.
Key Coaching Points
1. Screens must be stationary before the cut begins. This is the most important technical requirement. A moving screen is a contact infringement in netball. Drill this relentlessly: GA and WA must be planted and still before GS takes their first step into the cut. Use a freeze-frame drill where you call "freeze" and check that both screeners are stationary before GS moves.
2. GS must cut tight to the screens — within arm's reach. A wide cut gives the defender room to recover around the screen. The whole point of the double screen is to use the screeners' bodies as a physical barrier. Coach GS to brush the screeners' shoulders as they cut through.
3. The feeder (C) must hold the ball until GS presents hands. A premature pass telegraphs the play and allows the defender to intercept. C should read the cut, wait for GS to show a clear target hand, and then deliver with pace and precision. The pass should be flat and direct — a looping pass gives the defender time to recover.
4. Screeners roll immediately after the ball is released. Once C has passed, GA and WA are no longer needed as screens. They should immediately roll into the shooting circle to compete for a rebound or to provide a secondary shooting option if GS's shot is missed. This keeps the attacking pressure continuous.
5. Timing is everything — the play only works if all three moving parts (Screen 1, Screen 2, GS cut) happen simultaneously. If GS cuts too early, the screens are not set. If GS cuts too late, defenders have time to read and recover. Use a count system in training: "Set... set... CUT" to build the shared timing.
6. GS should use a change-of-pace lead before the cut. A flat-out sprint from the start telegraphs the move. Coach GS to take 1–2 slow steps toward the post (drawing the defender in), then explode into the cut. This deception adds an extra half-second of separation.
Common Mistakes

Mistake 1 — Moving screens (contact infringement)
The most frequent error, especially with younger players. GA or WA sets the screen but continues to move their feet or arms as GS cuts through, making contact with the defender. Correction: Drill the screen-setting technique in isolation. Have screeners practise planting their feet and holding a "statue" position for a full 3-second count before adding the GS cut.
Mistake 2 — GS cutting too wide around the screens
GS veers away from the screens to avoid contact, leaving a gap for the defender to recover. Correction: Place a cone 0.5 m outside each screener during training. GS must cut between the screener and the cone, forcing a tight line through the double screen.
Mistake 3 — C passing too early or too late
Passing before GS has achieved separation results in an interception. Holding the ball too long allows the defender to recover. Correction: Teach C to look for GS's "target hand" — the leading hand presented toward the ball — as the trigger to release the pass. Practise the feed in isolation with just C and GS before adding the full play.
Mistake 4 — Screeners not rolling after the pass
GA and WA hold their screen positions after the ball is delivered, becoming static and removing themselves from the play. Correction: Make the roll a mandatory part of the drill. Every repetition must include the screeners rolling to the circle after the pass. Award a bonus point in training games if a screener receives a pass off the roll.
Mistake 5 — GS not using a change-of-pace lead
GS sprints directly into the cut from the start, making the move predictable and giving the defender time to anticipate. Correction: Introduce a "slow-slow-FAST" cue. GS takes two deliberate slow steps toward the post, then explodes into the cut on the third step. Practise this footwork pattern without the ball first.
Variations and Progressions

Variation 1 — Reverse cut (GS cuts right instead of left)
Once defenders have learned to anticipate the left-side cut, flip the play. GS starts on the left side of the circle and cuts to the right, with GA and WA repositioning their screens accordingly. This keeps the play unpredictable and forces defenders to make a decision rather than react from memory.
Variation 2 — GA as the primary shooter
Instead of GS cutting off the screens, GA sets Screen 1 and then immediately rolls into the circle as the primary shooter, while GS acts as a decoy and holds the GK on the opposite side. This is particularly effective when your GA is a strong shooter and the opposition is heavily focused on stopping GS.
Progression 1 — Add a live GK and GD
Once the movement pattern is clean without defenders, introduce a live GK and GD who are instructed to play at 50% intensity (i.e., they shadow but do not intercept). This allows players to feel the physical presence of defenders without the full pressure of a game situation. Gradually increase defender intensity to 75% and then 100%.
Progression 2 — Trigger the play from a centre pass
Run the full centre pass sequence and have the play triggered when the ball reaches C at the top of the goal third. This adds the complexity of the preceding centre pass movement and replicates match conditions more accurately. Time the play from the centre pass whistle to the shot — target under 8 seconds for the full sequence.
Age Adaptations

Under 10 and Under 12 — Simplified single screen
At this level, the concept of a double screen is too complex to execute reliably. Simplify to a single screen: GA sets one screen at the top of the circle and GS cuts off it. Focus on the fundamental skills of screen-setting (stationary feet, arms in) and a clean cut. Introduce the second screen only once the single-screen version is consistent.
Under 14 — Full play with reduced defender pressure
Players at this age can handle the full double-screen concept but will struggle under full defensive pressure. Introduce the play in a drill environment first (no defenders), then add passive defenders (shadow only), and finally progress to semi-live defenders. Emphasise timing and communication — use verbal cues so players learn to talk through the play.
Under 16 and Open — Full play with game-realistic pressure and variations
At this level, run the play in full game conditions with live defenders and introduce the variations (reverse cut, GA as primary shooter) to build unpredictability. Challenge players to read the defensive response and self-select between the primary and secondary options in real time. Introduce the play as part of a broader attacking system, linking it to your centre pass patterns and transition plays.