Mastering the Foundation: A Coach's Guide to Netball Footwork and Landing Drills
This comprehensive guide provides Netball coaches with a detailed, step-by-step drill to perfect player footwork, balance, and safe landing technique, complete with tactical diagrams and progressions.
Equipment Needed
1. Overview
This drill is a cornerstone for developing two of the most fundamental and frequently used skills in Netball: correct footwork and safe, balanced landing. Mastering the two-foot landing is non-negotiable for injury prevention, particularly for reducing the risk of ACL and ankle injuries. It also provides the stable base required for a player to execute their next move effectively—be it a powerful pivot, a sharp drive, or a precise pass. This drill is designed to be used at the start of a session as part of a dynamic warm-up or as a core skills-focused segment. It ingrains the correct neuromuscular patterns, ensuring players can land safely under pressure and maintain possession without violating the footwork rule.
2. Setup
- Equipment: 6-8 cones or floor markers, 1-4 Netballs.
- Court Setup: The drill can be adapted to any third of a standard Netball court (30.5m x 15.25m). For the basic grid, place markers approximately 3 metres apart in the centre third. For progressions, utilize the goal third and the goal circle (4.9m radius).
- Player Positions: The drill requires a minimum of 4 players but is scalable to a full squad. Players will rotate through positions, acting as both passers and workers. Initial positions can be generic, but progressions will involve position-specific roles like Centre (C), Wing Attack (WA), Goal Attack (GA), and Goal Shooter (GS).
3. Step-by-Step Instructions
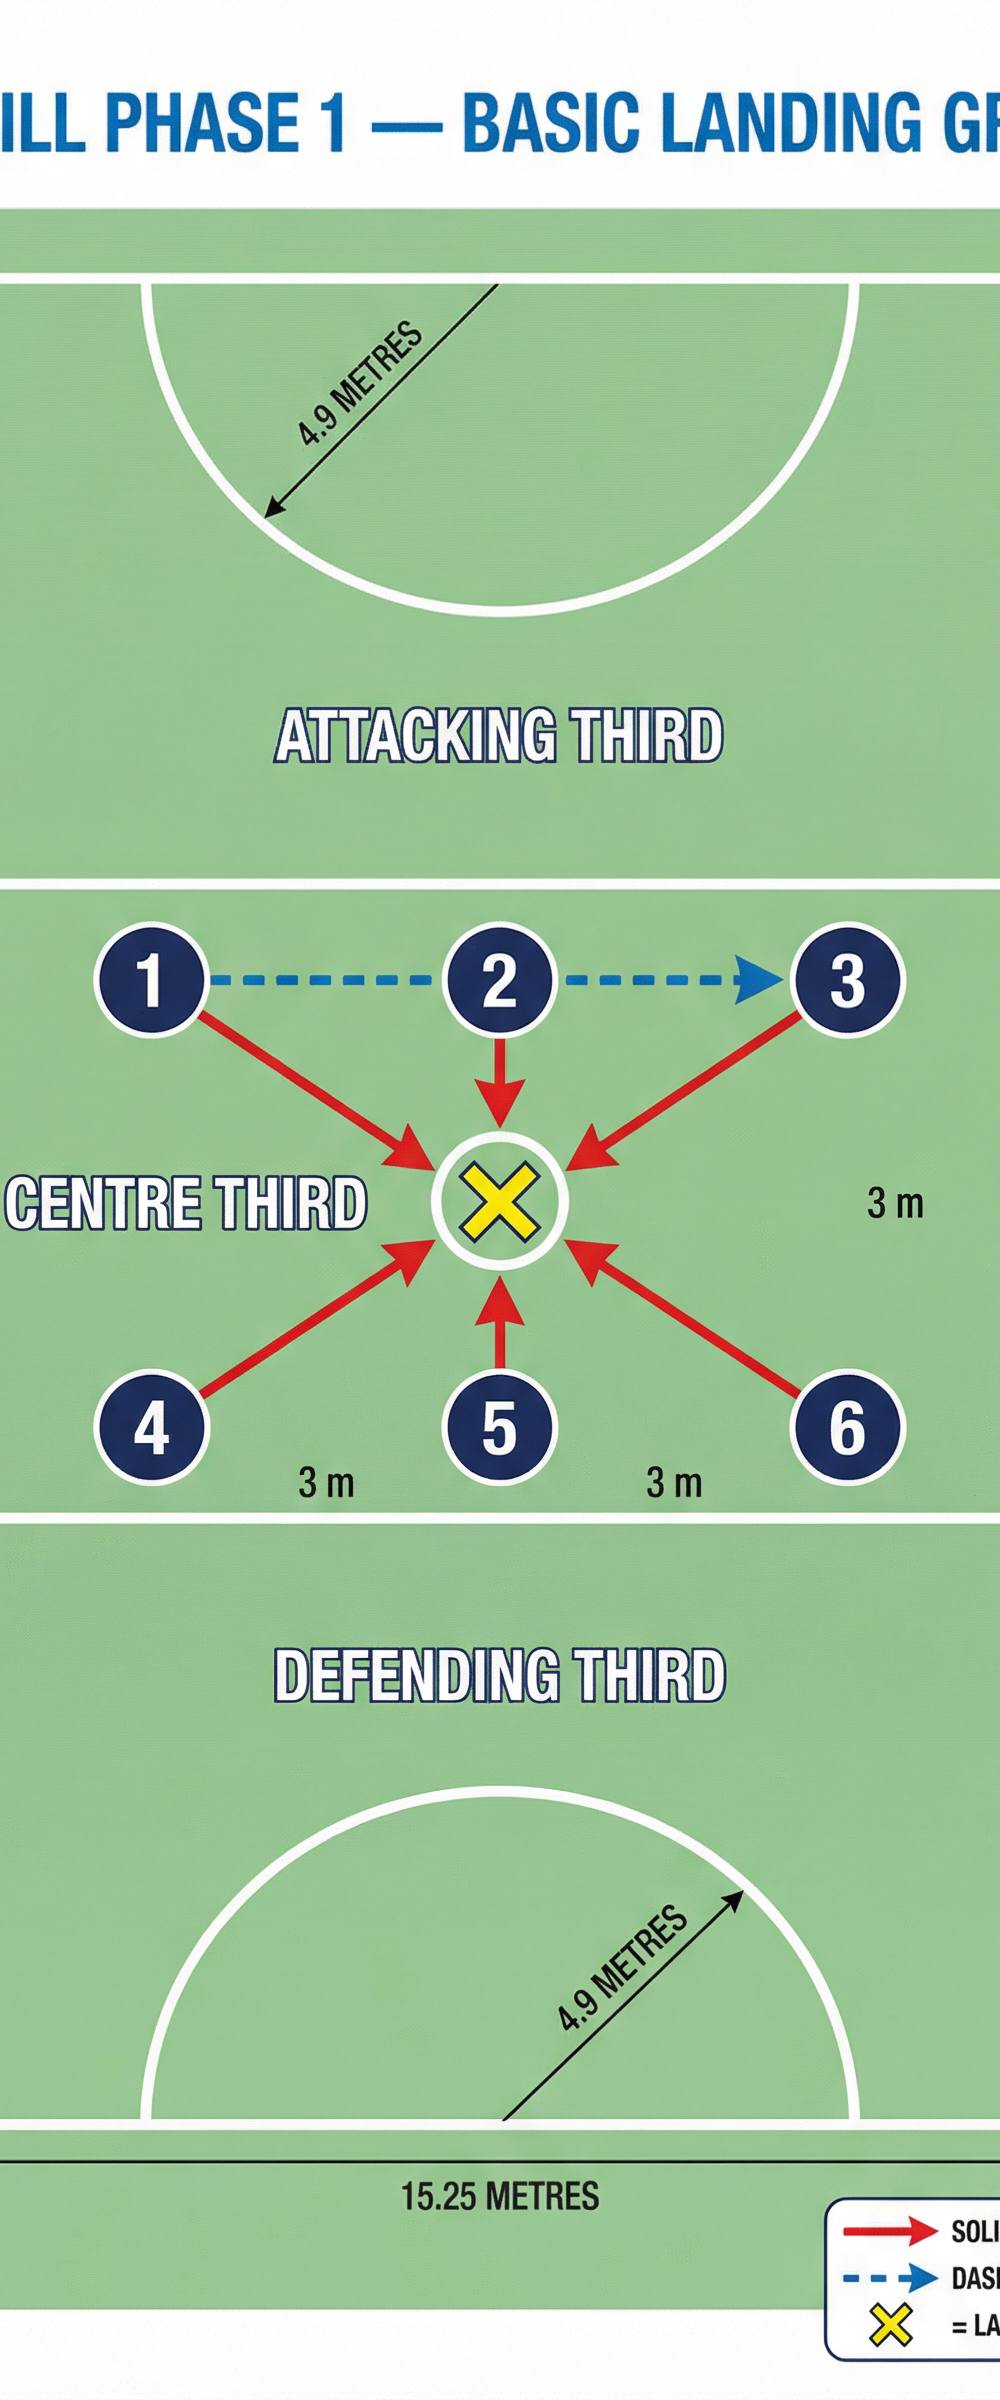
Phase 1: Basic Landing Grid

- Formation: Arrange 6 players in a grid as shown in
diagram_1.png. Players 1, 2, and 3 are on one side, with players 4, 5, and 6 opposite them. Place a central marker (the yellow 'X') in the middle of the grid. - Execution: Player 1 starts with the ball. On the coach's call, Player 4 drives towards the central marker.
- Pass and Land: Just before Player 4 reaches the marker, Player 1 executes a sharp chest pass. Player 4 must jump to receive the ball in the air and land on the central marker simultaneously on both feet.
- Hold and Pivot: Player 4 must demonstrate a controlled, balanced landing, holding the position for two seconds. They then pivot 180 degrees and pass to Player 2.
- Rotation: After passing, Player 4 returns to the back of their line. The drill continues with Player 5 driving to receive a pass from Player 2, and so on. Ensure the drill flows continuously.
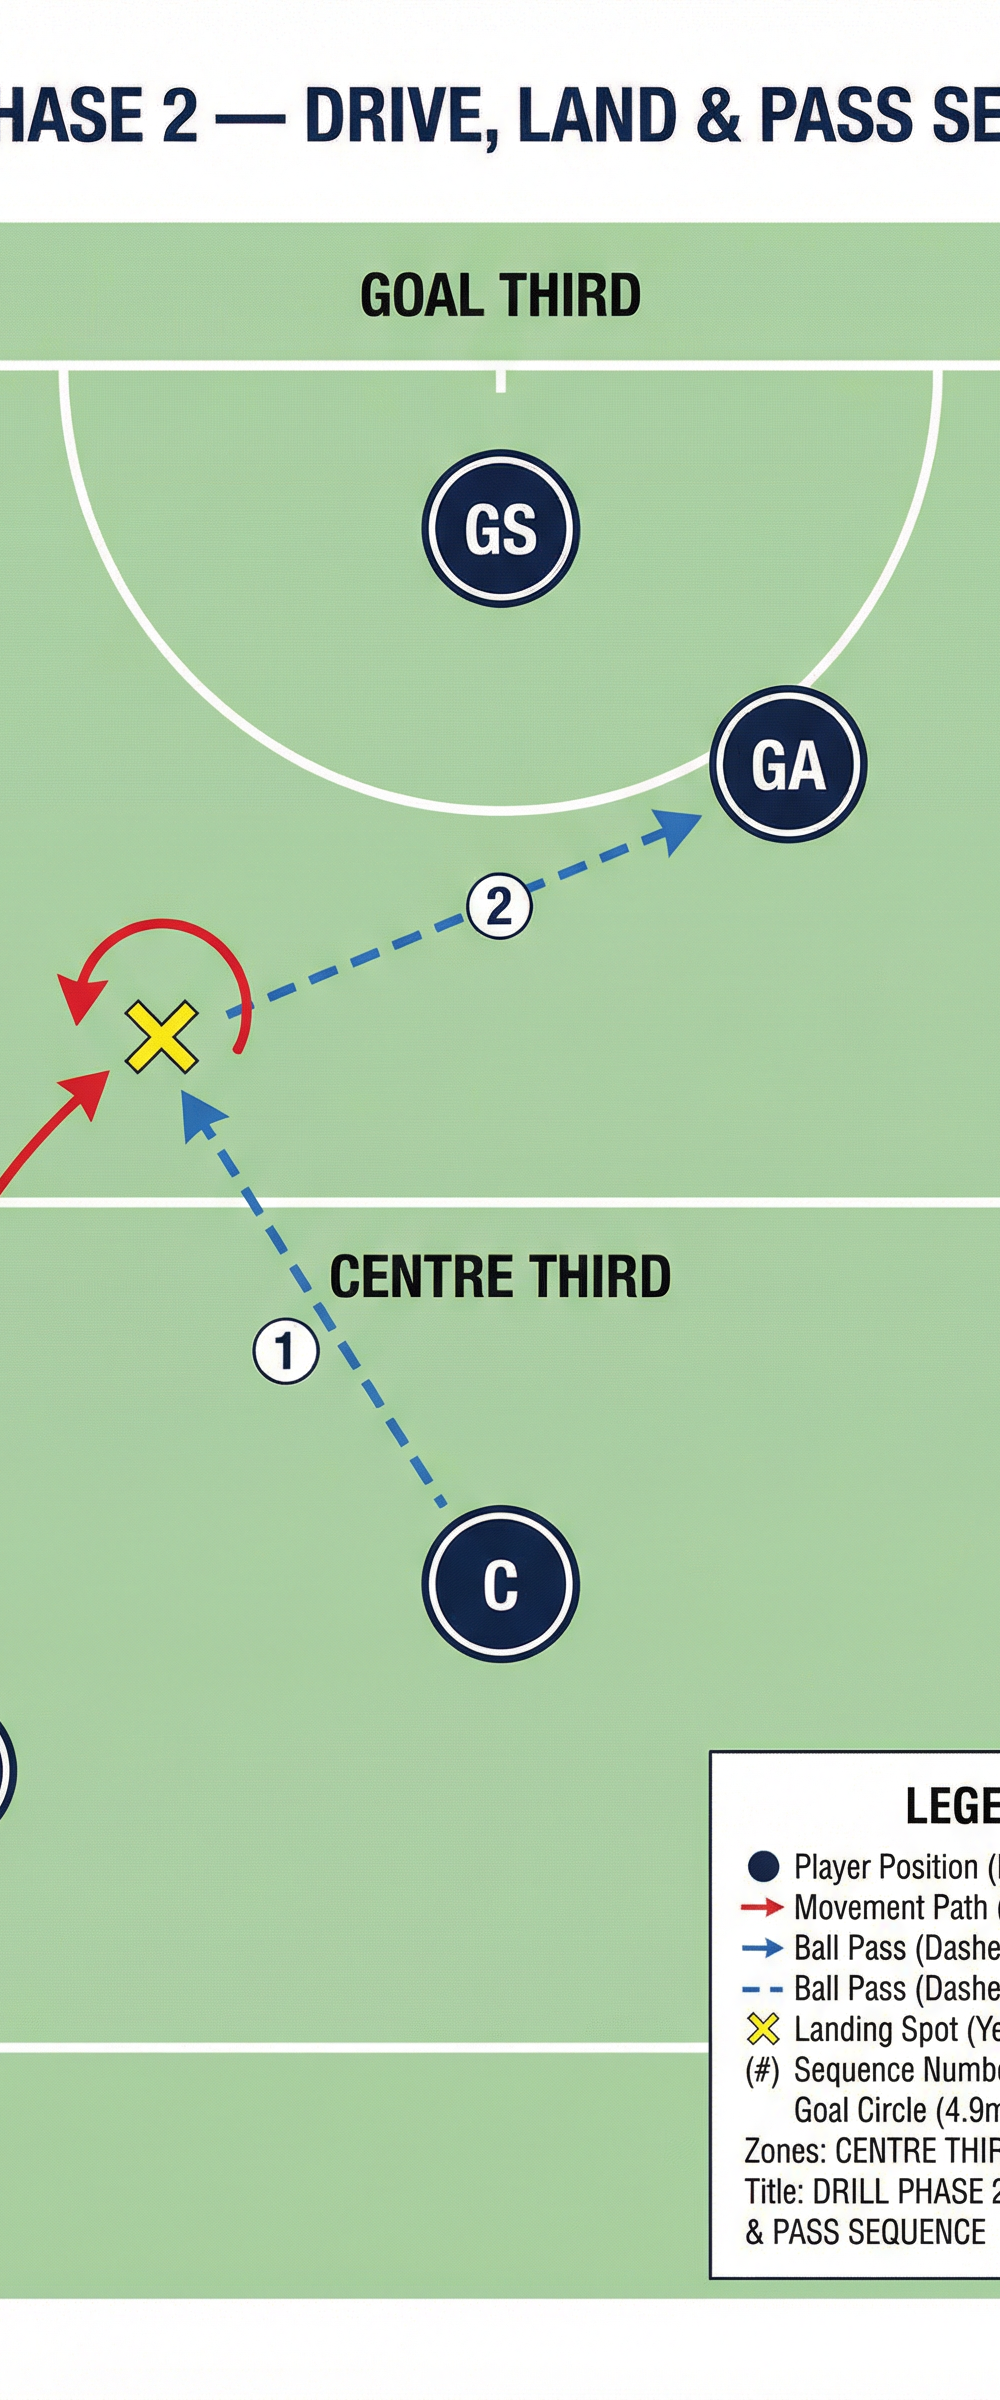
Phase 2: Drive, Land & Pass Sequence

- Formation: Position players in their respective roles: C, WA, GA, and GS as shown in
diagram_2.png. The C starts with the ball in the centre third. - Initial Drive: The WA drives hard from the transverse line into the goal third, calling for the ball.
- Receive and Land: The C passes to the WA, who must land on two feet at the designated landing spot (yellow 'X'). The landing must be balanced and controlled, with the player's body facing the sideline to open up the court.
- Vision and Pass: From the landed position, the WA pivots to face the goal and makes a quick pass to the GA, who has made a preliminary move to create space.
- Continuity: The drill can be continued with the GA passing to the GS or reset for the next player to cycle through the WA position.
4. Key Coaching Points

- Land on Two Feet Simultaneously: Emphasize that this is a two-foot landing. This provides the largest base of support and is the safest method for absorbing impact forces.
- 'Quiet' Landings: Encourage players to land softly, as if they are 'sneaking up' on the floor. Loud, stomping landings indicate poor force absorption and higher injury risk.
- Knees Bent, Hips Back: On landing, players' knees should be bent and aligned over their feet, with their hips pushed back as if sitting in a chair. This 'athletic stance' lowers the centre of gravity and engages the glutes and hamstrings to protect the knee joints.
- Head and Chest Up: Players must keep their head up to scan the court for their next passing option. A dropped head or chest indicates a loss of balance.
- Arms for Balance: Use arms out to the side or in front to maintain balance during and after landing, just like a gymnast.
- Controlled Pivot: The pivot after landing should be sharp and balanced, on the ball of the grounded foot, without dragging or shuffling the landing foot.
5. Common Mistakes

- Landing on One Foot: Players often revert to a one-foot landing out of habit. Immediately stop and correct this, reinforcing the two-foot rule for this drill.
- Stiff-Legged Landing: Landing with straight or locked knees places enormous stress on the knee ligaments. Cue players to 'bend and absorb'.
- Upright Posture: Landing too tall and upright raises the centre of gravity, leading to instability. Players must be coached to get low.
- Looking at the Ball: Players can become fixated on the catch and fail to have their head up, ready for the next play. Encourage 'eyes up' as soon as the ball is secured.
- Rushing the Next Play: A primary goal is control. Players who rush their pivot or pass immediately after landing often travel or throw an inaccurate ball. Enforce the 'land, balance, then pass' sequence.
6. Variations & Progressions
- Progression 1 (Add Defence): Introduce passive, then active, defensive pressure. A defender can stand near the landing spot, forcing the attacker to land strongly and protect the ball. This simulates match intensity.
- Progression 2 (Variable Passes): Vary the pass type. Instead of a simple chest pass, use a bounce pass or a high lob pass. This forces the player to adjust their body position and timing in the air before the landing.
- Variation (Landing and Shot): For shooters (GS and GA), the drill can be adapted so the landing is followed immediately by a shot at goal. This links the footwork directly to its ultimate purpose in the goal circle.
7. Age Adaptations
- Under 8 / Under 10: Focus exclusively on the basic landing grid (Phase 1) without a ball initially. Have players practice jumping and landing on the spot on the coach's command. Use fun cues like 'land like a superhero'. Introduce a ball only when the basic motor pattern is established.
- Under 12 / Under 14: Master Phase 1 and introduce Phase 2. The focus should be on the quality of every landing. Introduce the concept of pivoting and choosing the correct pass. Passive defence can be introduced at the U14 level.
- Under 16 / Open: All progressions should be used. The drill should be run at high intensity and speed, with defenders actively contesting the ball. The expectation is for flawless technique under pressure and quick decision-making following the landing.