Penalty Pass Advantage Play: Converting Set Pieces into Scoring Opportunities
Master the art of turning every penalty pass in the attacking third into a structured, high-percentage scoring opportunity with this complete tactical framework.
Equipment Needed
Overview
The Penalty Pass Advantage Play is one of the most underutilised set pieces in Netball. At every level of the game, teams are awarded penalty passes — yet the majority of teams treat them as a simple restart rather than a genuine scoring opportunity. This resource gives you a complete framework to convert penalty passes awarded in or near the attacking third into high-percentage shooting chances, using pre-rehearsed movement patterns that exploit the mandatory 0.9m exclusion zone around the offending player.
This play is most effective when a penalty is awarded within 7–10 metres of the goal circle, typically as a result of contact or obstruction by the Goal Defence (GD) or Wing Defence (WD). The temporary numerical advantage created by the offender standing beside — rather than defending — gives your attacking unit a critical two-to-three second window to execute a structured lead pattern before the defence can reorganise.
When to use it: Any penalty pass awarded in the attacking third, particularly when the offending defender is one of the primary markers on your Goal Attack (GA) or Goal Shooter (GS).
Setup
Equipment Required
- 1 Netball (match ball)
- Cones or markers (4–6) to mark the penalty spot and key reference zones during training
- Bibs in two contrasting colours for attackers and defenders
- Full-court or half-court space (minimum attacking third — 15.25m × 10.17m)
- Whiteboard or coaching board (recommended for pre-session walkthrough)
Court Dimensions Reference
The full Netball court measures 30.5m × 15.25m, divided into three equal thirds of 10.17m each. The goal circle has a radius of 4.9m. All player movement patterns in this play are designed with these dimensions in mind.
Player Positions Required
| Position | Role in This Play | Starting Zone |
|---|---|---|
| C — Centre | Takes the penalty pass; reads the lead options | At the penalty spot |
| WA — Wing Attack | Primary lead option; drives wide-to-inside | Wide right of attacking third |
| GA — Goal Attack | Secondary lead; drives from top of circle into space | Top of goal circle |
| GS — Goal Shooter | Tertiary lead; cross-drive to create circle congestion | Left side of goal circle |
| WD — Wing Defence | Safety valve / reset option | Left mid attacking third |
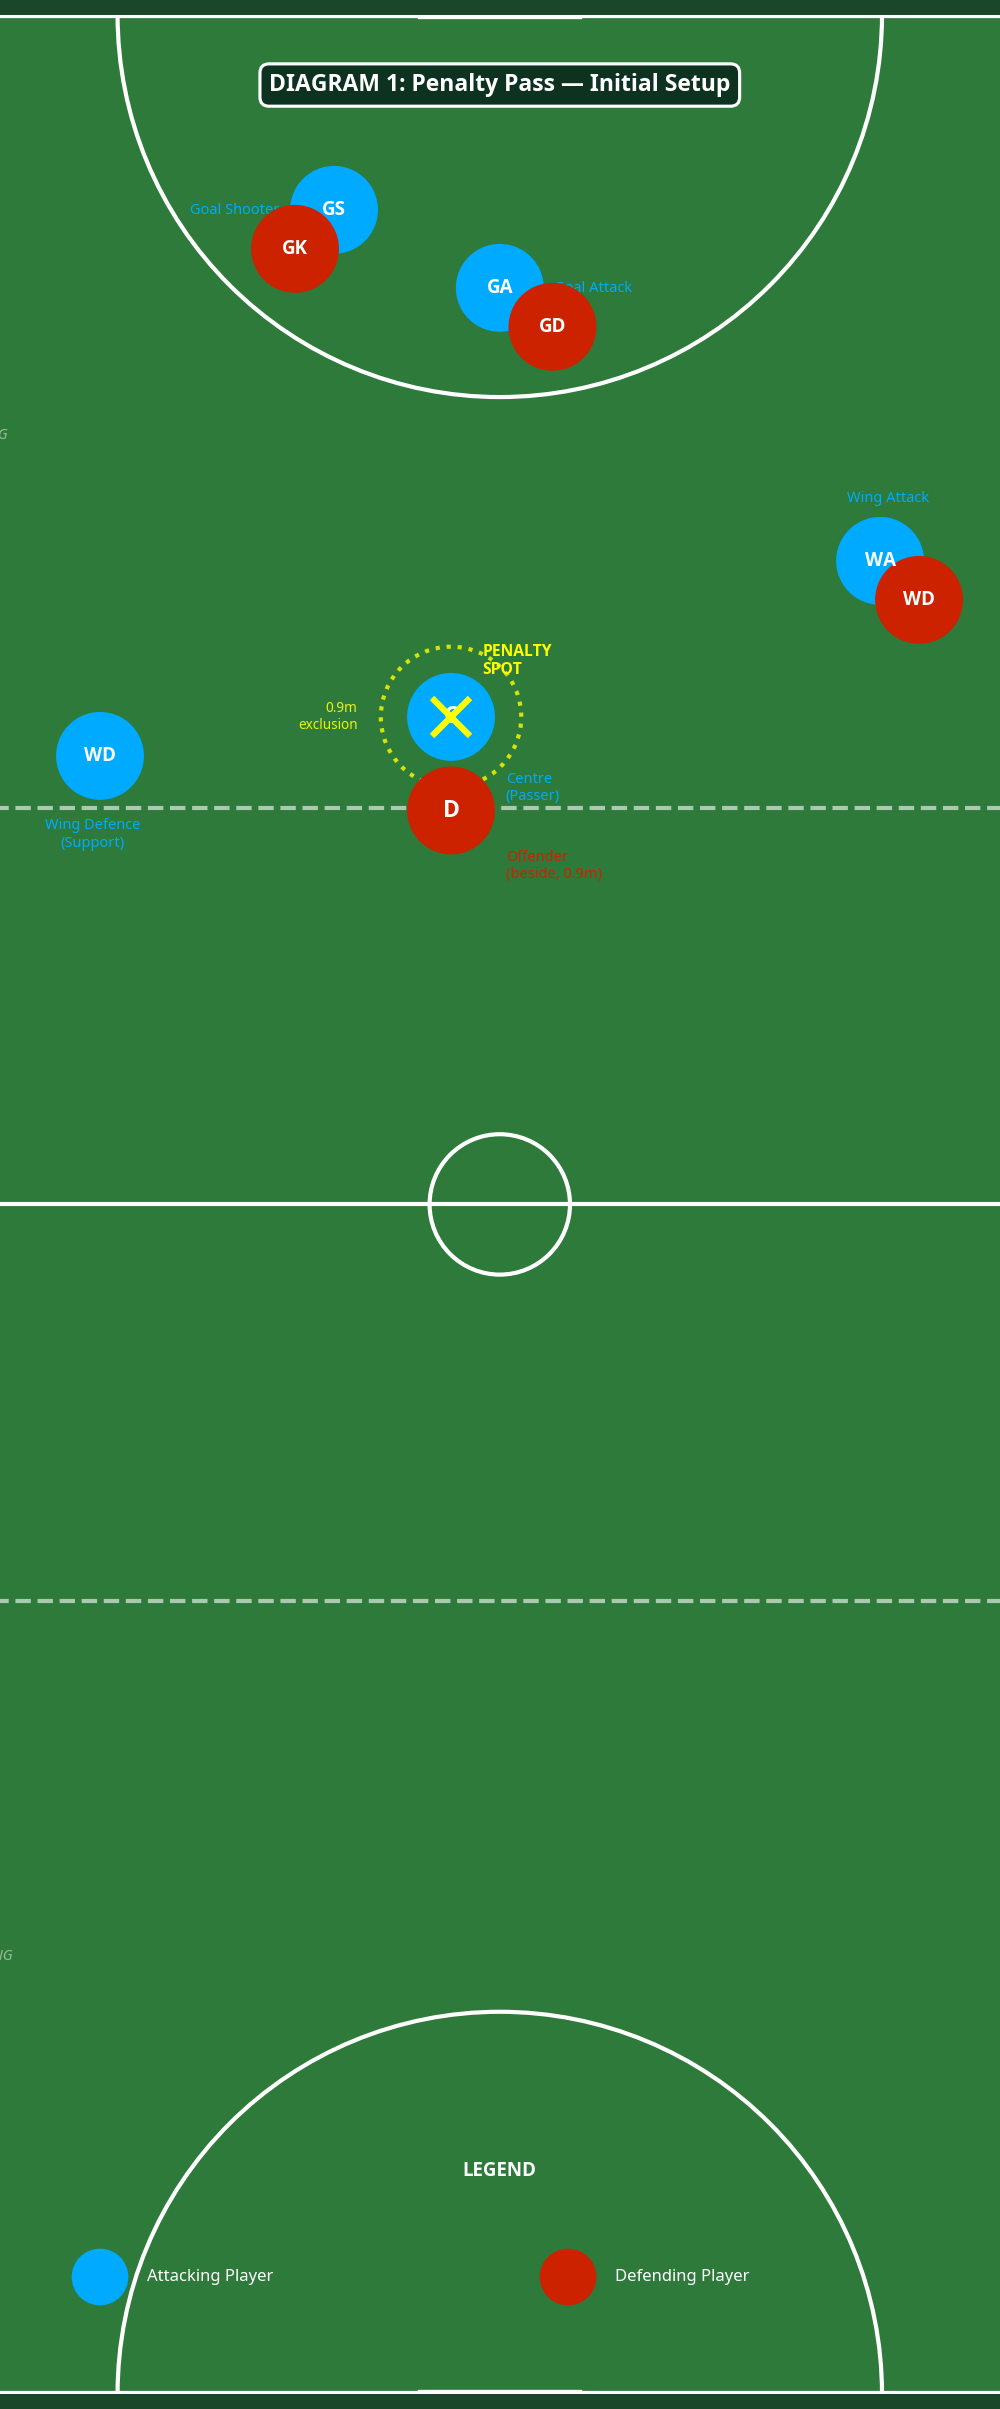
The defending team's offending player (D) must stand beside the Centre at a distance of 0.9m and may not defend until the pass is taken. The remaining defenders (GD, GK) are free to mark.
Diagram 1 — Initial Setup: Player positions at the moment the penalty is awarded. Note the 0.9m exclusion zone around the penalty spot and the starting positions of all five attacking players.
Step-by-Step Instructions

Step 1 — Signal the Set Play (0–2 seconds)
The moment the umpire awards the penalty, the Centre calls the pre-agreed code word (e.g., "Green" or "Arrow") to trigger the set play. Every player on court must know this signal. The Centre picks up the ball and places both feet at the penalty spot. Do not rush — use the full setup time to let your teammates read their positions.
Step 2 — WA Executes the Wide Lead (0–2 seconds)
The Wing Attack, positioned wide on the right-hand side of the attacking third, takes two sharp steps toward the sideline before cutting hard on a diagonal toward the top-right edge of the goal circle. This movement is designed to drag the opposing Wing Defence out of the central channel, creating a passing lane for the Centre. The WA's lead should reach the circle edge at approximately the 2-second mark.
Step 3 — GA Drives from the Top of the Circle (1–3 seconds)
Simultaneously, the Goal Attack — starting at the top of the goal circle — drives hard off their outside foot and moves diagonally toward the post. The GA's role is to occupy the GD and create a second passing option inside the circle. If the GD is caught flat-footed watching the WA lead, the GA drive becomes the primary option for a direct pass into the circle.
Step 4 — GS Executes the Cross-Drive (1–3 seconds)
The Goal Shooter begins on the left side of the circle and drives across toward the right post, moving in the opposite direction to the GA. This cross-drive creates congestion for the Goal Keeper and forces a decision: follow the GS and leave the GA free, or hold position and concede the GS space. Either outcome creates an advantage for the attacking team.
Step 5 — Centre Reads and Delivers (2–4 seconds)
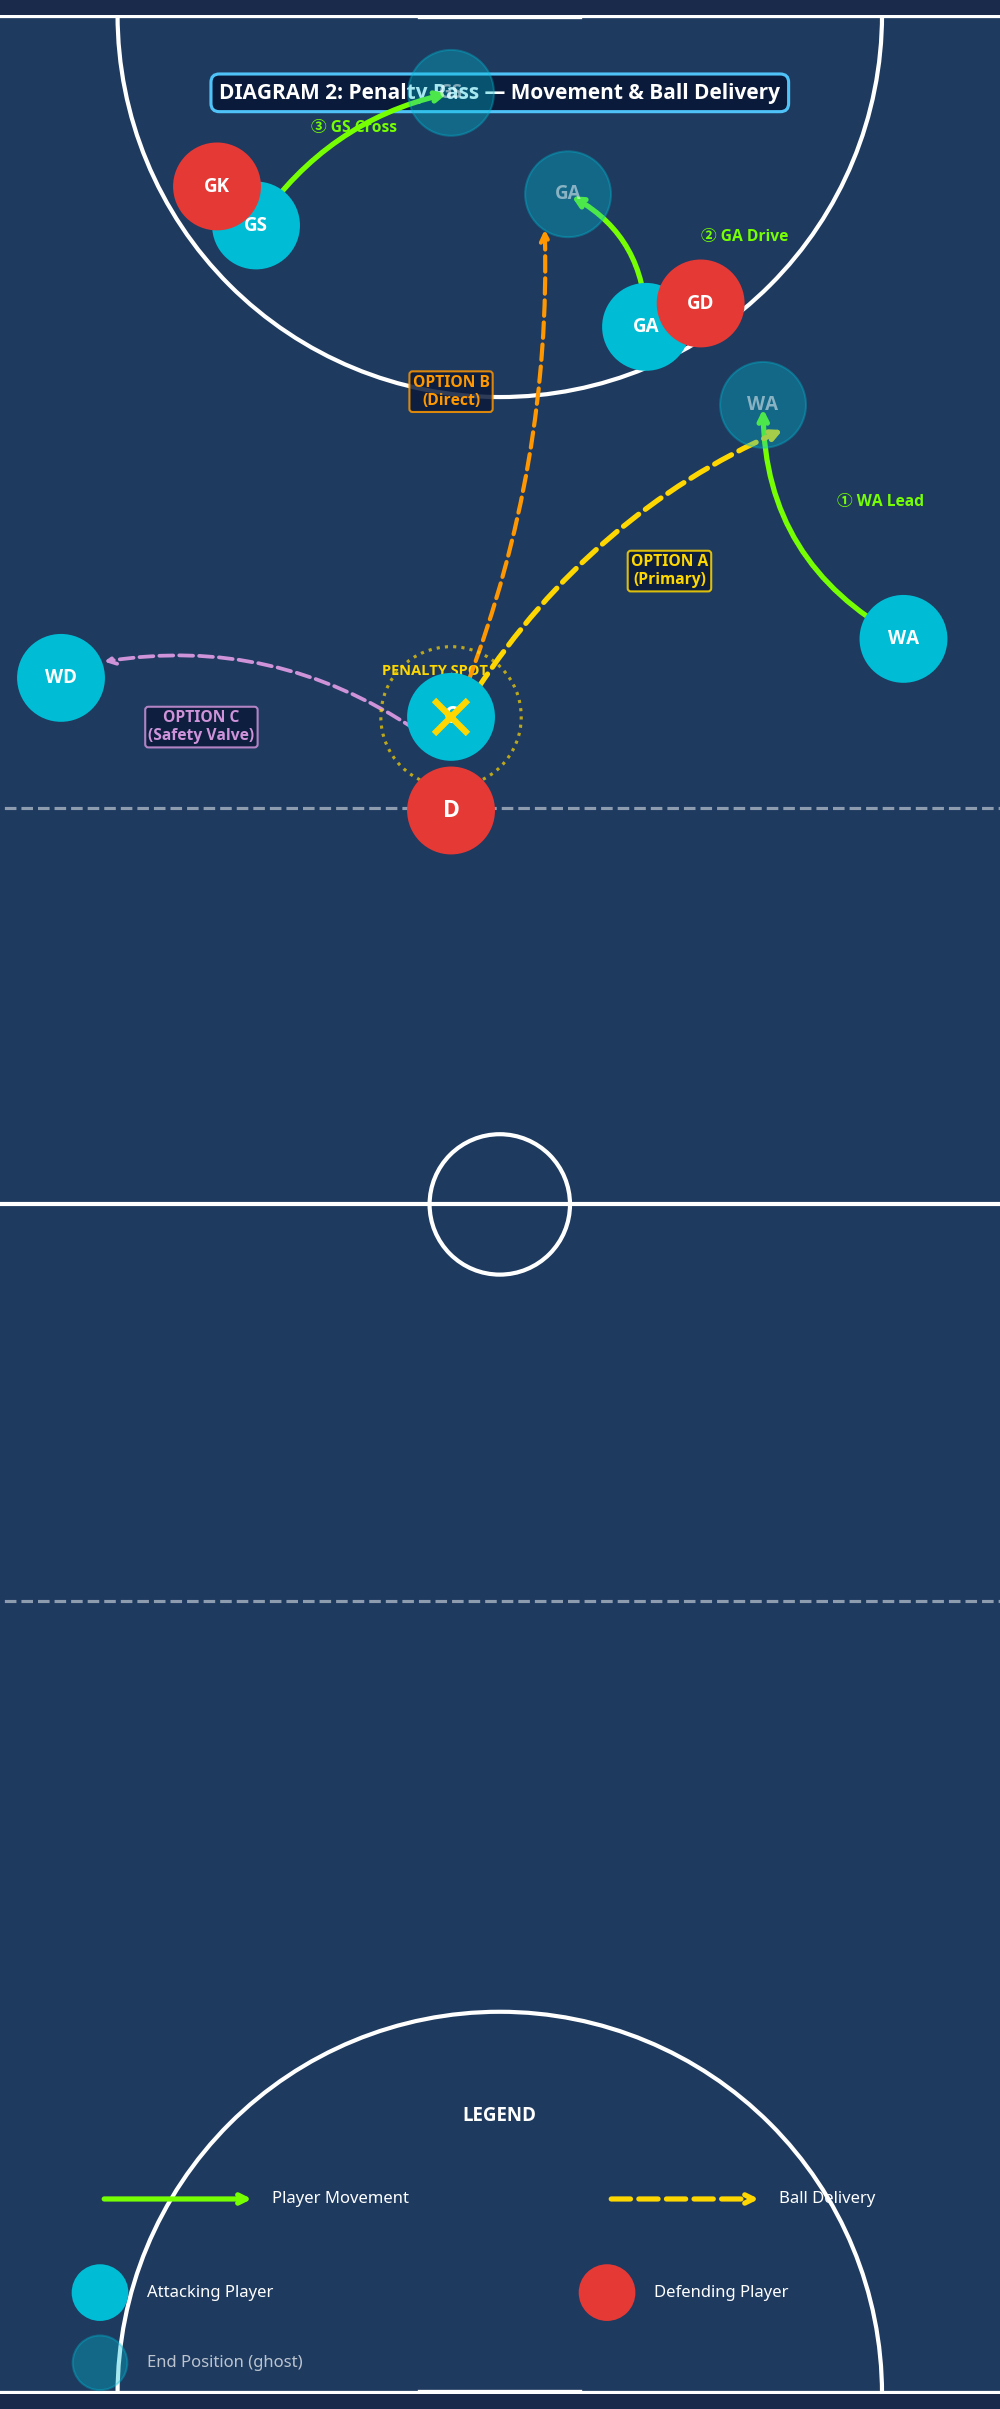
The Centre scans the three lead options in priority order: (A) WA if the wide channel is open and a quick transfer is needed; (B) GA if the GD has been drawn or is caught in transition; (C) WD as the safety valve if all primary options are covered. The pass must be decisive — a flat, accurate chest or shoulder pass delivered into the leading player's hands, not their feet.
Step 6 — Second Phase Attack
Once the ball is delivered to the WA (Option A), the GA and GS continue their drives into the circle. The WA's next pass should be a quick, flat delivery into the circle to either the GA or GS, who should now have a step on their defender. The entire sequence from penalty to shot should take no more than 6–8 seconds.

Diagram 2 — Movement Patterns: The three ball delivery options (A, B, C) and the corresponding player movement leads. Solid green arrows show player movement; dashed yellow/orange arrows show ball delivery paths.
Key Coaching Points

1. Speed of Setup is Everything. The advantage created by the exclusion zone lasts only as long as it takes the defence to reorganise. Coaches must drill their teams to begin the lead pattern before the Centre has even picked up the ball. Every second of hesitation reduces the numerical advantage.
2. The Centre Must Be a Decision-Maker, Not a Passenger. The Centre taking the penalty pass is not simply a distributor — they are the play-caller. Train your Centre to read the GD's body position: if the GD is goal-side of the GA, the WA lead is open; if the GD has tracked the GA's drive, the direct circle entry is available.
3. Leads Must Be Committed and Timed. A half-hearted lead gives the defence time to recover. The WA, GA, and GS must execute their drives at full intensity, committing their defender to a decision. Emphasise the change of direction — two steps one way, then an explosive cut — rather than a straight run that is easy to track.
4. The GS and GA Must Not Both Go to the Same Space. The cross-drive pattern only works if the GS and GA move in genuinely opposite directions. A common breakdown occurs when both players drift to the same side of the circle, allowing the GK to cover both. Use cones in training to enforce the spatial separation.
5. The WD's Safety Valve Role is Active, Not Passive. The Wing Defence should not simply stand and watch. Position the WD at a 45-degree angle behind and to the left of the Centre, approximately 3–4 metres away, offering a clear reset option if all forward passes are covered. A good reset allows the team to retain possession and reset the attack.
6. Communicate the Code Word Before Every Game. This play only works if all seven players on court know the trigger. Include a two-minute set play walkthrough in your pre-game warm-up routine and confirm the code word with every player.
Common Mistakes

Mistake 1 — The Centre Takes the Pass Too Quickly. Rushing the penalty pass before leads are established is the single most common error. Coaches should observe whether the Centre is watching the umpire rather than their teammates. Drill the habit: pick up the ball, scan the court, then pass.
Mistake 2 — Leads Begin Too Late. Players often wait to see where the penalty is awarded before beginning their movement. Teach your team to read the umpire's whistle and body language — the moment a penalty is signalled, leads should begin. In training, use a whistle cue drill where players must be in motion within one second of the whistle.
Mistake 3 — The GA Stands and Watches Instead of Driving. Goal Attacks who are not the primary receiver often become spectators. Reinforce that the GA's drive — even if they do not receive the ball — is what creates the space for the WA to receive. Movement without the ball is as important as movement with it.
Mistake 4 — Passing to a Stationary Player. A pass delivered to a player who has stopped their lead is easily intercepted or defended. The Centre must pass into the lead — ahead of the player's movement, not to where they are standing. Use target practice drills where the receiver must be moving to score a point.
Mistake 5 — Neglecting the Second Phase. Many teams execute the first pass well but then stall. The WA receiving the ball should already know their second-phase delivery target before the ball arrives. Rehearse the full sequence — penalty to WA to circle entry — as a single fluid movement, not two separate actions.
Variations and Progressions

Variation 1 — Reverse Side (Left-Hand WA Lead). Mirror the entire play to the left side of the court, with the WA leading wide left and the GA driving to the left post. This is particularly effective against defences that have scouted the standard right-side pattern. Introduce this variation once the base play is well-rehearsed, using a different code word (e.g., "Blue").
Variation 2 — Direct Circle Entry (Option B as Primary). In situations where the GD is consistently caught watching the WA lead, promote Option B — the direct pass to the GA driving into the circle — as the primary option. This requires the GA to time their drive to arrive at the circle edge exactly as the Centre is ready to pass. Use this variation against defences that are slow to recover.
Progression 1 — Add Live Defence. Once the play is established in a walk-through setting, introduce the full defending unit (GD and GK active, offender beside). The offending defender rejoins play the moment the pass is taken, adding realistic pressure to the second phase. Progress from passive defence (defenders shadow only) to semi-active (defenders can intercept but not contact) to fully competitive.
Progression 2 — Penalty in Varying Locations. Drill the play from three different penalty locations: (a) central attacking third entry, (b) wide left near the sideline, and (c) top of the goal circle. Each location changes the angle of the WA lead and the distance of the GA drive, requiring players to adapt their timing and spatial awareness.
Age Adaptations
Under 10 / Under 12 — Simplify to Two Options. Remove the GS cross-drive and focus only on the WA lead (Option A) and the WD safety valve (Option C). At this age, the priority is understanding the concept of the exclusion zone and the value of quick ball movement. Use cones to physically mark the 0.9m zone and walk through the play at half speed before adding any defenders.
Under 14 — Introduce the Three-Option Structure. Players at this level can begin to understand and execute all three options. Focus coaching attention on the Centre's decision-making process — use freeze drills where you stop the play and ask the Centre to verbalise which option they see and why. Introduce the code word system and begin rehearsing the second-phase delivery.
Under 16 / Open — Full Tactical Complexity. Introduce both the standard and reverse variations, and begin drilling the play against a fully competitive defence. Add video analysis where possible — review footage of the play in training and identify where the timing or spatial patterns broke down. At this level, players should be able to self-correct within the play rather than relying on coach intervention.