Three-Stage Attacking Play from Defence: The Full Court Transition
Master the art of transitioning the ball from the defensive goal circle to a scoring opportunity with this structured, three-stage attacking set play.
Equipment Needed
Overview
Transitioning the ball smoothly from defence into attack is one of the most critical phases in netball. When your Goal Keeper (GK) or Goal Defence (GD) secures a rebound or interception, the immediate objective is to clear the ball safely from the defensive third and systematically advance it down the 30.5m court to create a high-percentage scoring opportunity. This "Three-Stage Attacking Play" provides a structured, reliable framework for your team to move the ball through the defensive, centre, and attacking thirds. It relies on decisive leads, accurate passing, and intelligent use of court space, minimizing the risk of turnovers while maintaining attacking momentum.
Setup
- Equipment Needed: 1 netball, full court (30.5m x 15.25m), bibs for two full teams (attackers and defenders).
- Court Setup: Full court practice. Start with the attacking team taking a baseline throw-in or simulating a defensive rebound in their defensive goal circle.
- Player Positions: All 7 positions (GK, GD, WD, C, WA, GA, GS) are involved. The play starts with the GK in the defensive goal circle.
Step-by-Step Instructions
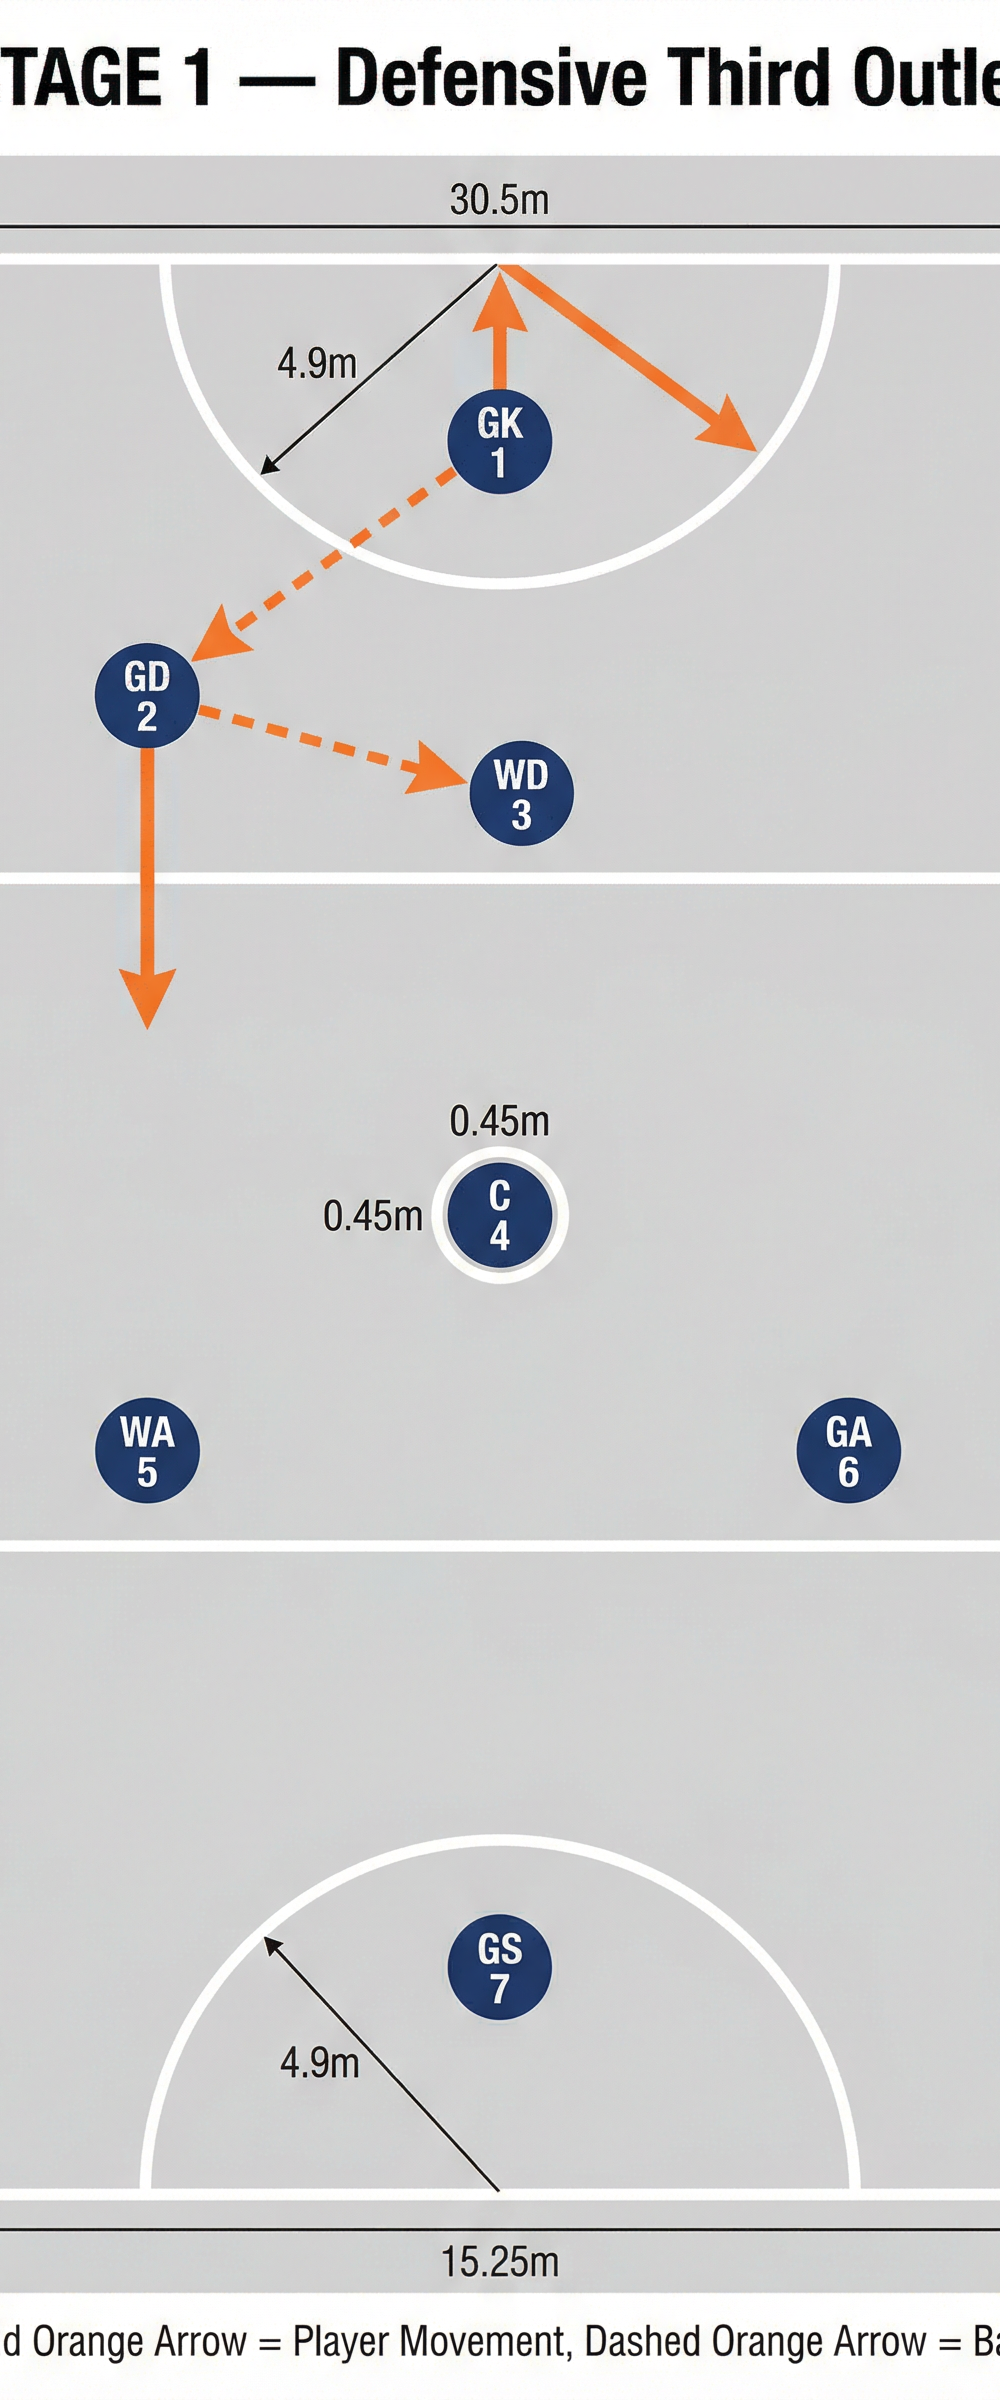
Stage 1: The Defensive Third Outlet
The first priority is a safe and decisive clearance from the defensive circle.
- The Initiation: The Goal Keeper (GK) secures the ball near the post (e.g., from a rebound). They immediately look to the edge of the circle.
- The First Lead: The Goal Defence (GD) makes a sharp, angled drive towards the sideline to create a safe passing channel, receiving the first outlet pass from the GK.
- The Secondary Option: Simultaneously, the Wing Defence (WD) pushes wide to the opposite side, offering a secondary outlet if the GD is heavily contested.
- Clearing the Third: Upon receiving the ball, the GD turns fully to face down the court, looking for the next phase of the transition.
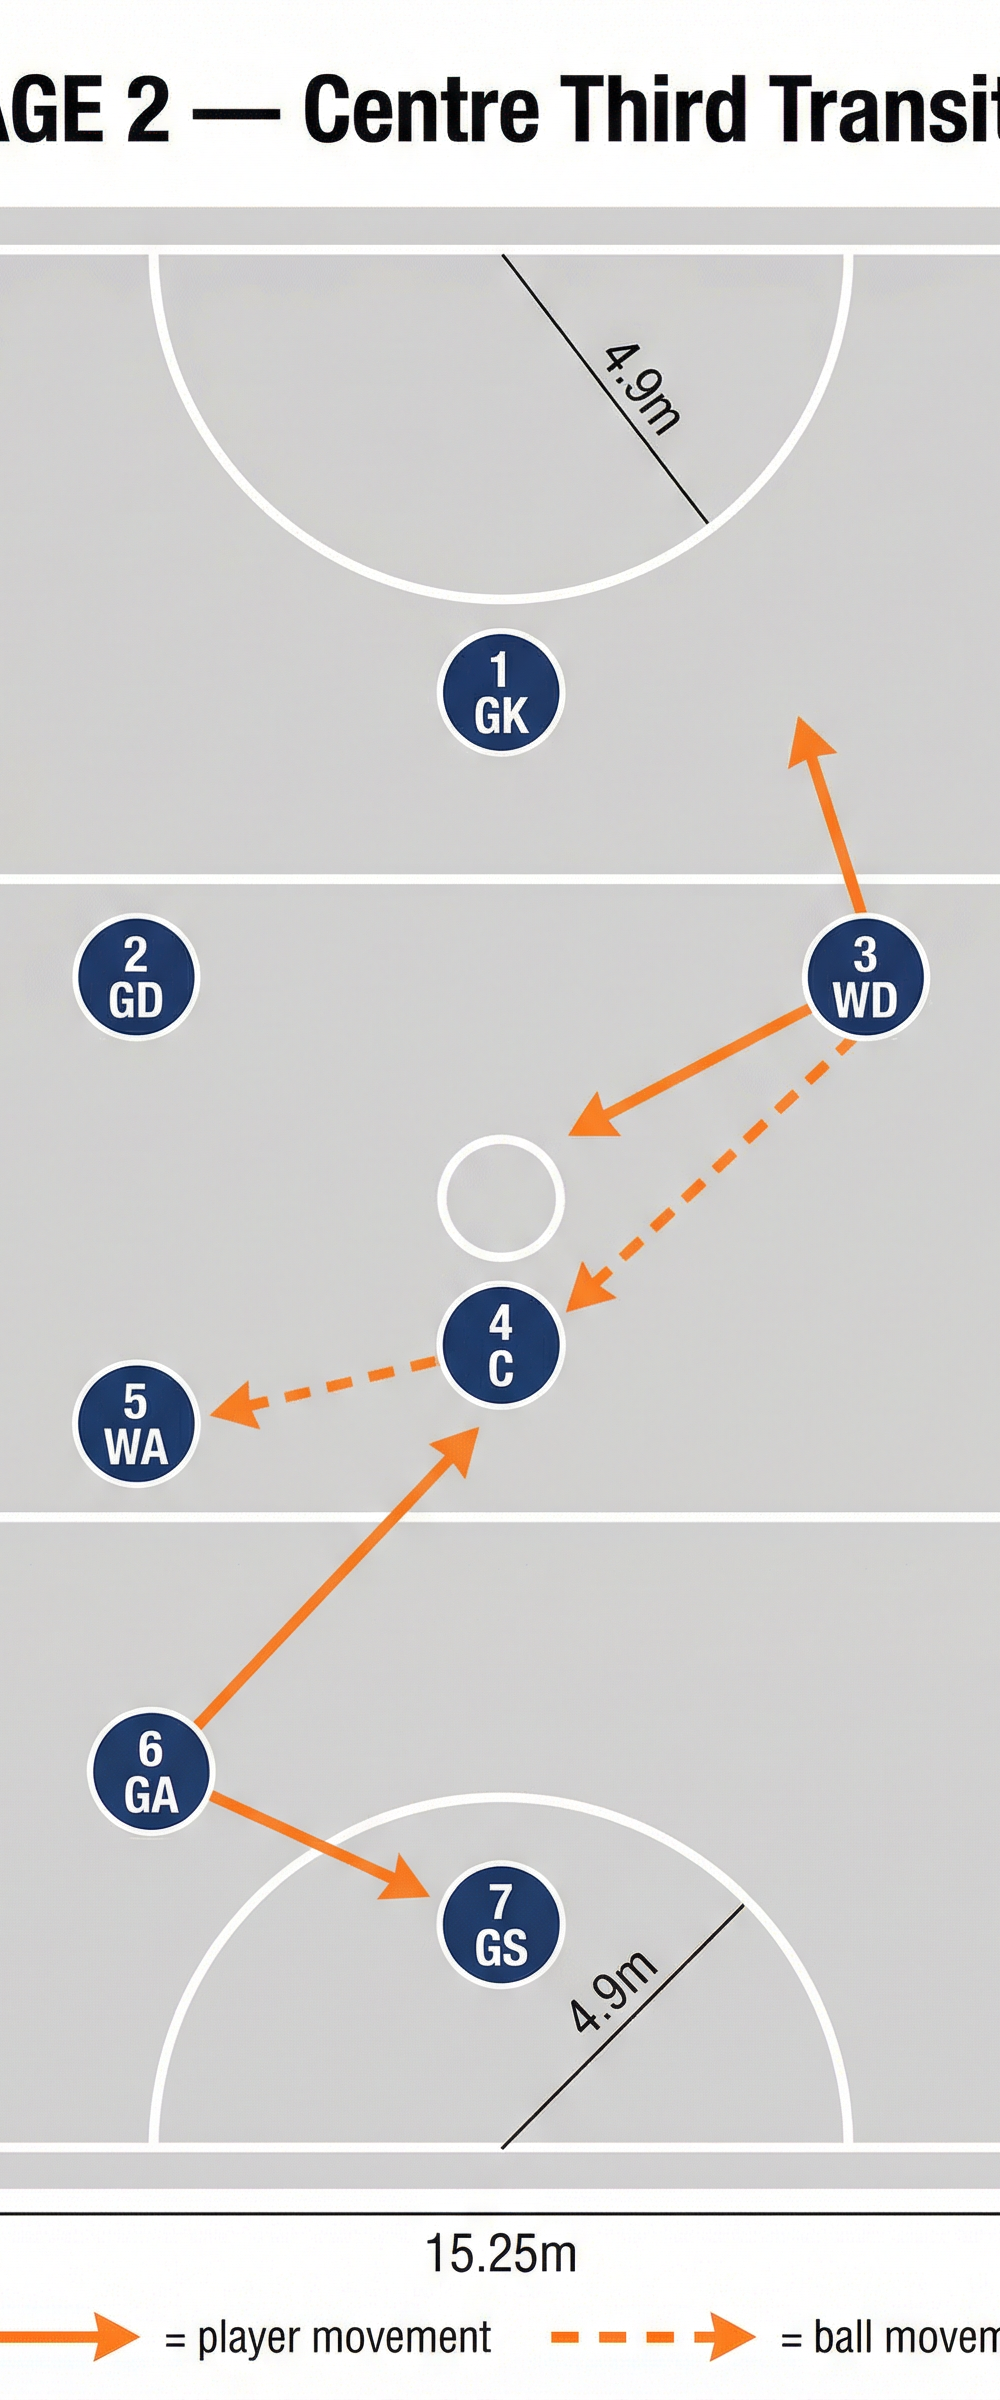
Stage 2: The Centre Third Transition
Once the ball crosses the first transverse line, the focus shifts to speed and linking the mid-court.
- The Link Player: As the GD looks downcourt, the Centre (C) makes a strong, direct drive into the middle third to receive the pass from the GD.
- Creating Width: The Wing Attack (WA) holds their position wide on the transverse line, stretching the opposition's defence and creating space in the middle channel.
- The Penetrating Pass: The C receives the ball, lands, and pivots to face the attacking third. They immediately look for the WA, who now makes a sharp, driving lead towards the top of the attacking goal circle.
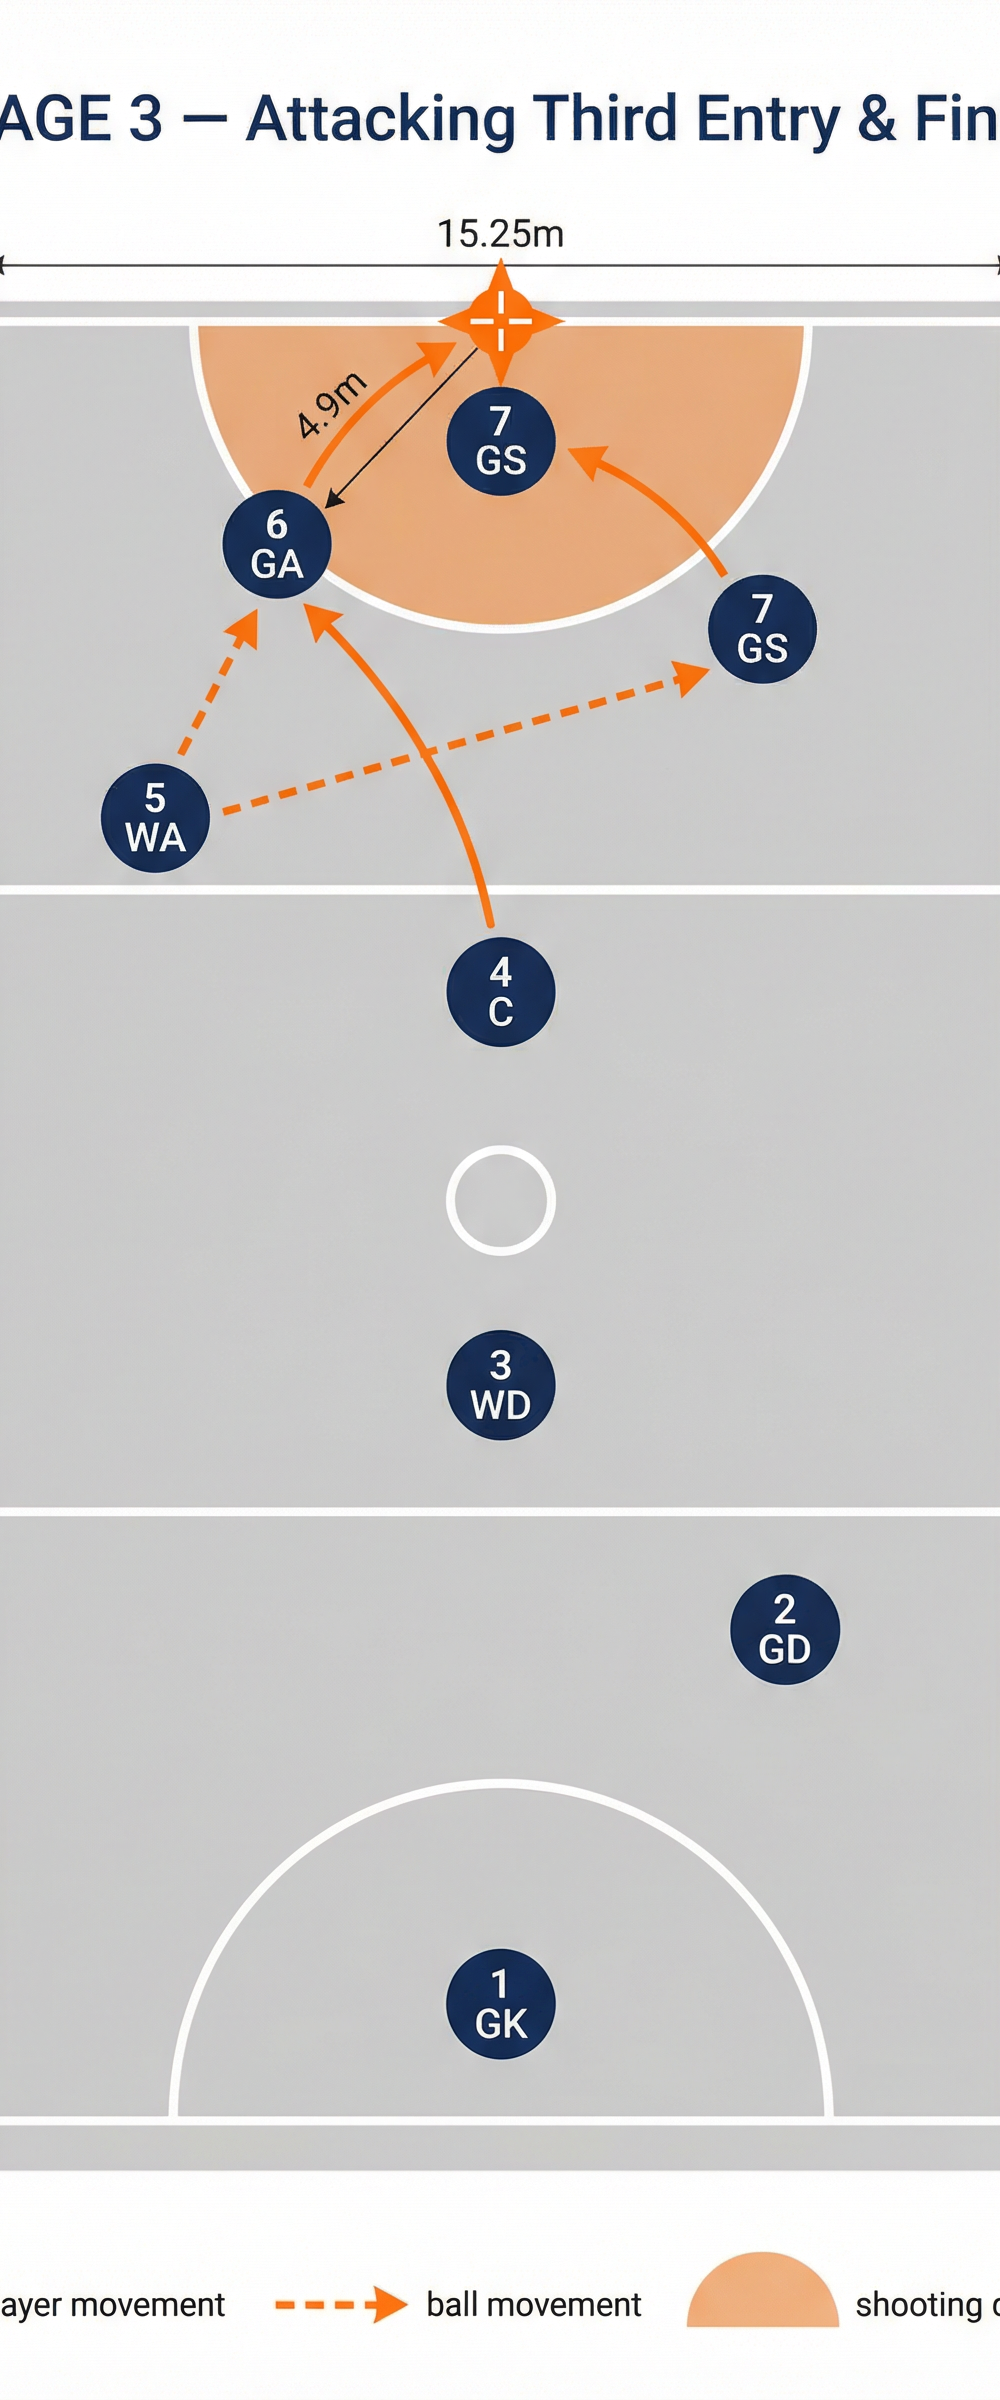
Stage 3: Attacking Third Entry & Finish
The final stage is about precision and feeding the shooters in the "danger zone."
- Circle Edge Delivery: The WA receives the ball at the edge of the goal circle, ideally in a balanced position ready to feed.
- The Shooter's Rotation: Inside the circle, the Goal Shooter (GS) and Goal Attack (GA) coordinate their movements. The GS may hold at the back to draw the defender, while the GA makes a sharp cut across the front of the circle towards the post.
- The Feed and Finish: The WA delivers a precise, weighted pass into the space created by the GA's cut. The GA receives the ball within the 3m "danger zone" and executes the shot.
Key Coaching Points
- Vision and Turning: Emphasize to all players the importance of turning fully to face down the court immediately after receiving the ball. Vision is key to a fast transition.
- Timing of Leads: Players must time their drives so they are hitting the space just as the ball carrier is ready to release the pass. Early leads destroy the space; late leads invite interceptions.
- Strong, Flat Passes: Encourage strong, flat shoulder passes to penetrate the defence. Loopy passes give defenders too much time to recover.
- Clearing Out: Once a player has delivered a pass, they must quickly clear out of the space to open up channels for the next phase of the play.
Common Mistakes
- Crowding the Ball Carrier: Players driving too close to the person with the ball, reducing passing options and bringing defenders into the play.
- Forcing the Long Pass: Attempting to skip a stage by throwing a long, risky pass from the defensive third straight into the attacking third.
- Static Shooters: Shooters remaining stationary in the circle, making it easy for the GK and GD to intercept the feed.
Variations & Progressions
- Progression 1 (Add Defenders): Start with passive defenders (shadowing only) and gradually increase to full, active defensive pressure to test the play under match conditions.
- Progression 2 (Time Limit): Challenge the team to execute the full transition from the defensive rebound to a shot on goal within a specific timeframe (e.g., under 10 seconds).
- Variation (The Switch): If the primary lead in Stage 2 (the Centre) is heavily defended, practice a pre-called switch where the WD makes the central drive instead.
Age Adaptations
- Under 10s: Focus heavily on Stage 1 (the safe outlet). Use shorter passing distances and emphasize the fundamental skill of turning to face down the court.
- Under 14s: Introduce the timing of the leads in Stage 2. Start emphasizing the coordination between the C and WA.
- Open/Advanced: Run the play at high speed with full defensive pressure. Introduce complex shooter rotations and deceptive feeding techniques in Stage 3.