Rapid Recovery & Angle Adjustment: Advanced Goalkeeper Shot-Stopping Drill
A high-intensity shot-stopping drill designed to improve a goalkeeper's footwork, angle adjustment, and ability to recover quickly for secondary saves.
Equipment Needed
1. Overview
This comprehensive goalkeeper shot-stopping drill focuses on the essential mechanics of angle adjustment, rapid recovery, and managing second-ball scenarios. In modern football, a goalkeeper rarely faces a single isolated shot; the ability to make an initial save, quickly regain a balanced set position, and react to a rebound or secondary phase of play is crucial. This session challenges the goalkeeper physically and mentally, demanding explosive lateral movement, precise footwork, and split-second decision-making under fatigue. It is ideal for pre-season conditioning or as an intensive mid-week technical session for your goalkeeping unit.
2. Setup
To ensure the drill runs smoothly and replicates match intensity, meticulous setup is required.
Pitch Area:
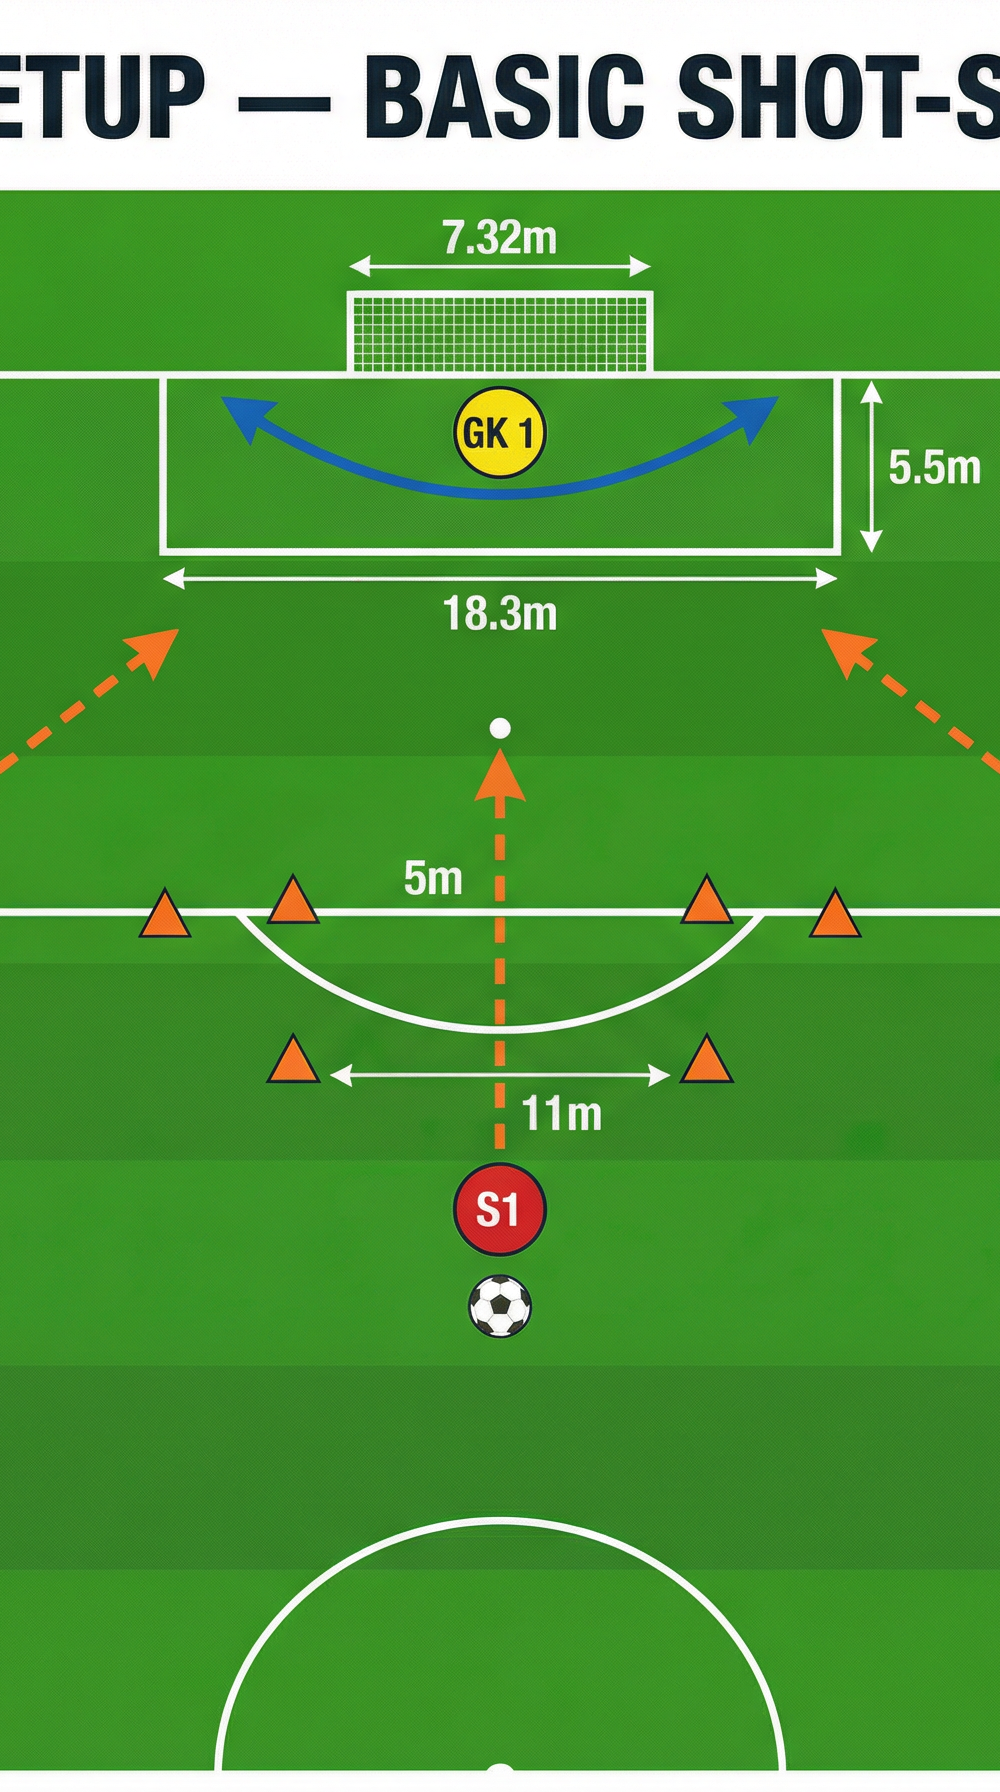
Utilise the standard penalty area (40.2m x 16.5m) and the six-yard box (18.3m x 5.5m). Ensure the goal net is securely pegged down and the pitch surface in the goalmouth is safe for diving.
Equipment:
- 1 Full-size goal (7.32m x 2.44m)
- 10-15 Footballs (fully inflated to match pressure)
- 4-6 Marker cones (preferably flat discs to avoid deflection interference)
- 1 Set of distinct bibs for the servers/strikers
Player Positions:
- GK 1 (Working Goalkeeper): Starts on the goal line, centrally positioned.
- S1 (Server 1): Positioned centrally on the penalty spot (11m).
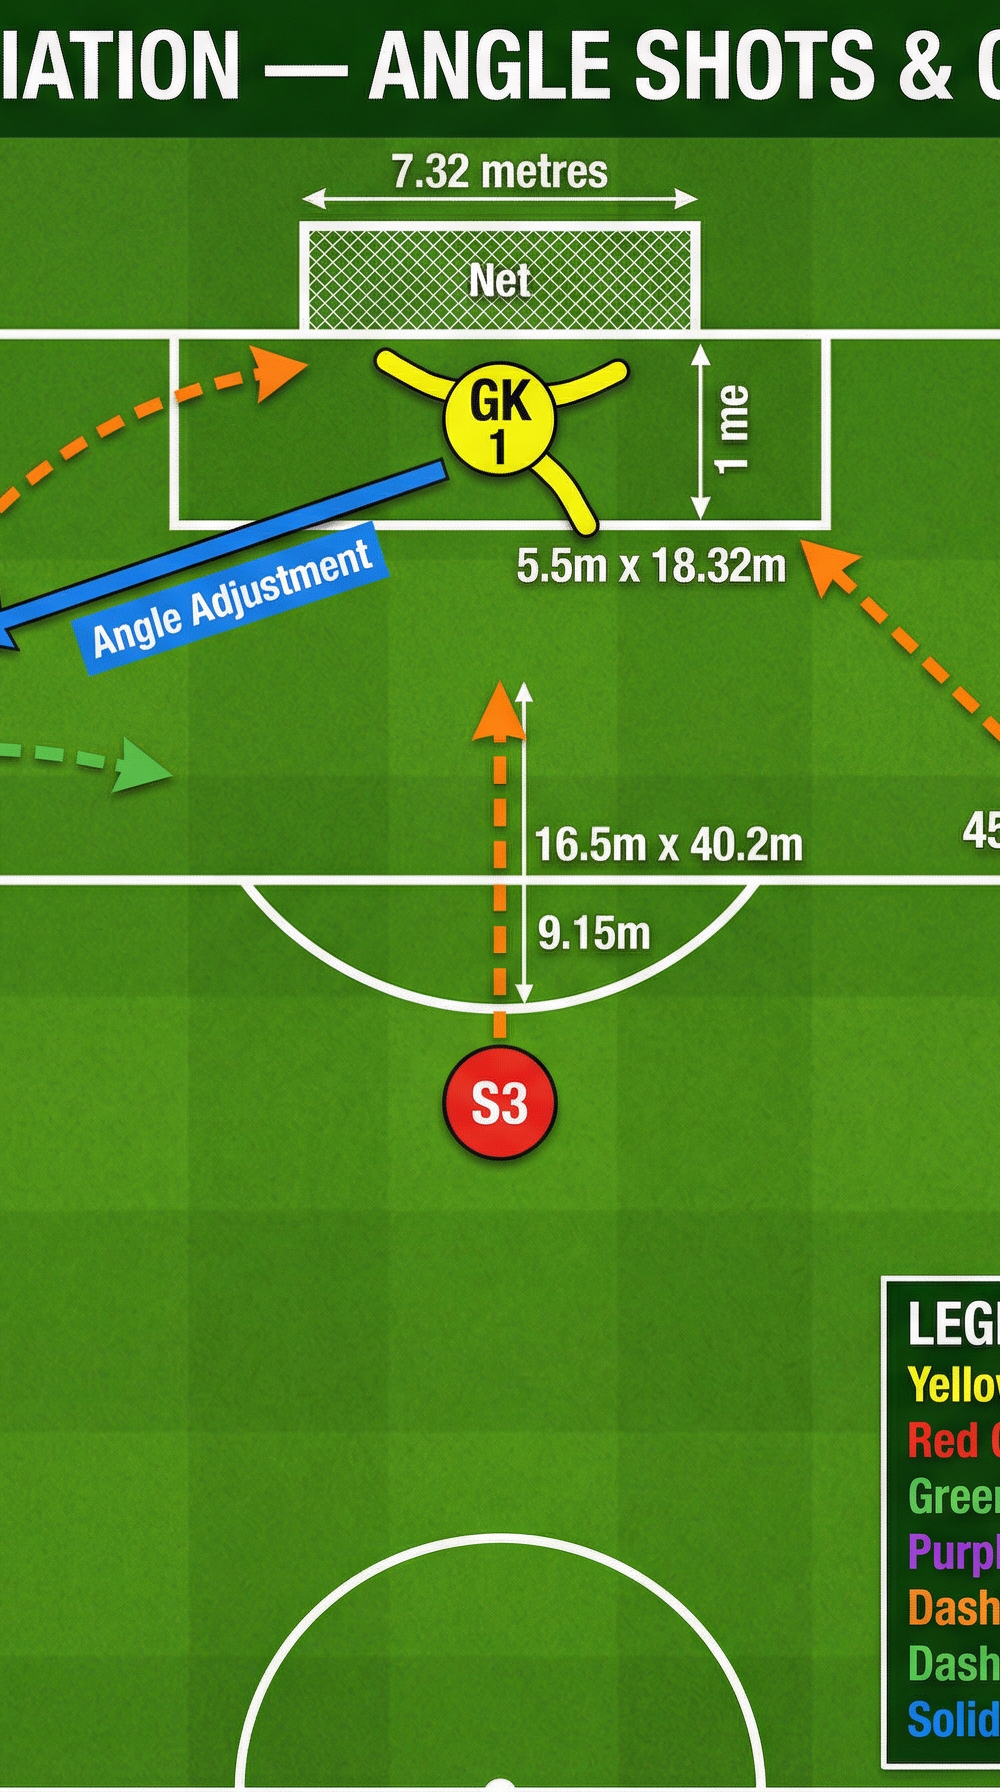
- S2 (Server 2): Positioned at the left edge of the penalty area (top of the D-arc, approx. 20m).
- S3 (Server 3): Positioned at the right edge of the penalty area.
3. Step-by-Step Instructions
Follow these steps to execute the basic phase of the drill effectively. Maintain a high tempo, but ensure the goalkeeper has a momentary pause to reset between repetitions if technique begins to falter.
- Starting Position: GK 1 begins in a dynamic, balanced set position in the centre of the goal, roughly 1 metre off the goal line. Hands should be forward, weight slightly on the balls of the feet.
- The Trigger: The coach blows the whistle or calls "Play!" S1 takes a touch out of their feet to trigger the goalkeeper's final set.
- First Phase (Central Strike): S1 delivers a firm, driven shot aimed at either the bottom left or bottom right corner. GK 1 executes the appropriate diving save (collapse dive or extension dive).
- Recovery: Immediately upon making the save (or if the ball goes out of bounds), GK 1 must rapidly recover to their feet. They must not use their hands to push up if holding the ball; instead, they should use core strength and leg drive.
- Angle Adjustment: As GK 1 recovers, S2 prepares to shoot. GK 1 must quickly shuffle laterally across the goalmouth to cover the new angle presented by S2 on the left side of the penalty area.
- Second Phase (Angled Strike): S2 strikes the ball. GK 1 must be set before the ball is struck, reacting to make the second save.
- Rotation: After the second save, GK 1 rotates out, and the next goalkeeper steps in. If working with only one goalkeeper, allow a 30-second active recovery period before repeating the sequence starting with S3.
4. Key Coaching Points
To maximize the effectiveness of this session, focus your feedback on these critical technical areas:
- The Set Position: The goalkeeper must be completely still and balanced at the exact moment the server strikes the ball. Moving while the ball is hit severely compromises reaction time and diving power.
- Footwork and Lateral Movement: Emphasize short, sharp side-steps (shuffling) rather than crossing the legs when moving across the goalmouth. The head should remain level, minimizing vertical bounce.
- Forward Momentum (Attacking the Ball): On every dive, the goalkeeper's momentum should be directed slightly forward, cutting the angle and meeting the ball in front of the body line, rather than falling backwards into the net.
- Recovery Mechanics: Teach the 'pendulum' recovery technique. After a low dive, the goalkeeper should swing their top leg forward and use their momentum to rock back onto their feet quickly, keeping their eyes on the play.
- Handling and Deflection: If the ball cannot be caught cleanly, the goalkeeper must parry it firmly away from the danger zone (wide of the posts), not back into the central area where a striker could capitalize.
5. Common Mistakes
Watch out for these frequent errors and correct them immediately:
- Cheating the Angle: The goalkeeper anticipates the second shot and begins moving towards S2 before S1 has even struck the ball, leaving the opposite corner completely exposed.
- Setting Too Deep: The goalkeeper retreats to the goal line, maximizing the target area for the shooter. Encourage them to stay 1-2 metres off the line to narrow the angle.
- Heavy Feet: The goalkeeper is flat-footed or has their weight entirely on their heels, making it impossible to generate explosive power for a dive.
- Taking Eyes Off the Ball: The goalkeeper looks away during the recovery phase, losing track of the second ball and failing to set in time for the follow-up shot.
6. Variations & Progressions
Once the basic mechanics are mastered, introduce these variations to increase cognitive load and match realism.
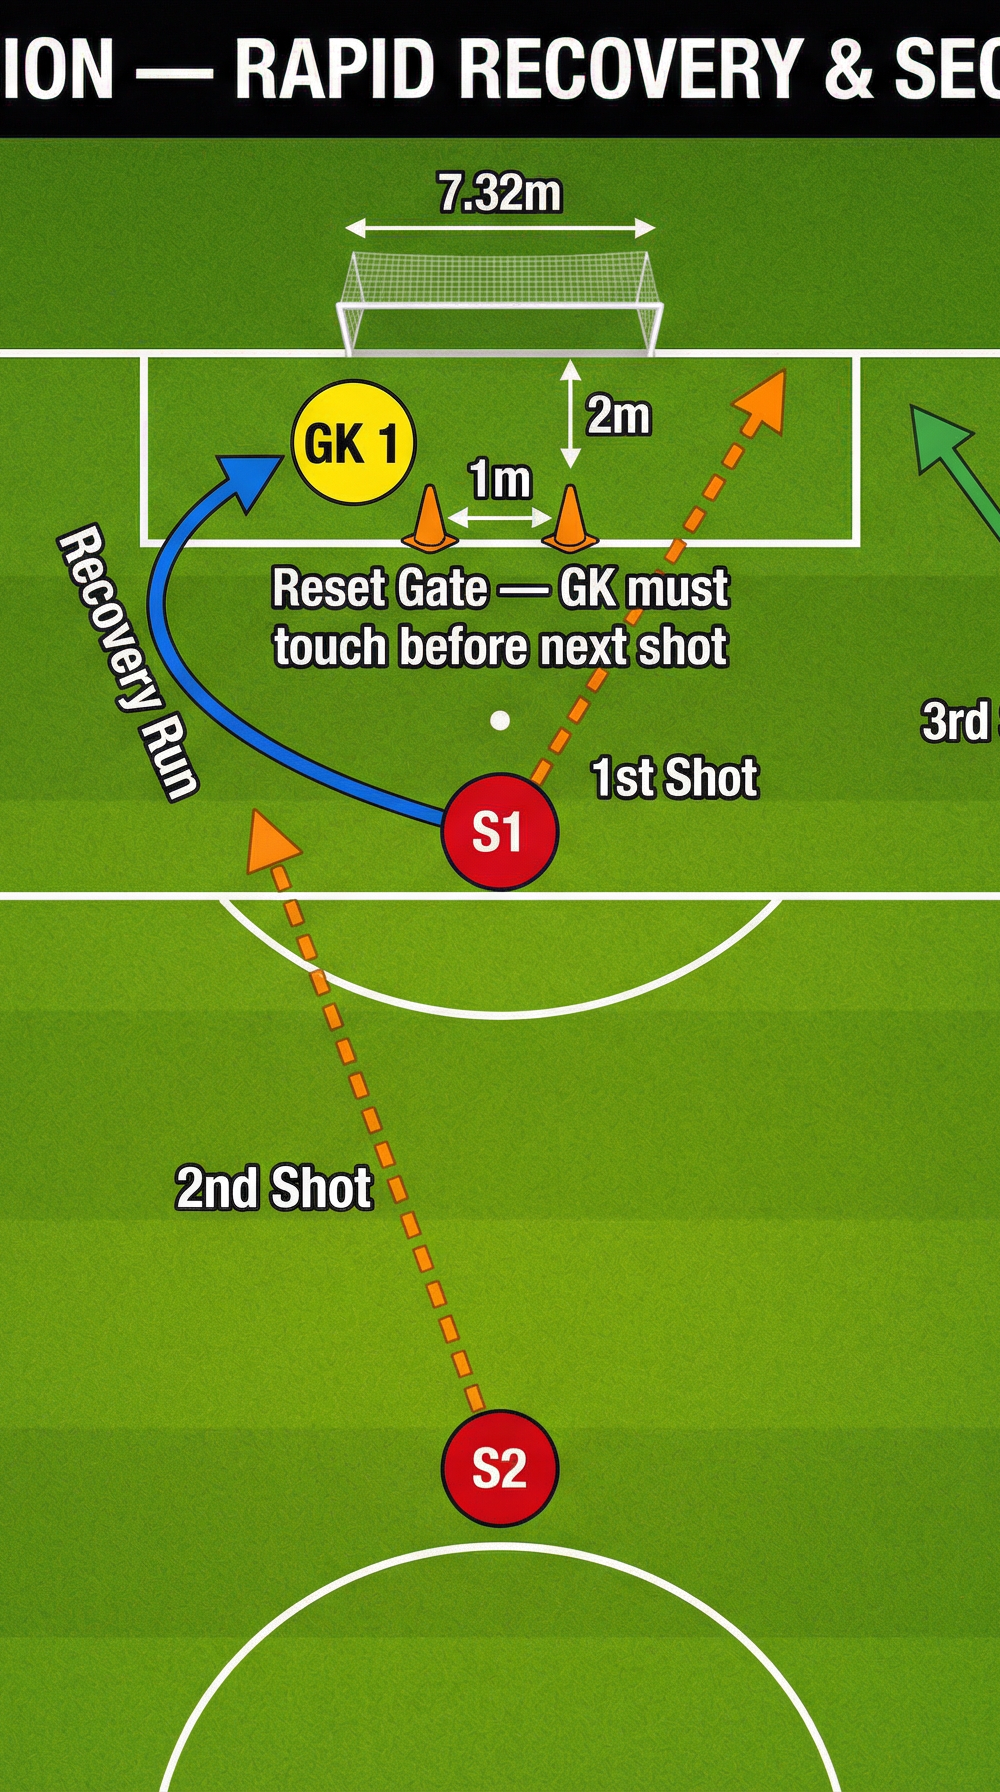
Progression 1: The Reset Gate
Place a small gate (two cones 1m apart) approximately 2m in front of the centre of the goal. After the first save from S1, the goalkeeper must sprint forward, touch one of the cones, and then rapidly backpedal and adjust their angle before S2 can shoot. This forces explosive forward and backward movement.
Progression 2: Live Rebounds (Second Ball)
Introduce a 'Second Striker' (S4) positioned inside the penalty area. If the goalkeeper parries the initial shot from S1 or S2, S4 is immediately active and attempts to score from the rebound. The drill only ends when the goalkeeper secures the ball, or a goal is scored.
Advanced Variation: Crossing Integration
Instead of S2 shooting directly, S2 plays a wide pass to a winger (W1) in a designated 'Crossing Zone'. W1 delivers a first-time cross into the six-yard box. The goalkeeper must adjust from a shot-stopping stance to a cross-collection stance, deciding whether to come and claim the cross or stay on their line.
7. Age Adaptations
Tailor the drill to suit the developmental stage of your goalkeepers:
- Under 8 - Under 10: Focus purely on the basic set position and safe handling. Reduce the distances significantly (servers at 6-8m). Use thrown serves rather than kicked shots to build confidence and ensure correct technique. Remove the rapid recovery element initially.
- Under 12 - Under 14: Introduce the angle adjustment phase, but keep the tempo manageable. Ensure the servers are accurate. Focus on the mechanics of the recovery run and getting set before the second shot.
- Under 16 - Open (Seniors): Run the drill at full match intensity. Incorporate all progressions, including live rebounds and crossing variations. Demand explosive power, vocal communication, and tactical awareness of positioning relative to the ball.