Mastering the 5-Man Lineout: Setup, Execution, and Attacking Options
Equip your team with a reliable 5-man lineout platform, covering the core lifting mechanics and three dynamic attacking options to break the gainline.

Equipment Needed
Overview
The 5-man lineout is a versatile and essential set piece in modern rugby. It provides a solid platform to secure possession while committing fewer forwards to the lineout itself, allowing for a more potent attacking backline or a stronger defensive presence in the midfield. This drill resource breaks down the fundamental mechanics of a successful 5-man lineout, focusing on the coordination between the thrower, the jumper, and the lifters. It also details three distinct attacking options to exploit the space created by this formation. By mastering this drill, coaches can ensure their team has a reliable source of primary possession and multiple threats to keep the opposition guessing.
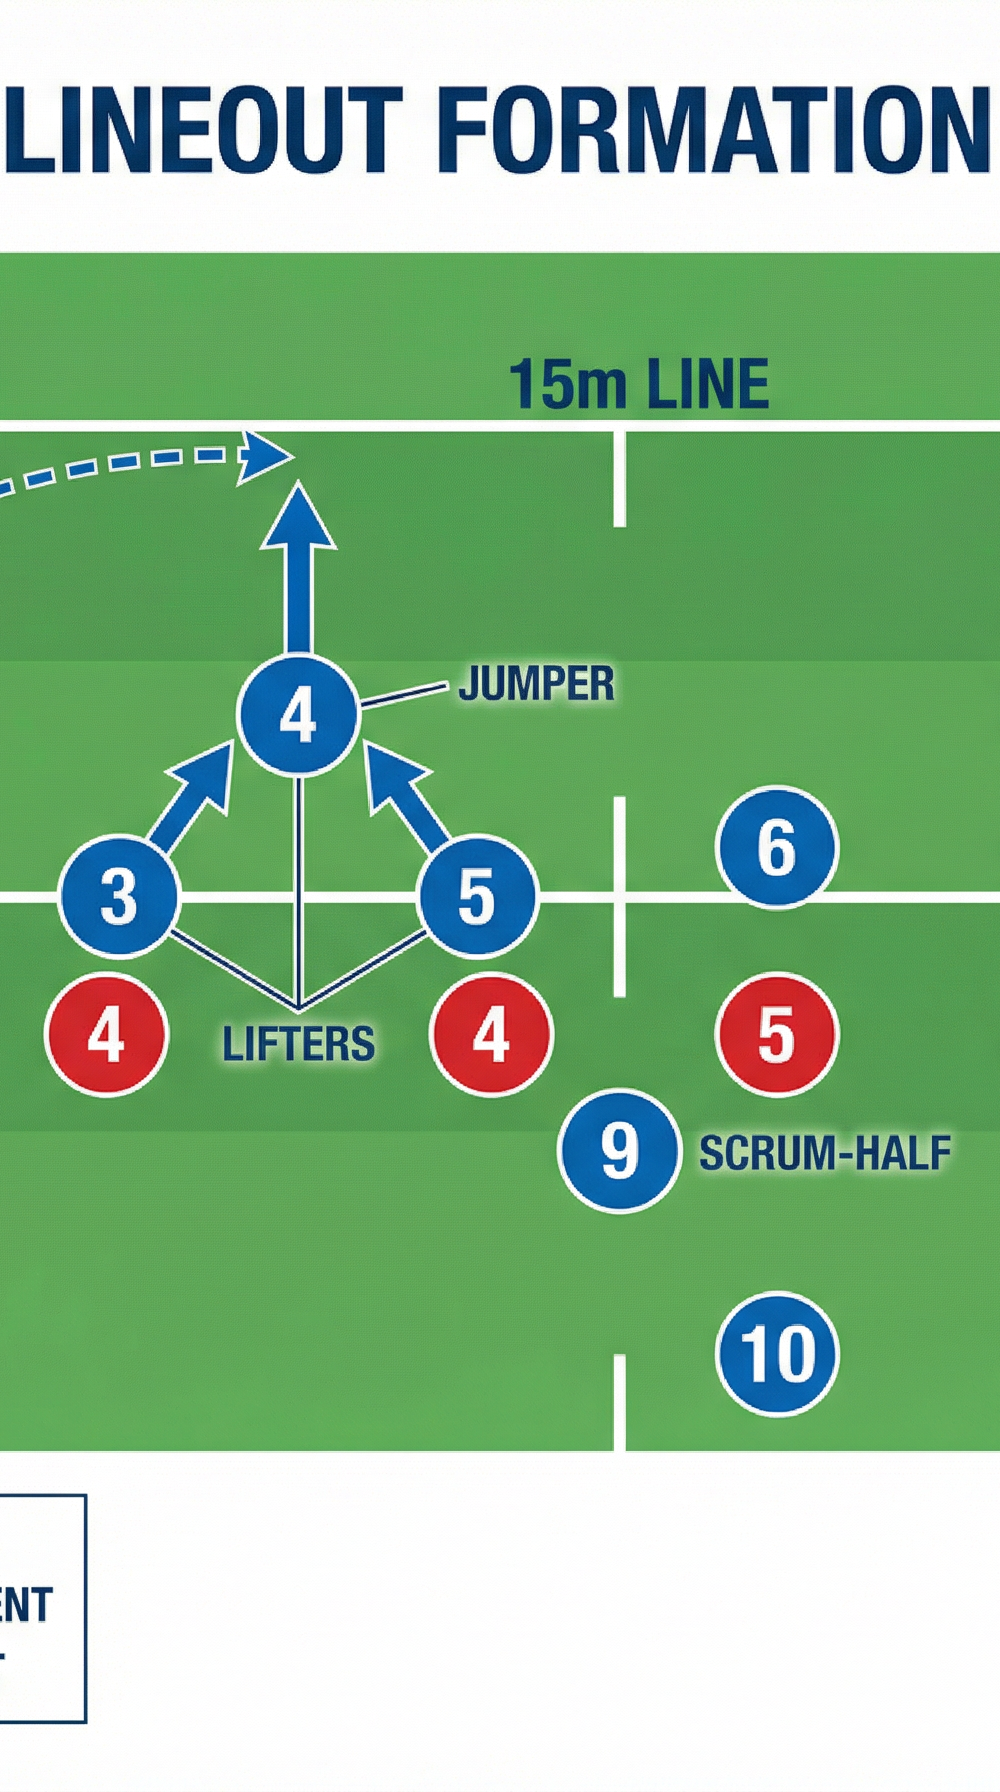
Setup

To effectively run this drill, you will need a designated area of the pitch with clear markings, specifically the touchline, the 5-metre line, and the 15-metre line. Ensure you have a minimum of 8 players for the attacking team (Hooker, two Props/Lifters, a Jumper, Scrum-half, Fly-half, and two additional forwards for the attacking options) and at least 5 players to act as the defensive lineout.
Equipment Needed
- 3-4 Rugby balls
- Training bibs (two different colours for attackers and defenders)
- Cones (optional, to mark specific running lines or defensive positions)
Pitch Setup and Player Positions
The attacking team sets up a 5-man lineout on the left side of the pitch. The Hooker (2) stands on the touchline, ready to throw. The two Lifters (typically 3 and 5) position themselves on the 5-metre line, with the designated Jumper (4) between them. The Scrum-half (9) stands approximately 2 metres behind the lineout, anticipating the catch. The Fly-half (10) aligns 10 metres back, ready to receive the ball or direct the play. The remaining forwards (6, 7, 8) position themselves strategically based on the chosen attacking option. The defending team aligns their 5 players opposite the attacking lineout.
Step-by-Step Instructions

- The Call and Movement: The lineout caller makes a clear, concise call to indicate the intended jump location and the subsequent play. The Jumper executes a sharp, deceptive movement to lose their opposite number.
- The Lift: The Jumper plants their feet and drives upwards explosively. The front Lifter grips the Jumper firmly on the lower thighs, while the rear Lifter grips just below the buttocks. Both Lifters sink their hips and drive upwards, extending their arms fully to elevate the Jumper.
- The Throw: The Hooker delivers a flat, accurate pass timed to meet the Jumper at the apex of their jump.
- The Catch and Delivery: The Jumper catches the ball cleanly with both hands at the highest point, then either brings it down to set a maul or delivers a quick pass off the top to the Scrum-half.
- Execution of the Attacking Option: The team executes one of the three pre-called attacking options.

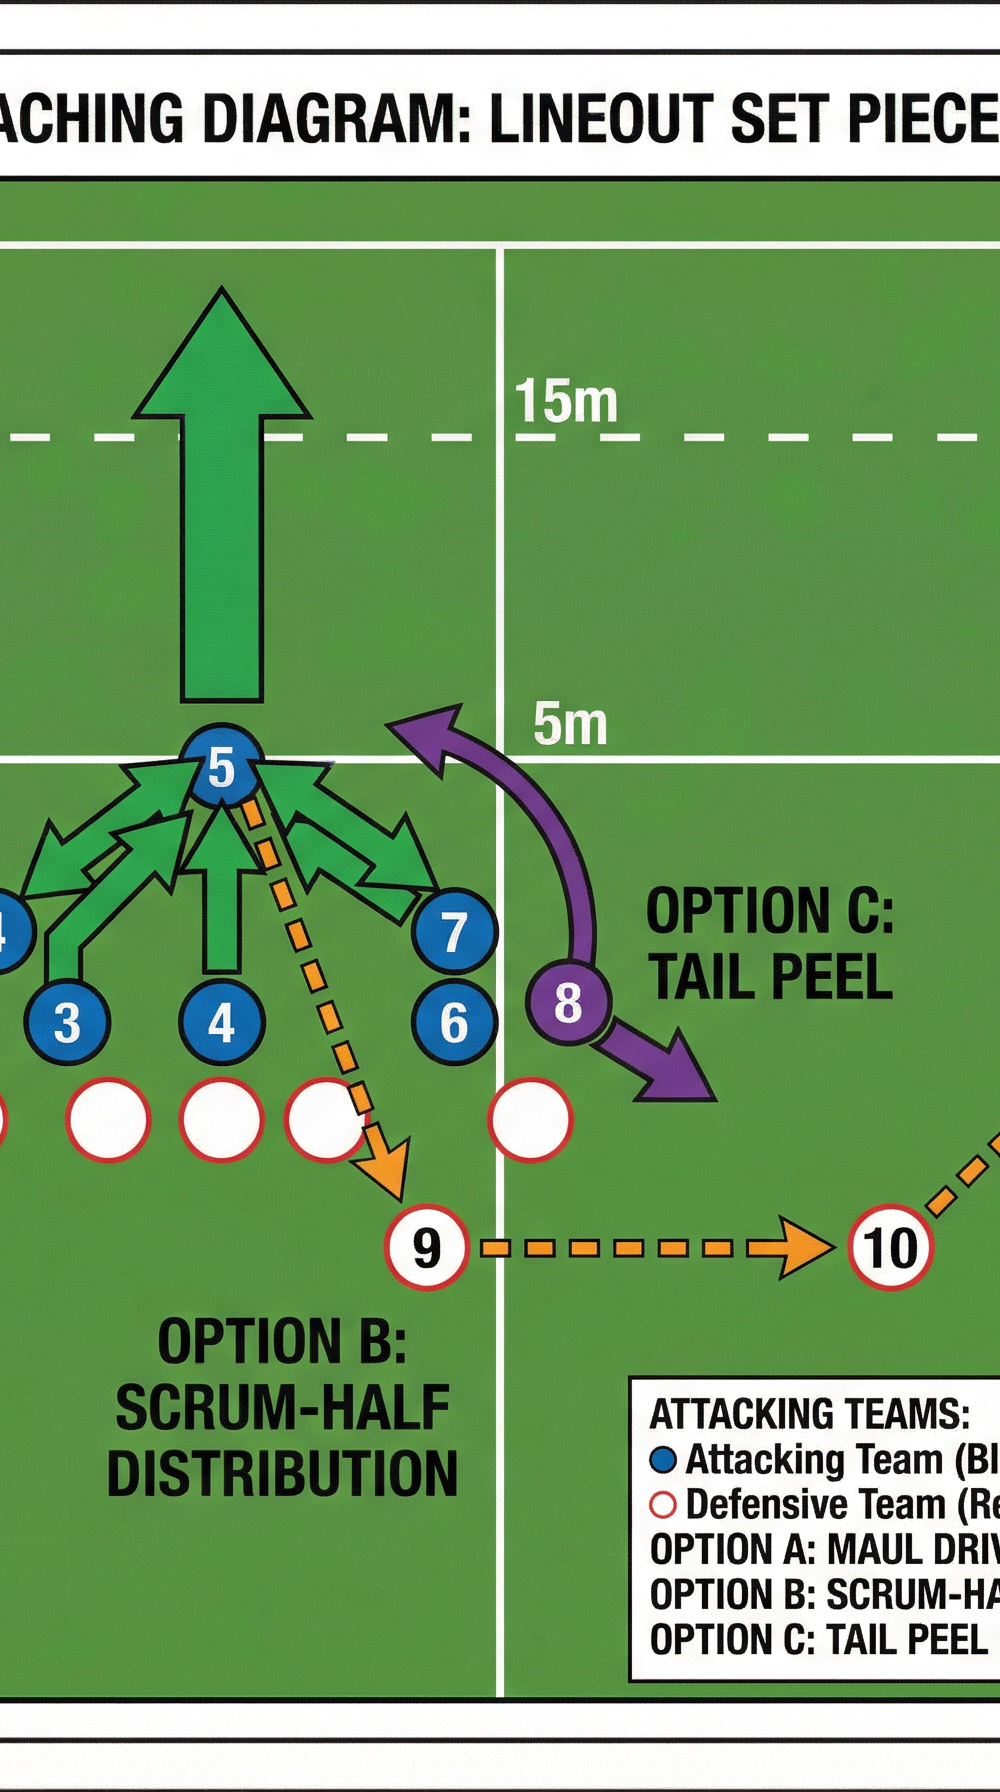
Attacking Options

Option A: Maul Drive
The Jumper secures the ball and brings it down, turning their back to the opposition. The Lifters immediately bind onto the Jumper. The remaining forwards (6, 8) drive in low and hard, forming a cohesive maul unit to gain metres.
Option B: Scrum-Half Distribution
The Jumper delivers a crisp pass off the top to the Scrum-half (9), who passes quickly to the Fly-half (10) to attack the gainline or distribute wide.
Option C: Tail Peel
The Number 8 peels rapidly around the back of the lineout, receiving a short pop pass from the Scrum-half or the Jumper, and drives hard into the space between the 15-metre line and the defending backs.
Key Coaching Points
- Synchronised Lifting: Lifters must work as a cohesive unit, dropping hips and driving upwards simultaneously.
- Explosive Jumping: The Jumper must use sharp, deceptive movements and drive upwards explosively.
- Accurate Throwing: The Hooker's throw must be precise, flat, and timed perfectly to meet the Jumper at the apex.
- Rapid Delivery: The transition from catch to the next phase must be immediate to prevent the defence from setting.
- Cohesive Binding (Maul): Binding must be tight and low, driving straight to maintain the maul's structural integrity.
Common Mistakes
- Telegraphing the Jump: The Jumper moving too early or obviously, allowing the defence to anticipate.
- Poor Lifting Technique: Lifters using only arms instead of legs and core, resulting in a low, unstable lift.
- Inaccurate Throwing: The Hooker throwing too high, too low, or not straight.
- Slow Delivery from the Top: Taking too long to deliver the ball, allowing the defensive line to advance.
- High Binding in the Maul: Joining the maul too high, making it easy for the defence to disrupt.
Variations & Progressions
- Defensive Pressure: Introduce active defenders who contest the throw and disrupt the maul or Scrum-half's delivery.
- Varying Numbers: Practice with 4-man or 6-man lineouts to develop tactical flexibility.
- Alternative Throwing Options: Incorporate throws to the front or tail of the lineout.
Age Adaptations
- Under 12s: Focus on fundamental throwing and catching mechanics without lifting. Introduce basic movement patterns and simple distribution.
- Under 14s: Introduce assisted lifting (if permitted by local regulations), emphasising safety and coordination.
- Under 16s and Above: Implement full lifting and complex attacking options with active defensive pressure to simulate match conditions.