Defensive Line Speed and Alignment: The Blitz & Drift Drill
Master defensive line speed and alignment to suffocate attacking space, force errors, and dominate the gain line.

Equipment Needed
1. Overview
Dominating the gain line is non-negotiable in modern Rugby. A well-organized, aggressive defensive line suffocates attacking space, forces errors under pressure, and ultimately wins turnovers. The Defensive Line Speed and Alignment Drill is designed to develop synchronized defensive movement, emphasizing rapid line speed (the blitz) off the mark, maintaining horizontal alignment, and executing effective drift mechanics when the attack shifts wide.
This drill bridges the gap between static defensive theory and live-game application. It challenges players to communicate effectively, trust their inside defenders, and make split-second decisions under fatigue. By consistently running this drill, coaches can instill a proactive defensive mindset that dictates terms to the opposition rather than reacting to them.
2. Setup
Proper setup is crucial for replicating game-realistic scenarios. Ensure the pitch dimensions are strictly adhered to, as this dictates the space attackers have and the speed defenders must generate.
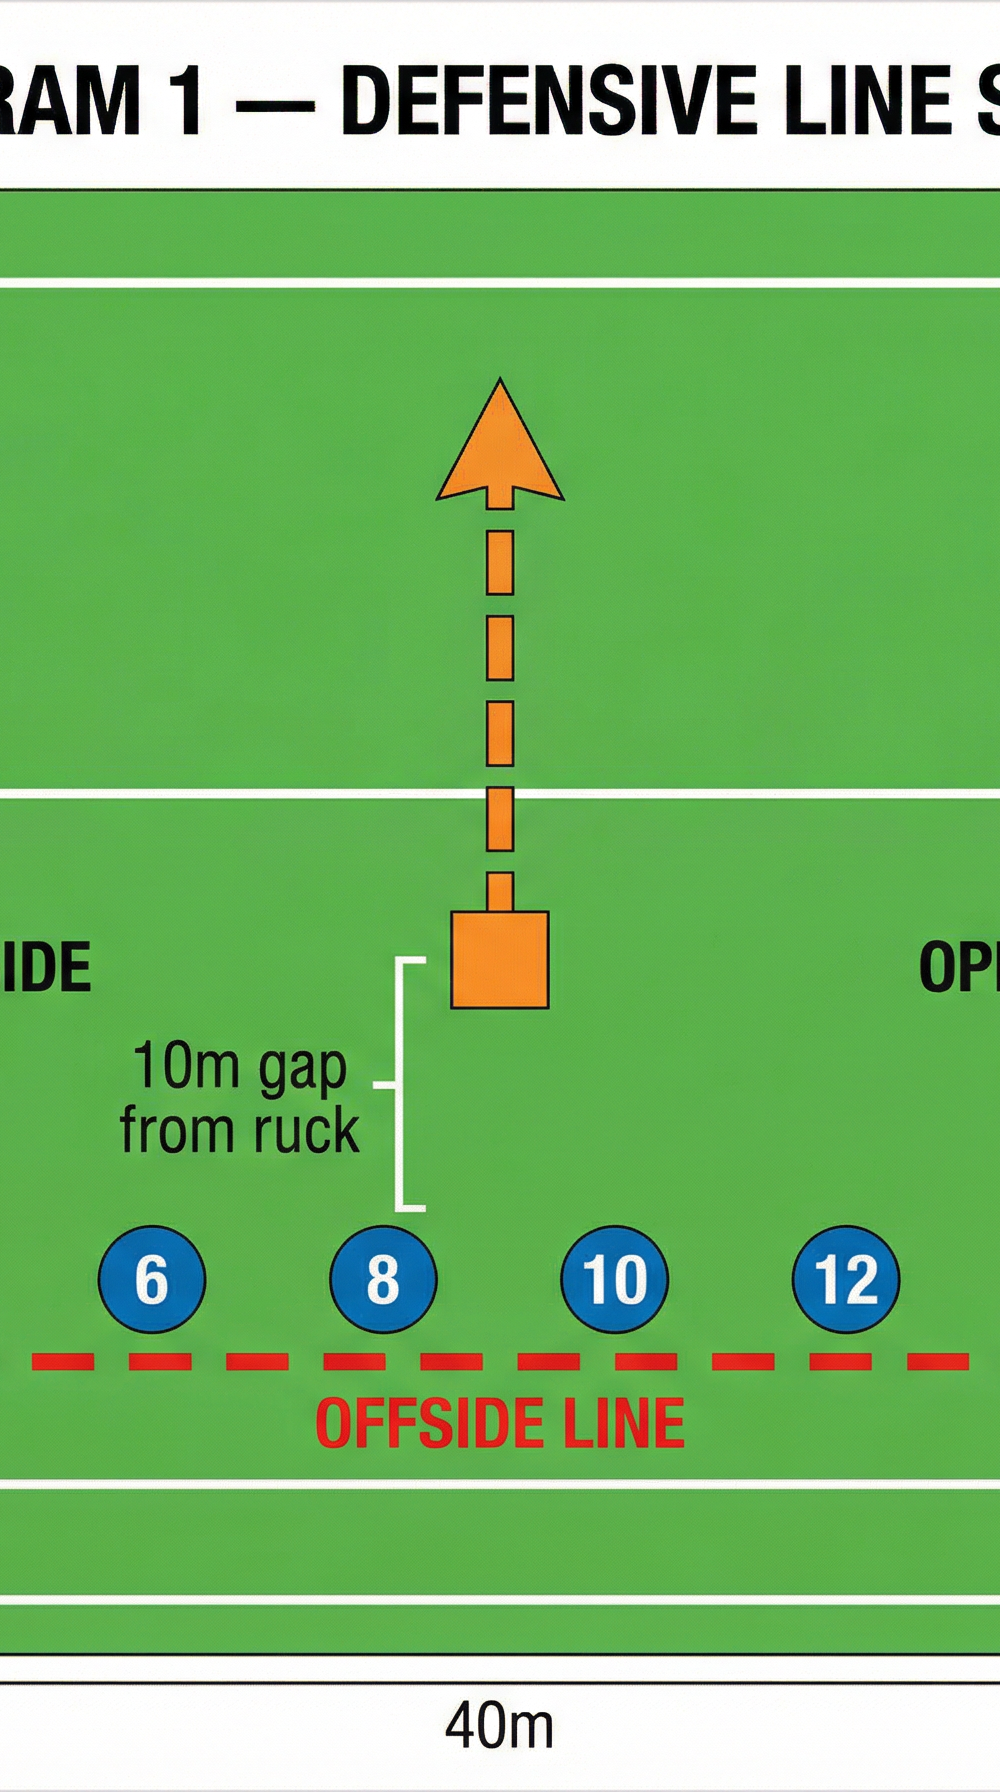
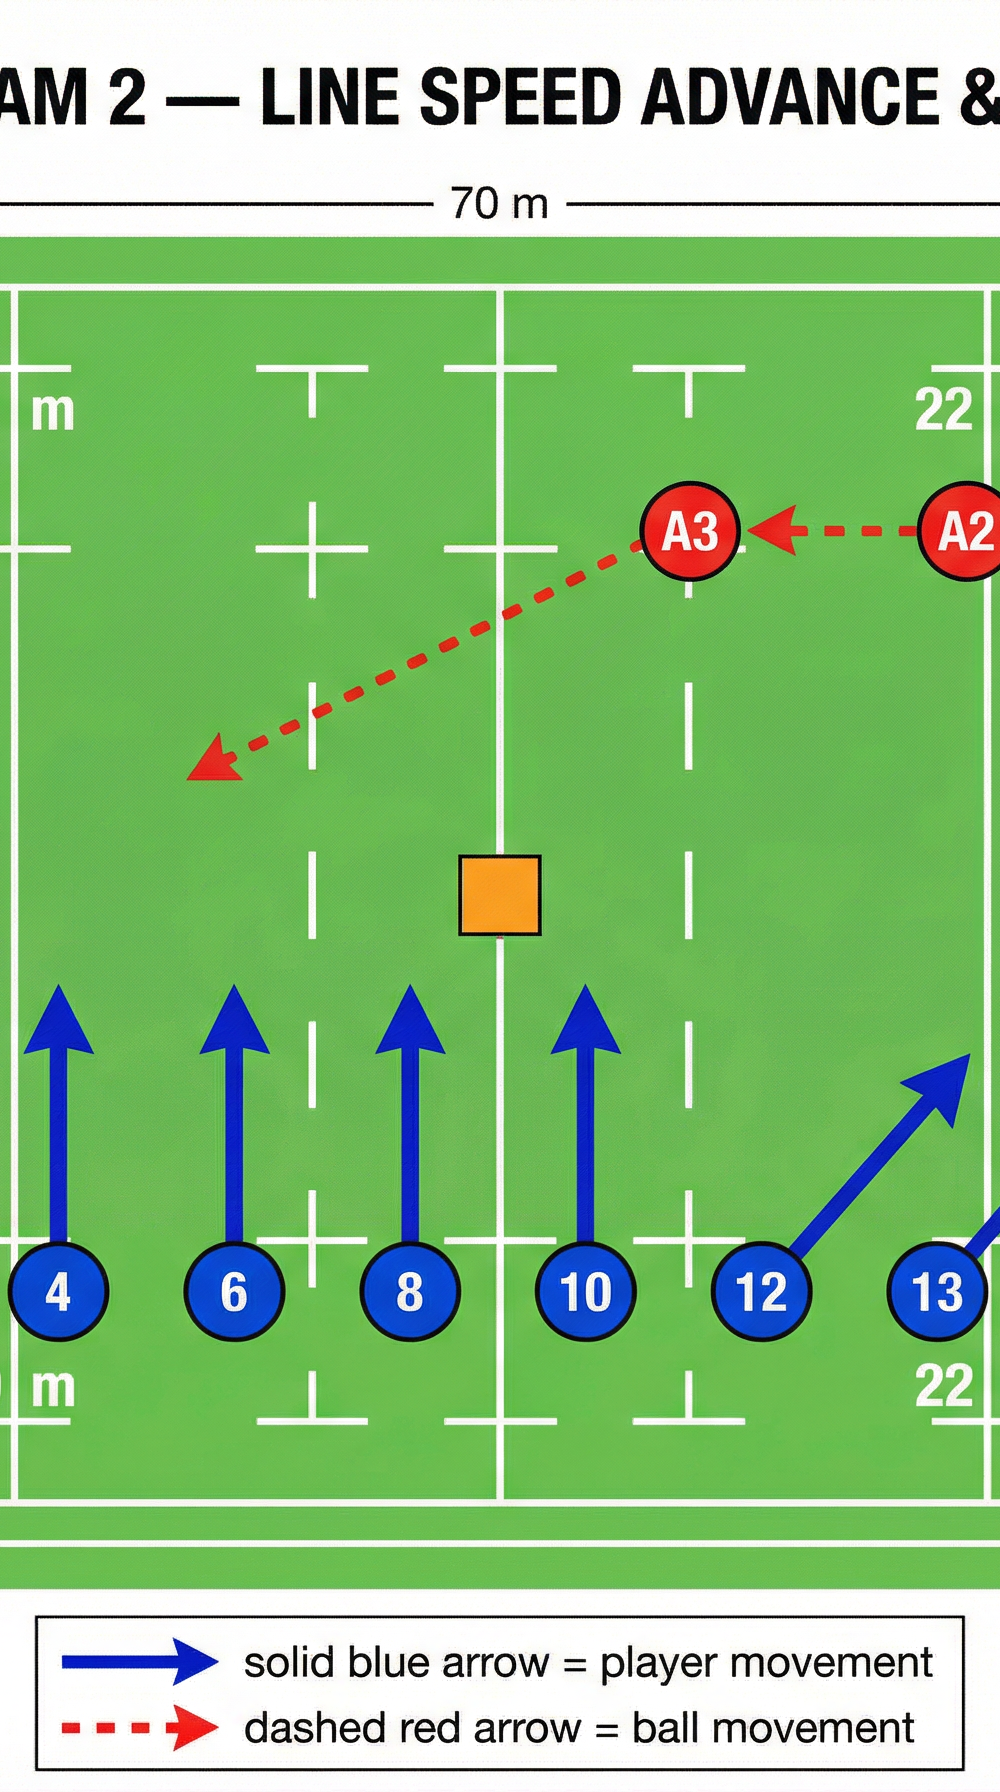
- Pitch Area: A 40m wide by 70m long section of the pitch. Use the 22m line and halfway line as natural boundaries if available.
- Equipment Needed: 15-20 marker cones (preferably two different colours), 3-4 rugby balls, and coloured bibs to distinguish attackers from defenders.
- Player Numbers: Minimum 13 players (8 defenders, 5 attackers). Can be scaled up to full 15 vs 15.
- Initial Positioning:
- Defenders: 8 players (typically numbers 2, 4, 6, 8, 10, 12, 13, 15) form a flat horizontal line exactly 10 metres behind the designated ruck area. They must span the width of the playing area.
- Attackers: 5 players (A1 to A5) positioned in a staggered attacking formation on the opposite side of the ruck, ready to receive the ball.
- Ruck Point: Mark a clear ruck point in the centre of the 40m width using a distinct cone or a tackle bag.

3. Step-by-Step Instructions
The drill progresses from unopposed shadow movements to live, full-contact scenarios. It is vital to master the mechanics before adding opposition.
Phase 1: Shadow Movement (Unopposed)
- The Call: The coach (acting as the scrum-half at the ruck) shouts "SET!" The defensive line must immediately establish their 10m offside line, ensuring they are perfectly flat.
- The Advance: On the coach's whistle or "UP!" call, the entire defensive line sprints forward aggressively. The goal is to cover 5-7 metres as rapidly as possible.
- The Hold/Drift: After the initial sprint, the coach signals either a breakdown (whistle) or a wide pass (points left or right). If a wide pass is indicated, the line must seamlessly transition into a drift defence, maintaining their spacing while moving diagonally to push the imaginary attack toward the touchline.
- The Reset: On the second whistle, the line must sprint backward, constantly scanning the attacking side, and reset perfectly on the new 10m offside line within 5 seconds.

Phase 2: Live Attack vs Defence
- Initiation: Introduce the 5 attackers. The coach feeds the ball to the attacking scrum-half (A1).
- Line Speed: As soon as the ball leaves the ruck, the defensive line must launch forward. The focus is on the middle three defenders (the 'Communication Zone') leading the line speed.
- Decision Making: The attackers attempt to break the line using switch passes, dummy runners, or wide distribution. The defenders must read the play, communicate threats, and decide whether to blitz the ball carrier or drift with the pass.
- The Collision: If a tackle is made, the drill immediately resets. The tackler and assist tackler must roll away quickly, while the rest of the line scrambles back to establish the new offside line 10m back.

4. Key Coaching Points

- "Eyes Up, Hips Square": Defenders must advance with their hips facing straight up the pitch, not turned sideways. This prevents attackers from easily stepping inside them. Eyes must constantly scan between the ball carrier and their immediate attacking threat.
- The 'Arrowhead' Formation: While the line should be flat initially, the defenders closest to the ruck (the 'guards' and 'bodyguards') should slightly lead the advance, creating a subtle arrowhead shape. This naturally funnels the attack wider and cuts off inside passing options.
- Relentless Communication: The defensive line is only as strong as its communication. Players must constantly call out their nominated attacker (e.g., "I've got ball!", "I've got inside!"). Silence is the enemy of a good defence.
- Sprint to Reset: The drill isn't over when the tackle is made. The speed at which the defensive line retreats, reorganizes, and sets the new offside line is often the difference between conceding a try and winning a turnover on the next phase.
5. Common Mistakes

- Dog-Legging: This occurs when one or two defenders rush up faster than the rest of the line, creating a jagged shape. This opens up massive gaps ('dog-legs') for attackers to exploit.
- Ball Watching: Defenders become fixated on the ball carrier and lose sight of the attackers running lines outside them, leading to easy overlaps.
- Passive Reset: Jogging or walking back to the offside line after a phase. This allows the attack to launch their next wave against an unorganized defence.
- Over-Drifting: Drifting too early or too fast before the ball has actually been passed wide, opening up dangerous cut-back lanes for the ball carrier.
6. Variations & Progressions

- Overload the Attack: Progress the drill by adding more attackers (e.g., 8 defenders vs 10 attackers). This forces the defence to work harder on their drift mechanics and decision-making under severe numerical pressure.
- Fatigue Factor: Before initiating the drill, have the defensive line complete a set of burpees or down-ups. This simulates late-game fatigue and tests their ability to maintain structure and communication when tired.
- Kicking Threat: Introduce an attacker who has the option to grubber or chip kick behind the advancing line. This forces the back three (15, and wingers if included) to constantly adjust their pendulum coverage while the main line advances.
7. Age Adaptations

- Under 10s - Under 12s: Focus purely on the concept of a flat line and moving forward together. Use walking or jogging paces initially. Replace tackling with two-handed touch to emphasize positioning over physicality.
- Under 14s - Under 16s: Introduce the drift mechanics and emphasize the importance of the 'Communication Zone'. Begin incorporating full-contact tackles, but keep the attacking options relatively simple (e.g., standard hands down the line).
- Open / Senior: Full speed, full contact, with complex attacking structures (decoy runners, loop passes). Emphasize the speed of the reset and the aggressive nature of the initial blitz.