Rugby
Drill
intermediate
Mastering the Offload in Contact: Breaking the Gainline
Develop your players' ability to keep the ball alive through contact with this comprehensive offloading drill, designed to break defensive lines and maintain attacking momentum.
May 1, 20265 min read20 min drill6 players

Equipment Needed
Cones
Rugby balls
Tackle shields (optional)
Bibs
1. Overview
The "Offloading in Contact" drill is designed to develop a player's ability to keep the ball alive through contact. In modern rugby, the ability to offload effectively breaks defensive lines, creates overlaps, and maintains attacking momentum. This drill focuses on the ball carrier's body position going into contact, ball security, and the timing and execution of the offload to a supporting runner. It is ideal for breaking down well-organised defences and capitalising on half-breaks.
2. Setup
Equipment Needed:
- 8-10 cones for marking the grid
- 2-3 rugby balls
- Tackle shields or hit shields (optional for defenders)
- Bibs for defenders
Pitch Setup:
- Mark out a 20m x 15m grid for Drill 1 (Basic Pattern).
- Mark out a 30m x 20m grid with a 10m inner channel for Drill 2 (Channel Offload).
Player Positions:
- Attackers: Groups of 3-4 players (e.g., Inside Centre (12), Outside Centre (13), Wing (14)).
- Defenders: 1-2 defenders (D1, D2) positioned in the middle of the grid.
3. Step-by-Step Instructions
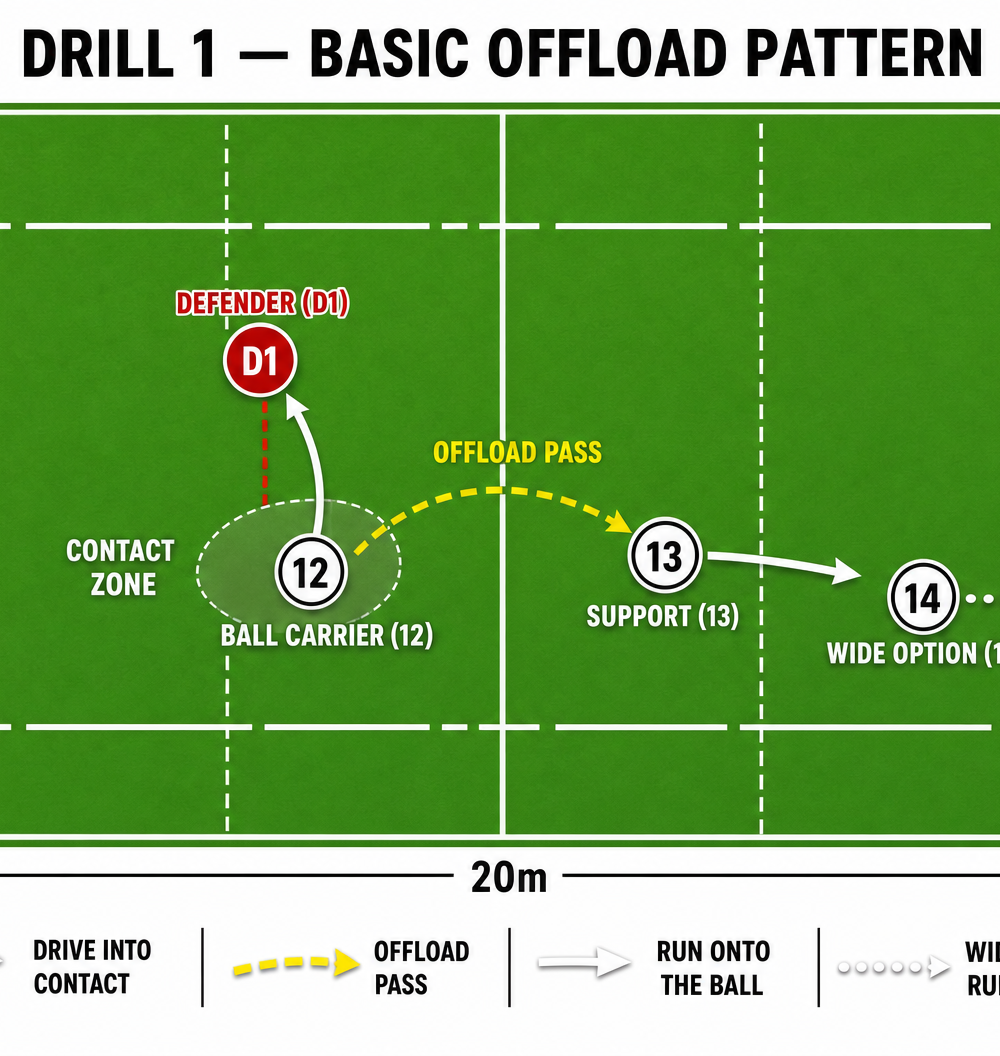
Drill 1: Basic Offload Pattern

- Starting Position: Three attackers line up at one end of the 20m x 15m grid. One defender (D1) stands in the middle.
- The Approach: The ball carrier (12) runs hard and straight at the defender (D1).
- The Contact: The ball carrier drives into the defender, ensuring they win the collision by staying low and driving their legs.
- The Offload: As the ball carrier goes into contact, they must keep their arms free. They execute a one-handed or two-handed offload to the support runner (13).
- The Support: The support runner (13) must communicate early, time their run to arrive at pace, and receive the ball cleanly.
- The Finish: The support runner (13) accelerates away, with the wide option (14) running a supporting line.
Drill 2: Channel Offload with Support Runners
- Starting Position: Set up a 10m channel within a 30m x 20m grid. Place two defenders (D1, D2) in the channel.
- The Attack: The ball carrier (e.g., Number 8) attacks the channel, targeting the space between or the inside shoulder of D1.
- Tight Support: A support player (e.g., Flanker 6) runs a tight line on the ball carrier's shoulder, anticipating an immediate offload.
- Wide Support: A second receiver (e.g., Inside Centre 12) runs a wider arc, offering an option if the tight offload is covered.
- Execution: The ball carrier engages D1, wins the contact, and offloads to the tight support (6).
- Continuation: The tight support (6) then has the option to carry or pass to the wider support runners (12 or 7) depending on D2's movement.
4. Key Coaching Points
- Win the Collision: The ball carrier must dominate the contact area. Low body height, leg drive, and forward momentum are crucial. If you go backward, do not offload.
- Ball Security: Keep the ball secure in two hands until the last possible moment. Only release one hand for the offload when the arms are free from the tackle.
- Keep Arms Free: The ball carrier must fight to keep their arms free above the tackle line. Fend or bump the defender to create space for the pass.
- Support Lines and Timing: Support players must read the ball carrier's body language. They should run 'L' lines (deep then accelerating onto the ball) rather than flat lines.
- Communication: Support players must be vocal ("Left!", "Right!", "Pop!"). The ball carrier needs to know where the support is without looking.
5. Common Mistakes
- Forcing the Offload: Attempting an offload when the tackle is dominant or arms are wrapped. This leads to knock-ons and turnovers. Correction: Coach players to take the tackle and present the ball if the offload isn't on.
- Flat Support Lines: Support players running too flat, meaning they overrun the ball carrier or receive the ball standing still. Correction: Emphasise depth and accelerating onto the ball.
- Poor Ball Presentation: Throwing a 'hospital pass' or a blind offload. Correction: The ball carrier must look at the target and deliver a sympathetic, soft pass.
- Upright Body Position: Going into contact too high, allowing the defender to wrap the ball and the player. Correction: Focus on dropping body height before contact.
6. Variations & Progressions
- Progression 1: Add a Sweeper. Introduce a second defender behind the initial defensive line to challenge the support runner's decision-making after receiving the offload.
- Progression 2: Full Contact. Move from touch/grab to full contact tackles to test the offload under realistic match pressure.
- Variation 1: Constraint-Led. The ball carrier is only allowed to offload out of the back of the hand, forcing them to turn their body in contact.
- Variation 2: Time Limit. The attack has 5 seconds to score, encouraging high tempo and rapid support lines.
7. Age Adaptations
- Under 8s - Under 10s: Focus on two-handed pop passes before contact. Avoid full contact; use tag or touch. Emphasise support players being close to the ball carrier.
- Under 12s - Under 14s: Introduce the one-handed offload. Focus heavily on winning the collision first. Use hit shields for defenders to build confidence in contact.
- Under 16s - Open: Full contact, high intensity. Focus on decision-making (when to offload vs when to go to ground) and complex support lines (dummy runners, tip-on passes).