Kick Chase & Catch: Dominating the Aerial Battle
Master the high ball with this complete kick-chase drill that sharpens kicker accuracy, chaser timing, and catcher composure under pressure — ready to run at your next training session.

Equipment Needed
Overview
The Kick Chase and Catch drill is one of the most tactically significant exercises you can run in a Rugby training session. It simultaneously develops three critical match skills: the kicker's ability to deliver a contestable up-and-under, the chase line's timing and lane discipline, and the receiver's composure when fielding under pressure. In modern Rugby, the aerial battle is a genuine weapon — teams that win the high ball consistently generate turnovers, territory, and momentum shifts. This drill replicates that contest in a controlled, progressive environment.
Use this drill during the skills phase of your session (typically 15–20 minutes in), after players are warmed up but before fatigue compromises technique. It is equally effective as a standalone unit or as the foundation for a broader kicking game structure. It suits all levels from Under-12 through to senior club and representative Rugby.
Setup

Equipment Required
- 6–8 Rugby balls
- 16 flat marker cones
- 4 tall poles or tall cones (optional, to mark the landing zone)
- Coloured training bibs (2 colours)
- Whistle
Pitch Setup
Use a 40m x 70m section of the full 100m x 70m pitch, centred around the halfway line and extending into one team's 22m zone. Mark the following zones with cones:
| Zone | Description | Dimensions |
|---|---|---|
| Kick Zone | Where the kicker operates | 10m wide, 5m deep, centred on the 15m channel |
| Chase Corridor | The lane each chaser runs | Full width (70m), 30m long from kick point to landing zone |
| Landing Zone | Target area for the kick | 10m x 10m square, 5–8m inside the opposition 22m line |
| Decision Zone | Where the catcher makes their choice | 5m radius around the landing zone |
Player Positions
Kicking Team (Red bibs): Position 10 (Fly-half) as the primary kicker, with 11 (Left Wing), 14 (Right Wing), 13 (Outside Centre), 12 (Inside Centre), and 15 (Fullback) as chasers spread across the width of the pitch in a flat line, 5m behind the kicker.
Receiving Team (Blue bibs): Position 15 (Fullback) as the primary catcher, 14 (Right Wing) and 13 (Outside Centre) as secondary catchers/support runners, and 9 (Scrum-half) as a sweeper 5m behind the catch point.
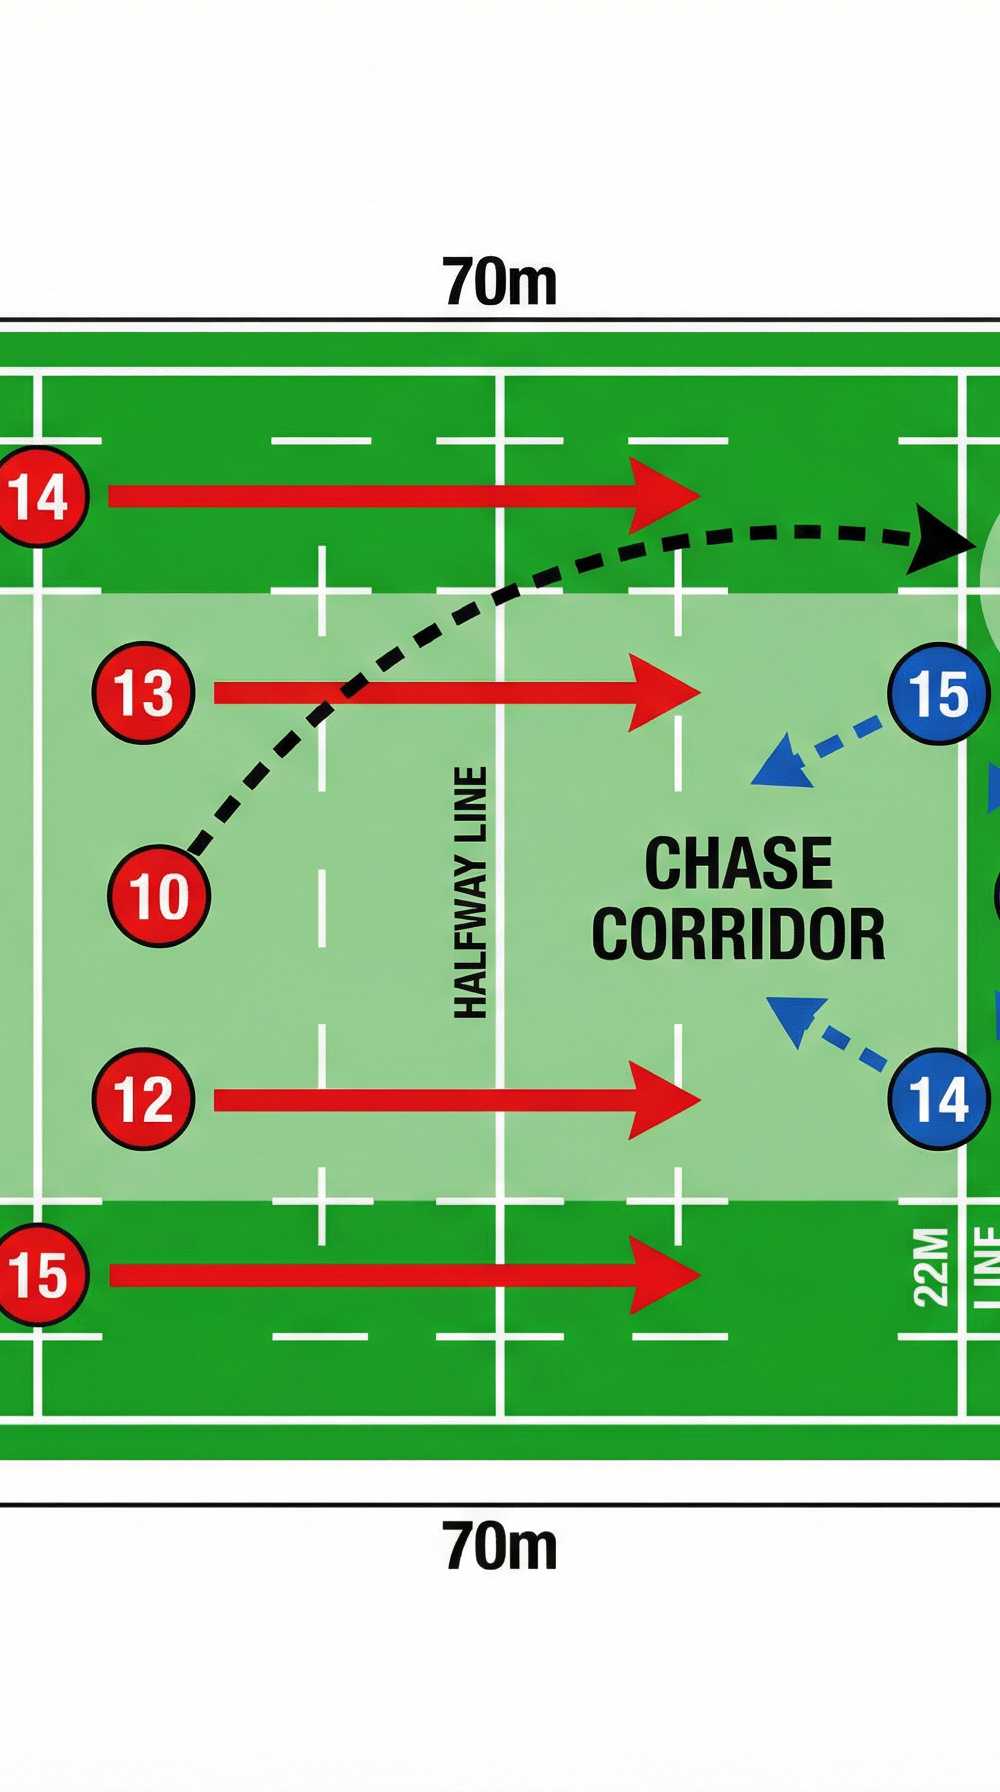
Diagram 1: Initial setup showing the kick zone, chase corridor, and landing zone. Red arrows indicate chaser sprint paths; the dashed black arc shows the ball trajectory from the kicker (10) to the landing zone.
Step-by-Step Instructions

Step 1 — Establish the chase line. Before the drill begins, walk your chasers (11, 14, 13, 12, 15) through their starting positions. They should form a flat line across the full width of the pitch, each player in their positional channel. Emphasise that no chaser may advance beyond the kicker's position until the ball is kicked — this is both a drill rule and a Law of the game.
Step 2 — Signal and kick. The coach calls "Set!" to alert both teams. The kicker (10) receives a pass from a feeder standing 3m to their left, takes one step, and executes a high up-and-under kick targeting the landing zone. The kick should have a minimum hang time of 3.5 seconds — coach the kicker to prioritise height over distance at this stage.
Step 3 — Chase line advances. The moment the ball leaves the kicker's boot, all five chasers sprint forward in their designated lanes. The two widest chasers (11 and 14) are responsible for cutting off the sideline escape routes. The two middle chasers (13 and 12) aim to arrive at the landing zone within 1–2 seconds of the ball. The fullback (15) holds slightly deeper to cover a chip or re-kick.
Step 4 — Catcher receives under pressure. The receiving fullback (15) calls "Mine!" loudly to claim the ball, positions under it with feet shoulder-width apart, and catches with both hands extended above the head. They must make a clear decision: catch and present for a ruck, catch and counter-attack, or deliberately knock the ball dead if the catch is unsafe.
Step 5 — Decision and counter-attack. Once the catch is made, the catcher has 2 seconds to make a decision. If the chasers have not arrived, they counter-attack using the support runners (13 and 14) on either side. If chasers are arriving, they present the ball cleanly to the ground for the sweeper (9) to clear.
Step 6 — Reset and rotate. After each repetition, rotate kickers and catchers so all players experience both roles. Run 3 sets of 5 kicks per rotation. Allow 20 seconds between kicks for players to reset positions.

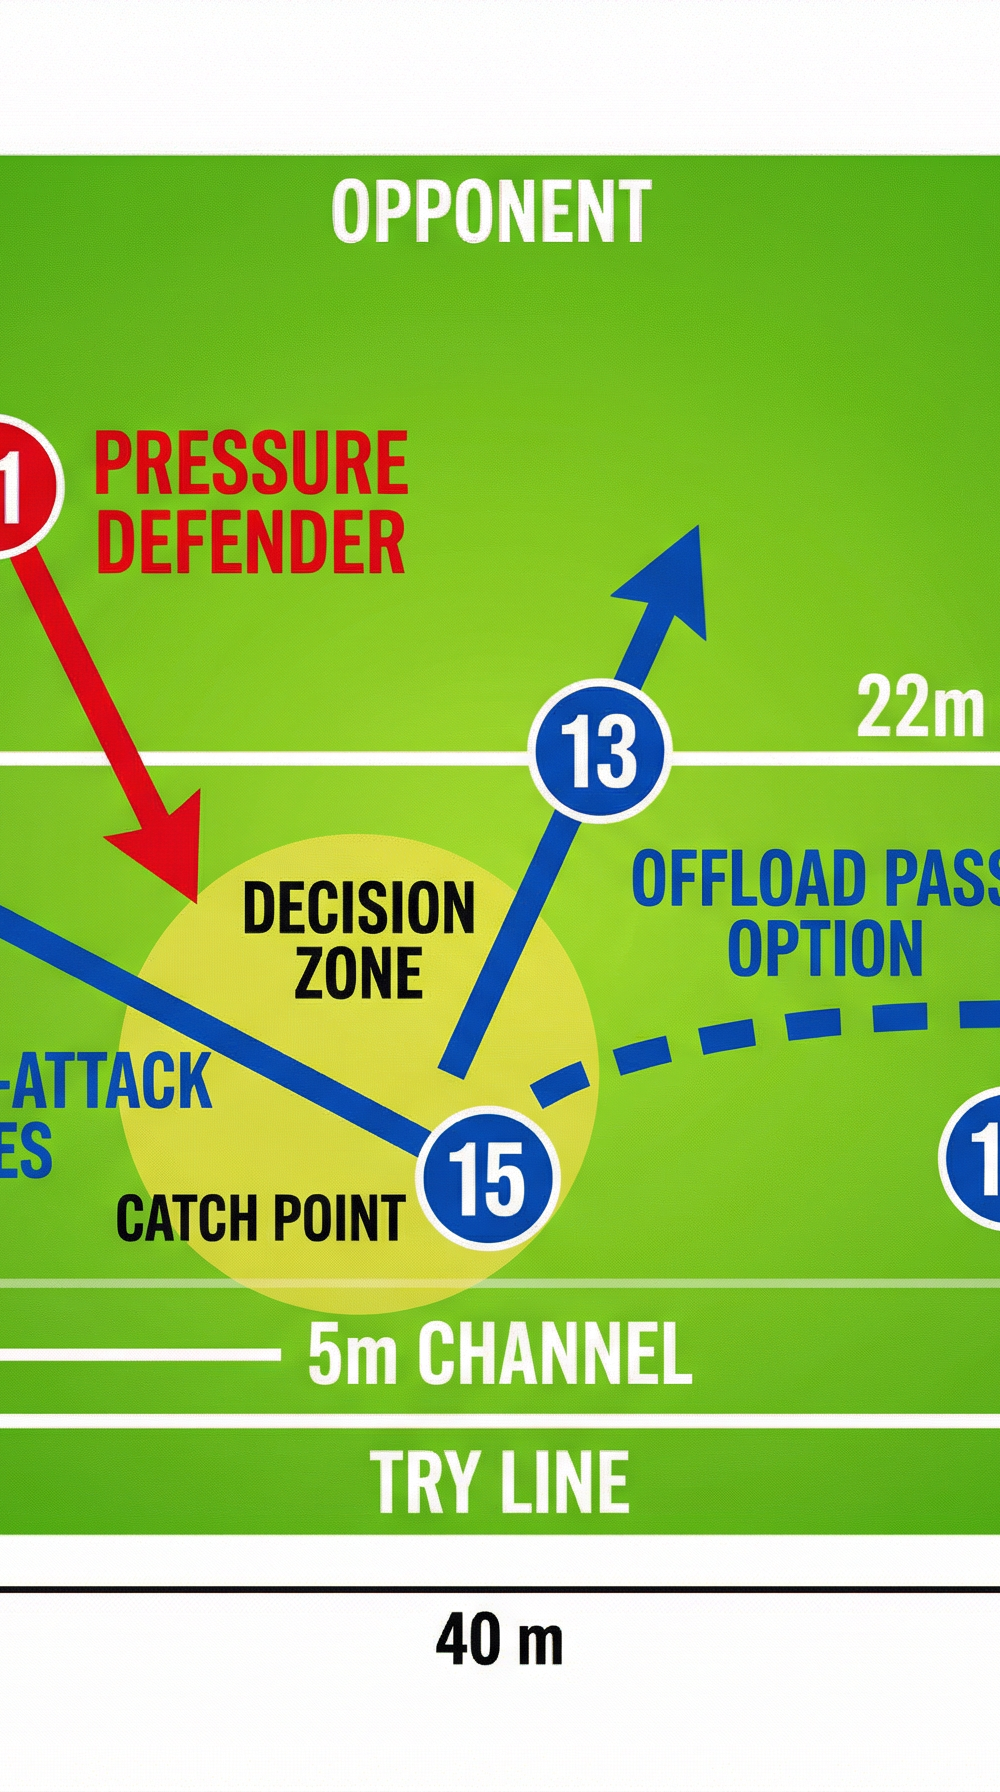
Diagram 2: Counter-attack phase after a successful catch. The catcher (15) is in the Decision Zone with two support runners (13 and 14) offering counter-attack lines. The dashed blue arrow shows the offload pass option to 14. The pressure defender (11) is closing from the left.
Key Coaching Points

1. Kick quality is the foundation. A chase drill is only as good as the kick that starts it. Coach the fly-half (10) to kick for hang time first, accuracy second. A kick that drops short with 4 seconds of hang time is more valuable than a precise kick that arrives in 2 seconds. Cue: "Kick it to the sky, not to the try line."
2. Chase line integrity — stay flat, stay connected. The most common breakdown in this drill is chasers running at different speeds and creating gaps. Insist that the chase line advances as a unit. The fastest chaser should regulate their pace to stay connected with the line. A broken chase line creates space for the counter-attack. Cue: "Chase as a wall, not as individuals."
3. Lane ownership. Each chaser owns a 14m-wide lane across the 70m pitch. They must not drift out of their lane to chase the ball — their job is to cover their zone and force the catcher into a decision. The widest chasers (11 and 14) must stay tight to the touchline to eliminate the sideline option.
4. Catcher communication — call it early. The receiving fullback must call "Mine!" the moment they identify themselves as the primary catcher. This call must be loud enough for support runners to hear and adjust their lines accordingly. Late or absent calling leads to collisions and dropped balls. Cue: "If you're catching it, own it loudly."
5. Body position under the high ball. Coach the catcher to position themselves slightly behind the projected landing point and move forward into the catch — never stationary or moving backwards. Feet shoulder-width apart, knees slightly bent, eyes locked on the ball, hands extended above the head with fingers spread. A forward-moving catch is far more secure than a static or retreating one.
6. Decision-making speed after the catch. Once the ball is secured, the catcher has a 2-second window before chasers arrive. Train them to scan left and right before the ball arrives — not after. The decision (counter-attack or present) should be made during the catch, not following it.
Common Mistakes
Mistake 1 — Chasers going offside. Players instinctively want to advance early. Reinforce the offside law: no chaser may move forward until the ball is kicked. Use a cone line to mark the kicker's position and call back any chaser who crosses it early. In a match, this concedes a penalty in a dangerous position.
Mistake 2 — Kicker watching the chase instead of the kick. The kicker often looks up too early to watch their chasers, which disrupts their follow-through and reduces hang time. Instruct the kicker to complete their full kicking action and follow-through before looking up. Cue: "Finish your kick before you watch it."
Mistake 3 — Catcher looking at the chasers instead of the ball. Under pressure, catchers instinctively glance at oncoming defenders, which causes them to drop their hands and misjudge the ball's trajectory. Drill the catcher to keep their eyes on the ball until it is physically in their hands. Cue: "Eyes on the ball, not on the boots coming at you."
Mistake 4 — Support runners arriving too early and crowding the catch point. If 13 and 14 sprint directly to the landing zone, they crowd the catcher and eliminate the counter-attack space. Train support runners to run lines that arrive 2–3m either side of the catch point and 1–2 seconds after the catch is made.
Mistake 5 — No post-catch communication. After the catch, players often go silent. The catcher must immediately communicate their decision: "Counter!" signals a running play, "Down!" signals they are presenting the ball. This communication must be trained as a habit, not left to chance.
Variations & Progressions
Progression 1 — Add a live contesting jumper. Once the basic drill is running smoothly, introduce one contesting jumper from the kicking team. This player (typically the 6 or 7) sprints into the landing zone and attempts to contest the catch in the air. This replicates the genuine aerial contest and forces the catcher to commit fully to their technique under physical pressure. Ensure players are coached on safe aerial contest technique before introducing this element.
Progression 2 — Kick from a ruck platform. Rather than a standing kick, the drill now begins from a simulated ruck. A pod of forwards drives a bag 5m, the ball is presented, the 9 passes to 10, and the kick is executed from a moving platform. This adds the realistic time pressure of a live game situation and trains the kicker to execute under a compressed decision window.
Progression 3 — Full counter-attack to try. After the catch is made, the receiving team attempts to score from their own 22m against the five chasers (who now become defenders). This transforms the drill into a live 3v5 or 4v5 counter-attack scenario, developing decision-making, support lines, and defensive transition simultaneously.
Age Adaptations

Under-12 and Under-14. Reduce the kick distance to 20m and use a size 4 ball. Remove the contesting element entirely — the focus is purely on kick technique, chase line shape, and safe catching. Allow the catcher to take an extra step before catching to build confidence. Reduce the chase line to 3 players (11, 15, 14) to avoid overwhelming the catcher. Prioritise fun and repetition over competitive pressure.
Under-16. Use the full drill as described but without the live contesting jumper until players demonstrate consistent catching technique. Introduce the decision-making element (counter-attack vs. present) and begin coaching communication habits. Kick distance can be extended to 25–30m.
Open Age / Senior Club. Run the full drill including all progressions. Add a time constraint: the kicking team must execute the kick within 4 seconds of the coach's signal to simulate game tempo. Introduce a second kicker operating simultaneously from the opposite side of the pitch to train the receiving team to manage two threats at once.