Kick-Off Reception & Counter-Attack: The 'Catch, Secure, Strike' System
Master the complete kick-off reception system that transforms a defensive restart into a devastating counter-attack, using structured forward pods, a disciplined distribution spine, and a wide strike play to create overlaps in open field.

Equipment Needed
Overview
The kick-off is one of the most contested and tactically significant moments in Rugby Union. Far too many teams treat it as a purely defensive obligation — something to survive rather than exploit. The 'Catch, Secure, Strike' system reframes the kick-off reception as a genuine attacking opportunity. When executed with precision, it allows a well-organised receiving team to catch the opposition mid-transition, stretch their defensive line across the full 70-metre width of the pitch, and deliver the ball into space before the kicking team can reorganise.
This set play is most effective at the start of each half and immediately following a score, when the kicking team is emotionally elevated and their defensive shape is at its most vulnerable. It is equally applicable at all levels of the game, from age-grade rugby through to senior club competition, and can be scaled in complexity to suit your squad's experience.
Setup

Equipment Required: 1 match ball (size 5 for senior/open, size 4 for U14 and below), 16 training cones, 4 coloured bibs (two sets of contrasting colours), a full-size pitch or a marked training grid of at least 60m x 50m.
Pitch Reference: Standard Rugby Union pitch — 100m playing length x 70m width, with a 10m line and a 22m line at each end.
Players Required: 15 (full team). A minimum of 11 players is needed to run a meaningful version of the play.
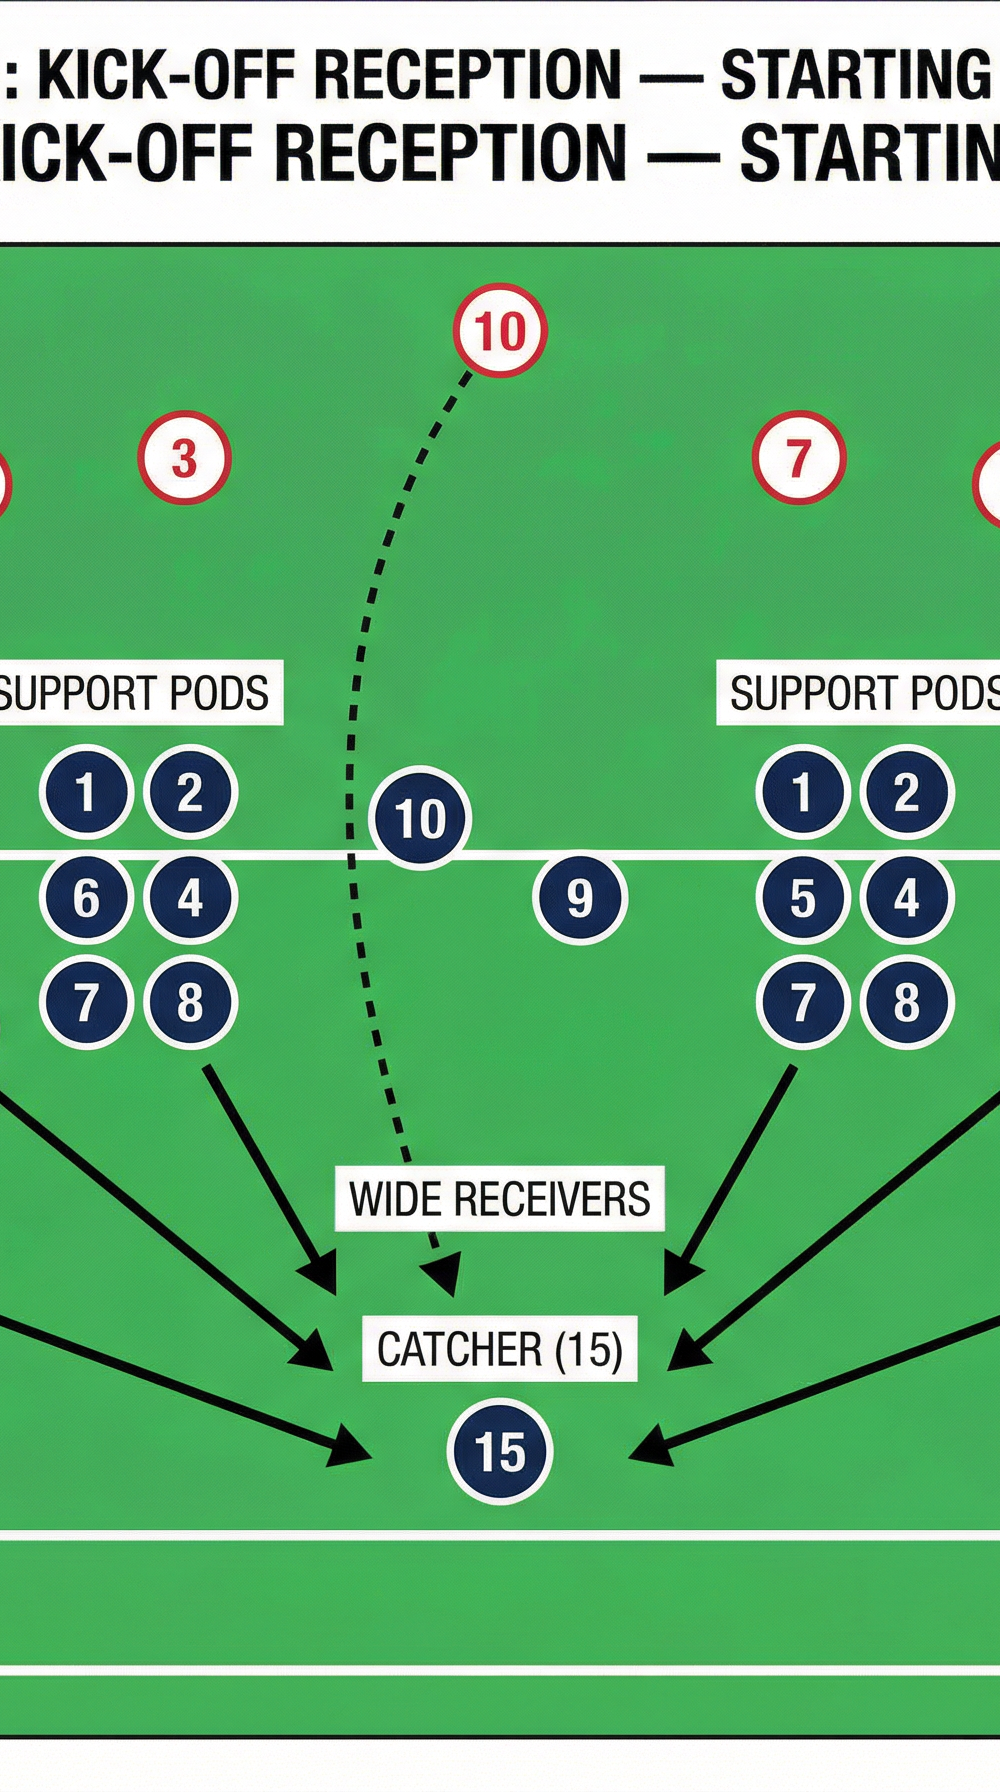
Player Positions at Kick-Off Reception (see Diagram 1):
| Position | Player | Starting Location |
|---|---|---|
| Fullback | 15 | Deep centre, 5–10m behind the 10m line |
| Right Wing | 14 | Deep right, 5m inside the right touchline |
| Left Wing | 11 | Deep left, 5m inside the left touchline |
| Outside Centre | 13 | 10m line, right of centre |
| Inside Centre | 12 | 10m line, left of centre |
| Fly-half | 10 | 2m behind 10m line, centre-right |
| Scrum-half | 9 | 2m behind 10m line, centre |
| Loose Forward Pod (6, 7, 8) | Flankers & No.8 | 10m line, left of centre, in a tight cluster |
| Lock Pod (4, 5) | Locks | 10m line, right of centre, in a tight cluster |
| Front Row Pod (1, 2, 3) | Props & Hooker | 10m line, far left, ready to drift right |
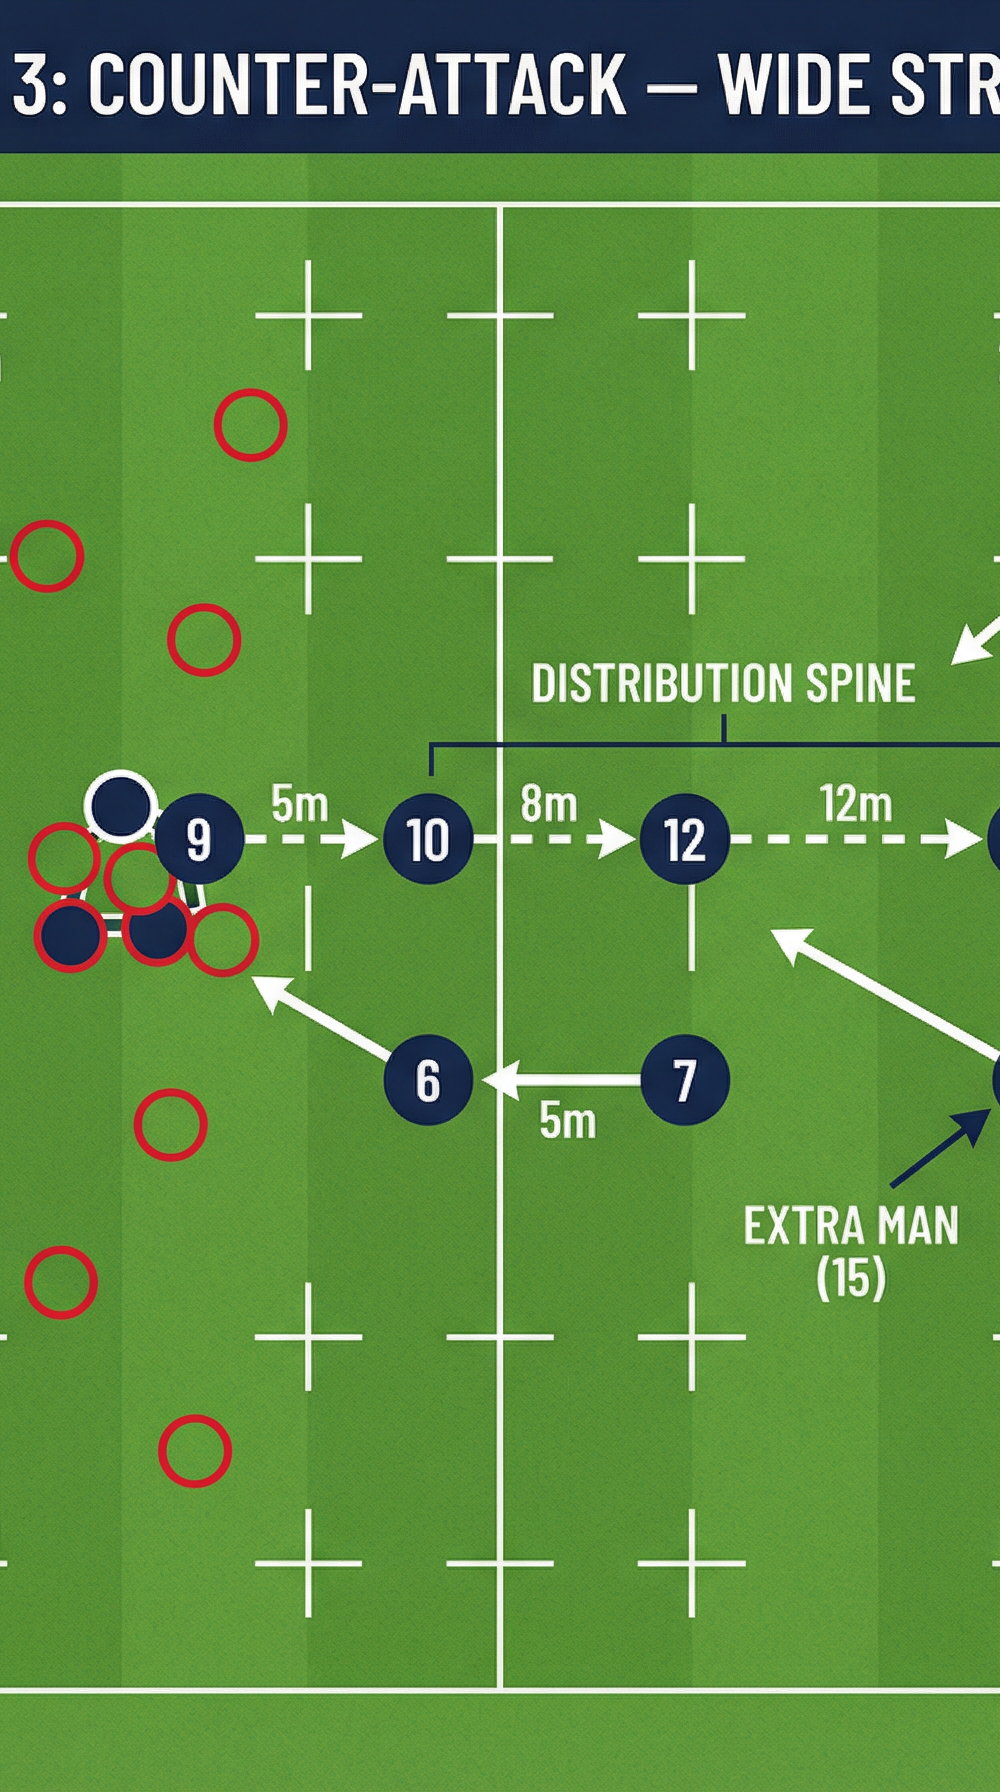
The primary catcher is the Fullback (15). The secondary catchers are the wings (11 and 14), used if the kick is directed wide. The distribution spine runs 9 → 10 → 12 → 13 → 14, with 15 acting as the extra man entering the line between 13 and 14.
Step-by-Step Instructions

Phase 1 — Set and Read (Pre-Kick)
- As the kicker places the ball on the tee, the entire receiving team walks into their designated starting positions. Every player must be in position before the kicker begins their run-up.
- The Fullback (15) calls the wind direction and communicates to the team whether the kick is likely to travel short (inside the 10m line), mid-range (between 10m and 22m), or deep (beyond the 22m). Use a simple colour call: "RED" (short), "AMBER" (mid), "GREEN" (deep).
- The Fly-half (10) echoes the call so the forward pods can adjust their depth by 3–5m accordingly.
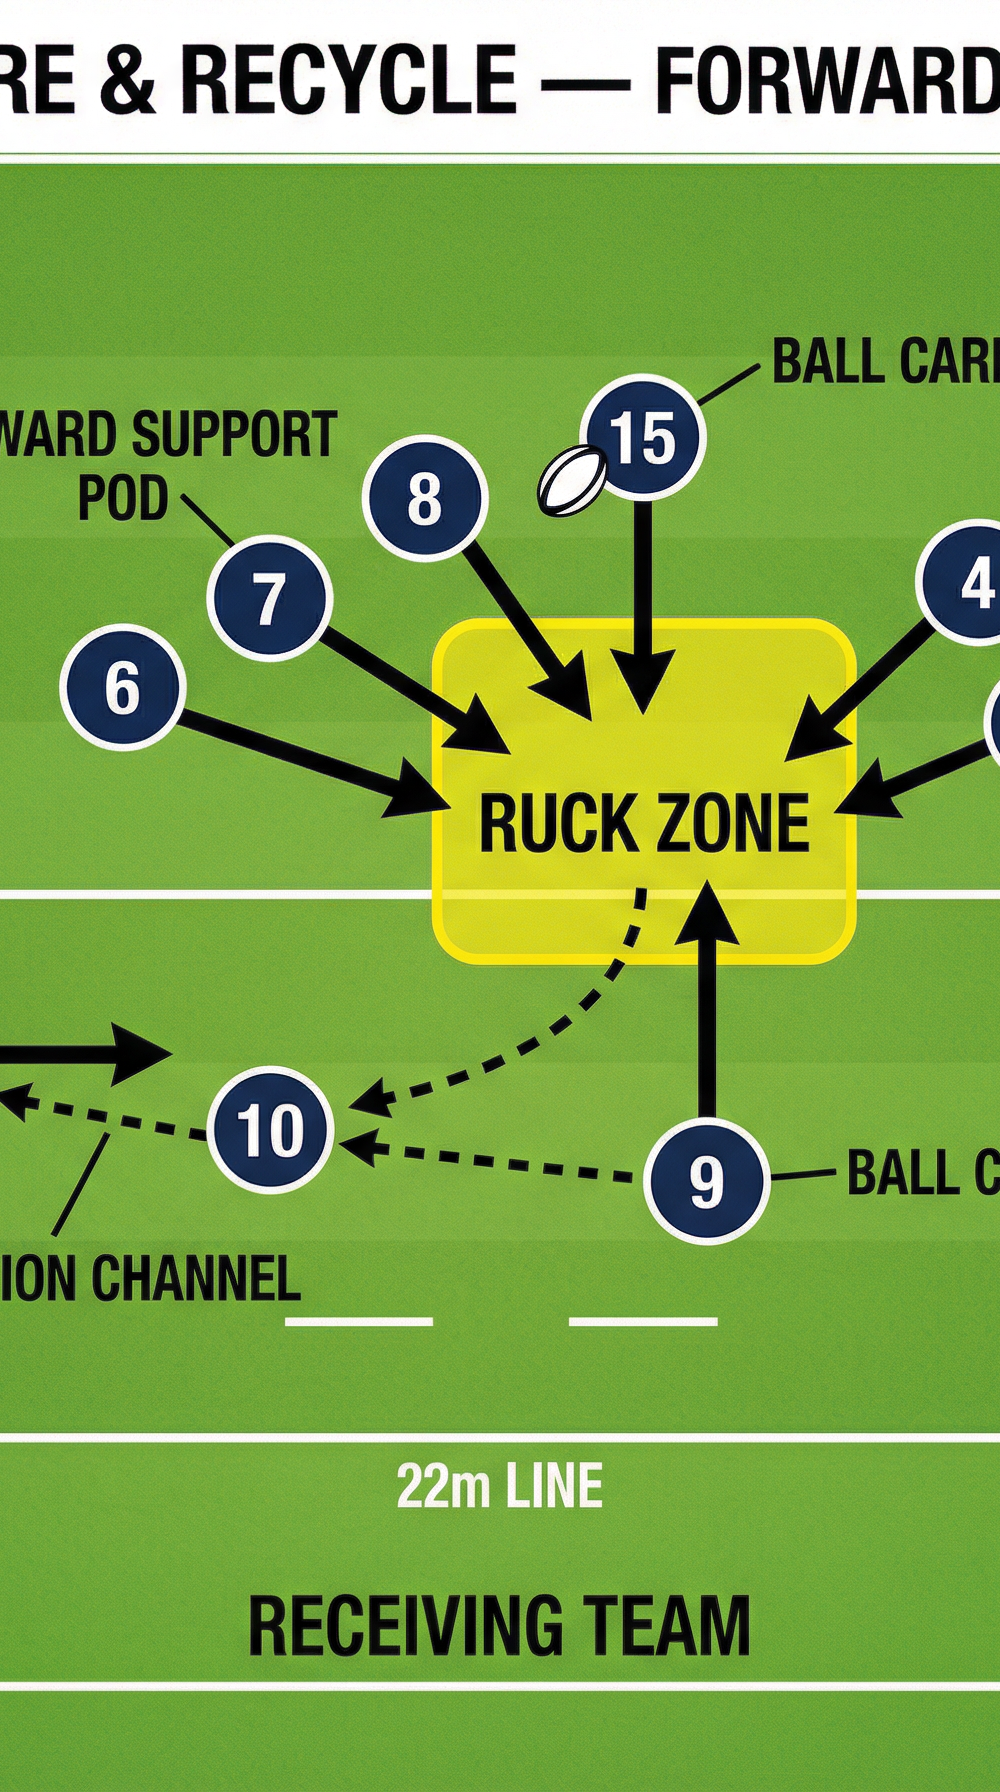
Phase 2 — Catch and Secure
- As the ball is kicked, the Fullback (15) tracks the ball's flight path and calls "MINE" loudly if taking the catch, or "LEFT" / "RIGHT" to redirect the catch to a wing.
- The catcher must present a strong, two-handed catch with elbows in and feet planted under the body. Do not jump unless absolutely necessary — a grounded catch is faster to recycle.
- Immediately after the catch, the catcher takes two hard steps forward into contact, presenting the ball in a strong ball-carry position. This is the trigger for the forward pods to arrive.
- The three forward pods (6, 7, 8 as the primary pod; 4 and 5 as the secondary pod) sprint onto the ball carrier from pre-set angles, arriving within 3 seconds of the catch. Their job is to secure the ruck and win the contest.
Phase 3 — Recycle and Distribute
- Scrum-half (9) positions at the base of the ruck the instant it is formed, no more than 1m from the back foot. They must not wait — slow ball kills the counter-attack.
- On 9's signal ("BALL"), the distribution spine activates. 9 passes to 10, who is already running a flat line at pace.
- 10 makes the key decision: "HOLD" (carry into the gain line if the defence is up fast) or "GO" (pass immediately to 12 to shift the ball wide). In most cases, the default is "GO" — the aim is to get the ball to the wide channels before the kicking team's chasers can reorganise.
- 12 receives the ball at pace and passes immediately to 13. 13 fixes the last defender with a hard running line.
Phase 4 — The Wide Strike
- 15 (Fullback) has been tracking the play from behind and now enters the line at pace between 13 and 14, acting as the extra man. This creates a 2-on-1 or 3-on-2 overlap on the right flank.
- 13 makes the final decision: pass to 15 (the extra man running a straight line) or pass to 14 (the wing on the outside). The correct choice depends on which defender commits.
- The strike player (14 or 15) attacks the space in the Strike Zone — the channel between the 15m line and the right touchline, between the opposition's 10m line and 22m line.

Key Coaching Points
Catch first, attack second. The most common error is players thinking about the counter-attack before they have secured possession. Drill the mantra: "Catch it clean, then we play." A knock-on or dropped ball gifts the opposition a scrum in a dangerous position.
Forward pods must arrive on a running line, not standing still. Pods that jog to the ruck and then stand are useless. Every forward should be at near-sprint pace when they arrive, so they can drive through the contact zone and secure the ruck in one motion.
9 must be at the ruck before the ball hits the ground. The scrum-half's positioning is the single biggest determinant of how quickly the ball is recycled. If 9 is slow, the entire play collapses. Use a stopwatch in training: target under 3 seconds from catch to 9 passing.
The distribution spine must run flat and hard. 10, 12, and 13 should be running at the defensive line when they receive the ball, not standing flat-footed waiting for a pass. Flat running fixes defenders and creates the space that 15 exploits as the extra man.
15 must time the entry run perfectly. The Fullback's entry into the line is the play's decisive moment. Too early and the defence reads it; too late and the overlap has closed. Coach 15 to begin their run when 9 passes to 10 — this gives them exactly the right timing to arrive at pace between 13 and 14.
Communicate constantly. The catcher's call ("MINE"), 10's decision call ("HOLD" or "GO"), and 13's final call (pass direction) must be loud and clear. In match conditions, crowd noise and adrenaline will suppress communication — train at high volume in practice.
Common Mistakes
Mistake 1 — The catcher tries to run immediately after the catch. Players instinctively want to run with the ball the moment they catch it. Remind them that the play is designed to work through the ruck recycle, not off the initial catch. The catcher's job is to make contact, present the ball cleanly, and let the pods do their work.
Mistake 2 — Forward pods arriving in a cluster rather than from different angles. If all three forwards arrive from the same side, the ruck is lopsided and easily contested. Coach pods to arrive from slightly different angles — one from the left, one from the right, one straight — to form a solid, balanced ruck.
Mistake 3 — 10 holding the ball too long. The fly-half sometimes tries to make the perfect decision rather than the fast decision. In this play, speed of ball is more valuable than precision of decision. If in doubt, the default is always to pass wide.
Mistake 4 — 15 running too early and telegraphing the play. If the Fullback starts their entry run before 9 has passed, the opposition's defensive winger will read the line and drift to cover. Drill the trigger point: 15 moves when 9's hands release the ball.
Mistake 5 — Wingers drifting infield after the catch. Wings (11 and 14) must hold their width throughout the play. If they drift infield to watch the action, they close the space that the strike play is designed to exploit. Coach them to stay wide and stay deep until the ball reaches 13.
Variations & Progressions

Variation 1 — Left-Side Strike: Mirror the entire play to the left side, with the distribution spine running 9 → 10 → 12 → 13 → 11, and 15 entering the line between 12 and 11. Use this variation when the opposition's right-side defence is stronger, or when you want to keep the defence guessing.
Variation 2 — Short Ball to 8 ("Crash Ball" Option): If 10 calls "HOLD", instead of passing wide, 9 delivers a short flat ball to the Number 8 (8) who hits the gain line at pace through the middle of the field. This is used when the opposition's defensive line is rushing up fast and the wide channels are not yet open. It gains territory and resets the defensive line for a second phase strike.
Progression 1 — Add a Defensive Pressure Unit: Once the play is running smoothly in unopposed practice, introduce 4–6 defenders (the kicking team's chasers) who apply realistic chase pressure. Start with passive defenders who jog, then progress to active defenders who contest the catch and the ruck.
Progression 2 — Decision-Making Trigger: Remove the pre-set "GO" default and require 10 to read the defence and make a genuine decision on every repetition. Introduce a coach standing behind the defence who holds up a coloured card (red = carry, green = pass) at the moment 9 passes, forcing 10 to process information under pressure.
Age Adaptations

Under 12 and Below: Remove the ruck phase entirely. The catcher simply catches the ball, takes one step forward, and passes to 9. The distribution spine runs 9 → 10 → 12 → 13, with no extra-man entry from 15. Focus purely on the catch technique and the flat passing spine. Use a size 4 ball and reduce the pitch width to 50m.
Under 14 and Under 16: Introduce the ruck phase and the forward pods, but keep the distribution spine to three players (9 → 10 → 13). Add the Fullback entry run as a progression once the basic shape is consistent. Emphasise communication calls and body position at the catch. Allow 5 seconds (rather than 3) for the ruck recycle at this level.
Open Age / Senior: Run the full play as described, including the decision-making trigger for 10 and the left-side mirror variation. Add a kick-chase pressure unit from the first session. Introduce the "Crash Ball" variation once the wide strike is reliable. Time every repetition and set a team target of under 4 seconds from catch to 9 passing.