The Shield: A Comprehensive Guide to Kick-Off Reception & Counter-Attack
Master the art of turning a defensive kick-off receipt into a potent, multi-phase counter-attack with this detailed set play for all coaching levels.
Equipment Needed
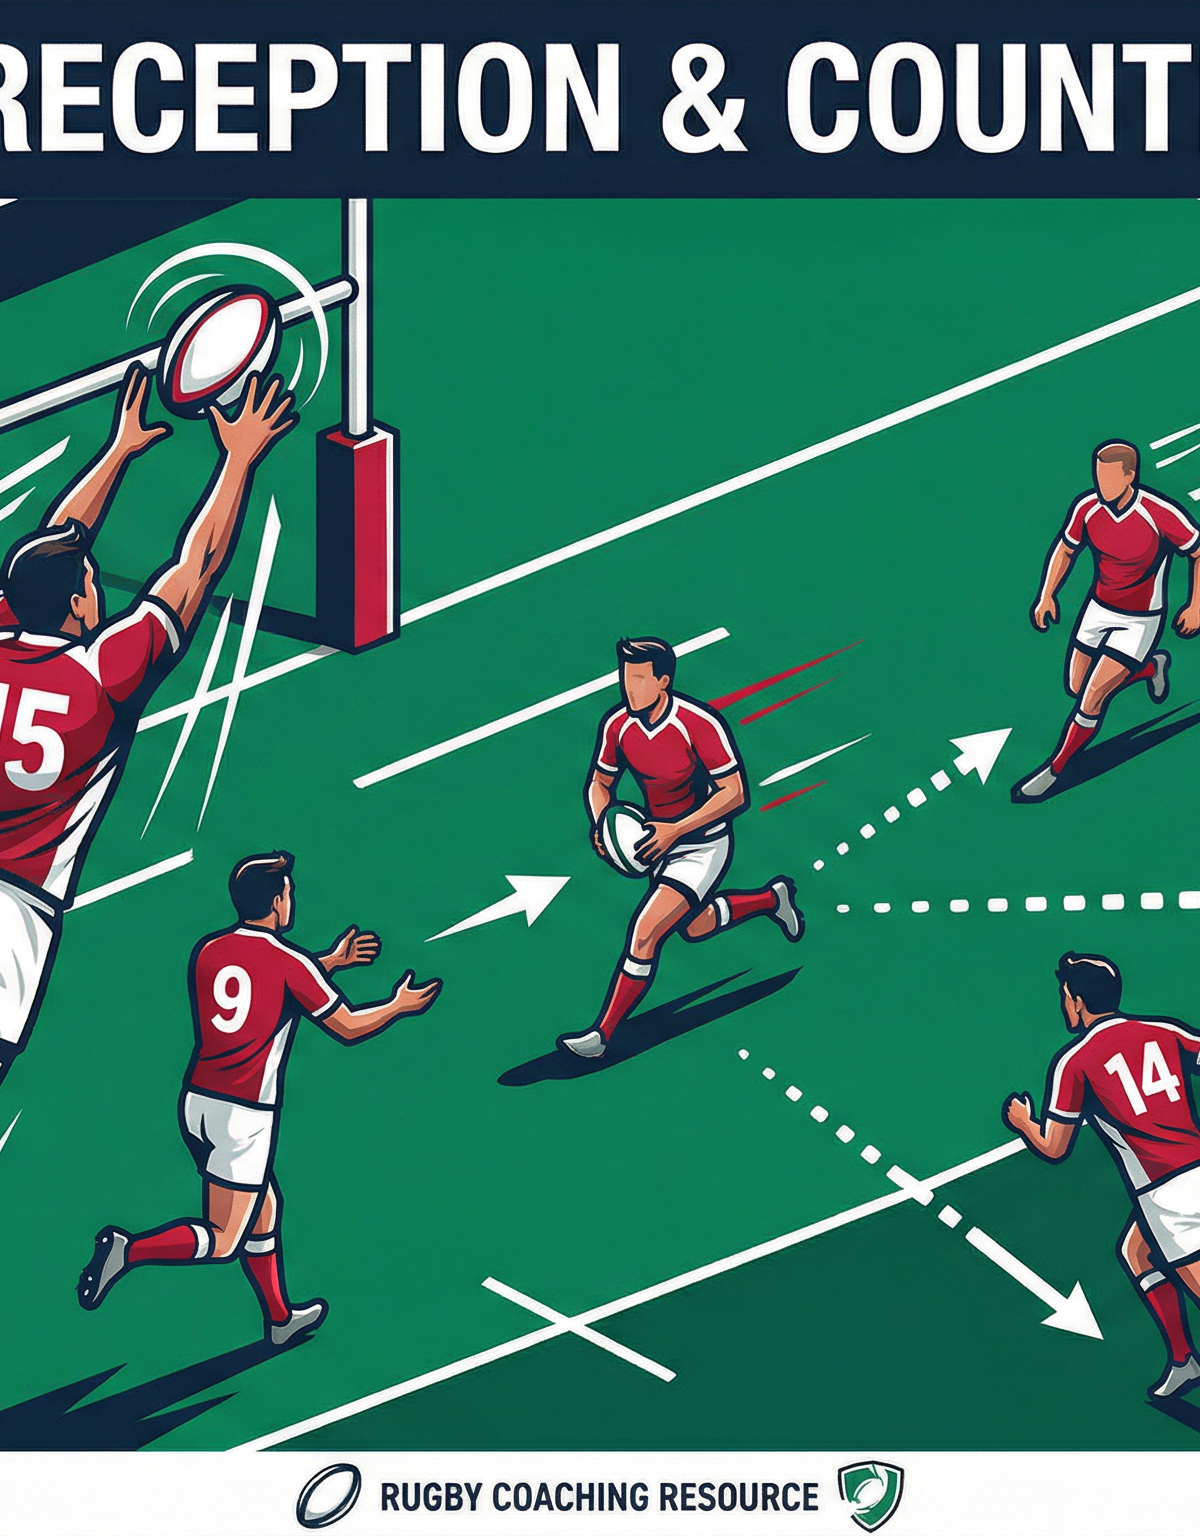
\n\n## 1. Overview\n\n'The Shield' is a fundamental set play designed to achieve two primary objectives: first, to securely receive a deep kick-off, and second, to immediately transition into a structured counter-attack that exploits the disorganized chasing line. This play is most effective when the opposition commits to a deep, central kick, aiming to pin your team inside your own 22-meter line. By turning a defensive situation into an attacking opportunity, 'The Shield' empowers your team to reclaim momentum, dictate the pace of the game, and potentially score from the first phase of play.\n\n## 2. Setup\n\nThis set play requires a full-size pitch and a full complement of 15 players to run effectively in a game scenario. For training, it can be adapted to smaller groups focusing on specific roles.\n\n### Equipment Needed\n- A full-size Rugby pitch (100m x 70m)\n- Multiple Rugby balls (to maintain a high tempo in training)\n- Cones or markers to designate starting positions if needed.\n\n### Player Positions\n\nThe initial setup is crucial for providing the catcher with maximum protection and ensuring support runners are in position to launch the counter-attack. Players are organized into three defensive pods across the pitch.\n\n \n\n- Deep Pod (The Catcher): The Fullback (#15) is positioned centrally, approximately 5 meters from their own try line, ready to field the deep kick.\n- Midfield Pods (The Shield): The Wingers (#11, #14) position themselves on the 15-meter lines, about 15 meters from the try line. The Centres (#12, #13), Fly-half (#10), and Scrum-half (#9) form a line across the 22-meter line. This creates a protective shield in front of the catcher.\n- Forward Pod (The Engine Room): The loose forwards (#6, #7, #8) and the tight five (#1, #2, #3, #4, #5) are positioned just behind the 10-meter line from the kick-off, ready to either support the breakdown or join the subsequent attacking phases.\n\n## 3. Step-by-Step Instructions\n\nExecution of 'The Shield' relies on precise timing, clear communication, and every player understanding their role.\n\n### Step 1: The Kick & The Catch\n1. As the opposition kicker approaches the ball, the receiving team gets into their starting positions as shown in Diagram 1.\n2. The Fullback (#15) tracks the ball in the air, communicating loudly with calls like "My ball! My ball!" to avoid any confusion.\n3. The nearest support players (typically the Wingers and Centres) move to form a protective 'shield' around the landing zone, preparing to block any immediate chasers after the catch is made.\n4. The Fullback (#15) catches the ball cleanly, ideally in the air to maximize time and space.\n\n### Step 2: Launching the Counter-Attack\n\n
 \n\n1. Immediately upon securing the ball, the Fullback (#15) runs forward and slightly across the pitch, away from the bulk of the chasing players.\n2. The Scrum-half (#9) runs a support line, aiming to receive a short pass from the Fullback (#15) to act as the first distributor.\n3. The Fly-half (#10) and Centres (#12, #13) adjust their depth and timing to receive a pass from the Scrum-half, running hard lines to punch through the disorganized chase.\n4. The Wingers (#11, #14) maintain their width to stretch the defense and provide an attacking option in the wider channels.\n\n### Step 3: The Breakdown & Recycle\n\n
 \n\n1. The ball carrier aims to break the initial line of chasers. If significant contact is made, their goal is to stay on their feet for as long as possible to allow support to arrive.\n2. The first arriving support players (often the loose forwards #6, #7, #8) are responsible for securing the breakdown, clearing out any threats, and ensuring quick, clean ball is available for the Scrum-half (#9).\n3. The Scrum-half (#9) clears the ball from the ruck, assessing the defensive line to decide the next point of attack. The team then transitions into its standard attacking shape, looking to exploit the space created.\n\n## 4. Key Coaching Points\n\n- Secure the Ball First: The entire play fails if the initial catch is not made. Emphasize the importance of a clean catch above all else.\n- Immediate Communication: The catcher must be loud and clear. Support players must communicate to organize the shield and the subsequent attack.\n- Attack Space, Not Players: The initial counter should target the gaps in the disorganized chase line, not run directly into the first defender they see.\n- Support Runners Must Be Available: The ball carrier is only as effective as the support around them. Runners must be in position for a pass to maintain momentum.\n- Maintain Depth in Attack: To create time and space, the attacking line must maintain its depth, preventing the defense from rushing up and shutting down the play.\n- Accuracy of the Pass: Passes must be crisp, accurate, and delivered in front of the receiver to allow them to run onto the ball at pace.\n\n## 5. Common Mistakes\n\n- Catcher Becomes Isolated: If support players are too slow to react, the catcher can be tackled immediately, turning the ball over.\n- Support Players are Slow to React: The transition from defense to attack must be instant. Hesitation allows the chasing team to get organized.\n- Poor Passing Execution Under Pressure: Inaccurate or dropped passes will kill the momentum and put the team on the back foot.\n- Forwards Getting in the Backline's Way: Forwards must understand their roles, which is primarily to support the breakdown, not to clog the attacking channels for the backs.\n- Losing Shape After the First Phase: After the initial break, the team must quickly reorganize into its attacking structure to continue exploiting the advantage.\n\n## 6. Variations & Progressions\n\n### Progressions\n1. Add Live (but passive) Defenders: Start with defenders who can run the chase lines but cannot make a tackle. This allows the attacking team to work on their timing and lines of running.\n2. Introduce a Competitive Chaser: Add one or two fully live defenders to the chase to put real pressure on the catcher and first receiver.\n3. Run the Play Against a Full Defensive Line: Progress to a full 15 vs 15 scenario where the play is run in a game-like context.\n\n### Variations\n1. Switch the Direction of Attack: Instead of the Fullback always running to one side, have a pre-called signal to switch the direction of the counter-attack based on the defensive setup.\n2. Use a Forward Pod to Carry: If the opposition's chase is narrow, the Fullback can pass inside to a pod of forwards (e.g., #8 and #6) to punch through the middle before distributing to the backs.\n3. Kick Back Possession: If the counter-attack is not on, the Fly-half (#10) can opt to return the kick with a contestable up-and-under or a long territorial kick to put pressure back on the opposition.\n\n## 7. Age Adaptations\n\n- Under 10/12: Simplify the play. Focus solely on the secure catch and the role of the two nearest support players. The goal is simply to secure possession and set up a ruck.\n- Under 14/16: Introduce the full backline counter-attack. Focus on the roles of the Scrum-half and Fly-half as distributors. The concept of attacking space is key at this age.\n- Open Age/Senior Rugby: All elements of the play should be executed with precision. Introduce the variations and allow the playmakers (#9, #10, #15) to make decisions based on what they see in the defense.