Precision Under Pressure: The Complete Lineout Set Piece Drill
Master the full lineout sequence — from hooker throw to backs attack — with this structured drill that builds accuracy, timing, and multi-phase options for coaches at every level.
Equipment Needed
Overview
The lineout is one of rugby's most technically demanding set pieces, yet it is also one of the most controllable. Unlike a scrum, where the outcome depends heavily on raw power and referee interpretation, a well-rehearsed lineout gives the attacking team near-complete ownership of the ball — provided the throw, the lift, and the catch are executed with precision. This drill develops the full lineout sequence from the hooker's throw-in through to a clean ball delivery to the backs, with two distinct exit options: a driving maul and a wide backline attack.
Use this drill in the mid-week technical session (Tuesday or Wednesday) when players are fresh enough to absorb detail but the physical load should be managed. It is equally valuable as a pre-match warm-up activation on game day, reinforcing the calls and timing your squad has rehearsed during the week. Coaches will find it most effective when run in blocks of 10–12 minutes with clear verbal feedback between reps.
Setup
Equipment Required
| Item | Quantity | Purpose |
|---|---|---|
| Rugby balls | 4–6 | Continuous repetitions without retrieval delays |
| Cones (disc or tall) | 12 | Mark the 5m line, 15m line, and channel boundaries |
| Tackle bags / pads | 2–3 | Simulate defensive pressure on the maul option |
| Bibs (two colours) | 8 | Distinguish attacking and defending units |
| Measuring tape | 1 | Accurate pitch marking for the 5m and 15m channels |
Pitch Setup
Use a 30m × 40m section of the pitch, orientated so the touchline runs down the left edge. Mark the 5-metre channel (between the touchline and the 5m line) and the 15-metre channel (between the 5m and 15m lines) using cones. Place a cone at the exact throw-in spot on the touchline. If working near a try line, position the lineout 20–25m out to allow the backs attack option to develop into open space.
Player Positions
This drill requires 15 players at full complement: a full attacking lineout unit (8 forwards + 9 + 10 + 12 + 13 + 11) and a defending unit of 5–7 players. At minimum, it can be run with 10 players (attacking lineout of 5 + scrum-half + fly-half, with 2–3 defenders).
Attacking Unit:
- 2 (Hooker): Stands 5m back from the touchline, responsible for the throw.
- 1 (Loosehead Prop): Front of the lineout, acts as front lifter or blocker.
- 4 (Lock): Front jumper — used for short throws ("A" call).
- 6 (Blindside Flanker): Middle lifter, binds on the jumper's shorts and thigh.
- 5 (Lock): Primary middle jumper — used for standard throws ("B" call).
- 7 (Openside Flanker): Rear lifter, completes the two-man lift with 6.
- 8 (Number 8): Tail of the lineout — used for long throws ("C" call) or peel options.
- 9 (Scrum-half): Stands 1m behind the lineout, receives the tap-down.
- 10 (Fly-half): First receiver, positioned 10–12m from the lineout.
- 12 (Inside Centre): Second receiver, 18–20m from the lineout.
- 13 (Outside Centre): Third receiver, 28–30m from the lineout.
- 11 (Left Wing): Widest receiver, 38–40m from the lineout.
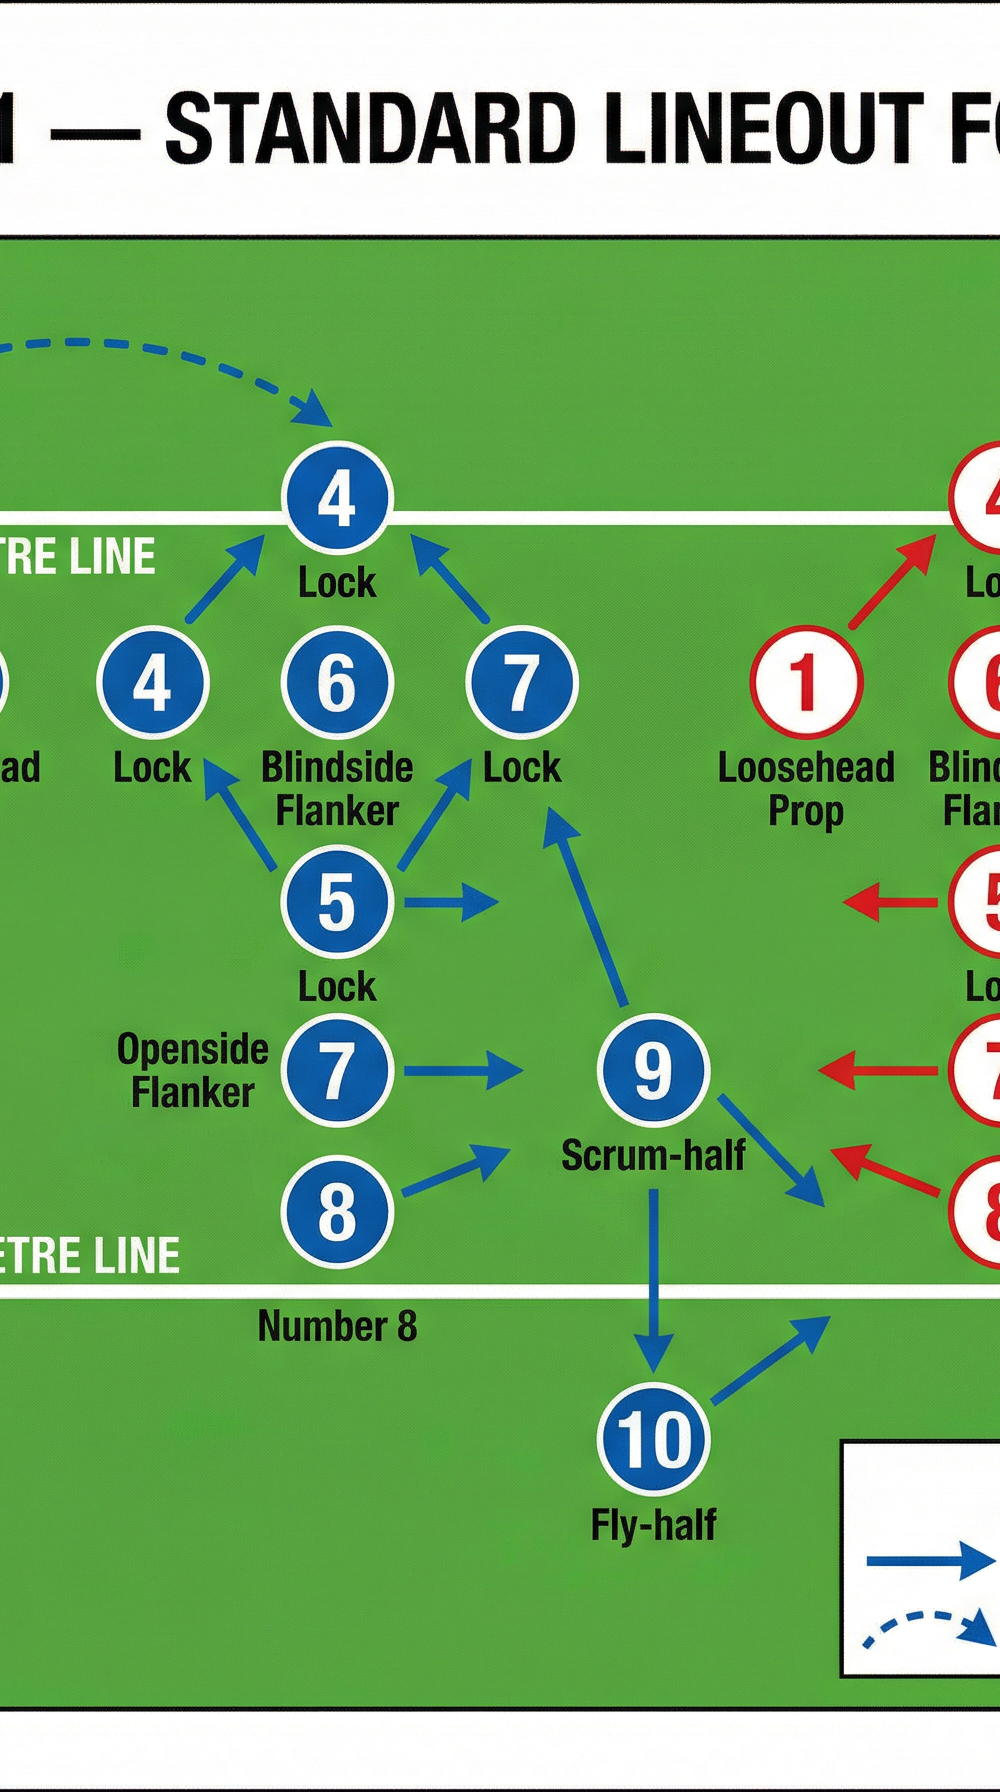
Diagram 1 shows the standard lineout formation with the "B" call throw to the middle jumper (5), and the ball delivery channel to the scrum-half (9) and fly-half (10).
Step-by-Step Instructions

Phase 1 — The Call (Pre-Throw)
- The hooker (2) receives the ball from the ball-carrier or referee and walks to the throwing position, 5m back from the touchline. The lineout forms within 10 seconds.
- The lineout captain (typically the Lock, 5, or the Number 8) calls the lineout code — a combination of a colour and a number that identifies the target jumper and the exit play. Example: "Blue Two" = middle jumper (5), maul option.
- All forwards in the lineout repeat the call quietly to confirm they have heard it. The scrum-half (9) relays the call to the backs so the fly-half (10) knows whether to expect a quick ball or a maul.
- Players take their positions in the lineout with 0.5m gaps between each player. Lifters adopt a low, athletic stance — hips back, knees bent, hands ready at hip height.
Phase 2 — The Throw
- The hooker makes eye contact with the target jumper. The jumper gives a subtle pre-agreed signal (e.g., a slight nod or hand position) to confirm readiness.
- The hooker delivers the throw using a two-handed overhead action, releasing the ball at the apex of the arc. The throw should travel parallel to the touchline — not angling infield — and arrive at the jumper's hands at maximum height (approximately 4–4.5m off the ground when the jumper is fully lifted).
- The throw must travel a minimum of 5m from the touchline to be legal.
Phase 3 — The Lift and Catch
- As the ball leaves the hooker's hands, the two lifters (6 and 7) simultaneously drive upward, lifting the jumper (5) by the shorts and thigh. The lift should be explosive and vertical — not forward or backward.
- The jumper reaches with both hands at the apex of the lift, secures the ball with a two-handed catch, and immediately brings it to the chest.
- The lifters hold the jumper elevated for 1–2 seconds to allow the scrum-half to position, then lower the jumper in a controlled manner.
Phase 4 — Ball Delivery
- The jumper (5) taps or passes the ball down to the scrum-half (9), who is standing 1m behind the lineout, slightly toward the open side.
- The scrum-half calls the exit option: "Drive!" (maul) or "Go!" (backs attack).
Phase 5A — Maul Option ("Drive")
- On the "Drive" call, all lineout forwards immediately bind onto the jumper and each other, forming a tight driving maul. The Number 8 (8) binds at the back and controls the ball.
- The maul drives forward for 3–5m, maintaining a low body position and driving through the hips. The scrum-half (9) stays at the back of the maul, ready to pick and go or pass wide.
- After the maul has gained momentum, the Number 8 or scrum-half releases the ball to the fly-half (10) to initiate the backs attack.

Diagram 2 illustrates the lineout-to-maul transition, showing how all forwards converge into the driving corridor between the 5m and 15m lines.
Phase 5B — Backs Attack Option ("Go")
- On the "Go" call, the scrum-half (9) passes immediately to the fly-half (10). The lineout forwards clear out to the sides to provide support runners.
- The fly-half (10) runs a flat line, fixing the first defender, and passes to the inside centre (12).
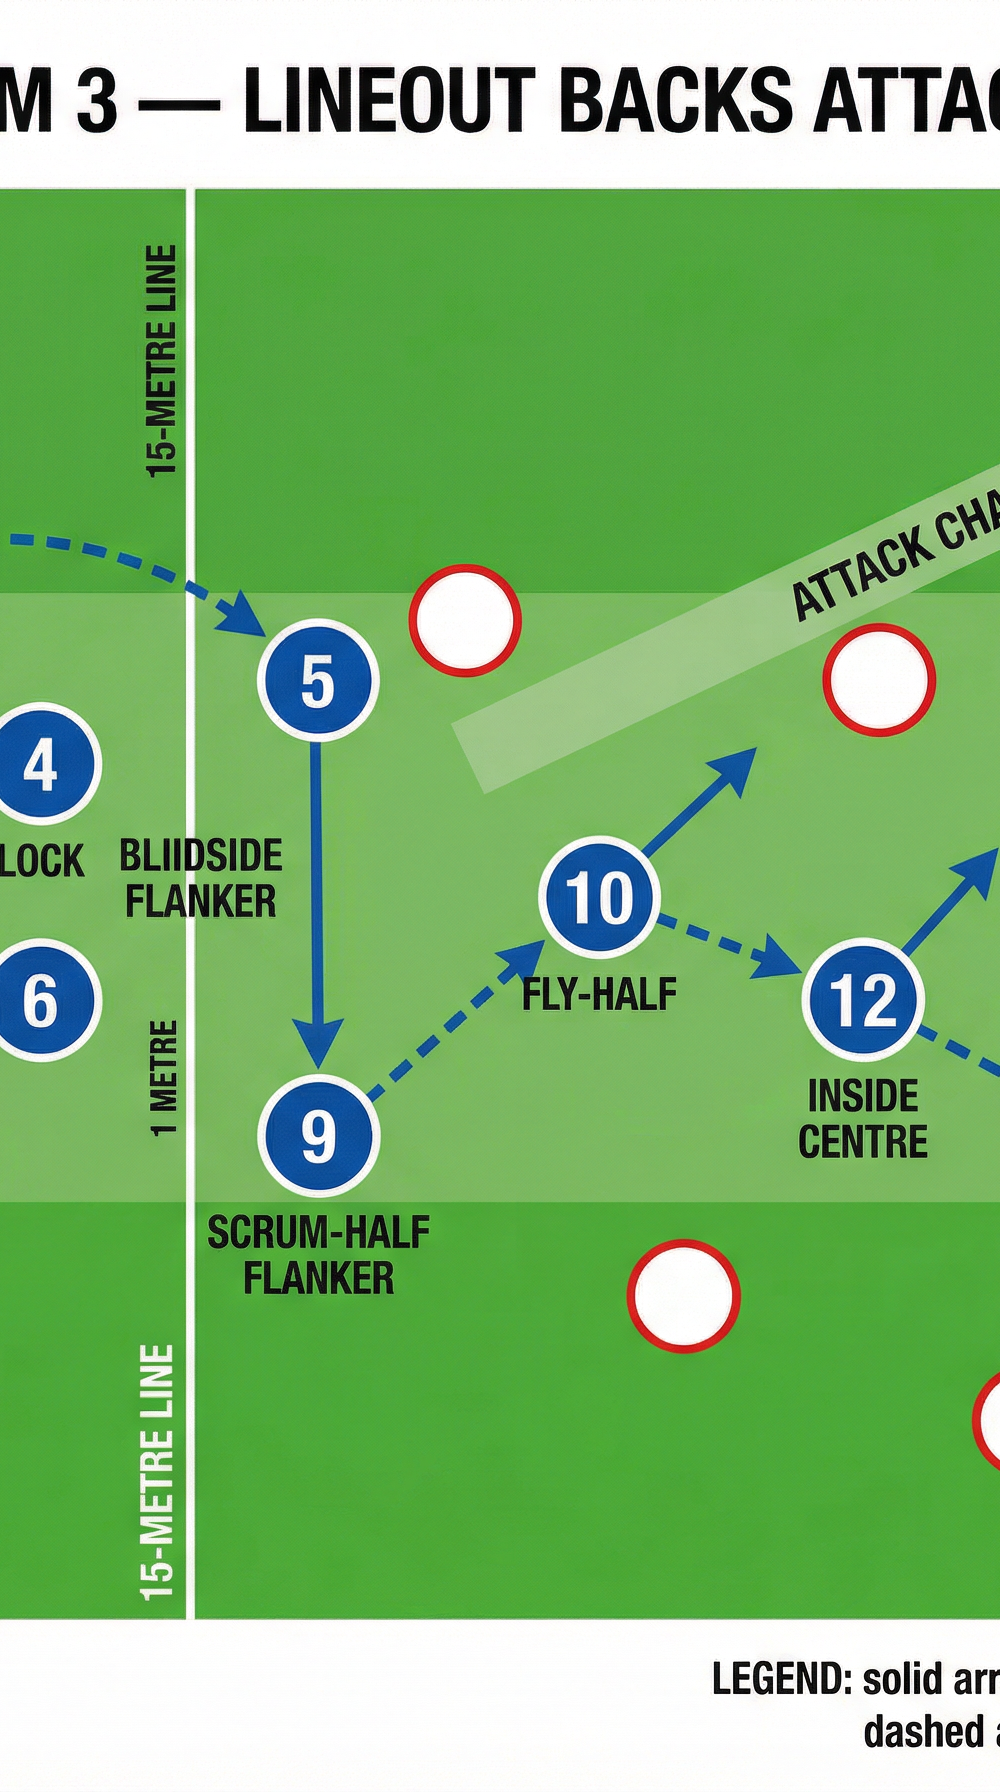
- The backline executes a standard flat attack: 12 to 13, 13 to 11, with the wing (11) attacking the open space in the attack channel.
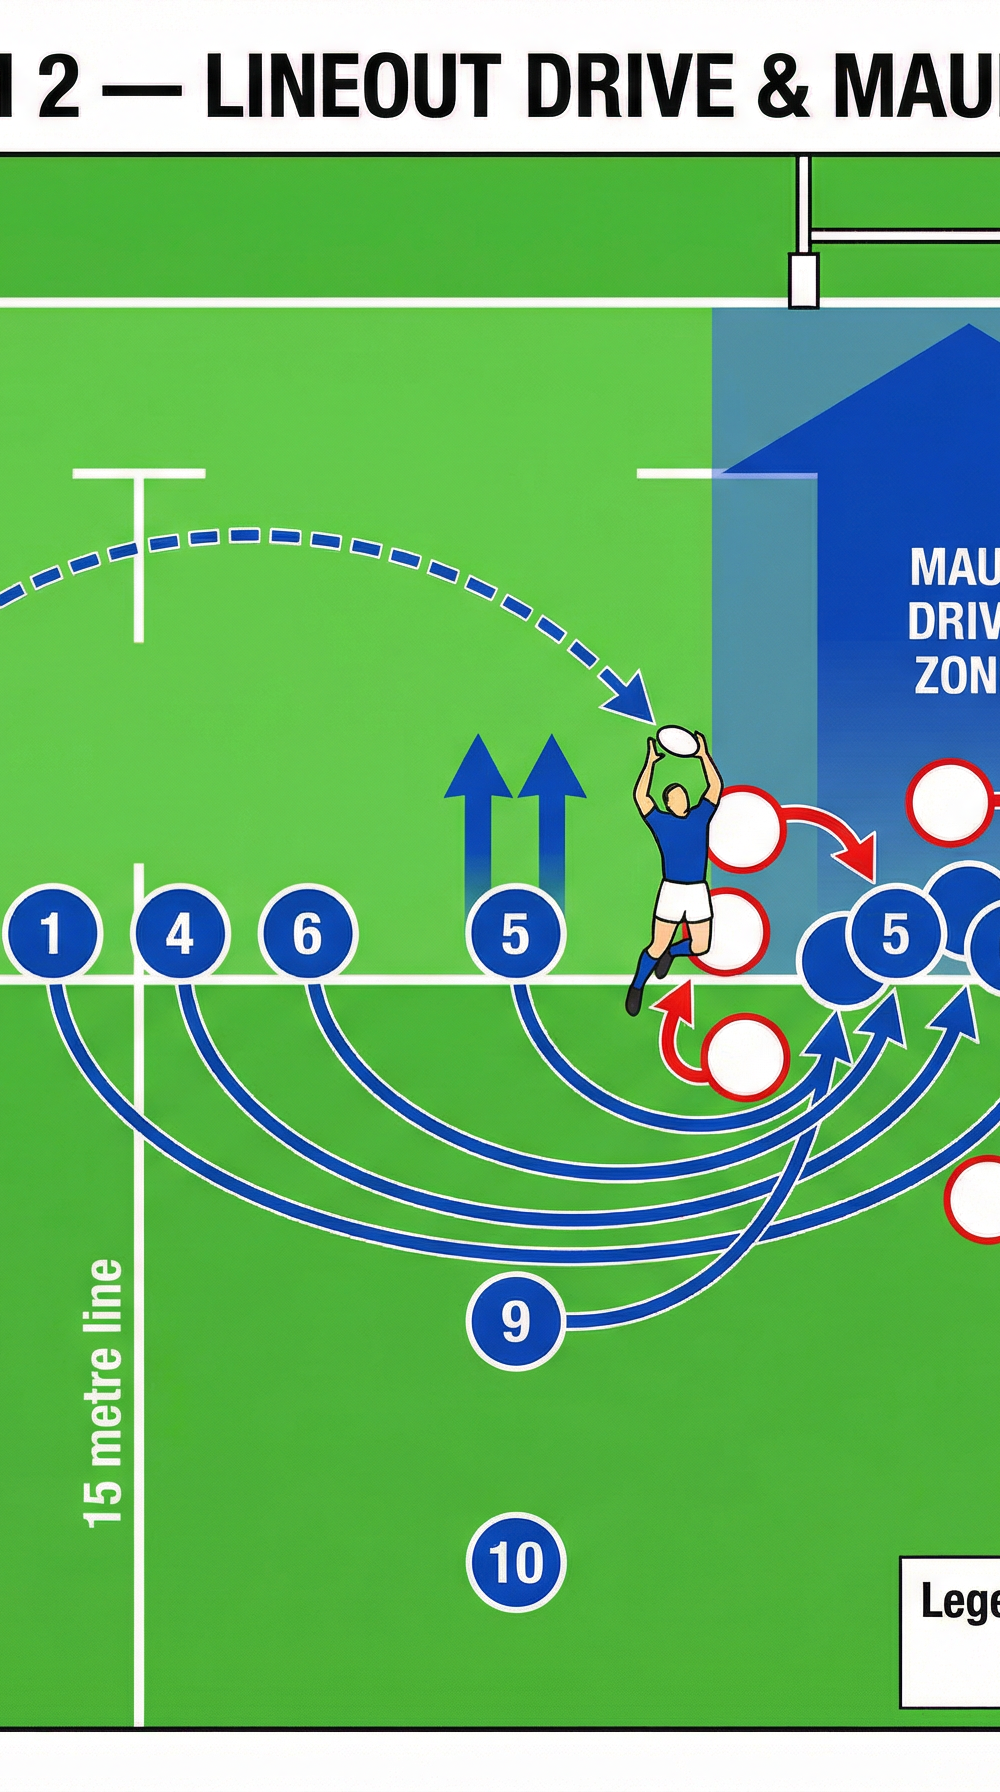
Diagram 3 shows the backs attack play off the lineout, with the ball moving along the backline from 9 through to the left wing (11) in the attack channel.
Drill Repetition Structure:
Run 4–6 repetitions of each exit option before switching. Allow 45 seconds between reps for players to reset and the coach to deliver feedback. Total drill time: 25–30 minutes including feedback.
Key Coaching Points

The throw is the foundation of everything. A poor throw cannot be saved by a great lift. The hooker must develop a consistent, repeatable throwing action in isolation before being integrated into the full lineout. Spend the first 5 minutes of every lineout session on hooker-only throwing practice at marked targets.
Timing between the throw and the lift is non-negotiable. The lift must begin as the ball leaves the hooker's hands — not when it arrives. Lifters should watch the hooker's release point, not the ball. A lift that is even half a second late will result in the jumper reaching for the ball at the wrong height.
The jumper must present a target. The jumper should extend both arms fully above the head before the ball arrives, creating a clear target for the hooker and reducing the catching area the opposition can contest. Hands should be firm, not relaxed.
Body position in the maul determines metres gained. In the driving maul, the key technical cue is "hips lower than shoulders." Players who stand upright in the maul are easily stopped. Drive through the hips, keep the spine neutral, and push from the legs — not the upper body.
The scrum-half must communicate the exit early. The 9 should be calling the exit option — "Drive" or "Go" — before the ball is even caught. This gives the backs time to adjust their depth and running lines. A scrum-half who waits until the ball is in their hands has already cost the team a second of reaction time.
Lineout calls must be disguised. As players progress, the calling system must be varied so that the opposition cannot read the target from the call alone. Use dummy calls, physical signals, and rotating code systems to maintain the element of surprise.
Common Mistakes

Mistake 1 — The throw angles infield. Many hookers, particularly younger or less experienced ones, throw the ball on a diagonal toward the infield rather than parallel to the touchline. This makes the ball easier for the opposition to intercept and harder for the jumper to catch cleanly. Correction: Place a cone or pole 5m directly in front of the hooker, parallel to the touchline, and instruct the hooker to throw over it. Video feedback is highly effective here.
Mistake 2 — Lifters are not synchronised. When the front and rear lifters do not drive upward simultaneously, the jumper is twisted or tilted, making a clean catch nearly impossible. Correction: Use a verbal count — "One, two, UP" — so both lifters explode on the same beat. Practise the lift without a throw first, focusing purely on synchronisation.
Mistake 3 — The jumper drops their arms after catching. After securing the ball, some jumpers immediately bring it down to their chest and turn infield before the lifters have lowered them. This creates a dangerous situation and often results in a knock-on. Correction: Insist that the jumper holds the ball above the head until their feet are back on the ground, then delivers it cleanly to the scrum-half.
Mistake 4 — The maul collapses inward. When forwards bind onto the maul from the sides rather than from directly behind, the structure collapses sideways and the referee will penalise for obstruction or a collapsed maul. Correction: Use cones to mark a 1.5m-wide corridor and insist that all players enter the maul from directly behind the ball-carrier, not from the flanks.
Mistake 5 — The scrum-half telegraphs the exit call. If the 9 immediately looks toward the backs before calling "Go," the defence reads the play and drifts early. Correction: Train the scrum-half to look at the maul first regardless of the call, then execute. This brief hesitation is enough to hold the defensive line.
Variations & Progressions
Variation 1 — Contested Lineout (Intermediate to Advanced). Introduce a full opposing lineout unit that actively contests the throw. The attacking team must now execute their calls under genuine pressure. Begin with passive defenders who only jump without lifting, then progress to full contest with lifters. This is the most game-realistic version of the drill and should be the standard format for senior and academy squads.
Variation 2 — Short Lineout (2-Man or 3-Man). Reduce the lineout to 2 or 3 players to practice the short lineout options used near the opposition try line. A 2-man lineout (hooker + one jumper/lifter) with the scrum-half creates a fast, unpredictable ball that the defence struggles to read. This variation also develops the hooker's ability to throw accurately to different distances.
Progression — Lineout Under Fatigue. After a conditioning block (e.g., 4 × 200m runs), immediately run the lineout drill. The technical breakdown that occurs under fatigue is exactly what happens in the final 20 minutes of a match. Coaching players to maintain technical standards when tired is the most valuable training adaptation you can create.
Age Adaptations

| Age Group | Key Modifications |
|---|---|
| Under 10 / Under 12 | No lifting allowed (World Rugby laws). Focus entirely on the throw and catch at standing height. Use a shorter lineout of 3–4 players. Emphasise fun and basic throwing mechanics. Reduce distances: 5m throw maximum. |
| Under 14 | Introduce lifting with strict technique coaching. Use only 2-man lifts (no full 2-person lift until U16). Focus on the throw-lift-catch sequence before adding exit plays. |
| Under 16 | Introduce full lifting laws. Begin adding the maul option. Introduce a simple 2-call system (A = front, B = middle). Backs attack option can be introduced in the second half of the season. |
| Open / Senior | Full drill as described above. Add contested lineout, fatigue progressions, and a rotating call system. Introduce the "peel" option where the Number 8 (8) receives the ball and carries around the tail of the lineout. |
This drill is designed to be run immediately. Print the diagrams, brief your forwards and backs separately on their roles, then bring them together for the full sequence. The lineout is a weapon — treat it like one.