Precision Lineout: Set Piece Mastery Drill
A comprehensive lineout drill that builds hooker accuracy, lifter synchronisation, and three attacking play options from a secured lineout — ready to run in your next session.

Equipment Needed
Overview
The lineout is one of rugby's most technically demanding set pieces, yet it is also one of the most controllable. Unlike a scrum, where outcomes are heavily contested from the first engagement, a well-rehearsed lineout gives the attacking team a genuine opportunity to dictate terms — choosing where the ball is delivered, which player receives it, and what attacking shape emerges. This drill, Precision Lineout: Set Piece Mastery, is designed to give coaches a structured, progressive framework for developing all three phases of lineout execution: the throw, the lift, and the exit play.
Use this drill during any session where set-piece reliability is a priority. It is particularly valuable in the two to three weeks before a competitive fixture, when players need to sharpen their calls, timing, and communication under realistic pressure. It is equally effective as a standalone technical session for squads that are conceding too many lineout turnovers or struggling to convert lineout possession into meaningful attacking phases.
Setup

Equipment Required
- 1 rugby ball per lineout group (minimum 2 balls recommended for flow)
- Cones to mark the 5m and 15m lines if pitch markings are faint
- Tackle bags (2) for the maul variation
- Bibs in two colours (attacking and defending)
- Whiteboard or coaching clipboard for call communication
Pitch Setup
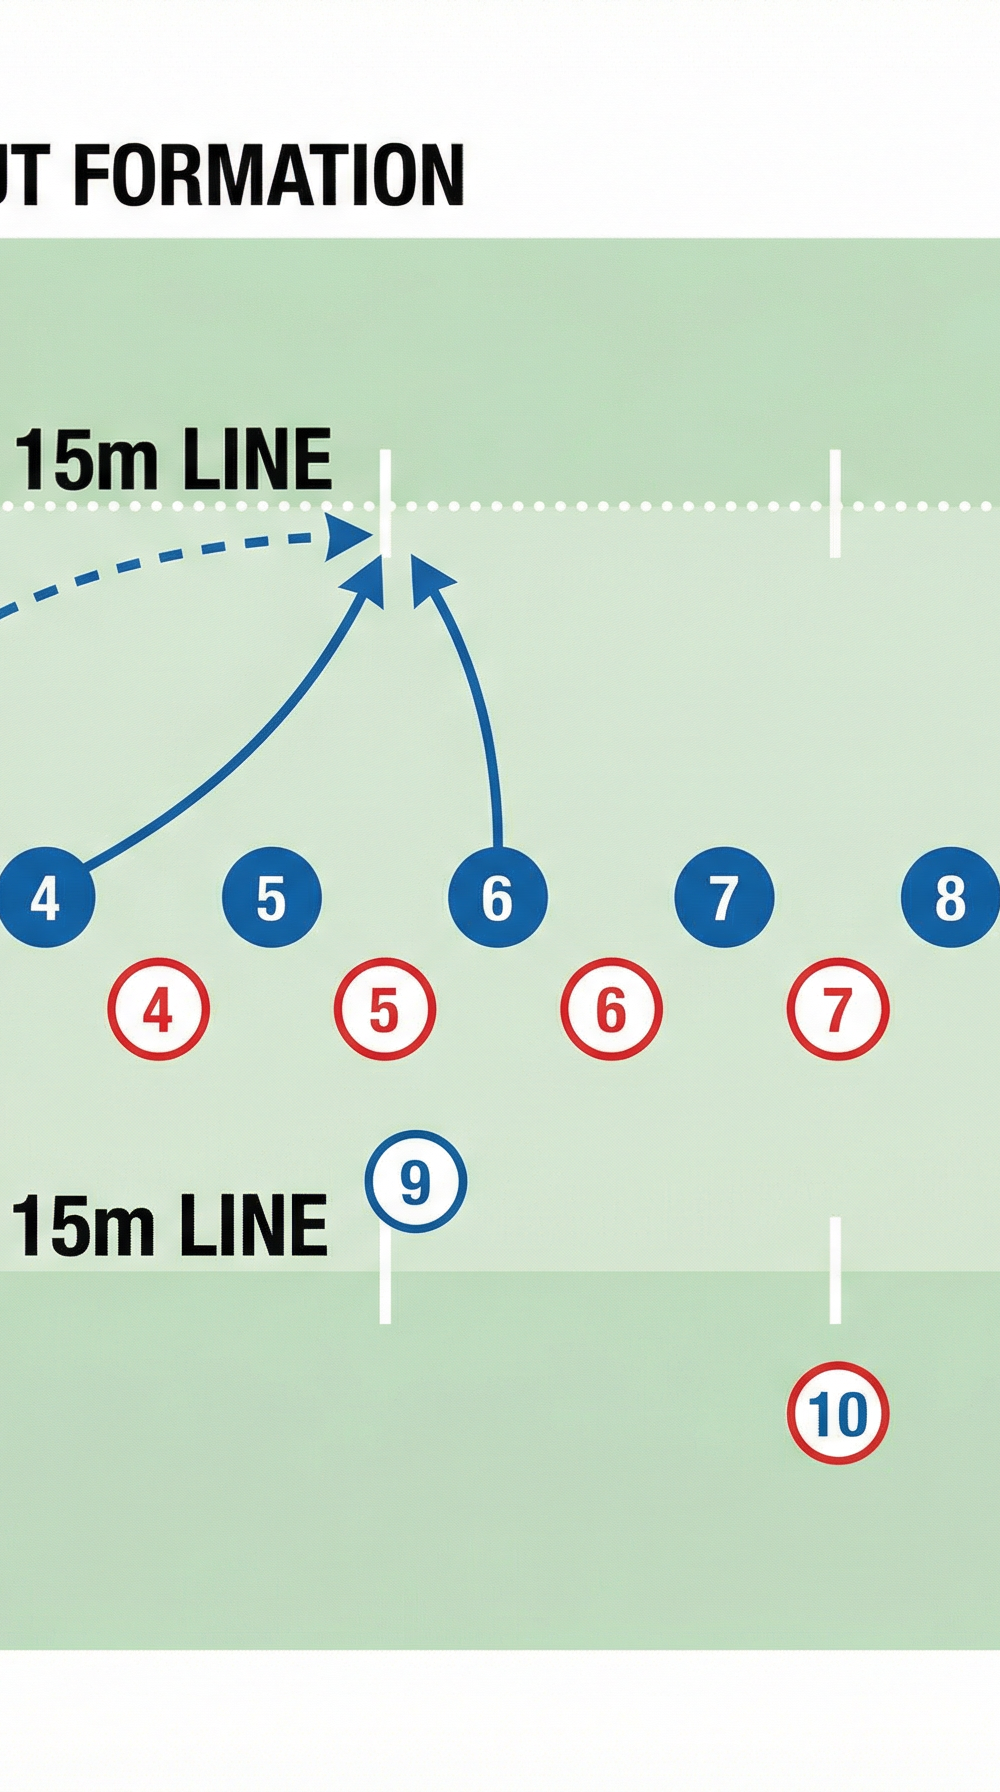
Use a 20m wide by 15m deep channel along the touchline, replicating the exact dimensions of a match lineout. Mark the touchline, the 5m line, and the 15m line clearly. The lineout itself is formed between the 5m and 15m lines. The scrum-half operates from 1m behind the lineout, and the fly-half sets up 10–12m from the lineout in the midfield channel.
Player Positions
| Position | Number | Role in Lineout |
|---|---|---|
| Hooker | 2 | Thrower — stands on the touchline |
| Loosehead Prop | 1 | Front lifter (front of lineout) |
| Lock | 4 | Primary jumper (front pod) |
| Tighthead Prop | 3 | Support lifter (front pod) |
| Lock | 5 | Secondary jumper (middle pod) |
| Blindside Flanker | 6 | Lifter (middle pod) |
| Openside Flanker | 7 | Back of lineout support |
| Number 8 | 8 | Back pod driver / maul initiator |
| Scrum-half | 9 | Ball receiver at base |
| Fly-half | 10 | First receiver in backline |
For this drill, a minimum of 10 players are required for the attacking unit. Add 5 defenders (opposing 2, 4, 5, 6, 7) to introduce competitive pressure in the later stages.

Diagram 1: Lineout Formation — showing attacking positions (blue), defending positions (red), the throw trajectory (dashed arrow), and lifter movement (solid arrows).
Step-by-Step Instructions

Phase 1 — Unopposed Technical Work (15 minutes)
Set the lineout. Position all forwards between the 5m and 15m lines. The hooker stands on the touchline. The scrum-half takes up position 1m behind the lineout, parallel to the 15m line. The fly-half is 10m back in the midfield channel.
Call the play. The hooker (No. 2) or the lineout captain calls the lineout code — for example, "Blue One" signals a throw to the front jumper (No. 4). All players must know the call before the hooker steps to the touchline.
Lifters bind and prepare. The front pod lifters (Nos. 1 and 3) bind on the jumper's shorts and thighs, knees bent, ready to drive upward. Timing is everything — lifters must not move until the hooker's throwing arm begins its motion.
The throw. The hooker delivers a flat, fast throw to the target zone — the jumper's hands at full extension. The ball should travel on a straight trajectory, arriving at the peak of the jump. Emphasise a consistent throwing action: same grip, same stance, same release point every time.
The catch and secure. The jumper (No. 4) catches with both hands, pulls the ball into the chest, and presents it cleanly downward to the scrum-half. The lifters hold the jumper elevated until the ball is clearly secured.
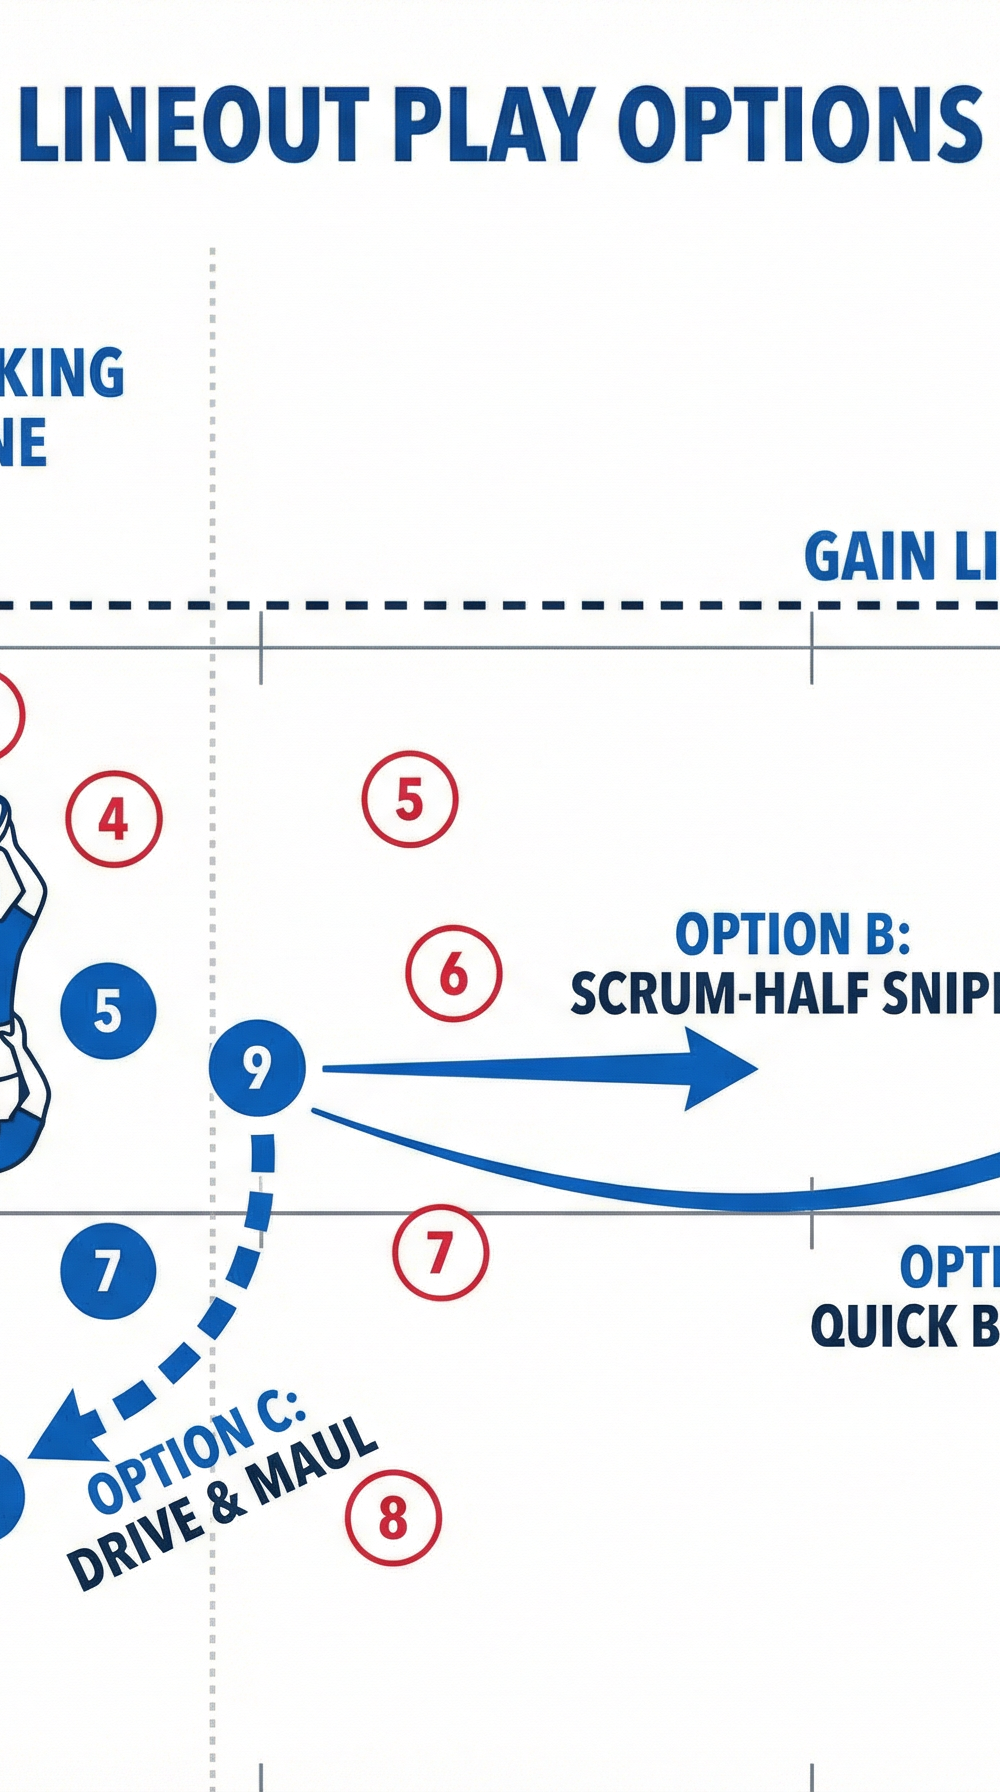
Exit play — Option A (Quick ball to 10). The scrum-half (No. 9) receives the ball and immediately fires a flat pass to the fly-half (No. 10), who is running onto the ball at pace. The backline continues from this point. Repeat 5 times.
Exit play — Option B (Scrum-half snipe). After securing the ball, the scrum-half identifies a gap between the last lineout forward and the first defender, and drives through it with the ball at pace. Forwards must hold their positions long enough to create the gap. Repeat 5 times.
Exit play — Option C (Drive and Maul). The jumper is lowered and immediately the back pod (Nos. 7 and 8) bind onto the ball carrier, forming a driving maul. The scrum-half feeds the ball from the back of the maul after 3–4 metres of forward momentum. Repeat 5 times.
Phase 2 — Opposed Lineout (15 minutes)
Introduce the defending lineout (Nos. 2, 4, 5, 6, 7 in red bibs). The defending hooker stands 1m from the touchline on the opposite side. Defenders must not enter the lineout until the ball is in the air.
Run all three exit play options against live opposition. Rotate through calls so defenders cannot predict the target. Debrief after every 3 lineouts.

Diagram 2: Lineout Play Options — showing all three attacking exit routes from the scrum-half (No. 9): Option A (quick ball wide to No. 10), Option B (scrum-half snipe through the gap), and Option C (drive and maul with No. 8).
Key Coaching Points

1. The throw is the foundation. Every lineout starts and ends with the quality of the throw. Coach the hooker to develop a consistent pre-throw routine — same foot position, same ball grip, same target focus. A throw that is 10cm off target at the touchline becomes a missed catch 7m away.
2. Lifters must be synchronised, not just strong. Lifting power is secondary to timing. Both lifters must begin their drive at exactly the same moment — one lifter going early will rotate the jumper and ruin the catch. Use a verbal or physical cue (e.g., the hooker's first step) as the shared trigger.
3. The jumper creates the target. The jumper should extend both arms fully above the head, creating a clear target for the hooker. Hands that are low, close together, or moving at the point of catch are the most common cause of lineout errors.
4. The scrum-half must be decisive. Once the ball is secured, the scrum-half has 1–2 seconds before defenders reorganise. Hesitation kills the advantage. Drill the scrum-half to make the exit-play decision before the ball arrives — read the call, read the defence, commit.
5. Communication is a skill, not an afterthought. The lineout call must be communicated clearly, confirmed by the jumper, and understood by every forward in the pod. Introduce a confirmation signal (e.g., a tap on the thigh) so the hooker knows the lineout is set before throwing.
6. Maintain shape after the lineout. Forwards who wander after the ball is won become a liability. Nos. 6, 7, and 8 must hold their positions and be ready to support the exit play — either as maul binders, carrying options, or defensive cover if possession is lost.
Common Mistakes
Mistake 1 — Throwing too early. The hooker throws before the lineout is fully set, catching lifters flat-footed and jumpers out of position. Correction: Insist the hooker makes eye contact with the jumper and receives a visual confirmation before initiating the throw. Use a 3-second minimum set time in early practice.
Mistake 2 — Lifters releasing too soon. Lifters drop the jumper before the ball is secured, causing the catch to be made at waist height rather than full extension. Correction: Drill the rule: lifters hold until the scrum-half calls "ball" or the jumper physically presents the ball downward.
Mistake 3 — Scrum-half standing too close to the lineout. A scrum-half who is pressed against the lineout has no time to assess options and is easily pressured by a blitzing defender. Correction: Mark a cone 1m behind the lineout and insist the scrum-half's heels are behind it at all times.
Mistake 4 — Predictable calling patterns. Coaches who always throw to the same jumper or always use the same exit play will be read and disrupted by any organised defence within two or three lineouts. Correction: Rotate calls deliberately in training. Challenge the hooker to throw to all three pods with equal confidence.
Mistake 5 — Forwards not binding tightly in the maul. A loose maul is easily killed by defenders who can strip the ball or collapse the structure. Correction: Teach the "chest-to-back" binding principle — every forward's chest should be pressed against the back of the player in front, with a low body position and driving legs.
Variations and Progressions
Variation 1 — Short Lineout (4-man). Reduce the lineout to four players (Nos. 2, 4, 5, 8) to create a faster, more deceptive set piece. This is particularly effective in the opposition's 22m area where space is at a premium. The reduced numbers also give the scrum-half more room to operate and create a wider range of exit options.
Variation 2 — Lineout Under Pressure. Introduce a time constraint: the hooker must throw within 5 seconds of the lineout forming, or possession is turned over. This replicates match conditions where referees are strict on lineout timing and forces players to set quickly and communicate efficiently.
Progression 1 — Full Set Piece to Phase Play. After securing the lineout and executing the exit play, continue into a full phase of attacking play — the backline runs a pre-set move off the fly-half. This develops the connection between the set piece and the wider attacking structure, which is where many teams lose cohesion.
Progression 2 — Contested Lineout with Turnover Scenario. If the defending team wins the lineout, they immediately counter-attack with the ball. The attacking team must transition to defence. This adds a consequence to poor execution and sharpens the mental focus of all players.
Age Adaptations

Under 12 and Below — Simplified Lineout. At this age, lifting is not permitted under World Rugby regulations. Focus entirely on the throw and the catch. Use a 3-man lineout (hooker, two jumpers) and practise accurate throwing to a stationary target. Jumpers stand on their own feet and simply catch the ball at chest height. The emphasis is on fun, accuracy, and basic communication.
Under 14 — Introduction to Lifting. Players at this age can begin learning the mechanics of lifting under close supervision. Use tackle bags or a partner in a static position before progressing to dynamic lifts. Limit the lineout to 5 players and focus on the front pod only. Exit plays should be restricted to Option A (quick ball to 10) until the throw-and-catch is reliable.
Under 16 and Open Age — Full Drill as Described. All three phases and all three exit play options are appropriate. Open-age squads should additionally practise lineout calls under crowd noise (use music or shouting) and against a blitzing defensive lineout to replicate the most challenging match scenarios.