Scrum Play: Blindside Attack — Number Eight Peel with Wing Finish
Master the blindside scrum attack by exploiting the narrow side of the field with a Number Eight peel, forward pod drive, and overlapping wing finish — a high-percentage set play that punishes defensive drift.

Equipment Needed
Overview
The Blindside Scrum Attack is one of the most reliable and tactically rewarding set plays in the modern game. When your team wins a scrum on or near the opposition's 22-metre line — particularly within 15 metres of the touchline — the blindside channel represents a prime attacking corridor. The defending team's blindside flanker and wing are frequently isolated, outnumbered, or caught in two-minds between tracking the openside threat and covering the short side.
This play exploits that indecision ruthlessly. By using the Number Eight (8) to peel from the base of the scrum, supported by the Blindside Flanker (6) and Left Wing (11), you create a two-on-one or three-on-two overlap in a condensed space. The Fly-half (10) and Inside Centre (12) act as decoy runners on the openside, holding the defensive line and preventing them from flooding across. The result is a high-tempo, low-risk attacking sequence that can be executed from anywhere in the opposition half.
Best used when: the scrum is within 15 metres of the left touchline (blindside), your pack is dominant and winning clean ball, the opposition's defensive line is drifting to the openside, or you have a powerful ball-carrying Number Eight and an elusive Left Wing.
Setup

Equipment Required
- 1 full-size Rugby pitch (100m × 70m) or a marked training grid of at least 40m × 30m
- 1 match ball (size 5 for senior, size 4 for under-14 and below)
- Scrum machine or tackle bags (for unopposed/semi-opposed practice)
- Cones to mark the 5-metre and 22-metre lines
- Bibs in two contrasting colours (attackers and defenders)
- Tackle shields (2–3) for contact progression work
Pitch Setup
Mark a scrum position approximately 8 metres from the left touchline and 10 metres from the opposition try line (inside the 22). This represents the most common game-realistic scenario for this play. The blindside channel is the 8-metre corridor between the scrum and the touchline. The openside stretches across the remaining 62 metres of pitch width.
Player Positions at Scrum
| Position | Number | Starting Location |
|---|---|---|
| Loosehead Prop | 1 | Front row, left of hooker |
| Hooker | 2 | Front row, centre |
| Tighthead Prop | 3 | Front row, right of hooker |
| Left Lock | 4 | Second row, left |
| Right Lock | 5 | Second row, right |
| Blindside Flanker | 6 | Left flank of scrum, bound to 4 |
| Openside Flanker | 7 | Right flank of scrum, bound to 5 |
| Number Eight | 8 | Back of scrum, between 4 and 5 |
| Scrum-half | 9 | 1 metre behind scrum base, left side |
| Fly-half | 10 | 5 metres behind scrum, openside |
| Left Wing | 11 | 10 metres left of scrum, near touchline |
| Inside Centre | 12 | 8 metres behind scrum, openside |
| Outside Centre | 13 | 12 metres behind scrum, openside |
| Right Wing | 14 | Wide right, 20 metres from scrum |
| Fullback | 15 | 15 metres directly behind scrum |

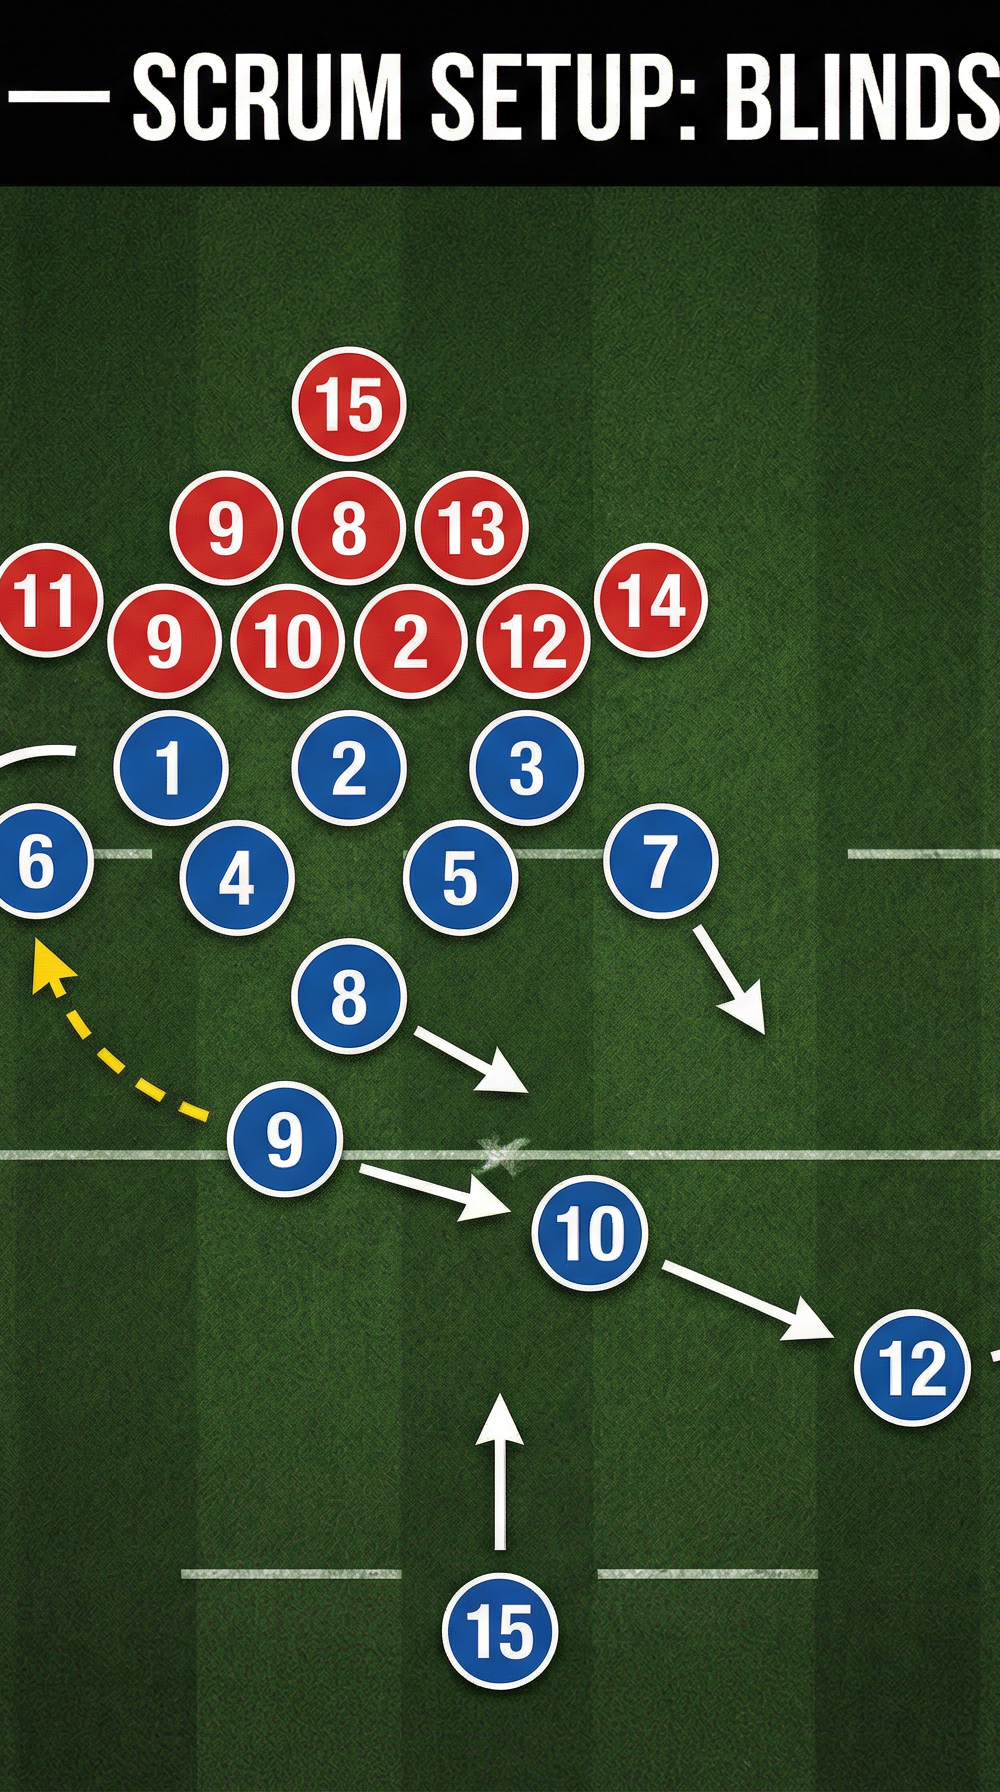
Diagram 1 shows the initial scrum setup with all 15 attacking positions (blue) and the defensive alignment (red). Note the blindside channel to the left and the openside decoy runners (10, 12) positioned to hold the defensive line.
Step-by-Step Instructions

Step 1 — Set the Scrum and Establish Dominance (0–3 seconds)
The front row engages and the pack drives forward. The hooker strikes for the ball cleanly. The Number Eight (8) controls the ball at the back of the scrum with their feet, holding it until the call is made. The scrum must be stable and moving forward — a retreating scrum gives the defence time to reset. Communicate the play call in the huddle before the scrum: use a simple code word such as 'Blind Eight' or a colour system.
Step 2 — Scrum-half (9) Positions on the Blindside (0–3 seconds)
As the scrum engages, the Scrum-half (9) positions themselves on the left (blindside) side of the scrum base, no more than 1 metre from the Number Eight's feet. This positioning is the first signal to the defence that the blindside is live. The Scrum-half should be low, balanced, and ready to receive or act as a dummy receiver.
Step 3 — Left Wing (11) Enters the Line (0–3 seconds)
Simultaneously, the Left Wing (11) must be moving infield from the touchline, timing their run to arrive at the gain line just as the ball is picked up. The Wing should start their run from approximately 10 metres out and aim to be at full pace by the time they receive a pass. This timing is the most practised element of the play.
Step 4 — Number Eight (8) Picks and Drives (3–4 seconds)
On the signal (typically a shout of 'Now!' from the Scrum-half), the Number Eight picks the ball cleanly from between their feet and drives hard into the blindside channel, targeting the space 2–3 metres to the left of the scrum. The Number Eight must hit the gain line with power and intent. Their body position should be low, ball secured in two hands, driving off both legs.
Step 5 — Blindside Flanker (6) Supports on the Inside Shoulder (3–5 seconds)
The Blindside Flanker (6) releases from the scrum as soon as the Number Eight picks up and runs a hard, flat support line 1 metre inside and 1 metre behind the Number Eight. If the Number Eight is held up, the Flanker takes the offload or cleans out the ruck. If the Number Eight breaks the first tackle, the Flanker becomes the next ball carrier.
Step 6 — Fly-half (10) and Inside Centre (12) Run Decoy Lines (3–5 seconds)
The Fly-half (10) takes a flat running line across the face of the scrum on the openside, calling loudly for the ball. The Inside Centre (12) runs a hard line 2 metres outside the Fly-half. These are decoy runners — their job is to hold the defensive line and prevent drift to the blindside. They should commit fully to their lines even though they will not receive the ball on this phase.

Diagram 2 illustrates Phase 1 of the play: the Number Eight (8) peels to the blindside attack zone, supported by the Blindside Flanker (6) and the Left Wing (11) curling infield. The Fly-half (10) and Inside Centre (12) run decoy lines on the openside, holding the defensive line.
Step 7 — Recycle or Offload at the Breakdown (4–6 seconds)
If the Number Eight is tackled, the Blindside Flanker (6) and arriving forwards secure the ruck immediately. The Scrum-half (9) must get to the ruck base within 2 seconds and deliver quick ball. If the Number Eight beats the first defender, they look for the offload to the Left Wing (11) who should be arriving at pace on the outside shoulder.
Step 8 — Scrum-half (9) Fires Quick Ball to Left Wing (11) (6–7 seconds)
From the ruck, the Scrum-half delivers a fast, flat pass to the Left Wing (11) who is running a wide arc toward the try line. The pass must be delivered before the defensive line resets. The Left Wing should be running at the inside shoulder of the last defender, forcing a decision: tackle the Wing and concede the outside, or drift and allow the cut-back.
Step 9 — Fullback (15) Provides Depth Support (6–8 seconds)
The Fullback (15) runs a support line 5 metres behind and outside the Left Wing (11), providing the final option if the Wing is caught. The Fullback should be calling loudly to communicate their presence.
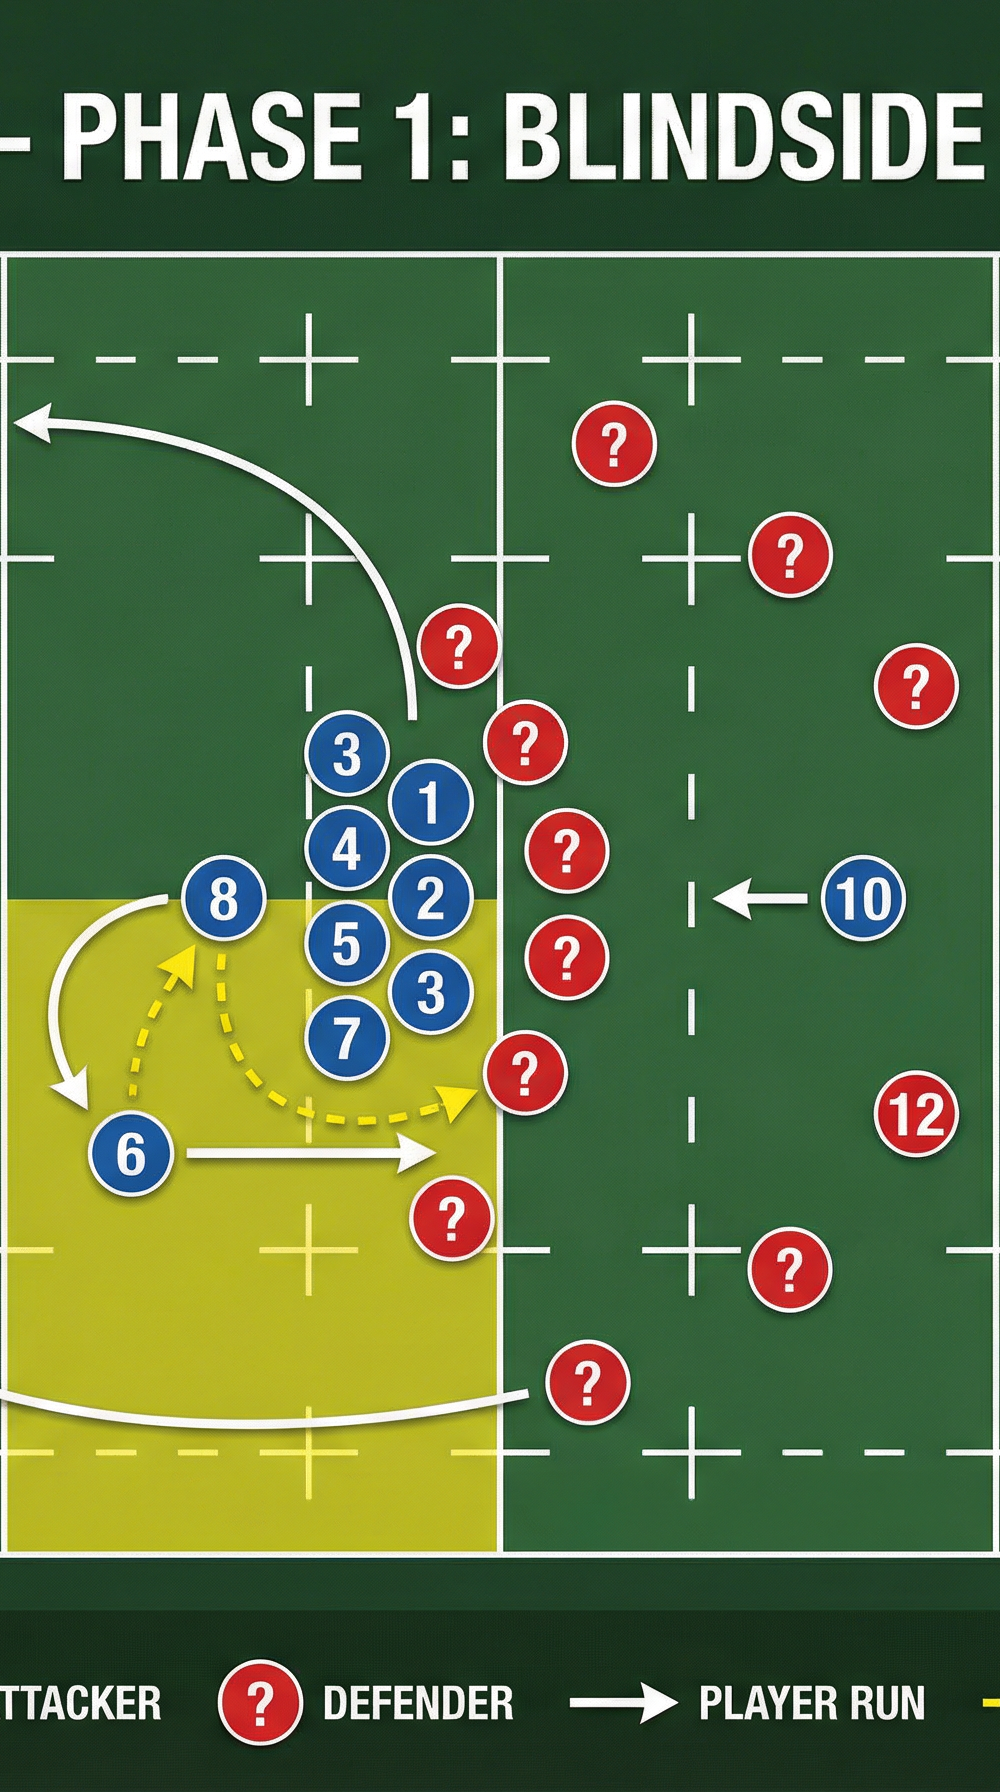
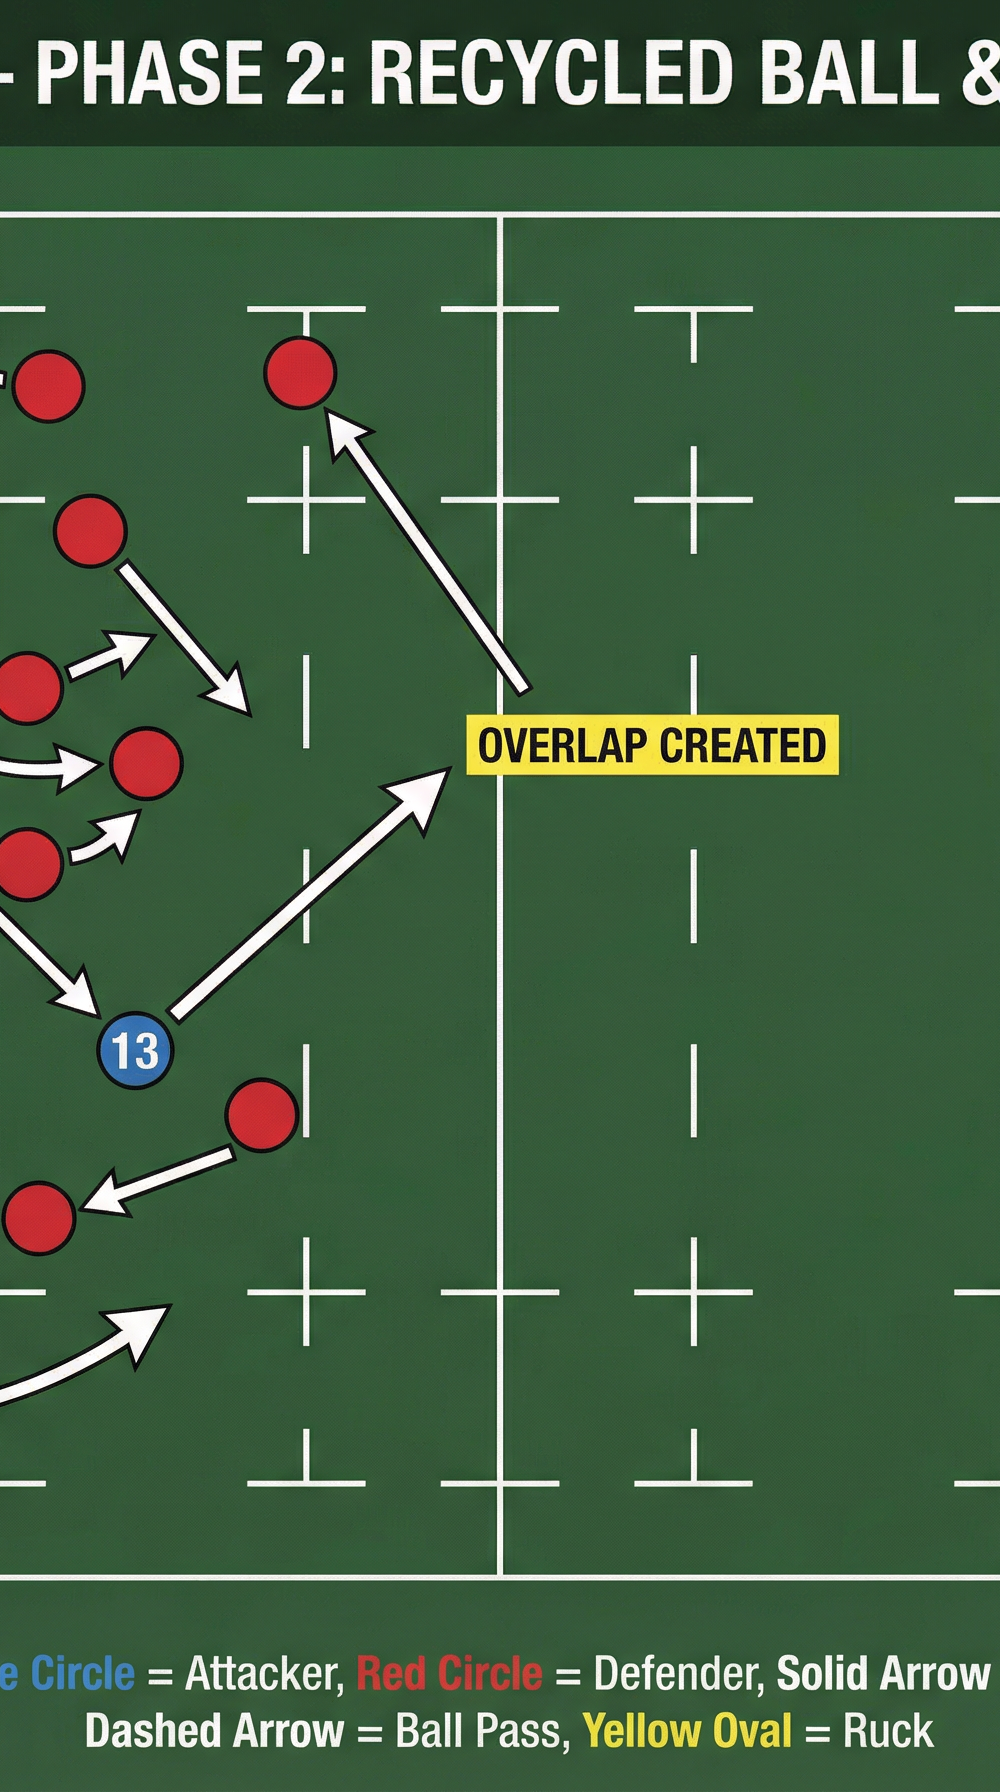
Diagram 3 shows Phase 2: after the ruck is secured, the Scrum-half (9) fires quick ball to the Left Wing (11) running a wide arc toward the try zone. The overlap is created as defenders scramble from the middle. The Fullback (15) provides depth support.
Key Coaching Points

1. Scrum Dominance is Non-Negotiable. This play only works if the scrum is stable and moving forward. A retreating or unstable scrum gives the defence time to read the play and reset. Spend the first 10 minutes of every session reinforcing scrum body position before introducing the set play.
2. The Number Eight Must Hit the Gain Line. The entire play is predicated on the Number Eight (8) reaching or crossing the gain line on the initial carry. A ball carrier who is stopped behind the gain line compresses the space for the Left Wing and allows the defence to flood across. Coach the Number Eight to drive off both legs, keep their hips low, and target the gap between the opposition's Blindside Flanker and Wing.
3. Timing of the Left Wing's Run is Everything. The Left Wing (11) must be at full pace when they receive the ball. Too early and they arrive before the ruck is secured; too late and the defence has reset. Use a consistent trigger — typically the Scrum-half's call of 'Go!' — and drill the timing repeatedly in unopposed practice before adding defenders.
4. Decoy Runners Must Fully Commit. The Fly-half (10) and Inside Centre (12) must run their lines with genuine intent and pace. A half-hearted decoy fools no one. Defenders are trained to read body language — if the decoy runners jog or hesitate, the defensive line will drift to the blindside and shut the play down. Reward committed decoy running in training.
5. Quick Ball from the Ruck is the Difference-Maker. The window to attack before the defence resets is approximately 3–4 seconds from the moment the ruck is formed. The Scrum-half must be at the ruck base immediately, and the forwards must secure the ball cleanly on their side. Practise ruck clearance and quick delivery as a standalone drill.
6. Communication is the Glue. Every player must know the call, their role, and their trigger. Use a clear, simple call system — a colour plus a number works well (e.g., 'Blue Eight'). Run the play from a standing start in training until every player can execute their role without thinking.
Common Mistakes
Mistake 1 — Number Eight Picks Too Early. If the Number Eight picks the ball before the scrum is stable, the scrum may collapse or wheel, destroying the play. Coach the Number Eight to wait for the pack to settle and for the Scrum-half's call before picking.
Mistake 2 — Left Wing Starts Their Run Too Late. The most common timing error. If the Wing is still flat-footed when the ball reaches the ruck, they will be running at a standing start and will be caught by the recovering defence. Use a cone 10 metres from the scrum to mark the Wing's starting position and insist they begin their run as the scrum engages.
Mistake 3 — Scrum-half Telegraphs the Direction. If the Scrum-half positions themselves on the blindside before the scrum engages, the opposition's defensive coordinator will identify the play immediately. Coach the Scrum-half to set up in a neutral position and move to the blindside only as the ball reaches the Number Eight's feet.
Mistake 4 — Forwards Fail to Secure the Ruck. If only one or two forwards arrive at the breakdown, the opposition can contest the ball and slow it down. The Locks (4, 5) and Openside Flanker (7) must release from the scrum quickly and arrive at the ruck with purpose. Drill ruck clearance with a minimum of three forwards arriving within 2 seconds.
Mistake 5 — Decoy Runners Peel Off Early. If the Fly-half (10) or Inside Centre (12) stop their decoy runs before the play has developed, defenders will read the play and drift. Insist that decoy runners maintain their lines for a full 5 metres past the gain line before adjusting.
Variations & Progressions
Variation 1 — Scrum-half Snipe (Easier). Instead of the Number Eight peeling, the Scrum-half (9) takes the ball themselves and snipes around the blindside of the scrum, targeting the gap between the opposition's Blindside Flanker and the touchline. This is a simpler execution requiring fewer moving parts and is ideal for younger or developing teams. The Left Wing still runs the wide support line as a second option.
Variation 2 — Double Peel with Flanker Lead (Intermediate). The Blindside Flanker (6) leads the carry rather than the Number Eight (8), with the Number Eight following as the second runner. This creates a two-man pod on the blindside and is harder for the defence to read, as the Flanker releases from the scrum slightly earlier and can draw the first defender before the Number Eight arrives at pace.
Progression 1 — Add a Third Phase (Advanced). After the Wing Finish phase, add a pre-planned third phase: if the Left Wing (11) is held up short of the line, the Fullback (15) takes the ball on a short inside pass and drives for the corner. This requires the Fullback to read the Wing's body language and adjust their support line accordingly. Introduce this only once the two-phase version is consistently executed.
Progression 2 — Introduce Live Defence (Advanced). Begin the play in an unopposed or shadow format, then progress to a passive defence (defenders at 50% intensity), then a semi-live defence (defenders can tackle but must give a 1-metre start), and finally a fully live scenario. Each stage should be mastered before moving to the next.
Age Adaptations

Under 12 and Below. Remove the scrum element entirely and begin the play from a static ball on the ground, simulating a scrum base. Focus on the Scrum-half's pass to the Number Eight, the Number Eight's carry, and the Wing's support run. Keep the play to three players initially (9, 8, 11) and build from there. Emphasise fun and movement over tactical complexity.
Under 14 and Under 16. Introduce the full scrum formation but use a scrum machine rather than a live opposing pack for the first 3–4 sessions. Add the decoy runners (10, 12) once the core three-player sequence is reliable. Begin with passive defenders before progressing to semi-live contact. Focus heavily on the timing of the Wing's run — this age group most commonly struggles with this element.
Open Age (Senior). Run the full play as described, including live scrums, fully committed decoy runners, and the third-phase progression. Add a pre-play defensive analysis component: show players video of the opposition's blindside defensive patterns and adjust the play accordingly (e.g., if the opposition's Blindside Flanker is slow to release, target them with the Number Eight's initial carry).