Blindside Strike: The Scrum-Half to Flanker Peel
Exploit the narrow channel with a rapid scrum-half to blindside flanker attack, catching the defense off guard and creating immediate front-foot ball.

Equipment Needed
1. Overview
The Blindside Strike is a highly effective scrum play designed to exploit the often under-defended narrow channel (the blindside) near the touchline. By committing the opposition's back row to the scrum and using a rapid exchange between the scrum-half (9) and the blindside flanker (6), attacking teams can isolate the opposing winger or scrum-half. This play is particularly potent when the scrum is positioned between the 5-metre and 15-metre lines, leaving just enough room to operate while forcing the defense to respect the openside threat. It is an excellent tactic for generating immediate front-foot ball, breaking the gain line, and setting up rapid phase play.
2. Setup
Pitch Location: Best utilized when the scrum is set on the left or right side of the pitch, approximately 10 to 15 metres infield from the touchline (a standard 100m x 70m pitch provides a 10-15m blindside channel).
Player Positions:
- Forwards (1-8): Standard scrum formation, bound tightly. The Number 8 must control the ball at the base securely.
- Scrum-half (9): Positioned at the base of the scrum, ready to clear the ball rapidly.
- Blindside Flanker (6): Bound on the side of the scrum nearest the touchline, prepared to detach explosively.
- Backs (10, 12, 13, 14, 15): Positioned on the openside to hold the opposition's defensive line and act as decoy runners.
- Blindside Wing (11): Positioned deep and wide in the blindside channel, ready to offer outside support.
3. Step-by-Step Instructions

- The Set and Strike: The pack engages and secures the ball. The Number 8 controls the ball at their feet, keeping it shielded from the opposing scrum-half.
- The Call: The scrum-half (9) initiates the play with a pre-agreed verbal or physical trigger, signaling the blindside flanker (6) to prepare for detachment.
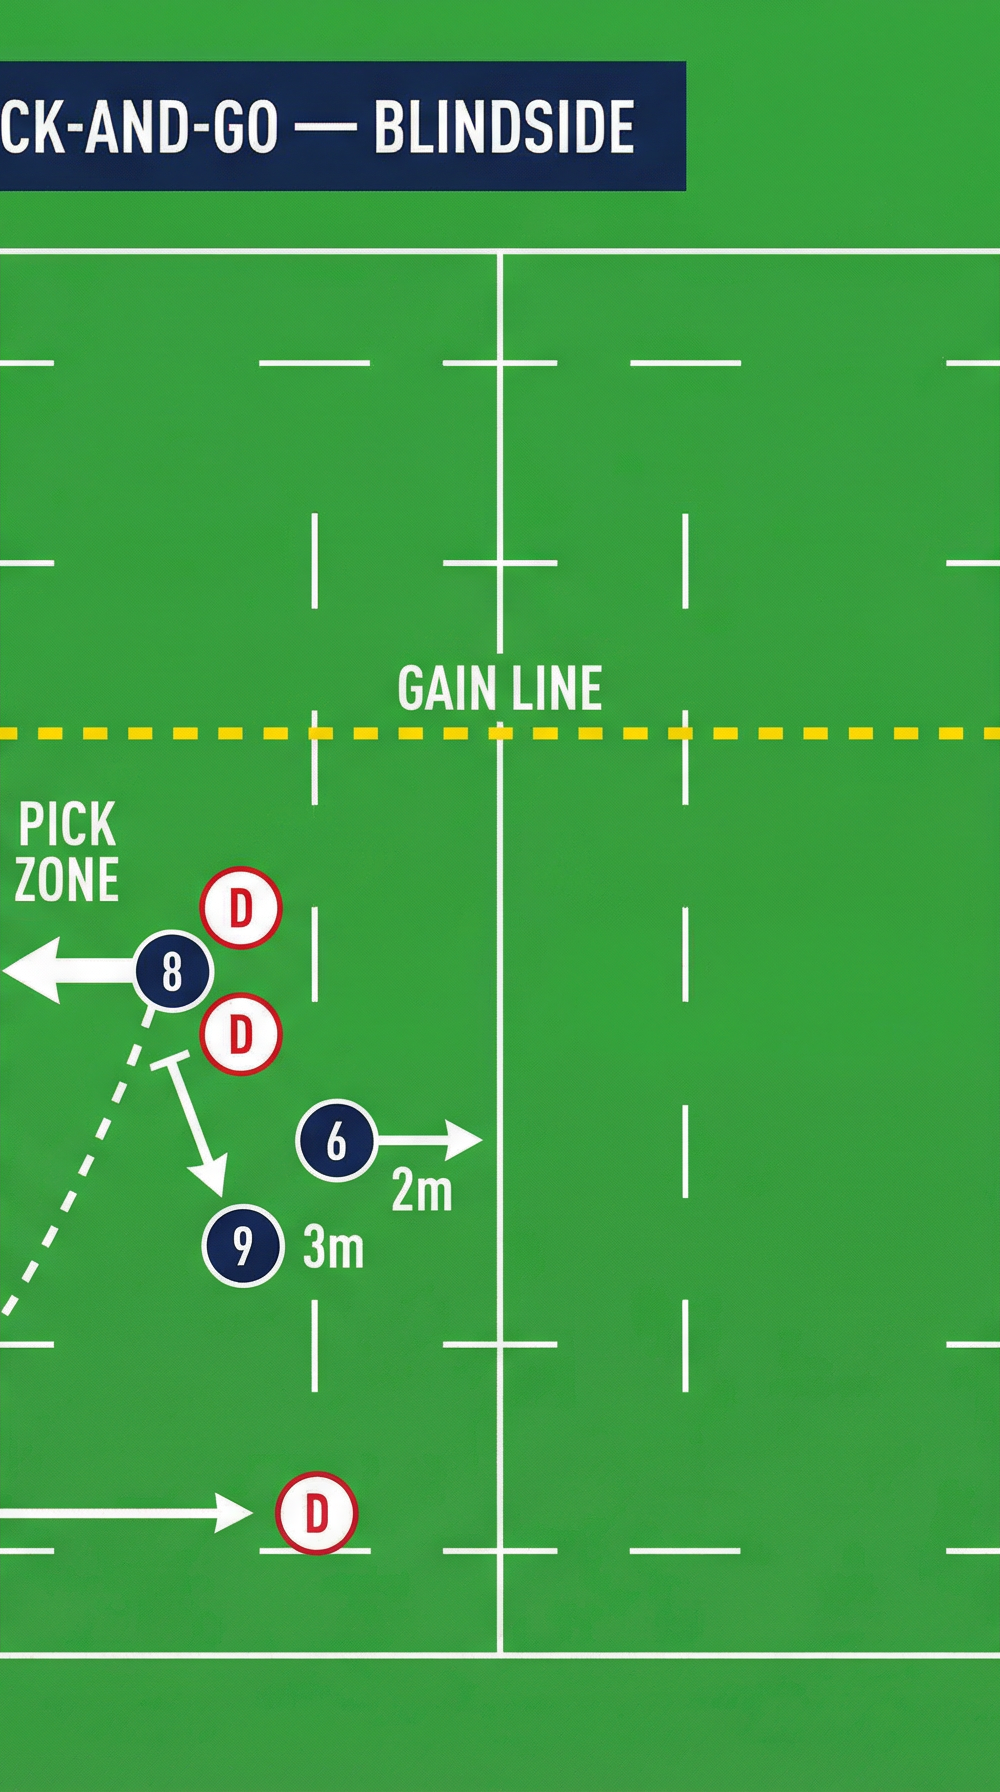
- The Peel: As the Number 9 digs the ball out, the blindside flanker (6) immediately unbinds and accelerates around the base of the scrum into the blindside channel. The timing must be precise; leaving too early results in a penalty, while leaving too late allows the defense to drift.
- The Pass: The scrum-half (9) delivers a swift, flat pass to the surging flanker (6). The pass should hit the flanker in stride, allowing them to attack the gain line without breaking momentum.
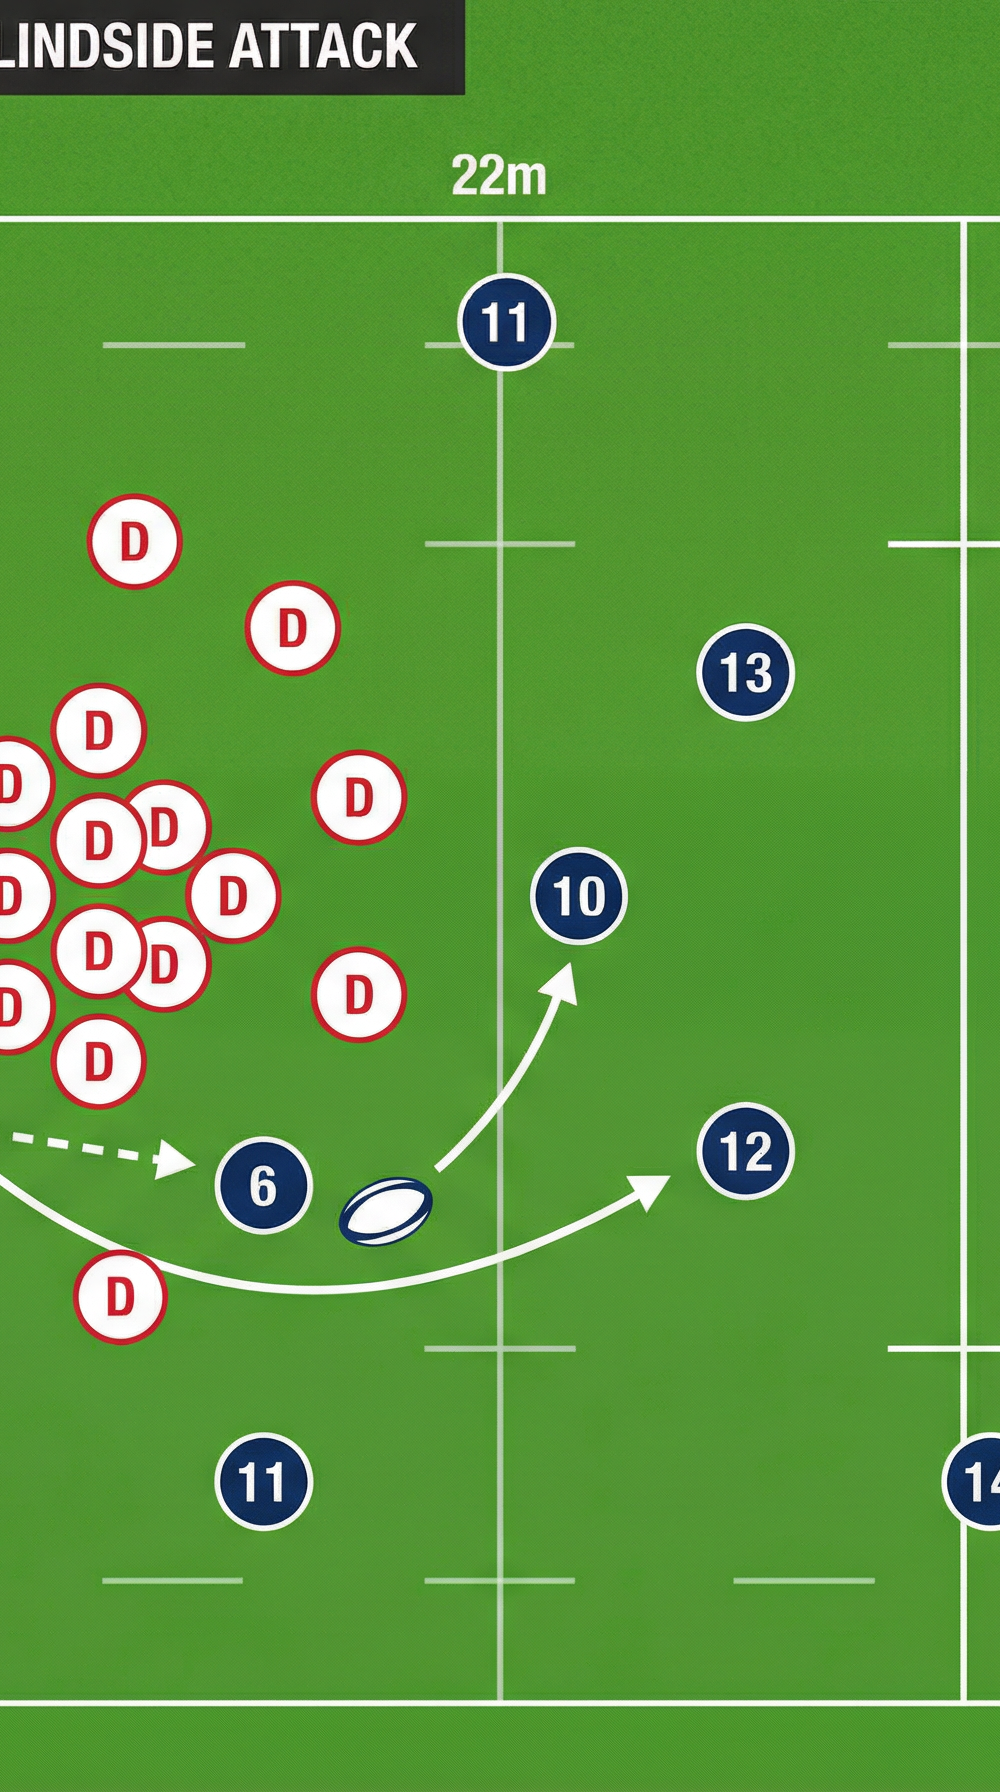
- The Attack: The flanker (6) attacks the space between the opposing scrum-half and the blindside winger. Their primary goal is to break the gain line and commit defenders.
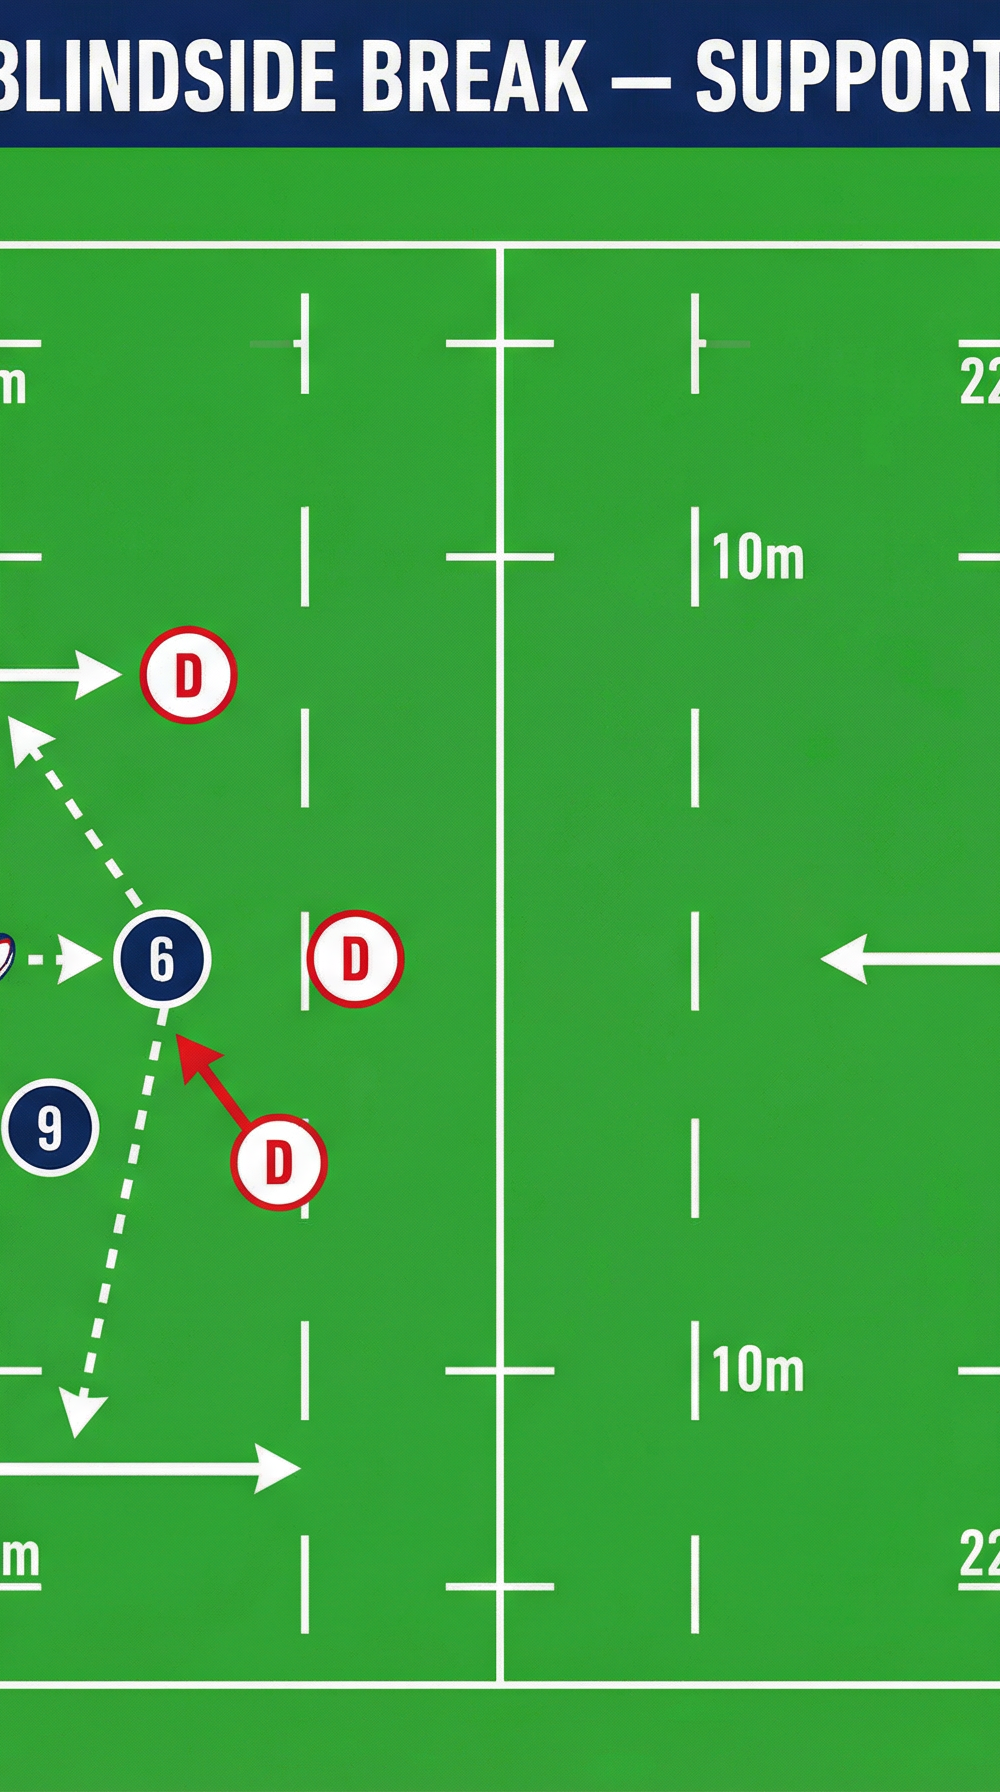
- Support Lines: The blindside winger (11) holds their width, offering an outside passing option if the defending winger bites in on the flanker. Simultaneously, the Number 8 detaches from the scrum and runs an inside support line, providing an offload option if the flanker is tackled.
- Decoy Action: The fly-half (10) and openside backs must run aggressive, realistic decoy lines to freeze the opposition's midfield defense, preventing them from folding across to the blindside.
4. Key Coaching Points
- Timing of the Peel: The flanker (6) must remain bound until the ball is physically out of the scrum. Premature detachment will result in a penalty for unbinding early.
- Scrum Stability: The forwards must maintain a strong, stable platform. Any backward movement or wheeling of the scrum will disrupt the timing and execution of the play.
- Pass Accuracy: The scrum-half's pass must be fast, flat, and accurate. A looping pass will give the defense time to slide and cover the space.
- Decoy Commitment: The openside backs must sell the dummy attack convincingly. If they stand flat or jog, the defense will immediately read the blindside play and shift across.
- Support Depth: Support runners (8 and 11) must maintain proper depth to offer viable passing options and avoid overrunning the ball carrier.
5. Common Mistakes
- Telegraphing the Play: The scrum-half looking exclusively down the blindside before the ball is out, alerting the defense to the intended attack.
- Poor Scrum Control: The Number 8 failing to control the ball at the base, leading to a messy extraction and delayed pass.
- Lateral Running: The flanker (6) running sideways toward the touchline instead of attacking vertically, allowing the defense to drift and push them into touch.
- Lack of Support: Support runners reacting too slowly, leaving the ball carrier isolated after making the initial break, which often results in a turnover.
6. Variations & Progressions
- Number 8 Pick-and-Go: Instead of the scrum-half passing, the Number 8 picks the ball from the base and attacks the blindside directly, with the scrum-half and flanker acting as support runners. This is highly effective near the opponent's try line.
- Scrum-Half Snipe: The scrum-half fakes the pass to the flanker and snipes through the gap themselves, utilizing the flanker as a decoy to draw the defending scrum-half.
- Winger Cut-In: The blindside winger (11) runs a hard, cutting angle off the flanker's shoulder, receiving a short pop pass to penetrate the defensive line closer to the ruck area.
7. Age Adaptations
- Under 10s / Under 12s: Focus purely on the basic pass from the scrum-half to the flanker. Ensure players understand the offside lines and the importance of running straight. Avoid complex decoy lines.
- Under 14s / Under 16s: Introduce the support lines from the Number 8 and the winger. Begin emphasizing the importance of the openside backs running realistic decoy lines to manipulate the defense.
- Open / Senior: Execute the full play with all variations. Focus on reading the defensive alignment pre-snap and calling the appropriate variation based on the opposition's setup. Emphasize explosive speed and precision timing.