Support Running and Angles: Building Continuity Through Intelligent Off-the-Ball Movement
Teach your players to read the ball carrier, time their runs, and arrive at the perfect support angle — turning isolated carries into sustained attacking phases.

Equipment Needed
Overview
This drill is the cornerstone of any structured attacking system. Support running and angles is not simply about being near the ball carrier — it is about arriving at the right place, at the right time, at the right depth and angle to give your team genuine continuity options. Poor support running is one of the most common reasons attacking phases break down at all levels of the game, from junior club rugby right through to elite competition.
Use this drill at the start of a pre-season block to establish attacking habits, or mid-season when your team is struggling to recycle ball cleanly after contact. It works equally well as a warm-up activity for senior squads or as the central skill focus for a junior development session. The drill isolates the decision-making and movement patterns that underpin every effective attacking structure — the 'pod' system, the 'wide-narrow-wide' game, and the classic 10-12-13 channel all rely on the principles trained here.
Setup

Grid dimensions: Mark out a 30m x 20m channel using 8 cones. This represents a realistic attacking corridor on a full-size 100m x 70m pitch. For junior groups, reduce to 20m x 15m.
Equipment required:
- 8 marker cones (minimum)
- 4 rugby balls
- 1 set of coloured training bibs (2 colours: attackers and defenders)
- Optional: tackle bags or pads for contact progressions
Player positions and starting formation:
Position players as follows at the bottom of the grid:
| Position | Number | Starting Location |
|---|---|---|
| Scrum-Half | 9 | Centre of grid, ball in hand |
| Fly-Half | 10 | 3m right of 9, 1m depth |
| Inside Centre | 12 | 8m right of 9, 2m depth |
| Outside Centre | 13 | 15m right of 9, 3m depth |
| Blindside Flanker | 6 | 4m left of 9, 3m depth |
| Number 8 | 8 | 2m left of 9, 5m depth |
| Openside Flanker | 7 | 1m right of 9, 5m depth |
For the initial unopposed phase, no defenders are required. Introduce 2 passive defenders (D1, D2) in the progression phase.

Diagram 1 shows the basic setup: 9 at the base, the backline aligned to the right, and forward support runners (6 and 8) positioned behind and to the left, ready to provide inside support angles after the initial pass sequence.
Step-by-Step Instructions

Phase 1 — Unopposed Pattern Work (10 minutes)
9 initiates. The scrum-half (9) calls "Ball!" and passes flat to the fly-half (10), who is running onto the ball at pace. The pass should be delivered at 10's hands — not behind, not above the shoulder.
10 fixes the channel. The fly-half runs a hard, flat line directly at the imaginary defensive line, committing to the space for 3–4 strides. This is critical: 10 must make the defence respect their running line before passing.
12 reads and angles. As 10 receives the ball, the inside centre (12) begins their run from depth. The key coaching point here is the angle of approach — 12 should run a line that starts slightly inward (toward the posts) before bending back out to receive the pass. This 'banana run' creates separation from the inside defender and generates momentum through the gain line.
13 mirrors the pattern. The outside centre (13) executes the same read off 12 as 12 did off 10 — starting flat, bending the run, arriving at depth and pace.
Forward support runners fill behind. Numbers 6, 7, and 8 do not stand and watch. From the moment 9 passes, they begin angled runs at 45 degrees behind the ball carrier, maintaining a 2–3m inside support position. If any ball carrier is 'tackled' (coach calls "Tackle!"), the nearest support runner must be in position to receive the offload or secure the ball.
Reset and repeat. After the sequence reaches the far end of the 30m grid, players rotate positions and the drill restarts from the opposite end.
Phase 2 — Passive Defender Introduction (10 minutes)
Introduce two defenders (D1 at 10m, D2 at 15m) who walk into the line but do not tackle. Attackers must now read the defender's position and adjust their support angle accordingly — if D1 drifts onto 10, the support runner from 12 must tighten their angle to offer an inside pass option.
Phase 3 — Live Contact Progression (10 minutes)
Defenders now tackle (or use tackle shields). The ball carrier must attempt to stay on their feet and present the ball cleanly. Support runners must arrive at pace, secure the ball, and continue the attack. The sequence is complete when the ball crosses the far try line or possession is lost.
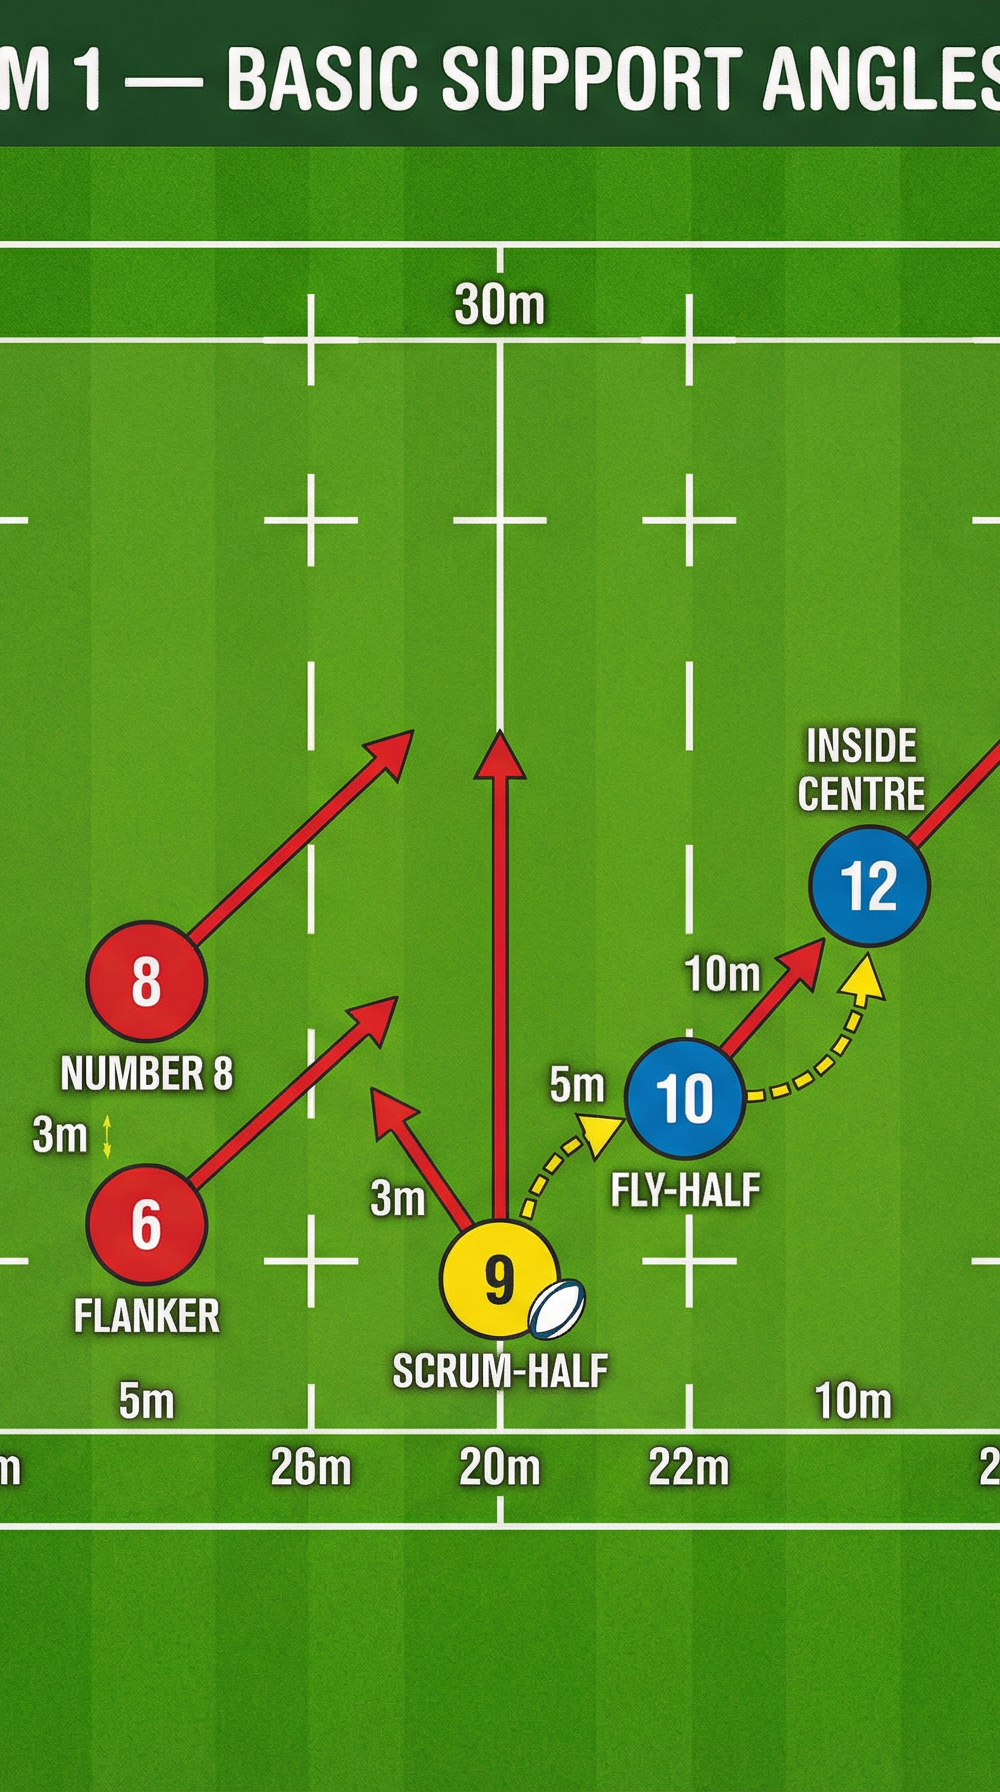
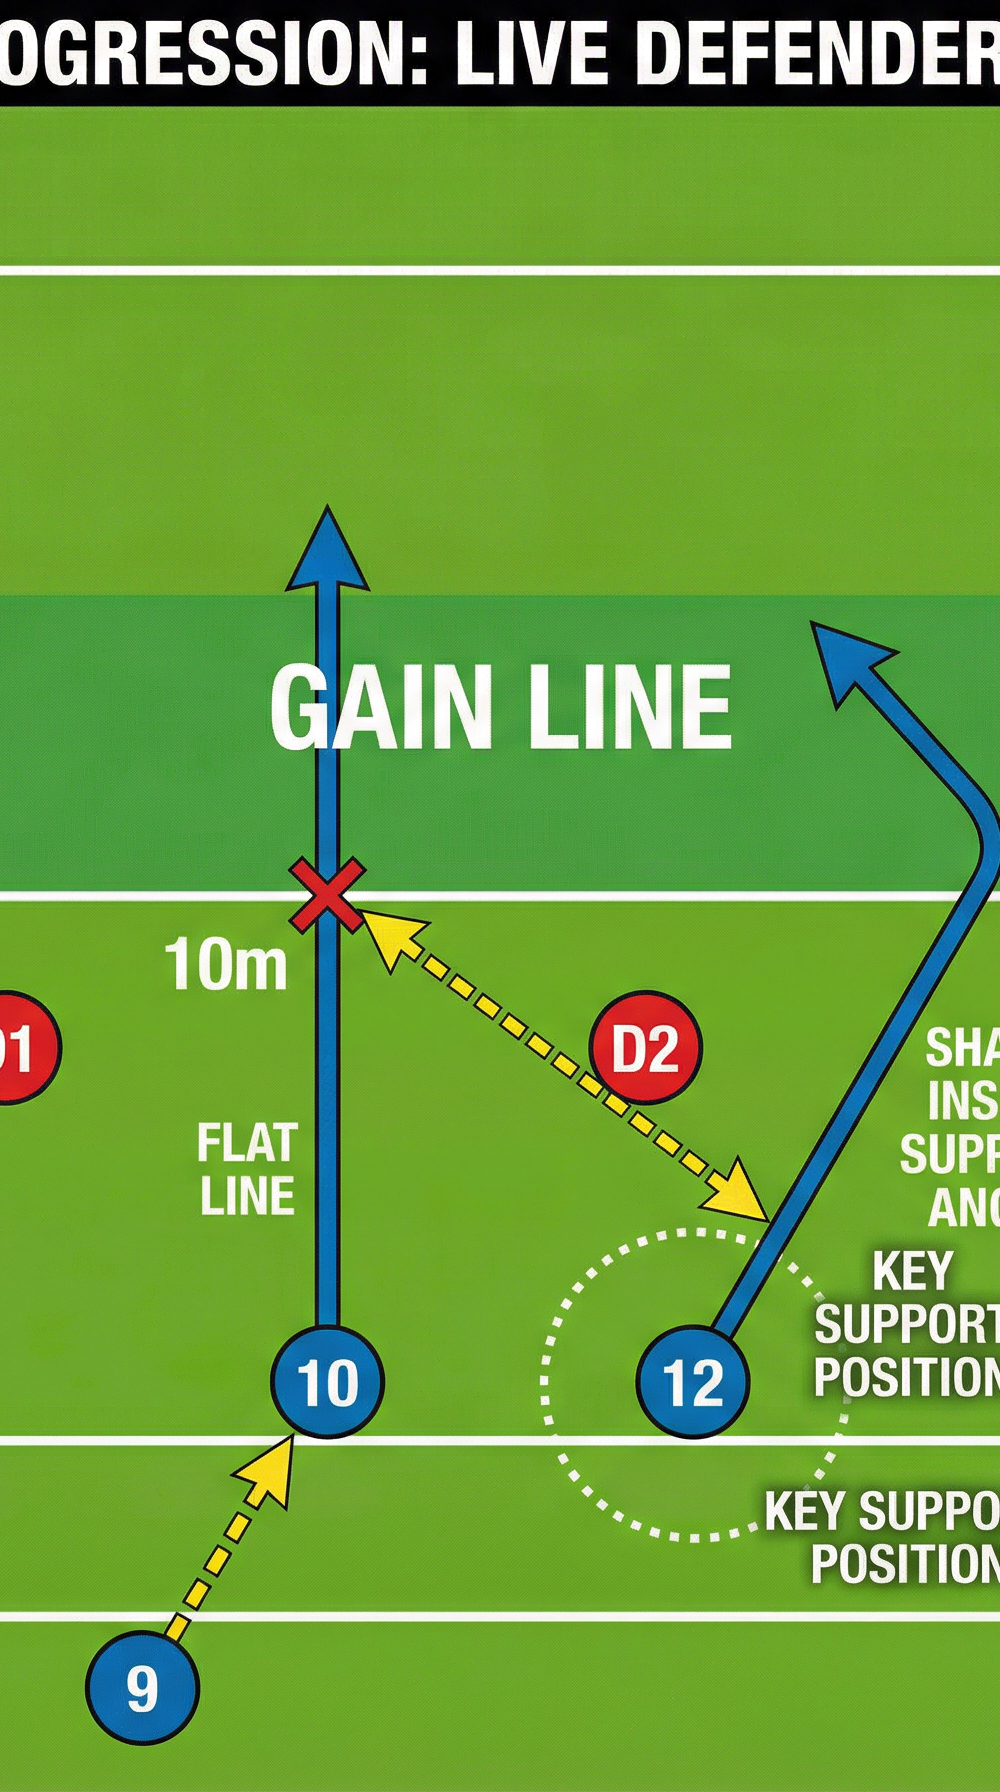
Diagram 2 illustrates the live defender progression. Note how 12 (the key support position, circled) reads 10's flat line, anticipates the contact point, and bends their run to arrive at the inside shoulder — precisely where the ball will be presented after the tackle. 13 simultaneously executes a wide looping arc to provide the second-phase wide option.
Key Coaching Points
1. Depth creates time; time creates options. Support runners who are too flat have no time to adjust their angle once the ball carrier commits. Insist on a minimum of 2m depth behind the ball carrier at the moment of reception. Use the phrase: "Get behind the ball before you get beside it."
2. The inside shoulder is the target. Support runners should aim to arrive at the inside shoulder of the ball carrier — not directly behind them. This angle allows the ball carrier to offload without turning their body, and it puts the support runner in a forward-facing position to continue the attack.
3. Read the ball carrier's hips, not their eyes. Players often watch the ball carrier's face for cues. Train them to watch the hips — the hips tell you where the body is going and when contact is imminent. When the hips drop and square up, the support runner must accelerate to the contact point immediately.
4. Communicate constantly. Every support runner must call their position loudly: "Left shoulder!", "Right!", "Coming inside!" This removes the cognitive load from the ball carrier and allows them to focus on the defender. Silent support running is ineffective support running.
5. Arrive at pace, not at a standstill. A support runner who jogs to the breakdown and then accelerates away is far less dangerous than one who arrives already at full speed. The momentum of the support runner is a weapon — use it.
6. The third man runs the width. While the first and second support runners cover the inside and immediate outside channels, a third support runner (typically 13 or a back-row forward) should always be tracking wide to provide the long pass or switch option. This prevents the defence from collapsing inward and shutting down the attack.
Common Mistakes

Mistake 1: Running parallel to the ball carrier. This is the single most common error at junior and intermediate level. Players run in straight lines alongside the ball carrier, offering no genuine angle. The result is that any pass is lateral rather than forward, and the attack stalls. Correction: Place a cone 2m behind and 2m inside the ball carrier's starting position. Support runners must pass through or inside this cone before bending their run outward.
Mistake 2: Arriving at the breakdown after the ball has been recycled. Support runners who are slow to read the contact situation arrive to find the ball already gone. They have effectively run themselves out of the next phase. Correction: Use the "Tackle!" call drill — the coach calls "Tackle!" at any point during the sequence, and the nearest support runner has 3 seconds to secure the ball. If they are not within 3m when the call is made, they have failed the drill.
Mistake 3: Bunching around the ball carrier. When multiple support runners all converge on the same contact point, the attack becomes congested and predictable. Defenders love this. Correction: Assign explicit roles before each rep — "6, you are the first receiver; 8, you are the second receiver; 7, you are the wide option." Rotate these roles each repetition so all players understand every responsibility.
Mistake 4: Stopping when the ball carrier is tackled. Players who stop running the moment contact is made are mentally disengaged from the play. Correction: Enforce a rule that any player who stops moving before the ball is recycled must perform 5 press-ups. This sounds harsh but quickly builds the habit of continuous movement.
Mistake 5: Passing too early under pressure. Ball carriers who offload the moment they feel pressure, rather than waiting for the support runner to arrive at the correct angle, often produce poor passes that lead to knock-ons or interceptions. Correction: Instruct ball carriers to count to two after contact before offloading. This forces support runners to arrive quickly and ensures the pass is made to a player in a strong position.
Variations and Progressions

Variation 1 — Narrow Channel (Easier). Reduce the grid to 15m x 10m and use only 5 players (9, 10, 12, 6, 8). The reduced space forces support runners to be precise with their angles and timing. This is an excellent starting point for younger or less experienced groups who are learning the concept for the first time.
Variation 2 — Full-Width Channel with Kick Option (Harder). Expand the grid to 40m x 30m and add a full backline (9 through 15) plus three forward support runners. Introduce a kick-and-chase option: if the defence overloads the inside, 10 may chip over the top and the support runners must transition to chasing the kick. This adds a decision-making layer that challenges even experienced players.
Progression — Continuous Loop Drill. Set up two identical grids side by side. As one group completes their sequence in Grid A, the second group begins in Grid B. Players rotate between grids after each rep, maintaining high intensity throughout. This progression adds a conditioning element and simulates the fatigue-under-skill demands of a real match.
Age Adaptations

Under 10 / Under 12: Remove all contact. Use the unopposed pattern work only (Phase 1). Reduce the grid to 20m x 10m. Use only 4 players (9, 10, 12, and one support runner). Focus exclusively on one coaching point per session — start with "depth" in week one, then introduce "the inside shoulder" in week two. Use coloured bibs rather than numbered positions to keep it simple and fun.
Under 14 / Under 16: Introduce passive defenders in Phase 2 and progress to tackle shields in Phase 3. Players at this age can begin to understand the tactical rationale behind each movement pattern. Encourage them to self-correct using the coaching language introduced in the Key Coaching Points section. Introduce the communication requirement (calling position) as a non-negotiable.
Open / Senior: Run all three phases within a single session. Add the full-width variation and the continuous loop progression. Challenge players to execute the drill at match pace with full defensive pressure. Use video review where possible — recording a session and watching it back as a group is one of the most powerful tools for embedding support running habits at senior level.