Scrum 8-9-11 Blindside Strike
A devastatingly effective set play to exploit a narrow blindside defence off a scrum, using the Number 8, Scrum-half, and Blindside Wing.

Equipment Needed
1. Overview
The Scrum 8-9-11 Blindside Strike is a highly effective attacking set piece designed to exploit space on the short side (blindside) of the field. By committing the opposition back row and scrum-half to the base of the scrum, the attacking team can create a 2-on-1 or 3-on-2 overlap down the narrow channel. This play is particularly potent when the scrum is positioned between 5 and 15 metres from the touchline, as it forces the defending winger to make a difficult decision: step in to cover the Number 8 or stay wide to mark their opposite number.
This move requires precise timing, strong ball-carrying from the base of the scrum, and excellent communication between the Number 8 (8), Scrum-half (9), and the Blindside Wing (11). When executed correctly, it can lead to a clean line break, a try in the corner, or front-foot ball well over the gain line for the second phase of attack.
2. Setup
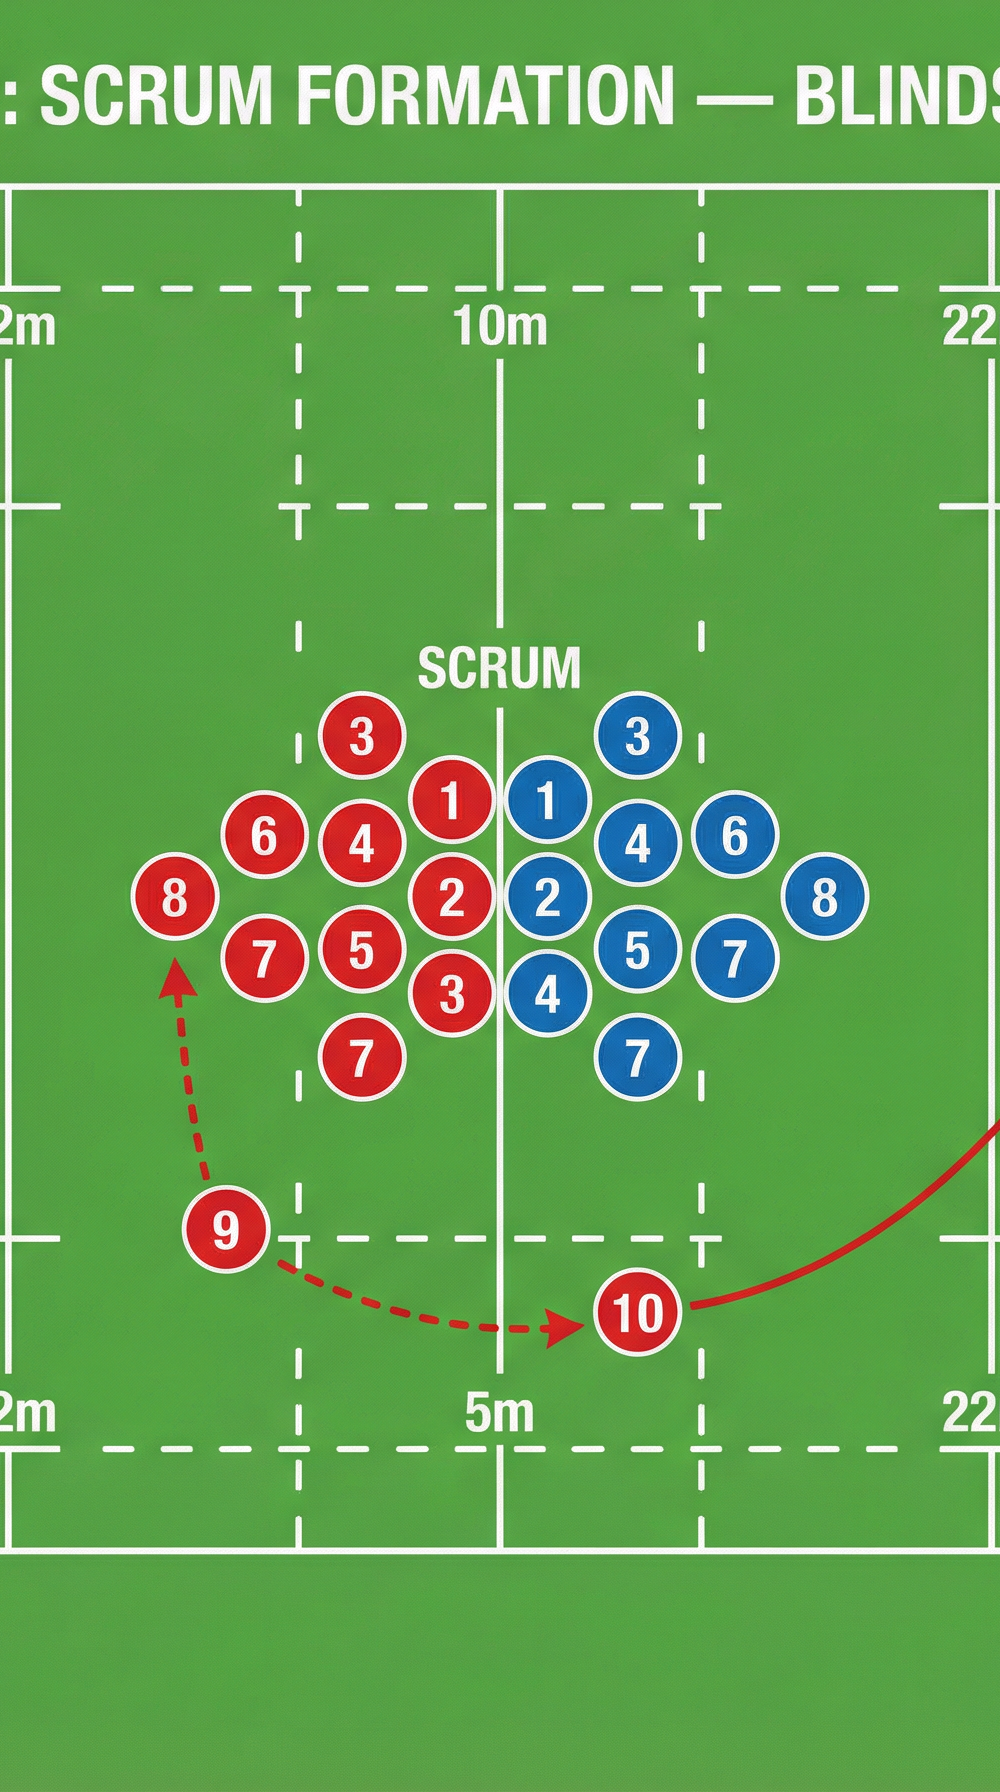
Pitch Location: The ideal position for this play is an attacking scrum located between 5 and 15 metres from the blindside touchline. The attacking team should be within the opposition's half, ideally inside their 22-metre area where the defence is under pressure.
Player Positions:
- Number 8: Positioned at the base of the scrum, ready for a quick pick and go.
- Scrum-half (9): Positioned at the back of the scrum, ready to clear the ball or support the 8.
- Blindside Flanker (6): Bound on the side of the scrum nearest the touchline, ready to detach quickly and provide immediate support.
- Blindside Wing (11): Positioned wide on the blindside touchline, holding width to stretch the defence before accelerating onto the ball.
- Fly-half (10) & Openside Backs: Positioned wide on the openside to hold the defending midfield and fullback in place, acting as a credible decoy threat.

3. Step-by-Step Instructions
- The Call: The Scrum-half (9) or Fly-half (10) calls the play before the scrum engages. The Number 8, 9, 6, and 11 must all acknowledge the call.
- The Strike: The Hooker strikes the ball cleanly, and it is channelled quickly to the feet of the Number 8.
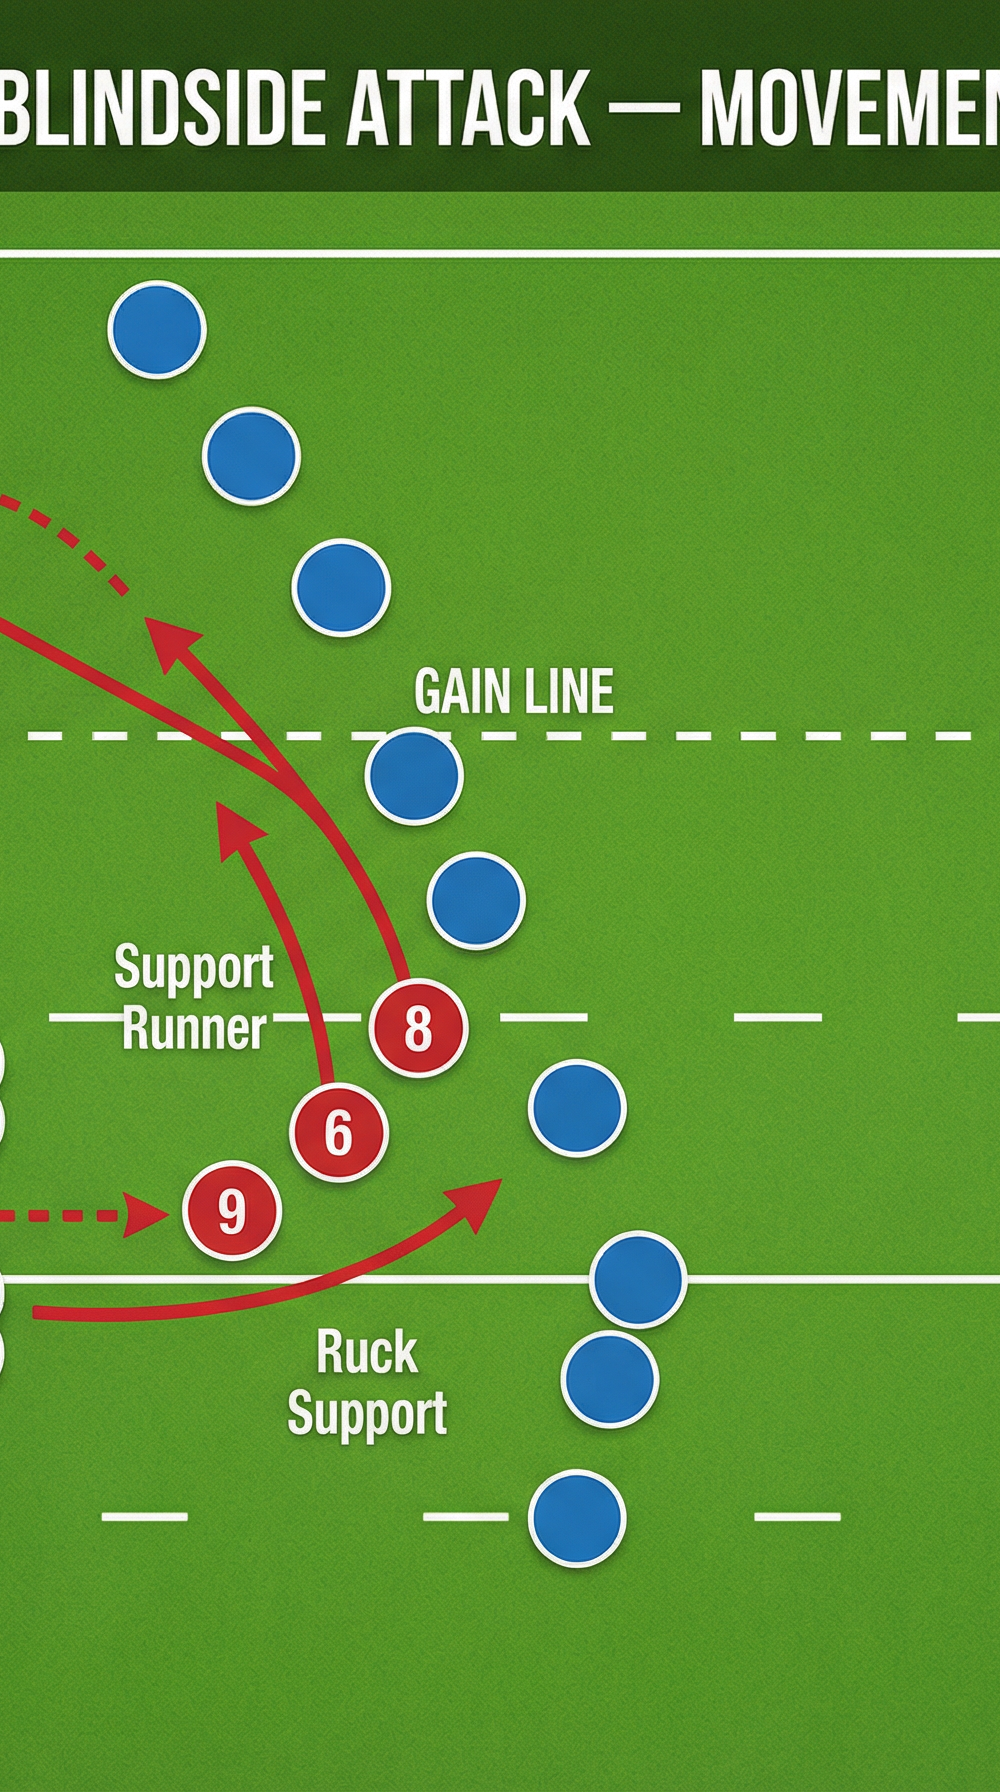
- The Pick: As the ball reaches the back, the Number 8 unbinds quickly, picks the ball up cleanly, and immediately attacks the blindside space, running hard at the inside shoulder of the defending Scrum-half or the gap between the scrum and the defending winger.
- The Decoy & Support: The Scrum-half (9) wraps around the Number 8 on the inside to offer a short pass option or secure the ruck if the 8 is tackled. The Blindside Flanker (6) detaches instantly and runs a hard support line directly behind the Number 8.
- The Wing Threat: The Blindside Wing (11) starts wide on the touchline and accelerates forward, reading the Number 8's movement. If the defending winger steps in to tackle the 8, the 11 holds their width for an offload.
- The Decision: The Number 8 must read the defence. If the gap is open, they drive through. If the defending winger commits to the tackle, the 8 delivers a perfectly timed pass or offload to the 11 screaming down the touchline.
4. Key Coaching Points
- Explosive Pick: The Number 8 must pick the ball and accelerate in one fluid motion. Any hesitation allows the defending back row to slide across and close the space.
- Holding Width: The Blindside Wing (11) must resist the urge to drift infield too early. Staying wide forces the defending winger to make a definitive choice, creating the gap for the 8 or the overlap for the 11.
- Flanker Support: The Blindside Flanker (6) must be the first player to the breakdown if the Number 8 is tackled. Their primary role is to secure lightning-fast ball for the next phase.
- Decoy Credibility: The openside backs (10, 12, 13) must run aggressive decoy lines and communicate loudly to hold the defending midfield and fullback, preventing them from drifting across to cover the blindside.
5. Common Mistakes
- Telegraphing the Play: If the Number 8 or Scrum-half look too obviously at the blindside before the ball is fed, the defence will anticipate the move and shift their numbers accordingly.
- Slow Ball from the Scrum: If the ball is slow to reach the back of the scrum, the defending back row will have time to detach and cover the blindside channel.
- Winger Crowding the 8: If the Blindside Wing (11) runs too close to the Number 8, one defender can tackle both players. The 11 must maintain spacing to stretch the defence.
- Poor Ruck Security: If the Number 8 takes the ball into contact but the support players (6 and 9) are too slow to arrive, the isolated 8 will likely be turned over or penalised for holding on.
6. Variations & Progressions
- The 8-9 Switch: Instead of the Number 8 carrying the ball, they pick and pass immediately inside to the Scrum-half (9) wrapping around. This changes the angle of attack and targets the gap left by the opposition's detaching flanker.
- The Blindside Chip: If the defending winger pushes up aggressively and the fullback is out of position, the Number 8 or Scrum-half can execute a short chip kick over the top for the winger (11) to chase.
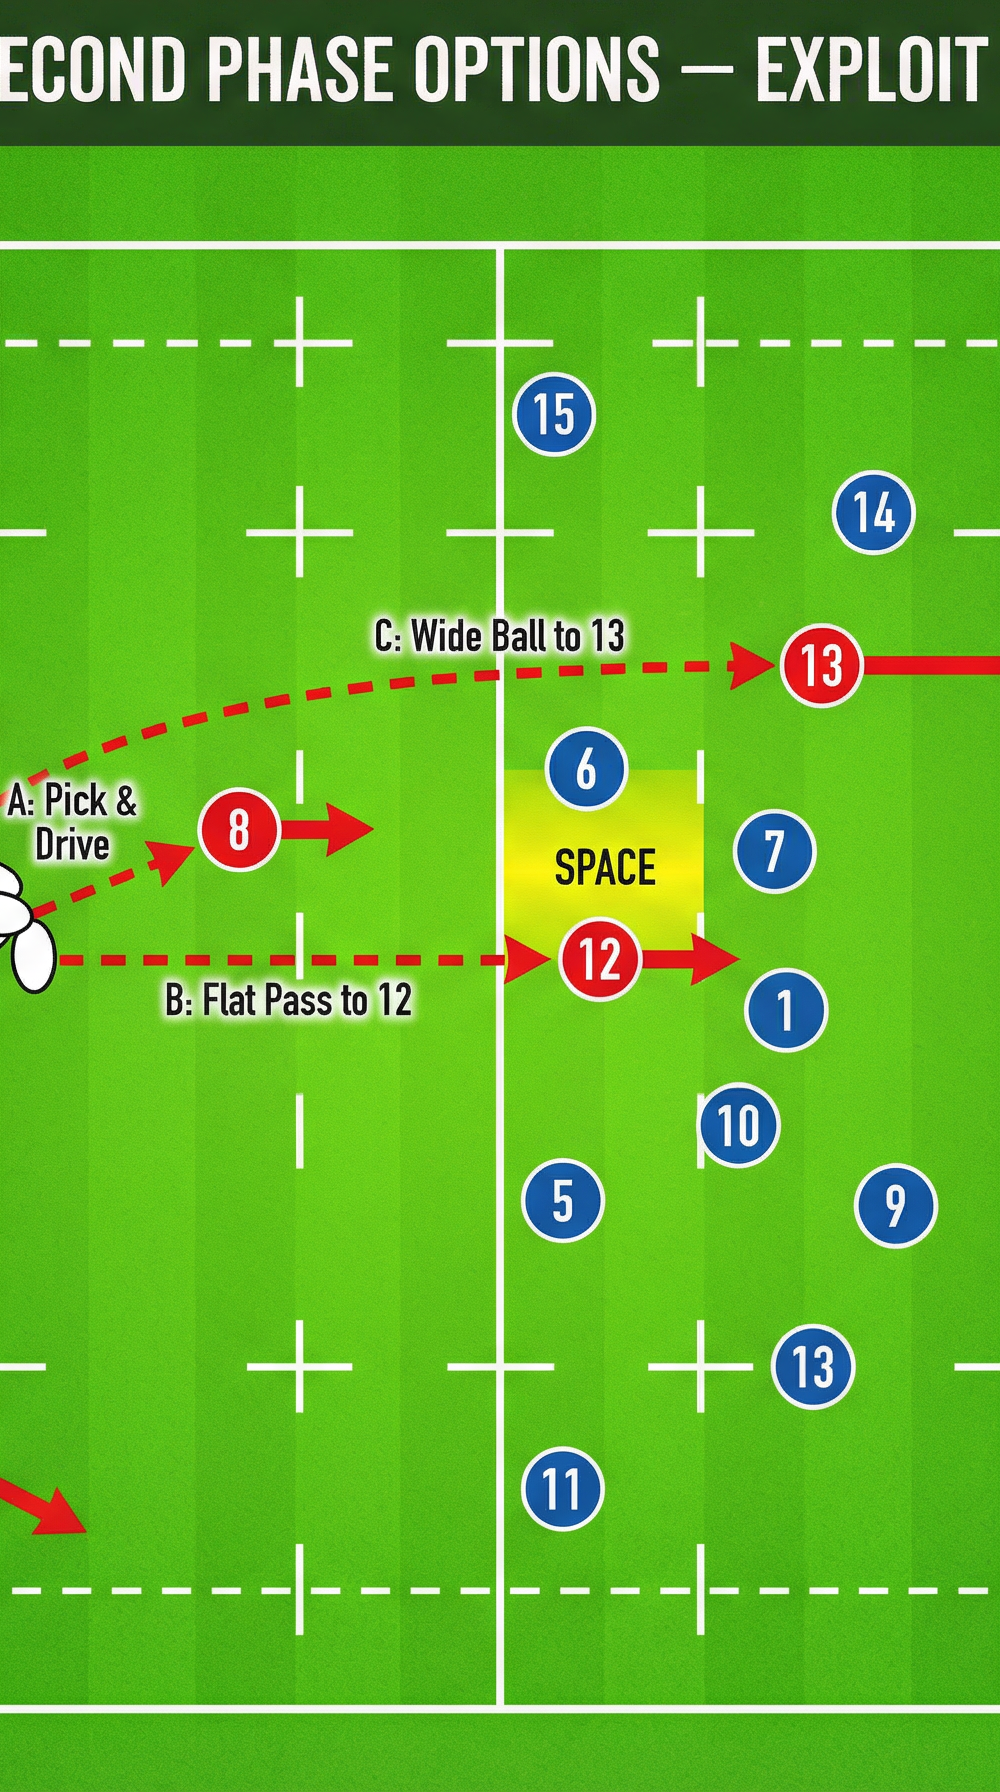
- Second Phase Strike: If the initial blindside attack is stopped just short of the line, the team must be prepared to strike quickly on the next phase. With the defence condensed on the short side, a rapid pass back to the openside can exploit significant overlaps.
7. Age Adaptations
- Under 10s / Minis: Focus entirely on the basic mechanics of the Number 8 picking the ball cleanly and running forward. Do not introduce complex passing options. Emphasise the Scrum-half's role in supporting the ball carrier.
- Under 12s - Under 14s: Introduce the concept of the 2-on-1 against the defending winger. Teach the Number 8 to draw the defender before passing to the wing. Ensure the Blindside Flanker understands their role in securing the ruck.
- Under 16s - Open: Execute the full play with all variations. Emphasise reading the defence, exploiting mismatches, and seamlessly transitioning into second-phase attacking structures.