Mastering the Scrum Blindside Attack: An Essential Back-Row Play
Learn how to exploit the short side of the pitch from a scrum, utilizing your Number 8 and blindside flanker to create an overlap and break the gain line.

Equipment Needed
1. Overview
The blindside attack from a scrum is a potent offensive weapon designed to exploit the often under-defended 'short side' of the pitch. When a scrum is positioned 10-15 meters from the touchline, the defending team naturally shifts their defensive focus towards the wider openside channel, where the majority of the backline is stationed. This play aims to catch the defense over-committing, using a coordinated strike involving the Number 8, Scrum-half (9), Blindside Flanker (6), and Blindside Wing (11).
By executing a rapid pick-and-go or a quick transfer off the base, the attacking team can isolate the defending Scrum-half and Blindside Flanker, creating a localized 3-on-2 or 4-on-3 advantage. This play is particularly effective when the opposing team's blindside defense is disorganized, slow to detach from the scrum, or when your Number 8 possesses strong ball-carrying capabilities.
2. Setup
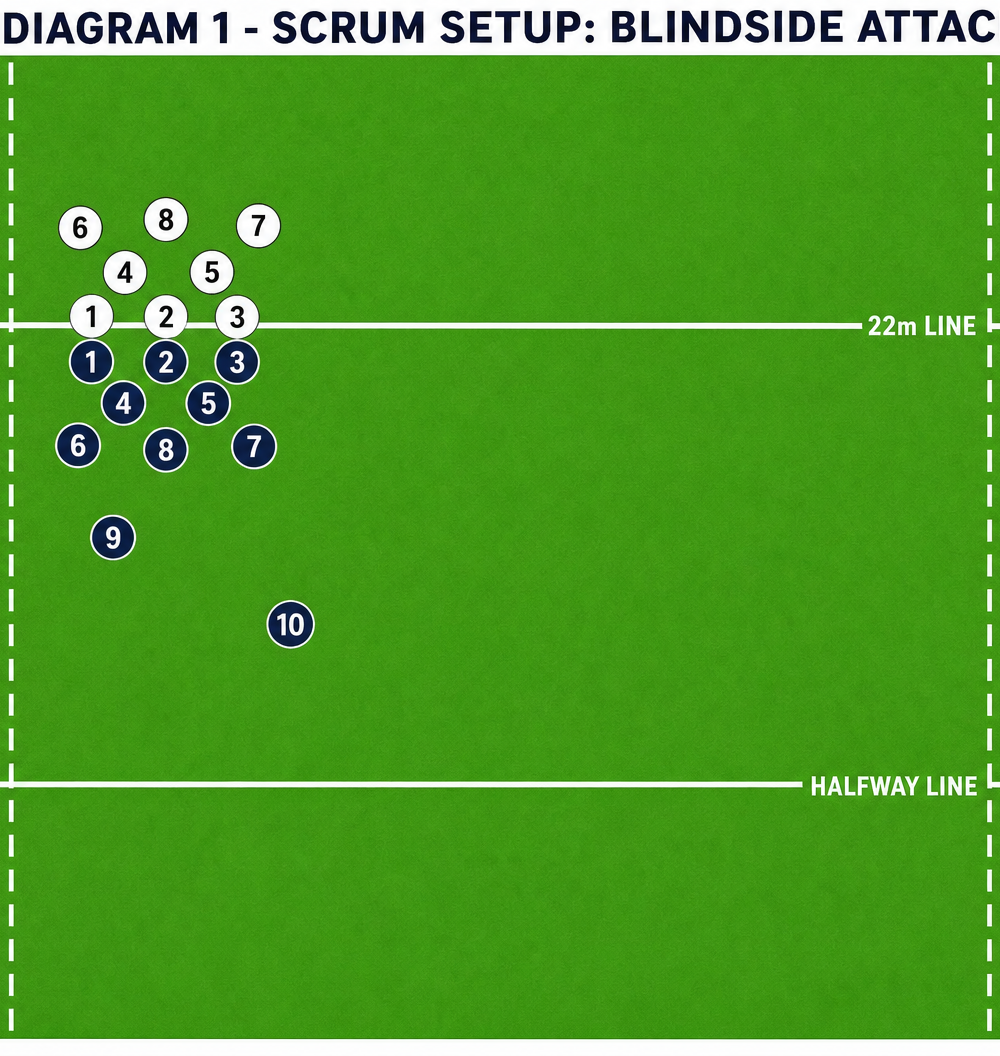
Pitch Location: Ideally, the scrum should be awarded between 10m and 15m from the touchline. This provides enough space for the attacking players to operate without being immediately bundled into touch, while still remaining a 'short side' that tempts the defense to narrow up.
Player Positions:
- Forwards (1-8): Standard scrum formation. The Number 8 must have a stable base and control of the ball at their feet.
- Scrum-half (9): Positioned on the blindside of the scrum, ready to clear the ball or act as a support runner.
- Blindside Flanker (6): Bound tightly to the scrum but prepared to detach instantly upon the Number 8's pick.
- Blindside Wing (11): Positioned flat and wide, holding the width near the touchline to stretch the defense.
- Fly-half (10) & Openside Backs: Positioned as decoys on the openside to hold the opposing backline in place.

3. Step-by-Step Instructions
- The Setup and Call: The Scrum-half (9) feeds the ball. As the ball is hooked to the back row, the Number 8 secures it at their feet. The Number 8 or 9 makes the pre-determined call for the blindside attack.
- The Pick: The Number 8 detaches from the scrum, picking the ball cleanly. Their initial step must be explosive, driving directly towards the gap between the opposing Scrum-half and the touchline.
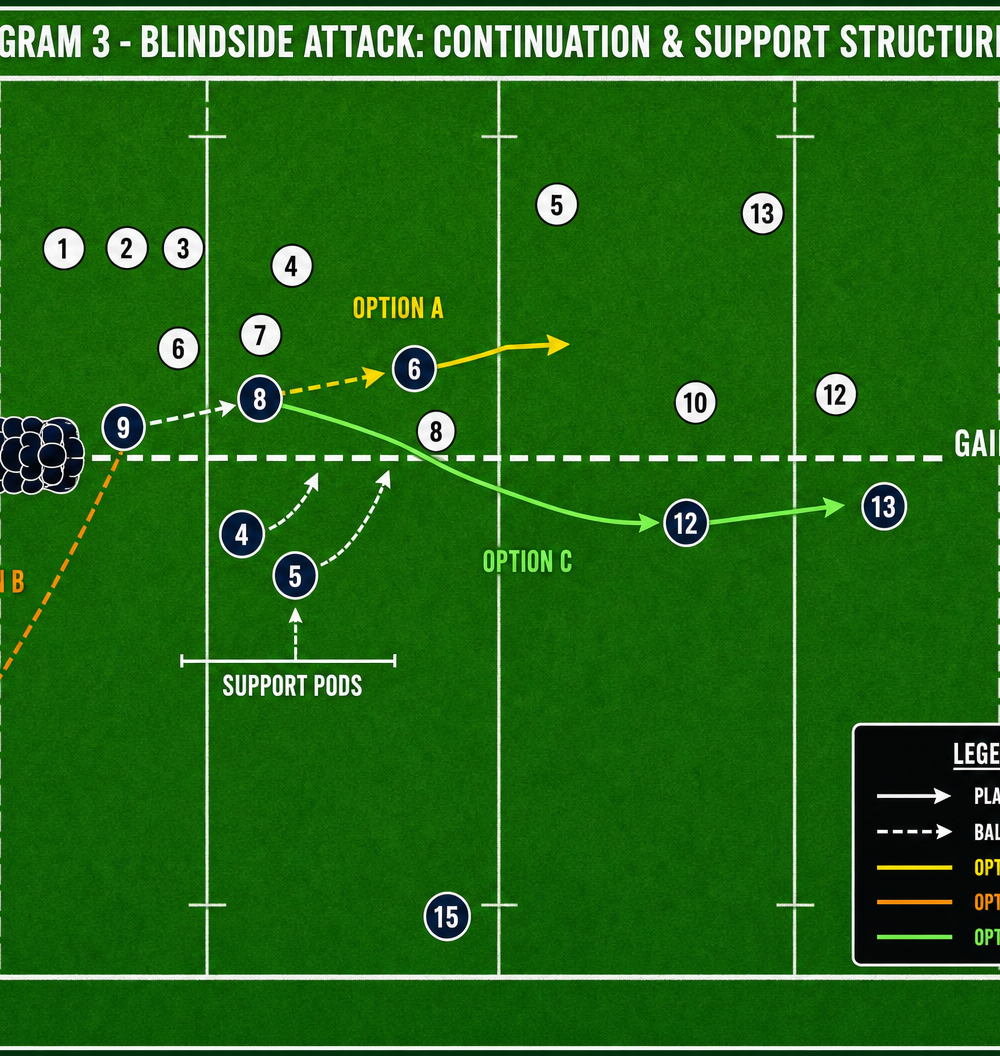
- The Flanker's Role: Simultaneously, the Blindside Flanker (6) detaches and runs a hard support line on the outside shoulder of the Number 8, offering an immediate offload option.
- The Scrum-half's Support: The Scrum-half (9) loops around the base of the scrum, tracking the Number 8 on their inside shoulder, providing an option if the Number 8 cuts back inside.
- The Wing's Positioning: The Blindside Wing (11) holds their width on the touchline, calling for the ball if the defense bites down on the Number 8 and Flanker.
- The Decision: The Number 8 reads the defense:
- If the defending 9 commits, the Number 8 offloads to the Flanker (6).
- If the defending wing steps in, the ball is shifted wide to the attacking Wing (11).
- If the gap opens, the Number 8 carries strongly through the contact area.
4. Key Coaching Points
- Explosive Detachment: The Number 8 and Flanker must detach from the scrum simultaneously and with maximum aggression. Any delay allows the defense to reset.
- Holding the Width: The Blindside Wing must resist the urge to drift infield. Staying wide forces the defending winger to make a decision, creating space for the inside runners.
- Decisive Decision Making: The Number 8 must quickly assess the defensive alignment and choose the right option (carry, pop to 6, or pass to 11). Hesitation will kill the play.
- Strong Ball Carry: The primary ball carrier (usually the 8 or 6) must focus on leg drive and ball security upon contact, ensuring clean presentation for the next phase if a line break isn't achieved.
- Decoy Runners: The openside backs must run convincing decoy lines to freeze the defensive line and prevent them from drifting across to cover the blindside.
5. Common Mistakes
- Telegraphing the Play: The Number 8 or Scrum-half looking exclusively down the blindside before the ball is out, alerting the defense.
- Slow Detachment: Forwards lingering in the scrum after the ball is picked, reducing the number of attacking options.
- Drifting Infield: The Blindside Wing stepping infield, compressing the space and making it easier for the defense to cover the attackers.
- Poor Ball Security: The Number 8 exposing the ball during the pick, leading to a knock-on or turnover.
6. Variations & Progressions
- The '9' Snipe: Instead of the Number 8 picking, the Scrum-half (9) takes the ball and attacks the blindside directly, with the Number 8 and Flanker acting as support runners.
- The Switch: The Number 8 picks and attacks the blindside, but then switches the ball back inside to the Scrum-half or a hard-running center (12) hitting a gap near the ruck.
- Adding a Fullback: The Fullback (15) can enter the line on the blindside, creating an extra man and an additional passing option.

7. Age Adaptations
- Under 10s/12s: Focus heavily on the basic mechanics of the Number 8 pick and the Scrum-half pass. Simplify the options—encourage the Number 8 to carry first, and only pass if obviously blocked.
- Under 14s/16s: Introduce the Blindside Flanker's support line and the decision-making process for the Number 8. Emphasize the importance of the Wing holding their width.
- Open Grade: Implement complex variations, such as the switch or bringing the Fullback into the line. Focus on the speed of execution and the ability to read the defense under pressure.