Three-Stage Attacking Play from Defence
A highly effective transition play that quickly moves the ball from a defensive turnover into the shooting circle in just three structured phases.

Equipment Needed
1. Overview
Transitioning from defence to attack efficiently is one of the most critical aspects of modern netball. The "Three-Stage Attacking Play from Defence" is a structured set play designed to capitalise on turnovers deep in the defensive third (such as a Goal Keeper intercept or rebound). Rather than scrambling to clear the ball, this play provides a reliable, high-speed framework to move the ball through the court in three distinct phases: the launch, the transition, and the finish.
This set play is particularly effective against teams that employ a heavy zone defence or struggle to reset defensively after losing possession. By assigning specific running channels and roles to each player, the play stretches the opposition and creates isolated 1-on-1 matchups across the 30.5m x 15.25m court.
2. Setup
Equipment Needed:
- 1 Netball
- Full netball court
- Optional: Cones to mark specific driving channels during early practice
Court Setup & Player Positions:
This play initiates from a defensive turnover, typically deep in the goal circle.
- GK (Goal Keeper): Positioned deep in the defensive goal circle with the ball.
- GD (Goal Defence) & WD (Wing Defence): Positioned near the transverse line in the defensive third, ready to offer the first outlet options.
- C (Centre): Positioned centrally in the centre third, acting as the primary link player.
- WA (Wing Attack): Positioned wide in the centre third to stretch the defence.
- GA (Goal Attack): Positioned high in the attacking third, acting as a decoy or secondary option.
- GS (Goal Shooter): Positioned deep in the attacking goal circle, preparing for the final feed.
3. Step-by-Step Instructions

Stage 1: Defence Third Launch

- The Turnover: The play begins when the GK secures the ball (e.g., via a rebound or interception) deep in the defensive circle.
- Initial Leads: Immediately upon the GK securing the ball, the GD and WD must make their leads. The GD drives forward aggressively into the middle channel of the defensive third. Simultaneously, the WD holds a wider option on the right side to stretch the opposition's Wing Attack and Centre.
- The Outlet Pass: The GK scans and delivers a crisp, flat pass to the GD. This pass must be accurate and placed out in front of the GD so they can take it on the run without breaking stride.
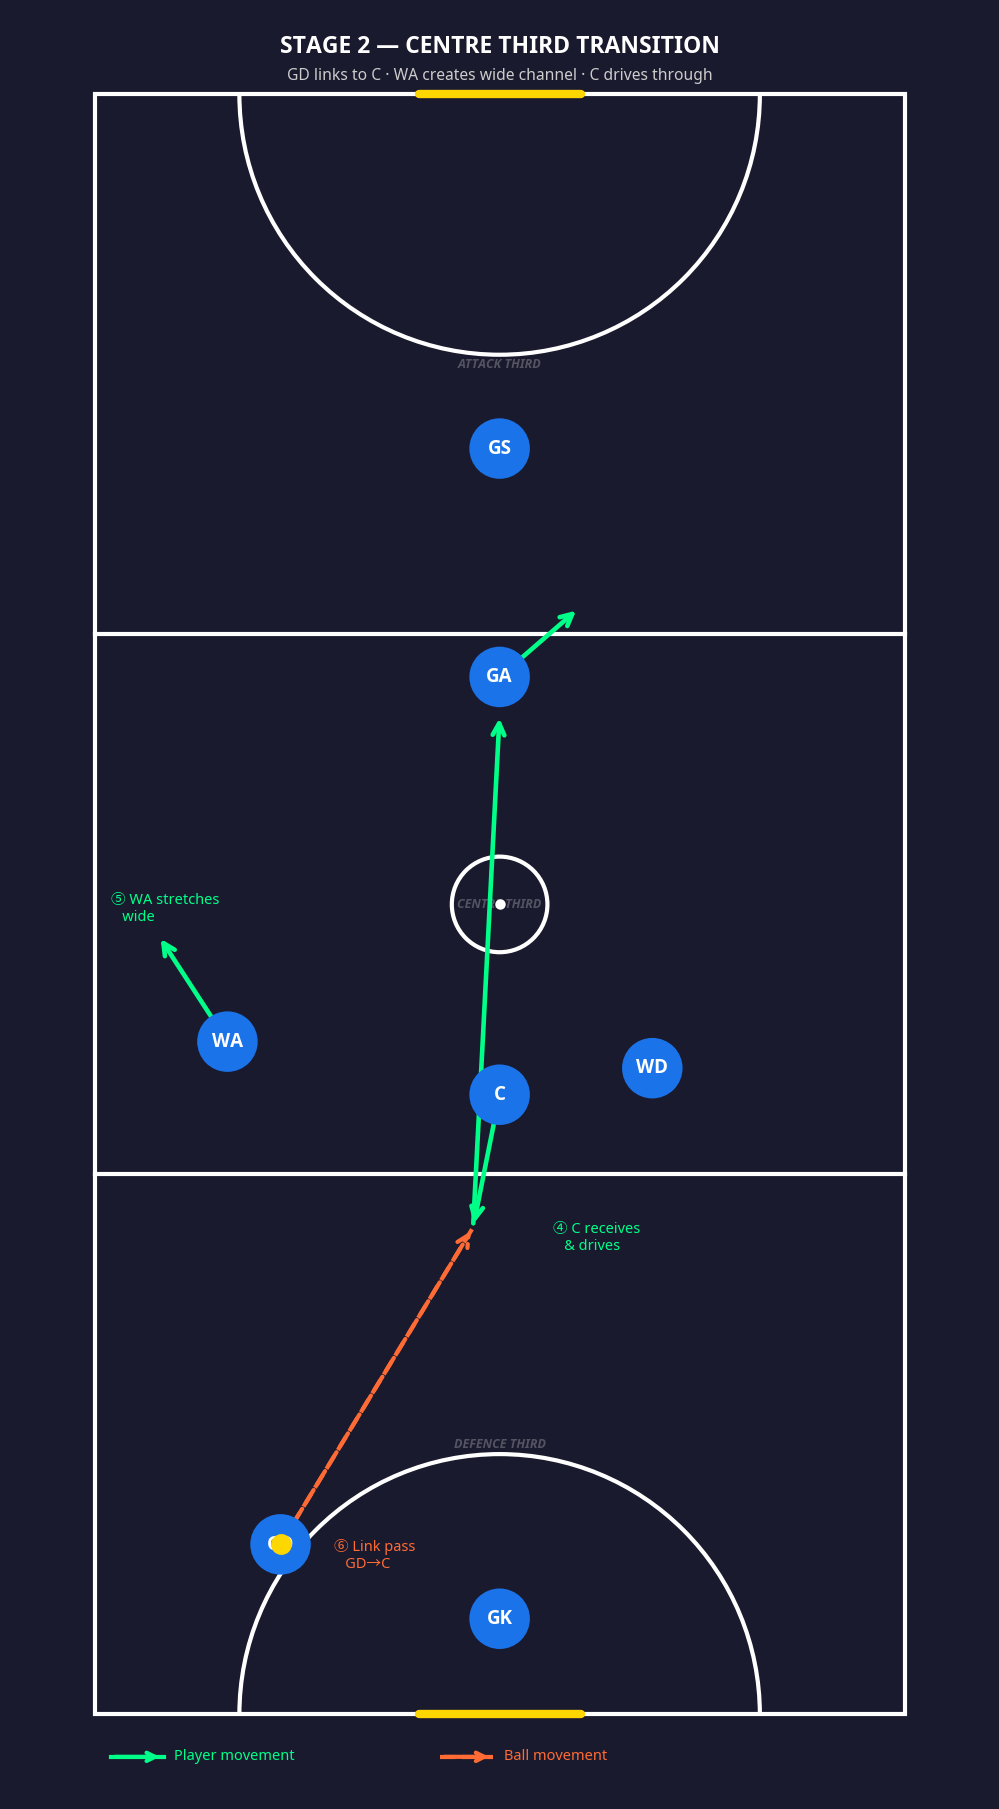
Stage 2: Centre Third Transition

- The Link Drive: As the GD receives the ball, the C must time their drive perfectly. The C drives hard towards the ball, entering the defensive third or receiving just over the transverse line in the centre third.
- Stretching the Court: Concurrently, the WA makes a wide, sweeping run towards the sideline in the centre third. This movement pulls the opposition's Wing Defence out of the central corridor, opening up space.
- The Transition Pass: The GD delivers a swift pass to the driving C. The C receives the ball, lands balanced, and immediately pivots to face down the court towards the attacking third.
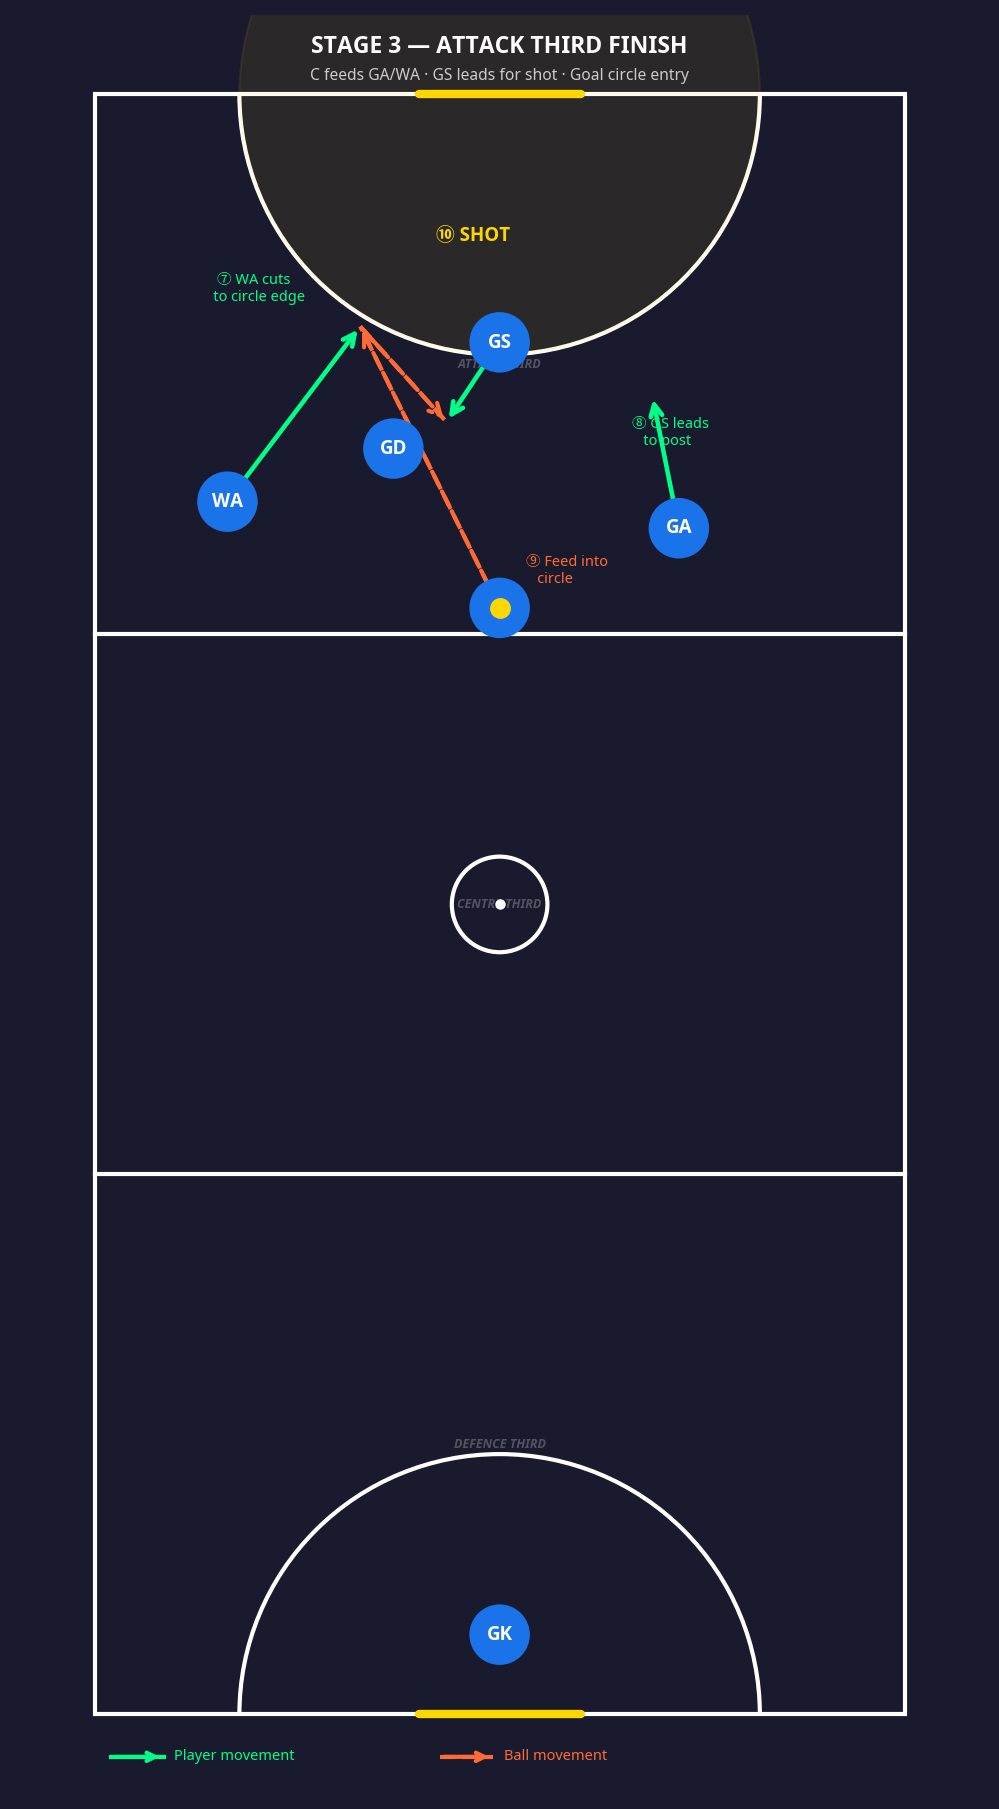
Stage 3: Attack Third Finish
- Circle Edge Cut: With the C now in possession and looking forward, the WA (who previously stretched wide) cuts back hard on a 45-degree angle towards the edge of the goal circle.
- The Decoy and The Lead: The GA holds their space on the opposite side of the attacking third to keep the opposition Goal Defence occupied. Meanwhile, the GS makes a strong, decisive lead towards the front of the goal post or the top of the circle, depending on the defender's positioning.
- The Feed: The C delivers a perfectly timed pass to the WA hitting the circle edge.
- The Shot: The WA immediately feeds the ball to the GS holding strong position in the circle, resulting in a high-percentage shot on goal.
4. Key Coaching Points

- Timing is Everything: Players must wait for the release of the previous pass before making their decisive cut. Premature leads will result in players holding space too early and becoming easily defended.
- Pass Placement: Emphasise flat, hard passes placed into the space ahead of the receiver. Loopy passes will allow the defence time to recover and intercept.
- Vision and Awareness: The ball carrier (especially the GK and GD in the early stages) must keep their eyes up and scan the court before the ball is even in their hands.
- Strong Angles: Attackers must hit the ball at strong 45-degree angles rather than running flat across the court. This makes it significantly harder for defenders to contest the pass.
- Clear the Space: Players who are not the primary option (e.g., the WD in Stage 1 or the GA in Stage 3) must actively clear out to create space for the primary drivers.
5. Common Mistakes

- Crowding the Ball: Players rushing towards the ball carrier simultaneously, dragging their defenders with them and clogging the passing lanes.
- Turning Blind: Receivers catching the ball and failing to pivot fully to see down the court, resulting in delayed passes and lost momentum.
- Weak Leads: Players making half-hearted or curved leads instead of sharp, decisive angles, allowing defenders to easily dictate their movement.
- Holding the Ball Too Long: Taking more than 2 seconds to release the pass, which allows the opposition's zone defence to set up and stifle the transition.
6. Variations & Progressions

- Progression 1: Add Passive Defenders: Introduce defenders who only shadow the attackers without attempting to intercept. This helps the attacking team get used to the timing and spatial awareness required with bodies on the court.
- Progression 2: Full Opposed: Run the play against a full, active defence. Award points for successfully executing all three stages without a turnover.
- Variation 1: The Switch: If the GD is heavily defended in Stage 1, the WD becomes the primary outlet, and the GD clears wide. The rest of the play adapts accordingly, with the C linking with the WD instead.
- Variation 2: GA Finish: In Stage 3, if the GS is double-teamed, the GA can make a baseline drive to receive the final feed from the WA instead.
7. Age Adaptations

- Under 10s / Under 12s: Focus primarily on Stage 1 (the outlet). Simplify the court into three distinct zones and ensure players understand their starting positions. Use cones to mark where the GD and C should drive.
- Under 14s / Under 16s: Introduce the timing elements of Stage 2 and Stage 3. Emphasise the importance of the WA's wide decoy run and the C's hard drive to the circle edge.
- Open / Advanced: Run the play at match intensity with full defensive pressure. Focus on split-second decision-making and executing the variations seamlessly when the primary options are shut down.