Three-Stage Attacking Transition: From Defence to Goal
Master the art of swift, structured transitions from the defensive third to the shooting circle with this highly effective three-stage set play.
Equipment Needed
1. Overview
Transitioning the ball smoothly from defence into attack is one of the most critical aspects of elite Netball. This set play, the Three-Stage Attacking Transition, is designed to move the ball from a defensive turnover or baseline throw-in through the mid-court and into the shooting circle with speed, precision, and purpose.
By breaking the court down into three distinct stages—Defensive Third Retrieval, Mid-Court Transition, and Attacking Third Entry—coaches can teach players to recognize spatial triggers and execute timed leads. This play is particularly effective against teams that employ a heavy zone defence in the mid-court, as it relies on quick, sharp ball movement to bypass defensive structures before they can set.
2. Setup
To effectively run this set play in training, you will need the following setup:
- Court: Full standard Netball court (30.5m x 15.25m).
- Players Required: 7 players (GK, GD, WD, C, WA, GA, GS). To simulate game pressure, add 4-7 defenders.
- Equipment: 1-2 Netballs, bibs for both attacking and defending teams, and optional flat markers to highlight the "1.5-second timing windows" in the mid-court.
- Starting Position: The play begins with the Goal Keeper (GK) taking a throw-in from the defensive baseline or immediately following a defensive rebound/turnover near the goal post.
3. Step-by-Step Instructions
Stage 1: Defensive Third Retrieval & First Outlet
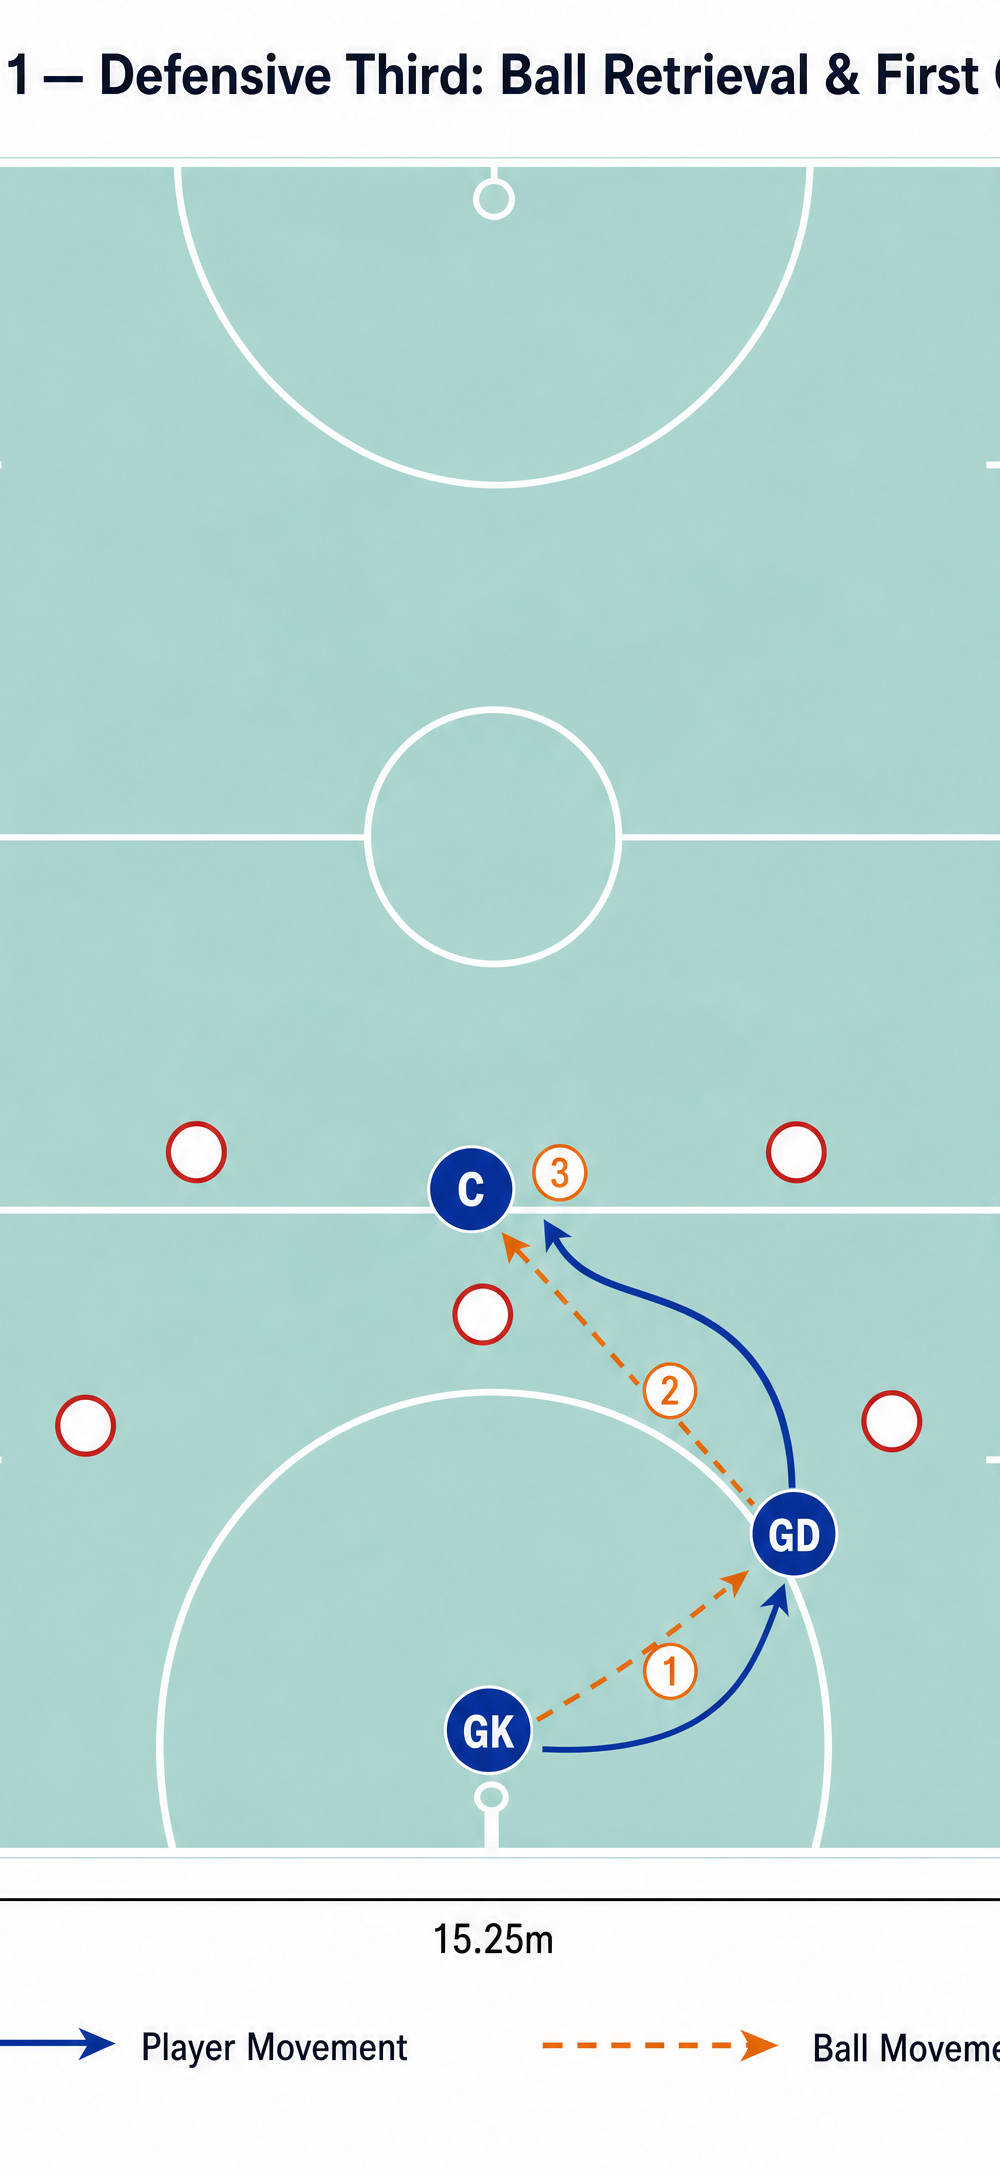
- The Trigger: The GK secures the ball near the defensive goal post.
- The First Option: The Goal Defence (GD) immediately sprints wide to the side channel to offer the first outlet pass. This movement must be sharp to drag the opposing Goal Attack away from the central corridor.
- The Outlet Pass: The GK delivers a crisp, flat pass to the GD in the wide channel.
- The Link: As the GD receives the ball, the Centre (C) drops back toward the defensive transverse line, offering a strong, front-cut lead to receive the second pass.
Stage 2: Mid-Court Transition
- The Pivot: Upon receiving the ball, the C immediately pivots to face down the court, scanning the attacking options.
- The Timed Lead: The Wing Attack (WA) initiates a hard, diagonal drive from the centre third toward the sideline. This lead must hit a precise "1.5-second window"—arriving exactly as the C is ready to release the ball.
- The Penetration: As the WA secures the ball, the Goal Attack (GA) pushes up aggressively toward the attacking transverse line, offering a strong preliminary movement before driving back into the central corridor to receive the next pass.
Stage 3: Attacking Third Entry & Finish
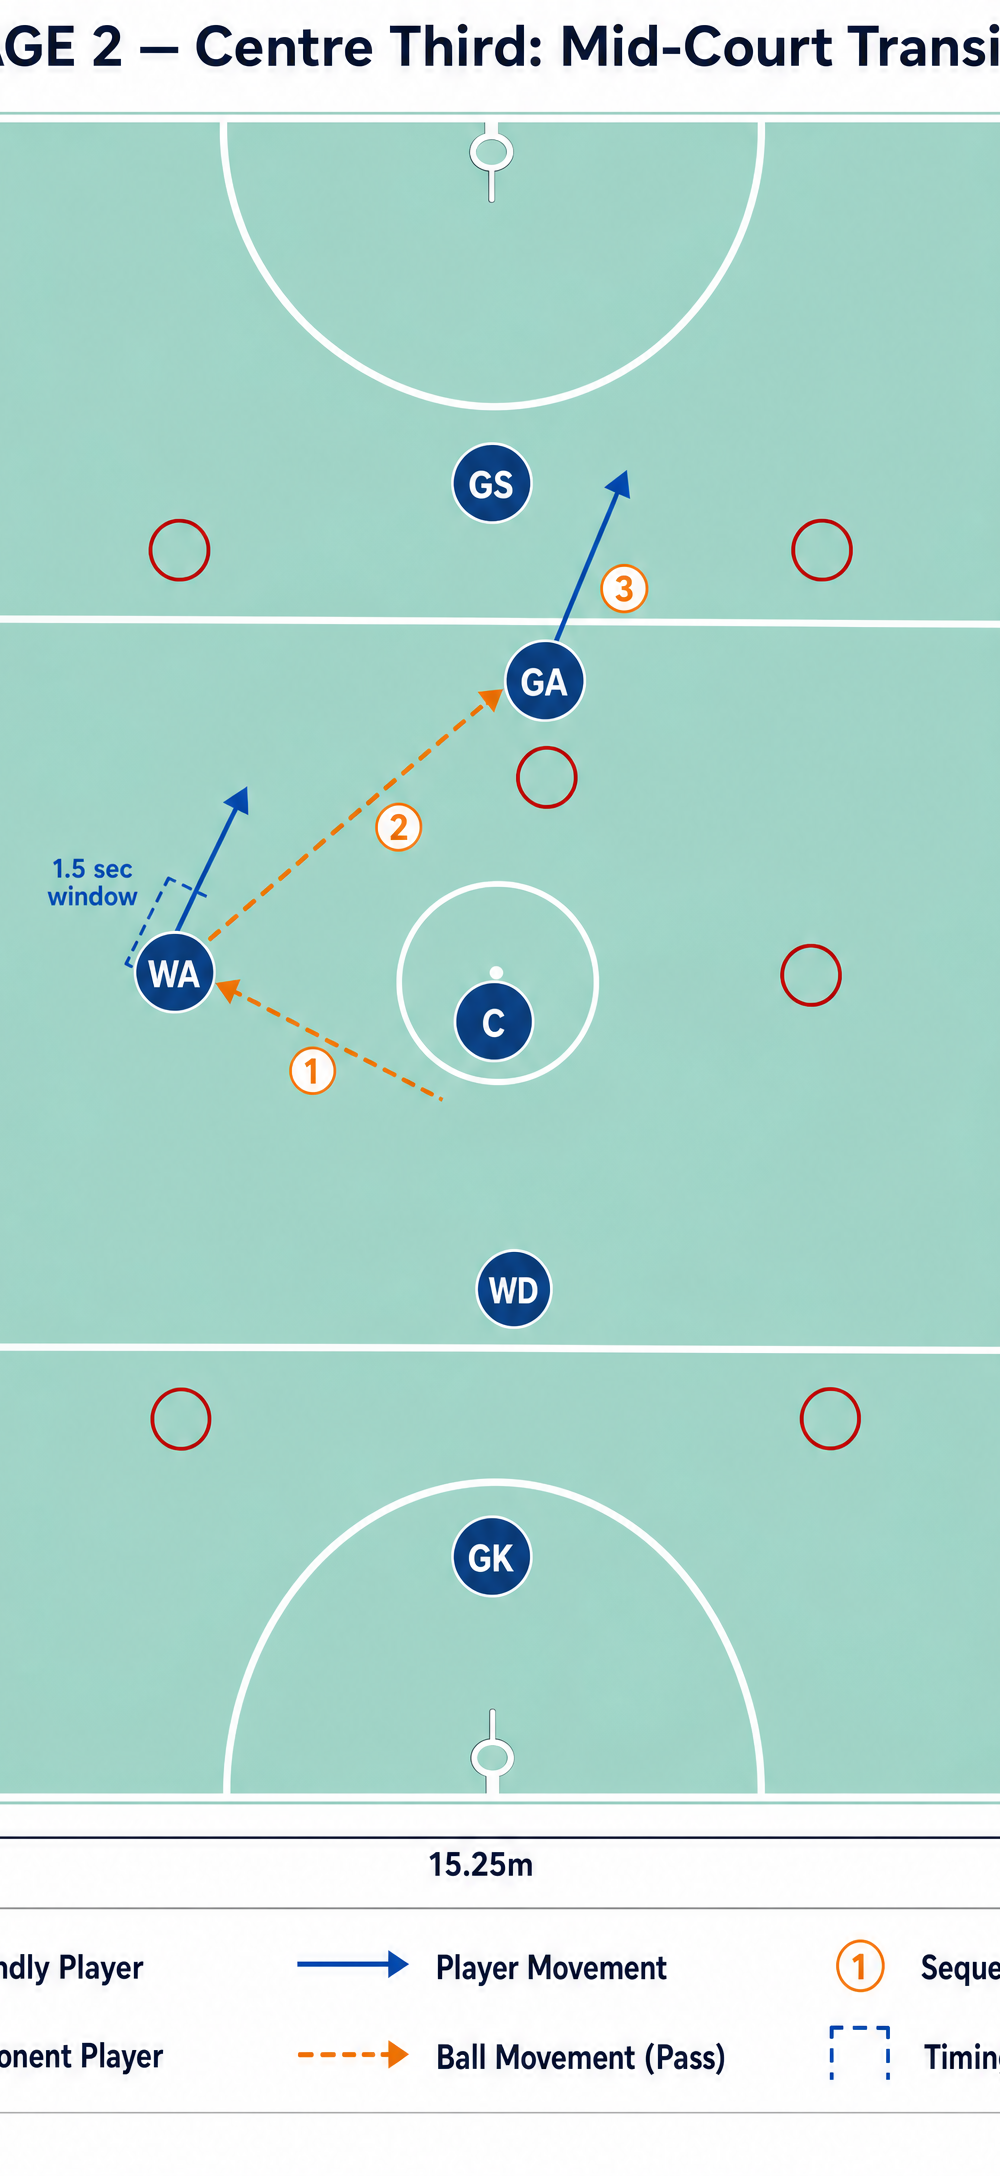
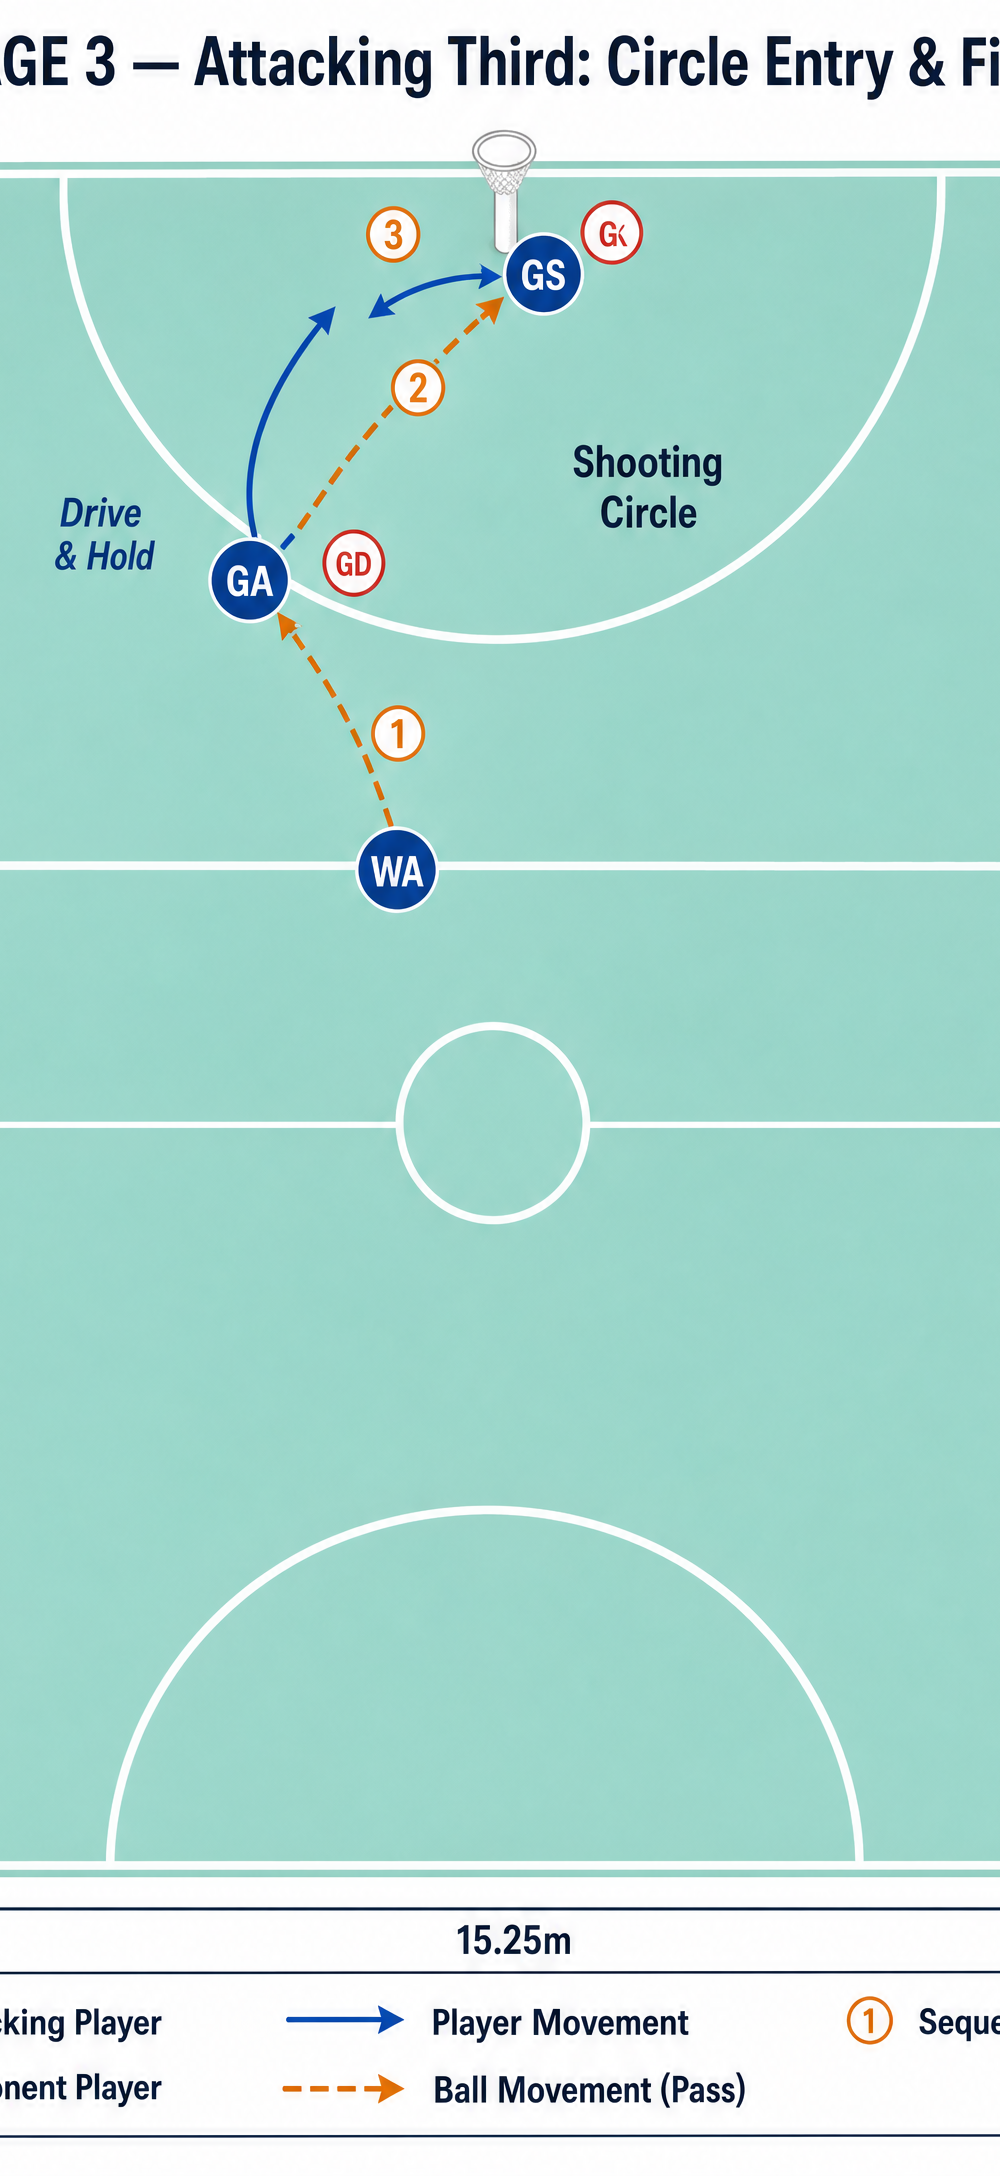
- The Circle Edge: The WA delivers the ball to the GA, who is now positioned near the top of the shooting circle.
- The Drive & Hold: The Goal Shooter (GS) establishes a strong holding position near the goal post, occupying the primary defender.
- The Finish: The GA drives hard into the shooting circle, cutting across their defender to receive a quick give-and-go from the WA, or alternatively, the GA feeds the holding GS for a high-percentage shot under the post.
4. Key Coaching Points
- Vision Before Receiving: Players must scan the court while the ball is in flight. The C, in particular, needs to know where the WA is before catching the outlet pass.
- Angle of the Drives: Encourage players to drive on 45-degree angles rather than running flat across the court. This creates better passing lanes and makes it harder for defenders to intercept.
- Timing is Everything: Emphasize the "1.5-second window." If a player leads too early, they will be stagnant when the ball arrives; if they lead too late, the passer will be held up.
- Strong First Step: Every lead must begin with an explosive first step to gain immediate separation from the defender.
5. Common Mistakes
- Crowding the Corridor: Players often drift into the middle of the court, congesting the space. Ensure the GD and WA utilize the wide channels to stretch the defence.
- Floating Passes: Loopy, floating passes give defenders time to recover and intercept. Insist on strong, flat, shoulder passes.
- Stagnant Shooters: The GS must remain active in the circle. If they stand still, the defenders can easily front them and deny the final feed.
6. Variations & Progressions
- Progression 1: Add Defensive Pressure. Introduce a floating Wing Defence (WD) whose sole job is to disrupt the pass between the C and the WA in Stage 2.
- Progression 2: The "Reset" Option. If the forward option is blocked, teach the players to reset the ball backwards to the WD or GD to switch the play to the opposite side of the court.
- Variation: The Long Bomb. If the opposing defence is playing a high press, have the GA make a deep, clearing run to the baseline, opening up space for a long, direct pass from the C into the GS.
7. Age Adaptations
- Under 10s / Under 12s: Focus primarily on Stage 1 and Stage 2. Ensure players understand the basic concept of clearing space and passing forward. Reduce the emphasis on strict timing windows.
- Under 14s / Under 16s: Introduce the full three-stage play. Focus heavily on the timing of the leads and the quality of the passes. Begin adding passive defenders to increase decision-making pressure.
- Open / Elite: Run the play at match intensity against a full zone defence. Focus on micro-adjustments, such as the angle of the GS's hold and the speed of the WA's release.

