Mastering the 1-3-1 Zone Offense: A Comprehensive Coaching Guide
Learn how to systematically dismantle a 1-3-1 zone defense with this complete coaching resource, featuring tactical diagrams, step-by-step player instructions, and proven progressions for all age groups.

Equipment Needed
Overview
The 1-3-1 Zone Offense is a structured half-court attack designed to exploit the predictable rotational gaps of a 1-3-1 zone defense. Zone defenses, while effective at disrupting man-to-man offensive sets, are inherently vulnerable to patient ball movement, overloads, and players who attack the seams between defenders. This offense addresses each of those vulnerabilities directly.
Use this play when you identify the opposition is running a 1-3-1 zone, when your team has a skilled high-post player who can pass and score from the elbow, or when you need to slow the game down and force the defense to work. It is equally effective as a primary half-court set or as a called play following a timeout.
Setup

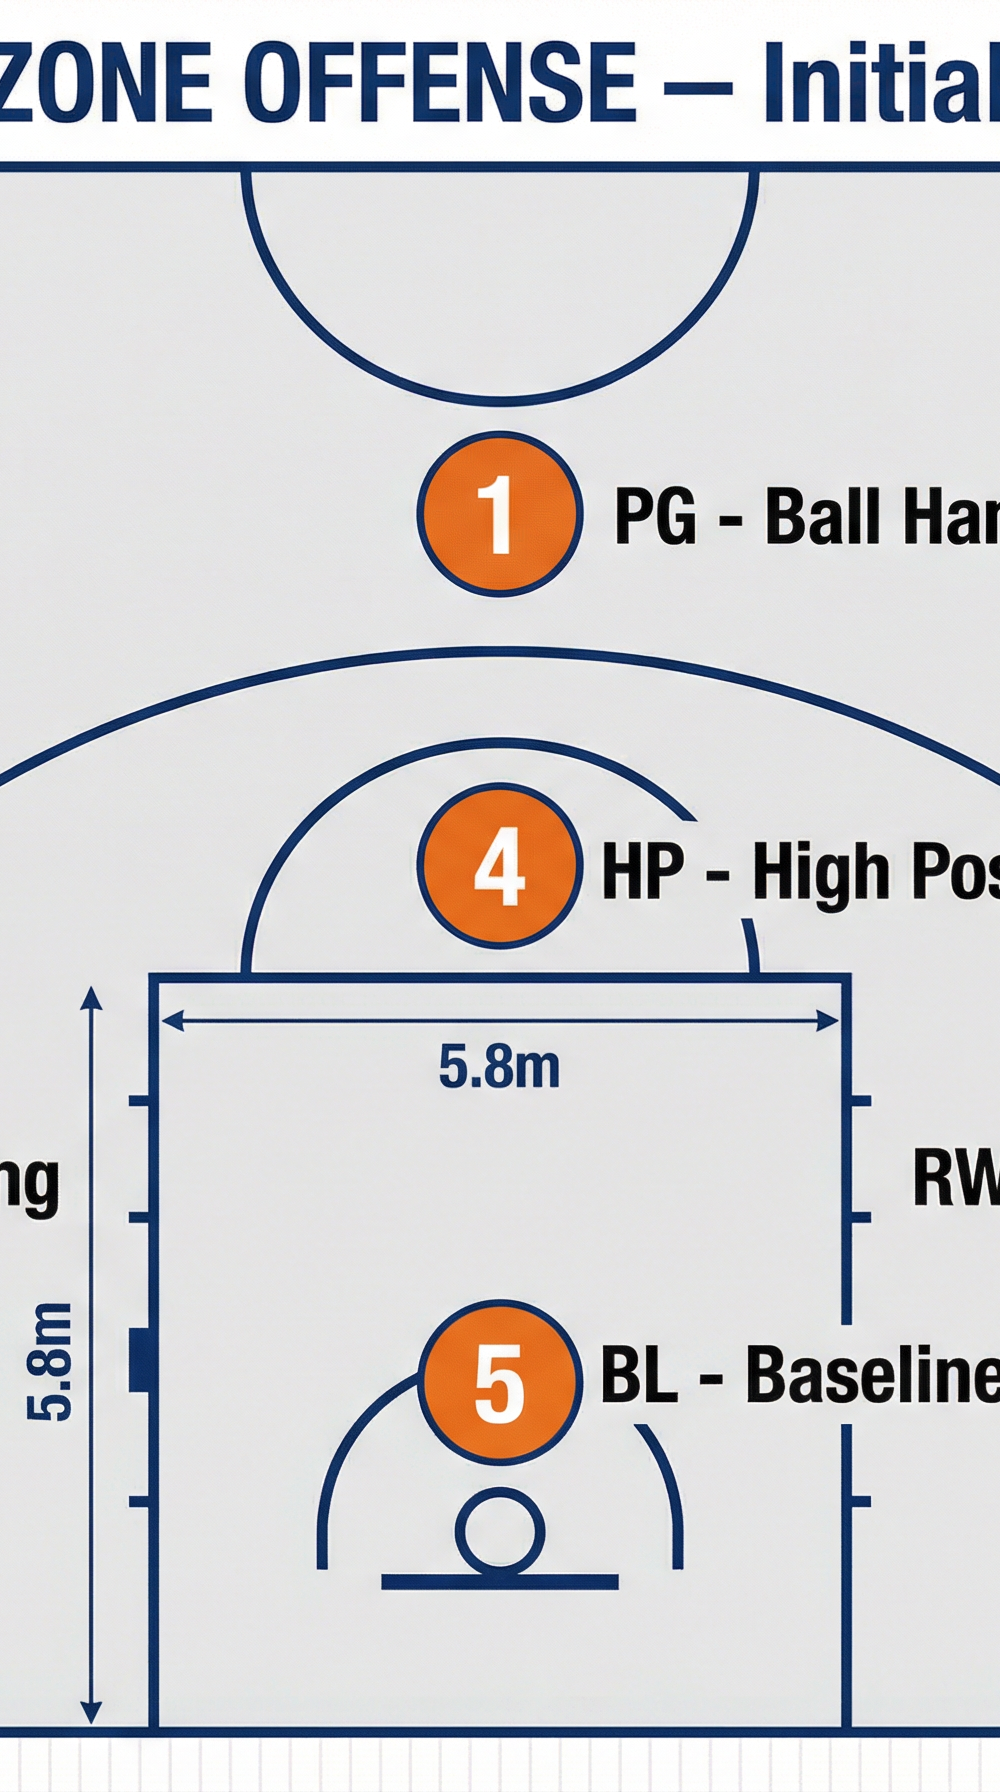
Court: FIBA standard half-court (28m x 15m full court; half-court attack zone approximately 14m x 15m). The three-point arc sits 6.75m from the basket at its furthest point. The key (paint area) is 5.8m wide and 5.8m deep.
Equipment Required:
- Regulation basketballs (minimum 2)
- Full half-court with visible markings
- Cones or floor markers (optional, for initial teaching)
Player Positions:
| Position | Number | Role | Starting Location |
|---|---|---|---|
| Point Guard | 1 | Ball Handler & Initiator | Top of the key, ~7m from basket |
| Left Wing | 2 | Perimeter Shooter & Driver | Left wing, on the three-point line |
| Right Wing | 3 | Perimeter Shooter & Driver | Right wing, on the three-point line |
| High Post | 4 | Playmaker & Scorer | Free-throw line, centre of the key |
| Baseline | 5 | Post Scorer & Rebounder | Baseline, between the two low blocks |

Diagram 1: 1-3-1 Zone Offense — Initial Player Setup. Players 2 and 3 are positioned in the gaps between the zone's top and wing defenders. Player 4 occupies the high post at the free-throw line, and Player 5 roams the baseline.
Step-by-Step Instructions
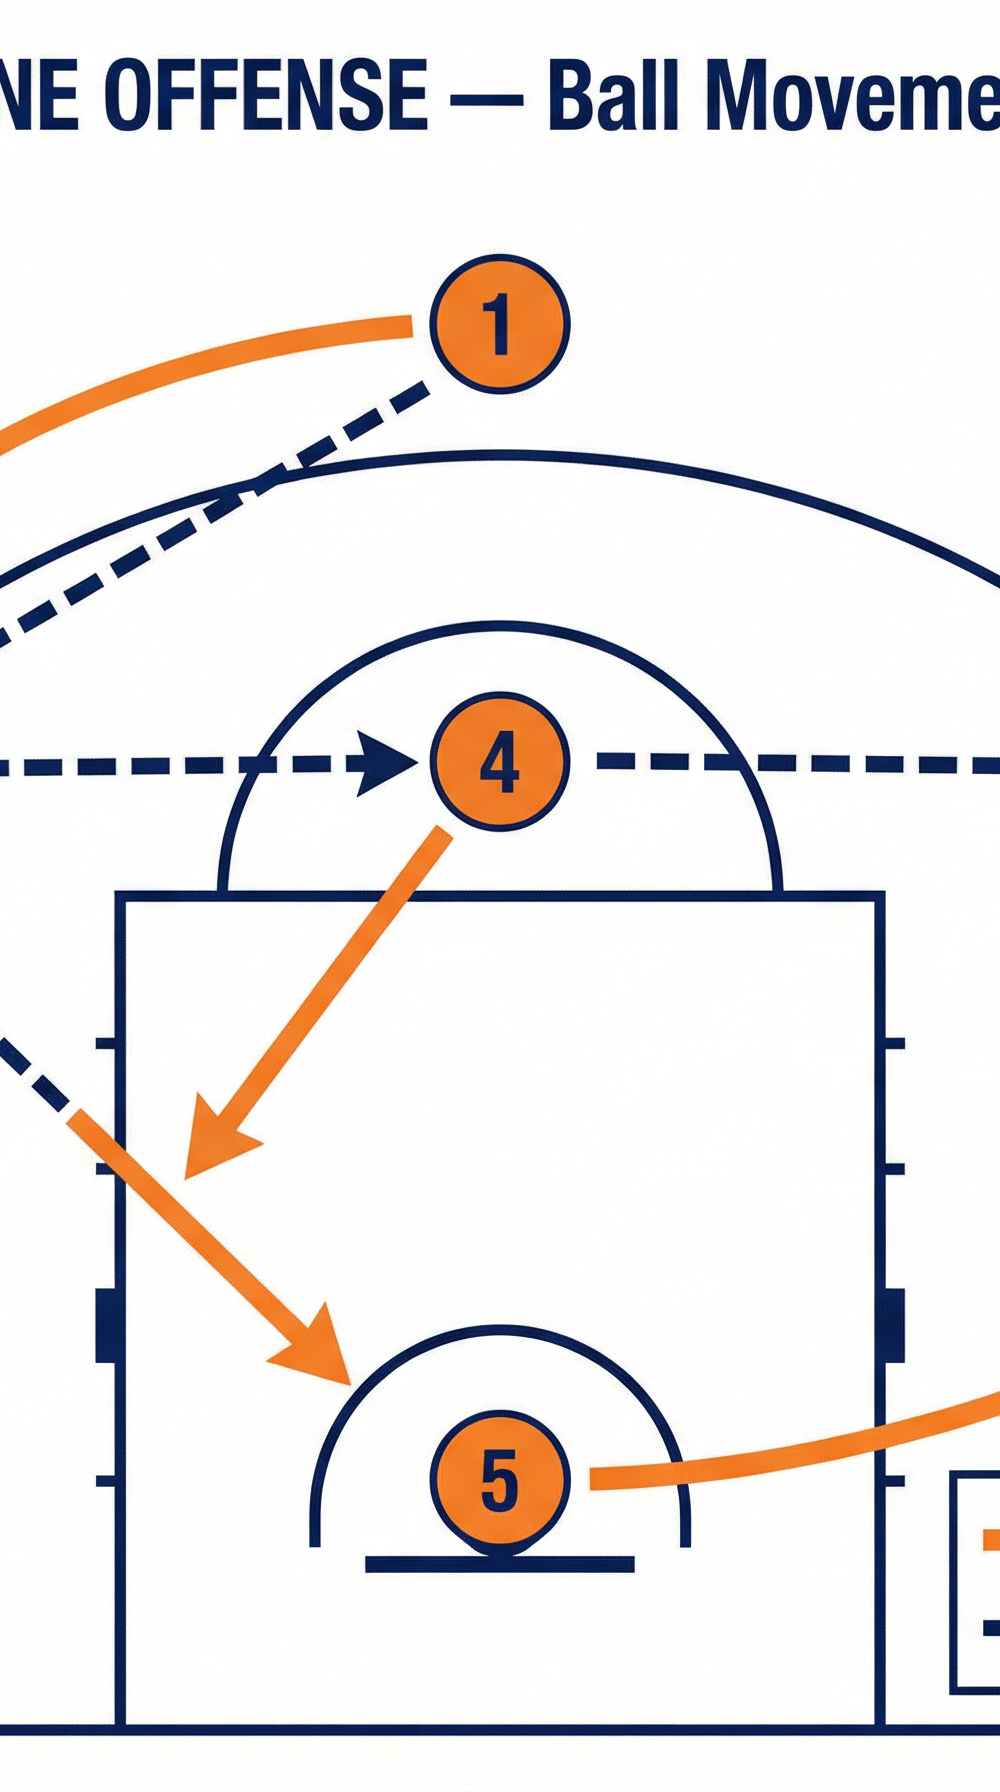
Step 1 — Entry Pass to the Wing.
The Point Guard (1) receives the ball at the top of the key and surveys the defense. The first action is a direct pass to either wing — in this example, to the Left Wing (2). The pass should be crisp and delivered within 2–3 seconds of the Point Guard receiving the ball. Hesitation gives the zone time to settle.
Step 2 — High Post Dive.
The moment the ball leaves the Point Guard's hands, the High Post player (4) makes a decisive cut to the strong-side (ball-side) low block. This cut should be timed to arrive just as the wing receives the ball, creating an immediate two-on-one situation on the ball side. The High Post must seal their defender and establish position.
Step 3 — Baseline Runner Slides.
Simultaneously, the Baseline player (5) slides from the centre of the baseline to the weak-side corner (right corner in this scenario). This movement serves two purposes: it pulls the weak-side zone defender out of the paint, and it creates a skip-pass outlet if the strong side becomes congested.
Step 4 — Point Guard Relocates.
After delivering the entry pass, the Point Guard (1) does not stand still. They cut hard to the strong-side corner, filling the space vacated by the High Post (4). This creates a three-player overload on the ball side: the Wing (2), the Point Guard (1) in the corner, and the High Post (4) on the block.
Step 5 — Wing Makes the Decision.
The Left Wing (2) is now the decision-maker and must read the defense:
- If the High Post (4) is open on the block: Deliver a quick entry pass for a power move or layup.
- If the Point Guard (1) is open in the corner: Hit the corner for a three-point attempt or drive opportunity.
- If the defense collapses: Execute a skip pass to the Right Wing (3) or the Baseline runner (5) in the opposite corner for an open look.
- If a driving lane opens: Attack the basket directly.
Step 6 — Ball Reversal and Reset.
If no shot is available, the ball is reversed back to the Point Guard (1), who swings it to the Right Wing (3). All players shift to the opposite side, and the sequence repeats. The High Post (4) is the pivot of this reversal — they can receive the ball at the elbow and act as a relay passer, creating a two-second window where they can also look to score.

Diagram 2: 1-3-1 Zone Offense — Ball Movement and Player Cuts. Dashed lines indicate ball movement; solid arrows indicate player movement. Note the three-player overload created on the left side and the skip-pass option to the right wing and baseline corner.
Key Coaching Points

1. Patience Breaks Zones. Coaches must instil the discipline to make at least two to three passes before looking to score. Zones collapse when the ball moves faster than defenders can rotate. Remind your players: "Make the zone chase the ball."
2. The High Post is the Engine. Player 4 is the most important player in this offense. They must be able to catch under pressure, make quick decisions, and finish in traffic. Spend extra time in practice developing your High Post player's two-handed catches, drop steps, and short-range passing.
3. Attack the Gaps, Not the Defenders. Players must be coached to cut into the spaces between zone defenders, not directly at them. Use the phrase "find the gap" as a consistent cue during practice.
4. The Skip Pass is a Weapon. Many teams run zone offenses without ever using the skip pass, which is the most effective tool against a zone. Drill the skip pass from wing to wing and from corner to corner until it becomes instinctive.
5. Move Without the Ball. Every player without the ball should be moving with purpose — either to create a passing option or to pull a defender out of position. Static players make the zone's job easy.
6. Crash the Offensive Glass. With the High Post diving and the Baseline player positioned near the paint, this offense naturally creates two strong offensive rebounders. Designate these players as primary rebounders and teach the wings to rebound from the perimeter.
Common Mistakes

Mistake 1 — Players Standing Still. This is the most common error at all levels. A zone defense is designed to cover areas, not players. If your players are stationary, the zone is doing its job. Correction: Implement a "constant motion" rule in practice — if a player is not moving with purpose, they run a sprint.
Mistake 2 — Forcing the Entry Pass to the High Post. Players often try to force the ball into the High Post too early, before the cut has developed or before the defender has been moved. Correction: Teach players to make the wing pass first, then look for the High Post on the dive.
Mistake 3 — Poor Floor Spacing. Players drifting too close together collapses the offense. The wings should be no closer than 4–5 metres from the Point Guard. Correction: Use floor markers during early teaching sessions to establish correct spacing.
Mistake 4 — Ignoring the Weak Side. Teams that only attack the strong side become predictable and easy to defend. Correction: Reward weak-side skip passes in practice with positive reinforcement. Run drills that specifically require a skip pass before a shot can be taken.
Mistake 5 — Slow Ball Reversal. Slow, telegraphed passes give the zone time to recover. Correction: Emphasise the "two-second rule" — the ball should not stay with one player for more than two seconds unless they are in a scoring position.
Variations & Progressions
Variation 1 — High Post Flash to the Elbow. Instead of diving to the block, Player 4 flashes to the ball-side elbow when the wing receives the ball. This creates a mid-range jump shot opportunity and a dangerous two-on-one with the wing driver. Best used against zones that sag their middle defender.
Variation 2 — Dribble Entry. Instead of a direct pass to the wing, the Point Guard (1) dribbles hard at the left wing defender, forcing a rotation. Player 2 back-cuts to the basket, and Player 4 pops to the vacated wing area. This variation is highly effective when the zone's top defender is aggressive.
Variation 3 — Double-Low Post. Move both Player 4 and Player 5 to the low blocks, creating a 1-2-2 look before shifting into the 1-3-1 alignment on the first pass. This disguises the offense and can create confusion in the zone's initial rotation.
Age Adaptations

Under 12: Simplify to a 3-player version. Use only the Point Guard, one Wing, and the High Post. Focus on the basic entry pass and the High Post dive. Remove the Baseline runner entirely. Emphasise spacing and catching the ball with two hands.
Under 14: Introduce the Baseline runner and the Point Guard's corner relocation. Begin teaching players to read the defense and make decisions based on where the zone rotates. Introduce the skip pass as a drill before incorporating it into the full play.
Under 16: Run the full 5-player offense. Begin introducing the dribble-entry variation. Teach players to call out the defensive rotation they see before initiating the play. Introduce the double-low post variation.
Open Age: All elements should be mastered. Focus on reading second and third rotations of the defense, incorporating screens at the high post, and developing the Point Guard's ability to run the offense from different starting positions on the floor.