Mastering the Batting Stance & Footwork: A Comprehensive Circuit Drill
A foundational circuit drill designed to help coaches build perfect balance, precise trigger movements, and explosive footwork in batters of all levels.

Equipment Needed
1. Overview
The Batting Stance and Footwork Drill is a foundational exercise designed to build a solid, balanced base for batters of all levels. A correct stance and precise footwork are the bedrock of successful batting in cricket. This drill isolates the initial setup and the primary trigger movements—the forward press and the back-and-across movement. By breaking down the mechanics of the stance and the first movement toward the ball, coaches can help players develop consistency, balance, and the ability to transfer weight effectively into their shots. This drill is best used during the pre-season to establish good habits or as a regular warm-up activity during net sessions to reinforce muscle memory.
2. Setup
Proper setup is crucial to ensure players are practising in a realistic environment that mimics match conditions.
- Equipment Needed: 1 cricket bat per player, 1 batting tee, 6-8 marker cones, 6-10 cricket balls (or incrediballs for juniors), chalk or spray paint for marking the crease.
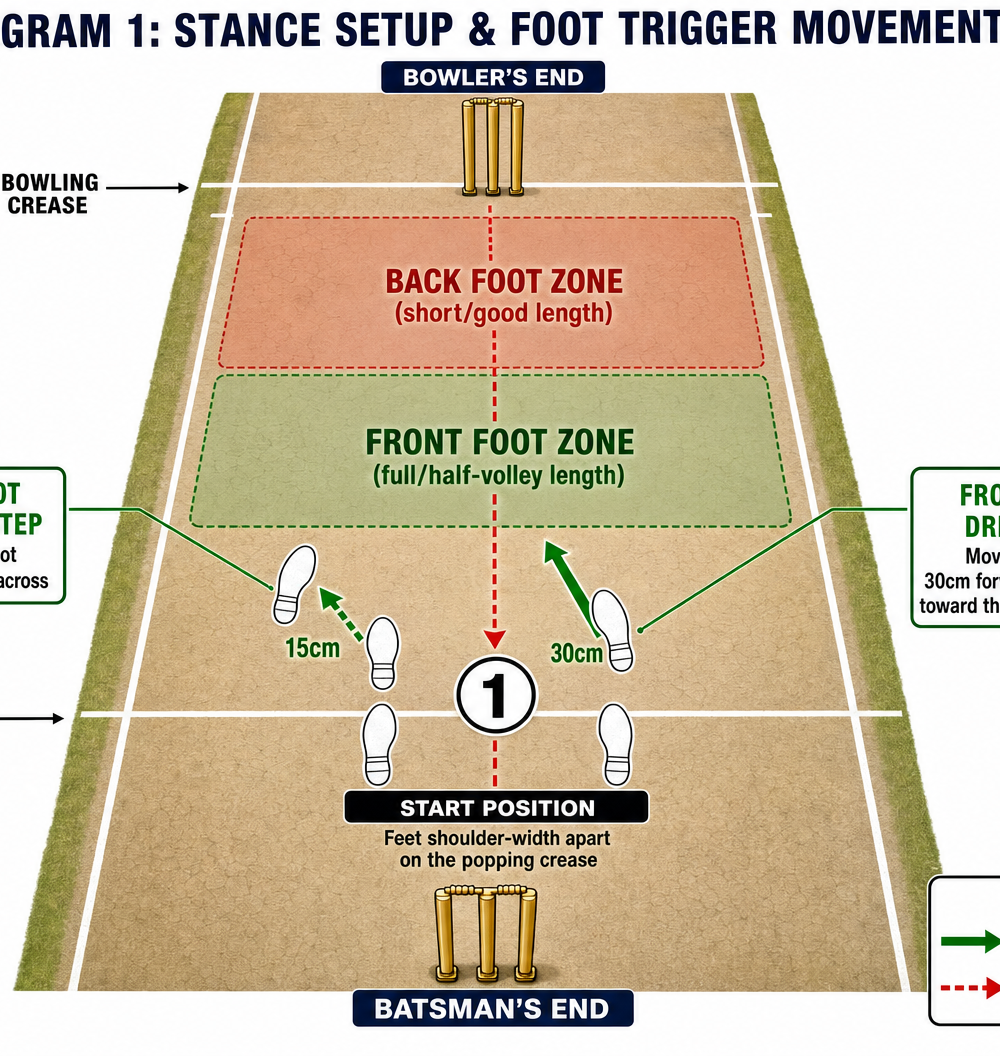
- Pitch/Field Setup: Use a standard 22-yard cricket pitch or a flat, hard surface. Mark out a standard batting crease (popping crease 1.22m from the bowling crease).
- Player Positions:
- Batter (Position 1): Standing at the batting crease in their stance.
- Feeder/Coach (Position 2): Standing approximately 5 to 7 metres away on a 45-degree angle (for drop feeds) or straight down the pitch for underarm throws.

3. Step-by-Step Instructions
Follow these steps to execute the drill effectively. The drill is broken down into three progressive stations to build the complete movement pattern.
Station 1: Stance and Trigger Setup
- Instruct the batter to take their guard on the batting crease. Their feet should be shoulder-width apart, parallel to the crease, with their weight evenly distributed on the balls of their feet.
- The batter rests the toe of the bat on the ground just behind their back foot, ensuring their head is level and eyes are focused straight down the pitch towards the bowler's end.
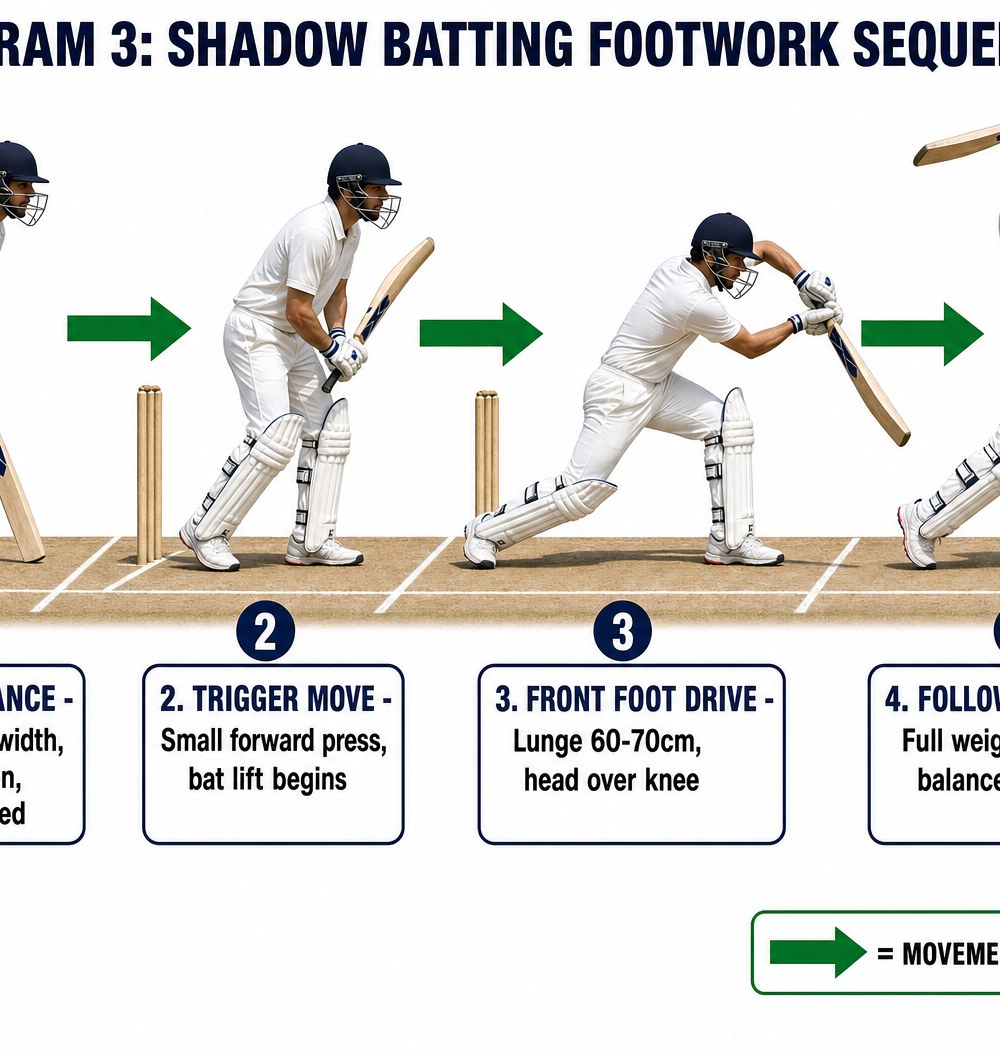
- On the coach's command ("Trigger!"), the batter performs a small forward press—a slight shift of weight onto the front foot, accompanied by a small lift of the bat.
- The coach checks for balance. The batter should hold this trigger position for 3 seconds without wobbling. Repeat 10 times.
Station 2: The Forward Lunge (Drop Feed)
- The coach stands 5 metres away, slightly to the off-side of the batter.
- The coach drops a ball onto a length that requires a front-foot shot (full or half-volley length).
- The batter initiates their trigger movement, then strides forward (approximately 30-60cm) with their front foot toward the pitch of the ball.
- The batter executes a shadow drive (or hits the ball if using a soft ball), ensuring their head is positioned directly over their bent front knee.
- The batter holds the follow-through pose for 2 seconds to ensure full weight transfer.
Station 3: The Multi-Station Circuit
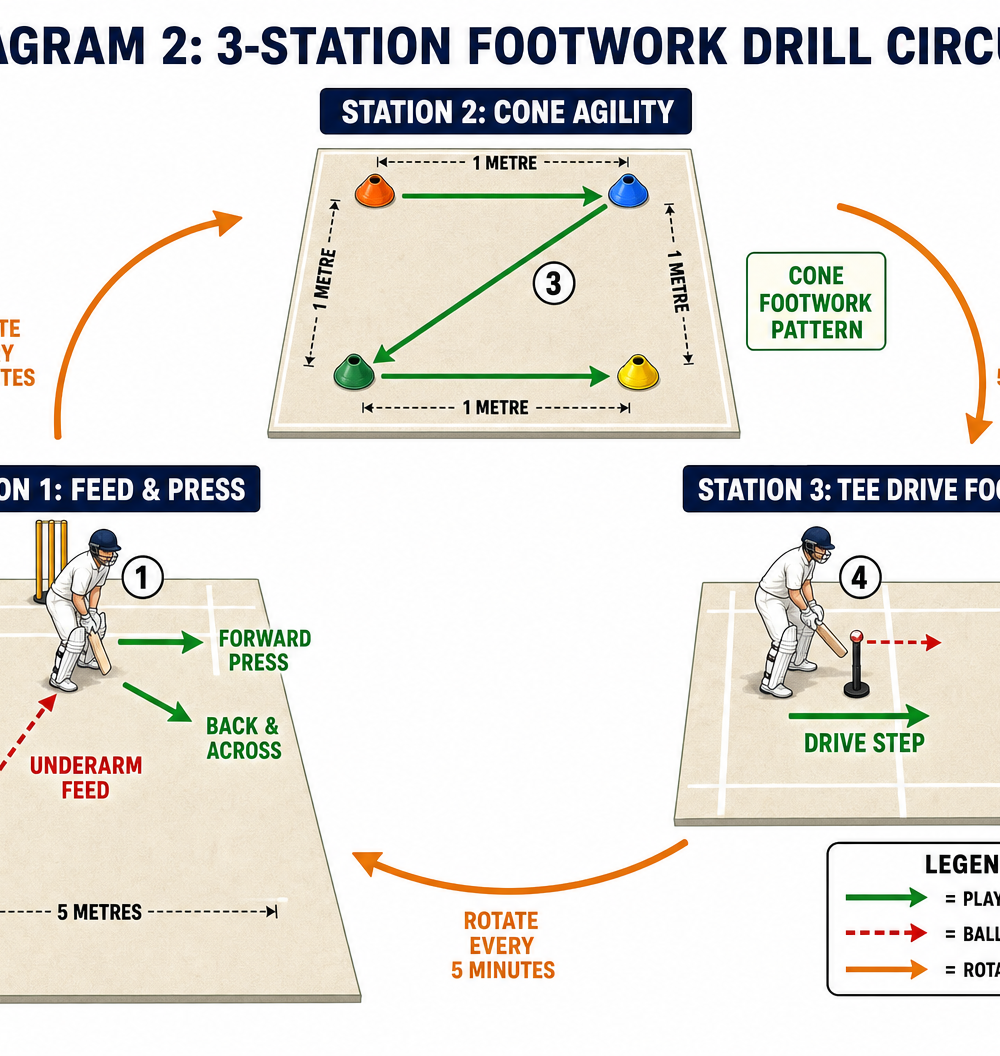
- Set up the three stations as shown in Diagram 2.
- Station 1 (Feed & Press): Batter receives underarm feeds, focusing on the initial forward press or back-and-across movement depending on the length of the feed.
- Station 2 (Cone Agility): Batter moves through a Z-pattern of cones placed 1 metre apart, maintaining a low, balanced athletic position to simulate moving down the pitch or adjusting in the crease.
- Station 3 (Tee Drive): Batter hits a stationary ball off a batting tee, focusing purely on a large front foot stride and a high elbow follow-through.
- Rotate players through the stations every 5 minutes.
4. Key Coaching Points
To maximise the effectiveness of this drill, coaches should focus on these critical technical elements:
- Head Position: The head must remain still and level throughout the stance and trigger movement. The head is the heaviest part of the body; if it falls over to the off-side, the body's balance will follow.
- Weight Distribution: In the initial stance, weight should be 50/50 on the balls of the feet. During the trigger movement, the weight shifts slightly, but the batter must remain balanced and ready to move forward or back.
- The First Step: The front foot should move toward the line of the ball, not just straight down the pitch. A stride of 30-60cm is ideal—too long, and the batter gets stuck; too short, and they cannot reach the pitch of the ball.
- Bat Lift: As the footwork initiates, the bat should lift smoothly toward the back shoulder, keeping the hands close to the body to ensure a straight bat swing.
5. Common Mistakes
Watch out for these frequent errors and correct them immediately:
- Planting the Foot Too Early: Batters often commit their front foot before the ball is released, leaving them vulnerable to short-pitched bowling. Correction: Emphasise the small, neutral trigger movement first.
- Falling Over to the Off-Side: This usually happens when the batter's head drops toward the off-side during the stride. Correction: Have the batter practice their stride alongside a wall or net to keep their alignment straight.
- Stiff Knees: A stance with locked knees prevents explosive movement. Correction: Instruct the batter to "soften" their knees and feel the weight on the balls of their feet, like a tennis player preparing to return a serve.
- Over-Striding: Taking too large a step compromises balance and power. Correction: Place a marker cone at the optimal stride length (approx. 60cm) and tell the batter not to step past it.
6. Variations & Progressions
Adapt the drill to challenge players as they improve:
- Progression 1: Variable Feeds. Instead of predictable drop feeds, the coach mixes up underarm throws—some full (requiring a front-foot stride) and some short (requiring a back-foot movement). This forces the batter to read the length and react with the correct footwork.
- Progression 2: Blind Feed. The batter closes their eyes in their stance. The coach says "Open!" just before releasing the ball. This dramatically reduces reaction time and forces instinctive, rapid footwork.
- Variation 1: Weighted Bat. Have the batter perform the shadow footwork sequence (Station 1) using a slightly heavier bat or a bat with a weight attached. This builds core stability and reinforces a strong base.
7. Age Adaptations
Tailor the drill to suit the developmental stage of your players:
- Under 8s / Under 10s: Focus purely on the stationary stance and balance. Use fun analogies (e.g., "stand like a statue", "knees like springs"). Do not introduce complex trigger movements; just encourage stepping toward the ball. Use batting tees extensively.
- Under 12s / Under 14s: Introduce the forward press trigger movement. Focus heavily on head position and hitting the ball under the eyes. Begin using drop feeds and slow underarm throws.
- Under 16s / Open: Players should be executing full trigger movements (forward press or back-and-across). Feeds should be faster and more variable in length to challenge decision-making and rapid footwork execution.