Mastering the High Press: A 3-Player Frontline System
A comprehensive guide for coaches on implementing an aggressive, organized high-pressing system with a front three to force turnovers and create scoring opportunities in the attacking third.
Equipment Needed
1. Overview
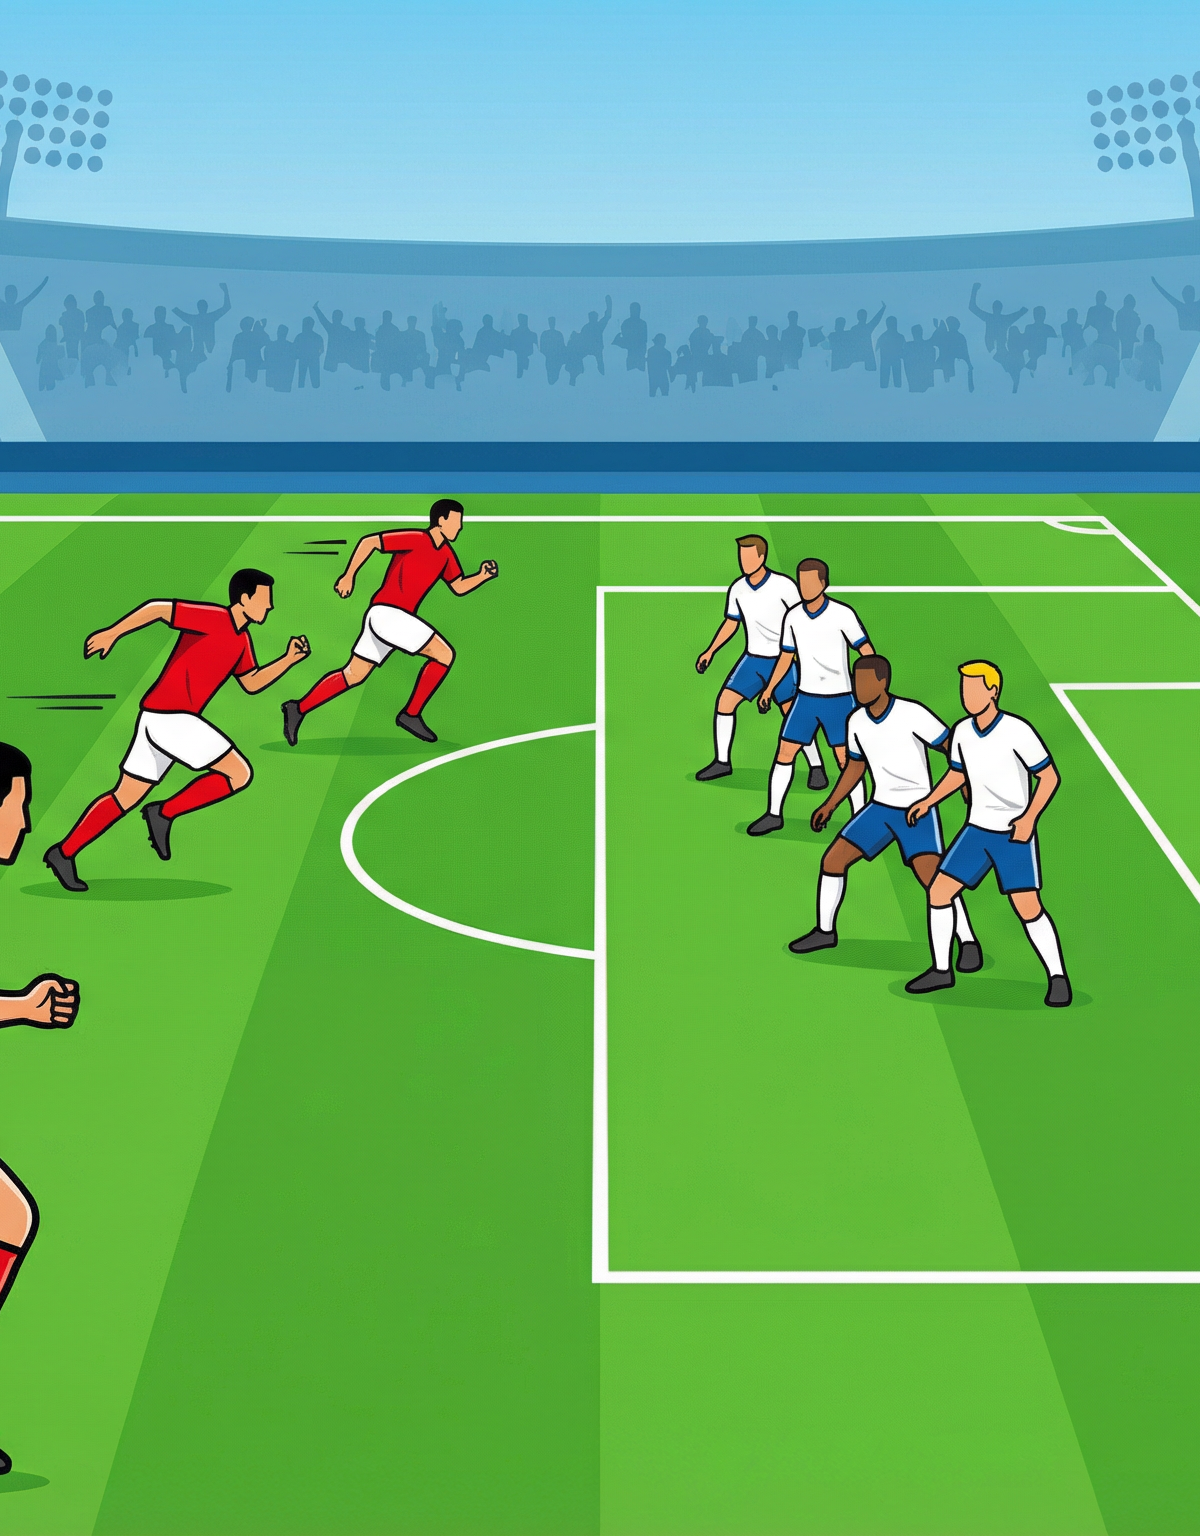
The high press from a front three is a coordinated, aggressive defensive strategy designed to win the ball back as close to the opponent's goal as possible. By applying immediate, intelligent pressure to the opposition's backline and goalkeeper, this system aims to disrupt their build-up play, force errors in dangerous areas, and create direct goal-scoring chances from turnovers. It is most effective when the opponent insists on playing out from the back, when your team has a high level of fitness and tactical discipline, and during moments in the game where a goal can shift momentum, such as the opening 15 minutes of either half.
2. Setup
- Equipment: 1 full-size goal, 10-12 footballs, 2 sets of different colored bibs (for attackers and defenders), cones or markers.
- Pitch Setup: Use the area from the goal line to just beyond the halfway line of a standard pitch (100-110m x 64-75m). The focus will be on the opponent's defensive third and the middle third.
- Player Positions:
- Attacking Team (Pressing Team - Red Bibs):
- #9 (Centre Forward): The leader of the press. Initiates pressure on the ball carrier.
- #7 (Right Winger) & #11 (Left Winger): Press the wide defenders (full-backs) and cut off passing lanes.
- #8 (Box-to-Box Midfielder) & #10 (Attacking Midfielder): Provide the second line of pressure, supporting the front three and intercepting passes into midfield.
- Defending Team (Playing Out - White Bibs):
- #1 (Goalkeeper): The starting point of the opponent's build-up.
- #4 & #5 (Centre-Backs): Positioned on either side of the penalty area.
- #2 (Right Full-Back) & #3 (Left Full-Back): Positioned wide, near the touchlines.
- #6 (Defensive Midfielder): Acts as the pivot and primary outlet pass for the defenders.
- Attacking Team (Pressing Team - Red Bibs):
3. Step-by-Step Instructions
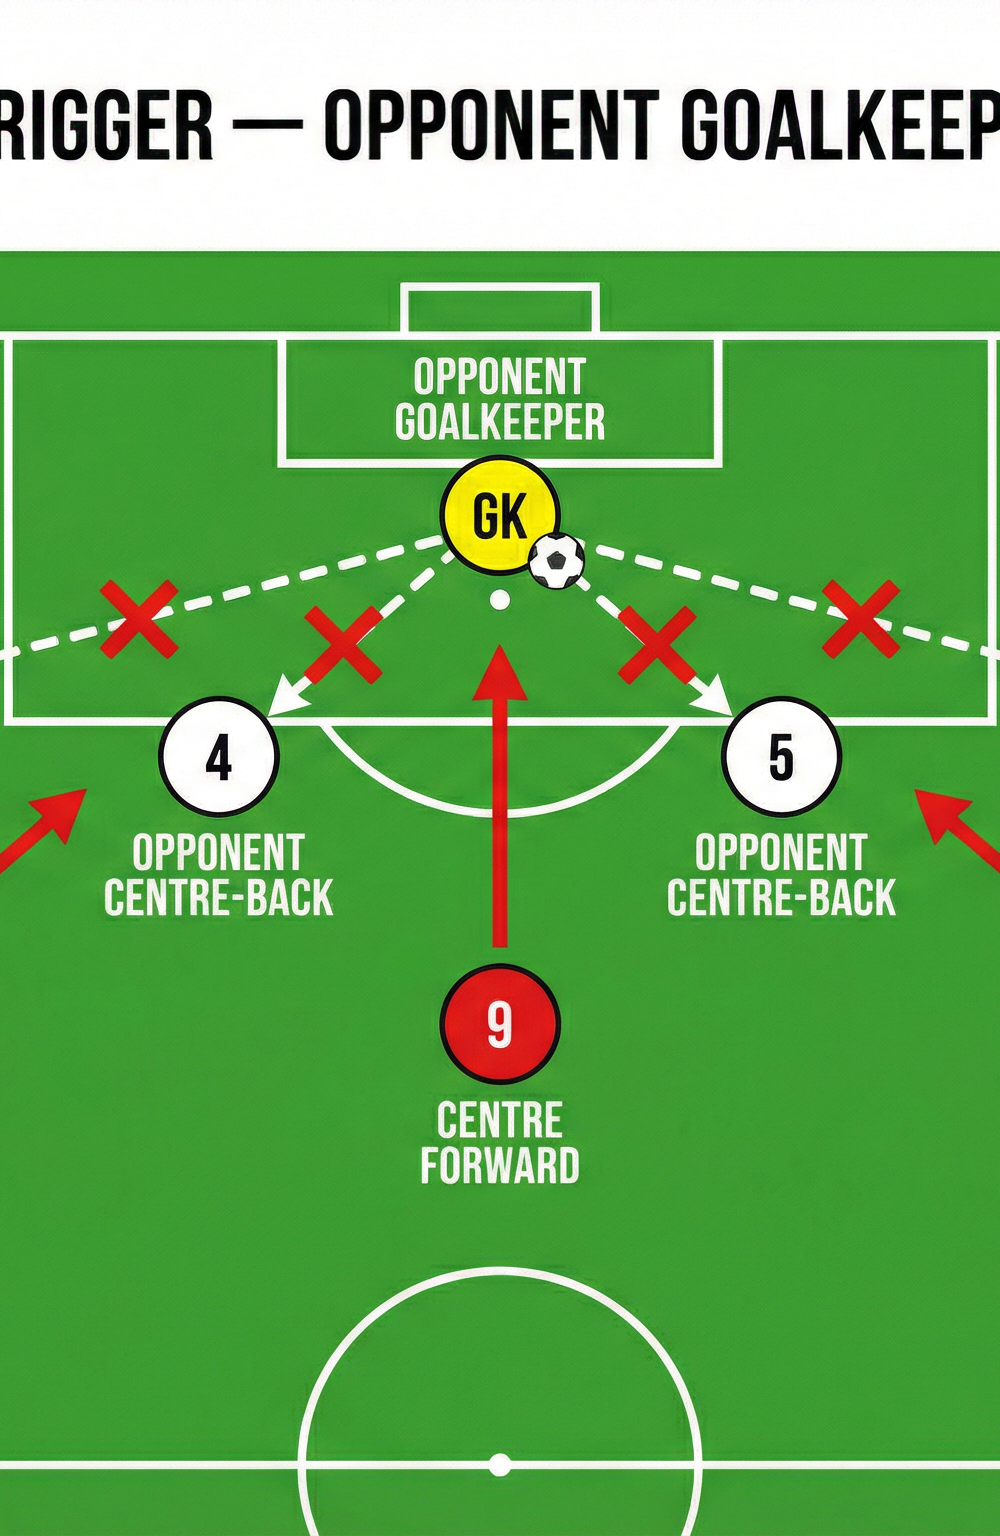
The Trigger: The press begins when the opponent's goalkeeper has the ball and prepares to play a short pass to one of the centre-backs. This is the primary trigger for the front three to advance from their initial positions.
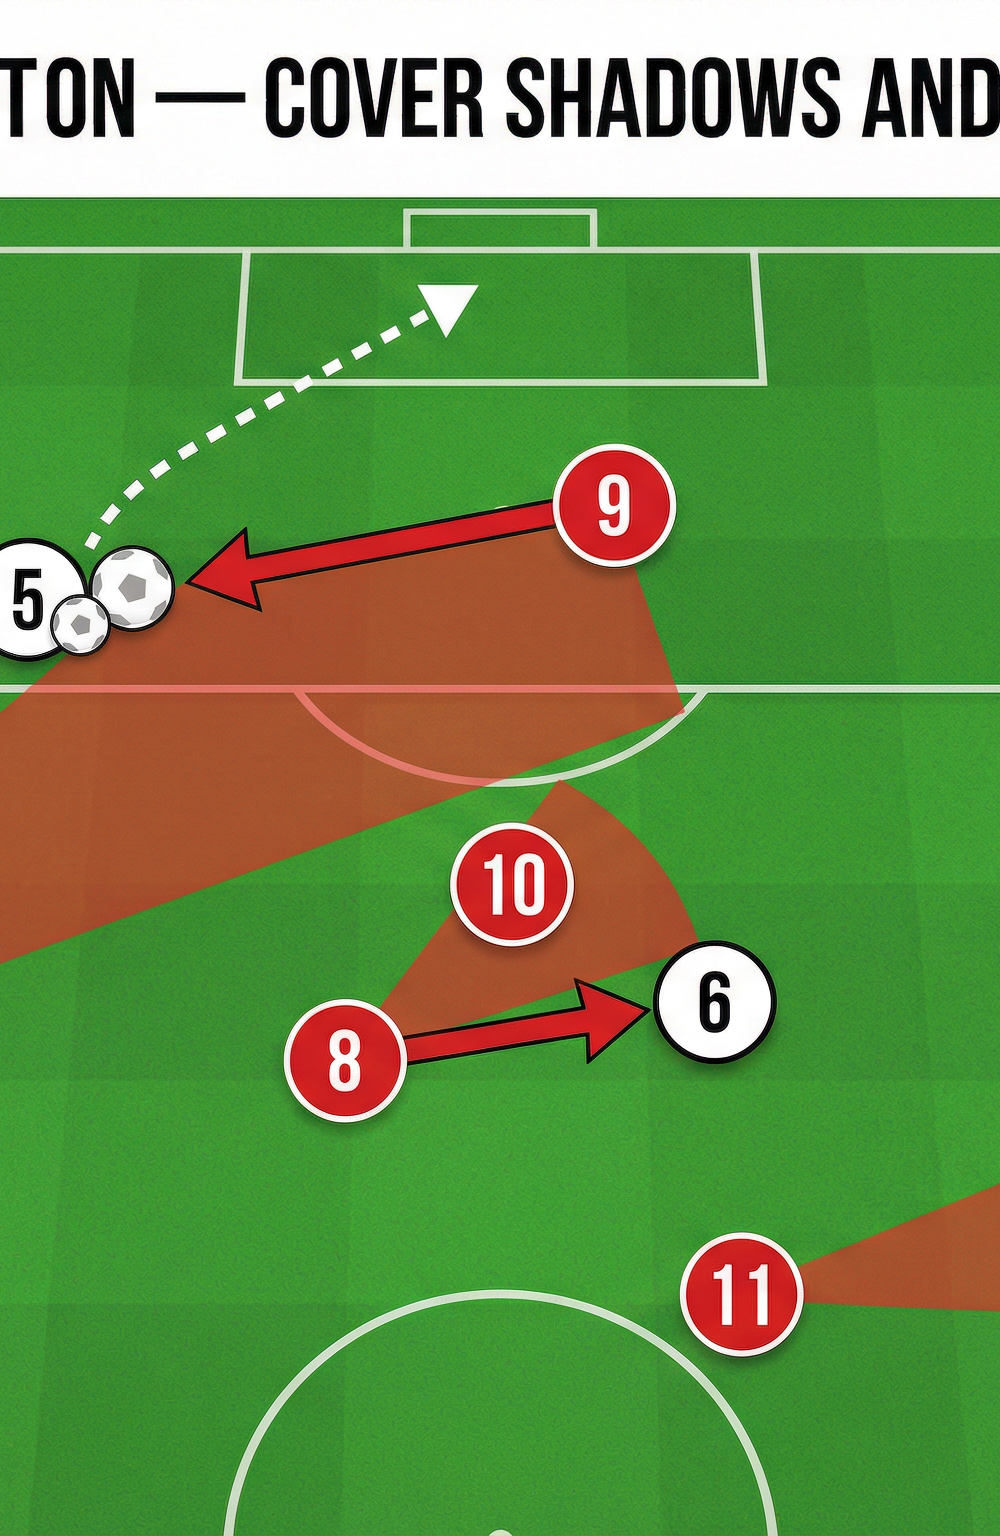
Initial Press from the #9: As the ball travels from the goalkeeper to a centre-back (e.g., #5), the Centre Forward (#9) immediately closes down the player on the ball. The angle of the press is crucial: the #9 must arc their run to create a 'cover shadow', blocking the return pass to the goalkeeper. This traps the opponent on one side of the pitch.
Wingers Cut Off Wide Options: Simultaneously, the wingers (#7 and #11) press the opponent's full-backs (#3 and #2). Their role is twofold: apply pressure to the full-back if they receive the ball, and, more importantly, position themselves to intercept any pass played out wide. The winger on the far side (#11 in this case) must tuck in slightly, ready to press the other centre-back (#4) if the ball is switched.
Second-Line Support: As the front three engage, the midfielders (#8 and #10) push up the pitch. Their job is to deny the opponent's primary midfield outlet, the #6. They must be close enough to intercept a pass into the pivot or apply immediate pressure if the #6 receives the ball. This support prevents the opponent from easily bypassing the initial press.
Force the Error or Long Ball: With all short passing options blocked by the front three and supported by the midfield, the centre-back in possession is forced into one of three outcomes: a risky pass across their own goal, a long, hopeful ball upfield (which your defenders should be prepared for), or a mistake leading to a direct loss of possession. The goal is to win the ball within 25-30 meters of the opponent's goal for an immediate strike.
4. Key Coaching Points
- The Angle of the Press: The #9's run is the most important part of the system. It must be curved to prevent the opponent from playing back to the keeper, effectively cutting the pitch in half.
- Work as a Unit: The press is only effective if all three forwards (and the supporting midfielders) work in unison. If one player is late or fails to do their job, the entire structure breaks down.
- Communication is Key: Players must communicate to signal the press, indicate who is pressing the ball, and who is covering passing lanes.
- Anticipation over Reaction: Teach players to read the triggers and anticipate the opponent's next move. The press should be initiated as the ball is traveling, not after it has been received.
- Intensity and Speed: The press must be executed at maximum speed for the first 5-10 meters to surprise the opponent and give them no time to think.
- Know When to Stop: If the initial press is broken, the team must quickly recover its defensive shape. Do not continue to press individually and risk being played through.
5. Common Mistakes
- Straight-Line Press from the #9: If the Centre Forward runs directly at the defender without a curved run, the defender can easily pass back to the goalkeeper, breaking the press.
- Wingers Not High Enough: If the wingers are too deep, they give the opponent's full-backs too much time and space if the ball is played to them.
- No Midfield Support: The front three cannot press alone. If the midfield fails to push up, the opponent will have an easy pass into their #6, bypassing the press entirely.
- Pressing at the Wrong Time: A disorganized, individual press is worse than no press at all. Players must learn to recognize the specific triggers (e.g., a slow pass, a poor touch) and press together.
- Failing to Create a Cover Shadow: Players pressing must understand they are not just closing down the ball; they are simultaneously blocking a passing lane behind them.
6. Variations & Progressions
- Progression 1 (Adding a Target): Place a mini-goal or a target player on the halfway line. If the defending team successfully breaks the press and passes to the target, they score a point. This forces the pressing team to be more organized.
- Progression 2 (The Back-Pass Trigger): Introduce a secondary trigger: a back-pass from a full-back to a centre-back. This teaches the front three to stay alert and re-press even after the initial build-up.
- Variation 1 (The Wide Trap): Instead of forcing the play inside, the #9's run can be designed to show the opponent the pass to the full-back, using the touchline as an extra defender. The winger then initiates an aggressive trap with the #8 midfielder.
7. Age Adaptations
- Under 10/12: Focus on the role of the #9. Use a 1v1 scenario where the forward learns to press a defender and block the pass back to a cone (representing the keeper). Keep it simple and reward effort and the correct angle of approach.
- Under 14/16: Introduce the 3v3 or 3v2 concept. Focus on the coordination between the #9 and the two wingers. Use cones to represent the cover shadows and help players visualize the passing lanes they are blocking.
- Open Age/Senior: The full 5v5 or 6v6 drill can be implemented. The focus should be on the speed of execution, the second-line support from midfield, and the transitions after winning (or failing to win) the ball.